Table of Contents
‘Conditions and Documents’ Widget Items, Their Description & Functionality
Update Stakeholders on Documents
Introduction
The purpose of this widget is to list and manage all conditions selected for a given application. It allows you to add from the list of preset conditions or create new custom conditions. It also presents users with the option to duplicate an existing condition in order to create a new custom condition based on a preset. Each condition must be associated with a stakeholder and a party responsible for fulfillment. The user is able to customize the arrangement of the ‘Conditions and Documents’ table via the ‘Customize Table’ button in the top right corner of the widget. If conditions are linked to documents, any updates made in the ‘Documents’ section of the widget will be reflected in the ‘Conditions’ section. This allows the user to manage the status of all conditions and their associated documents directly within the application.
The widget will default to ‘View All’ showing all conditions instead of filtering by stakeholders. This makes it easier to look through all the conditions added to the application. You can configure the condition table to include the Stakeholder as a column. Furthermore, the condition table is fully sortable and searchable. Conditions are now sorted by the time the user adds them by default with the latest at the bottom.
Note: The data in the ‘Conditions and Documents’ widget is synced with the ‘Conditions of Approval’ tab in the ‘Generate Documents’ section.
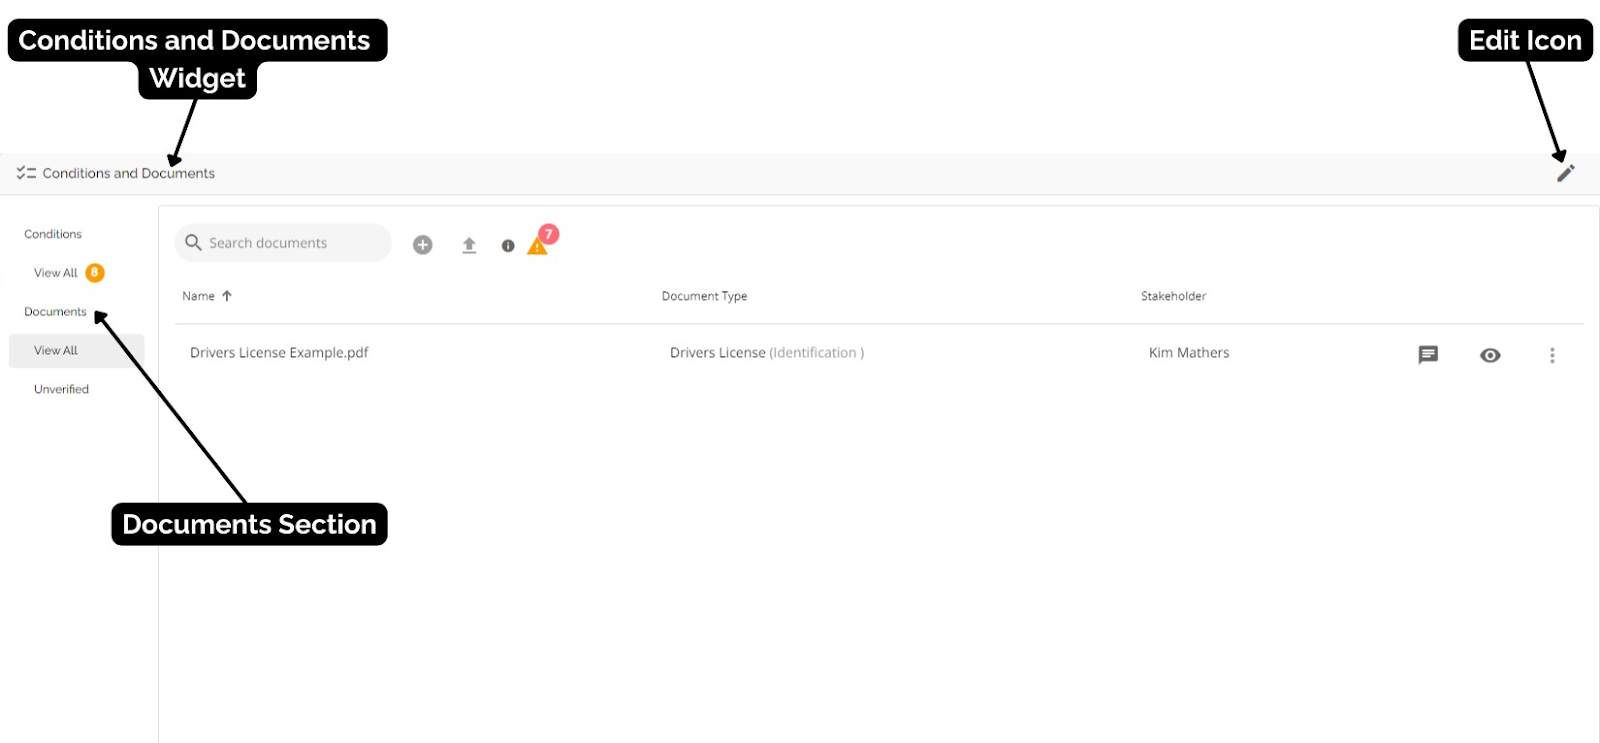
‘Conditions and Documents’ Widget Items, Their Description & Functionality

‘Conditions require actioning’ Counter - The number shown in this counter represents the number of conditions that have not been marked as either accepted, rejected, or not relevant for a given application.
Search Box - Located in the top left corner of the widget. In the search box, you are able to enter text/keywords related to the previously created conditions. All conditions with the search text/keywords in them will appear.
‘Add Conditions’ Button - To add a new condition, click the green plus button located to the right of the conditions search box on top of the widget.
‘Add Conditions’ Button → Add a condition from presets - Upon selecting this option, you will first be prompted to select a stakeholder to associate with those conditions. Generally, the stakeholders you select are the borrowers. If you need to create conditions that apply to each stakeholder, you need to create the condition for each stakeholder. I.E. Income verification for a joint application where both applicants are working. You would select the income condition for each borrower (it will appear twice). This allows you to attach the documents that apply to each borrower to their condition and clear them individually. Conversely, if there is a general condition that applies to the application such as an appraisal, you can select that condition once to whichever applicant you choose; typically the primary applicant. After you have selected a stakeholder, the ‘Add from presets’ pop up will appear. You will be able to utilize the search box and filter to help you select from the preset conditions list that was created in the Manager Portal. The top left corner of the pop up will display the stakeholder you selected should you need to refer to it.
To simplify things if a preset condition was created using tags, the text of the conditions is automatically replacing tags directly in the conditions widget. This way it will show exactly how the corresponding clause will look when printing it on a commitment letter.
Note: as the user selects conditions from the preset list to populate the application, these conditions will not populate the list on any subsequent preset condition searches as they have already been selected. This prevents users from selecting the same condition twice in error.


Search Box - Located at the top left of the pop up. In the search box, you are able to enter text/keywords related to preset conditions. All conditions with the search text/keywords in them will appear. Conditions that have already been selected for the stakeholder you chose will not be listed.
When searching for conditions from Presets, you will see that they now populate the list in a consistent order from top to bottom beginning with the Responsible column - Broker, then Lawyer. From there there will be an additional sort by the Name column alphabetically. Currently this is only in the preset list you pick from but we are working on continuing this logic within the Condition and Document widget.
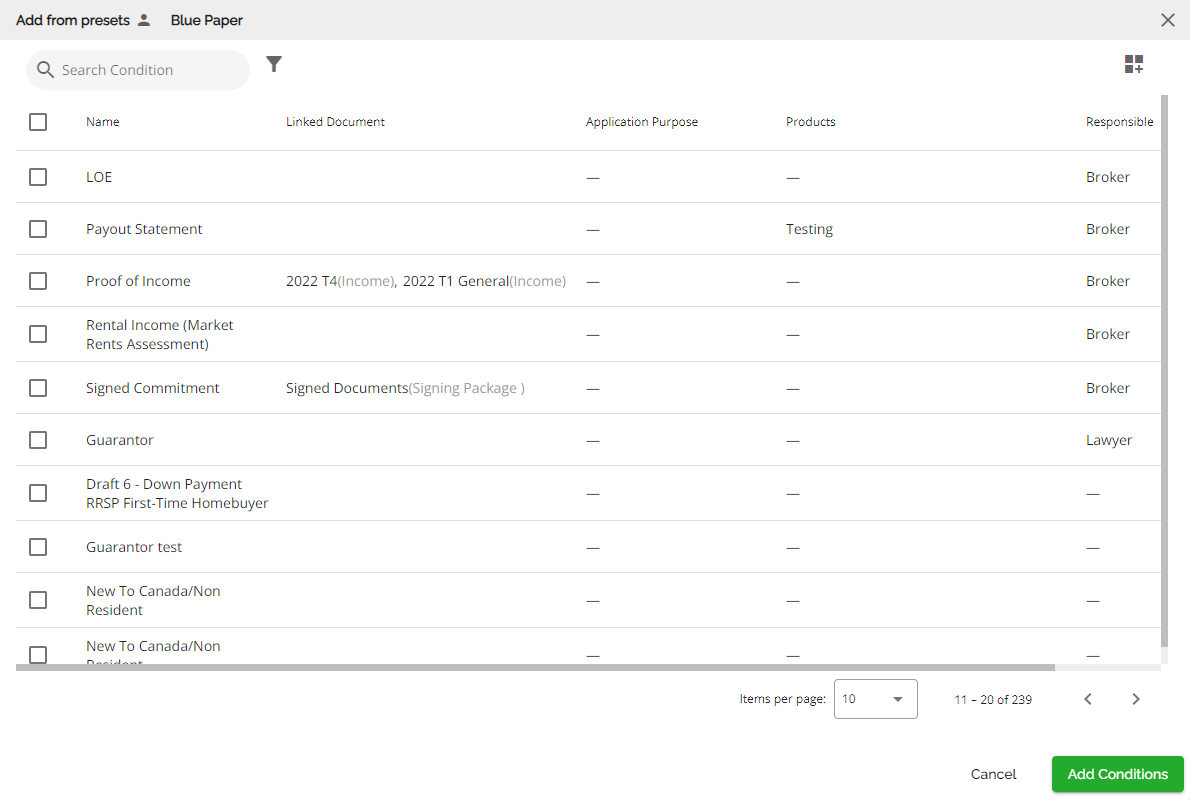
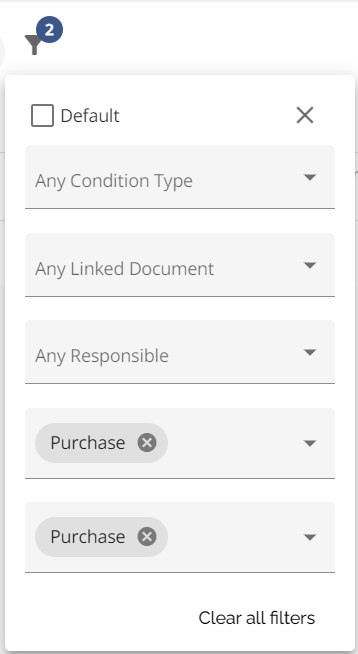
Filter Button - Located to the right of the search box. Enables you to filter the preset conditions list based on the following fields: Default, Condition Type, Linked Document, Responsible, Application Purpose, and Products. Default conditions are conditions that typically appear on every deal and apply to all Stakeholders. When filtering to select your conditions you need to filter by default first. Apply those and then go back in to filter for any other conditions that may apply to your specific application. You can single or multi select between the rest of the filter criteria and either select all that your filter query produces or select which conditions from the list apply.
We have implemented automated filter functionality within the Conditions and Documents widget. When you click on “Add Conditions from presets”, the list of conditions is filtered automatically based on the application purpose and product selected in the Loan Details widget. For this filter to work as expected, the following must be true:
- The application purpose in the Loan Details widget must mirror the application purpose configuration of the selected Condition in the Manager Portal.
- The product in the Loan Details widget must mirror the product configuration of the selected Condition in the Manager Portal.
Both filters must simultaneously apply for the list to populate with the appropriate conditions.
Here is a detailed explanation of how this functionality works:
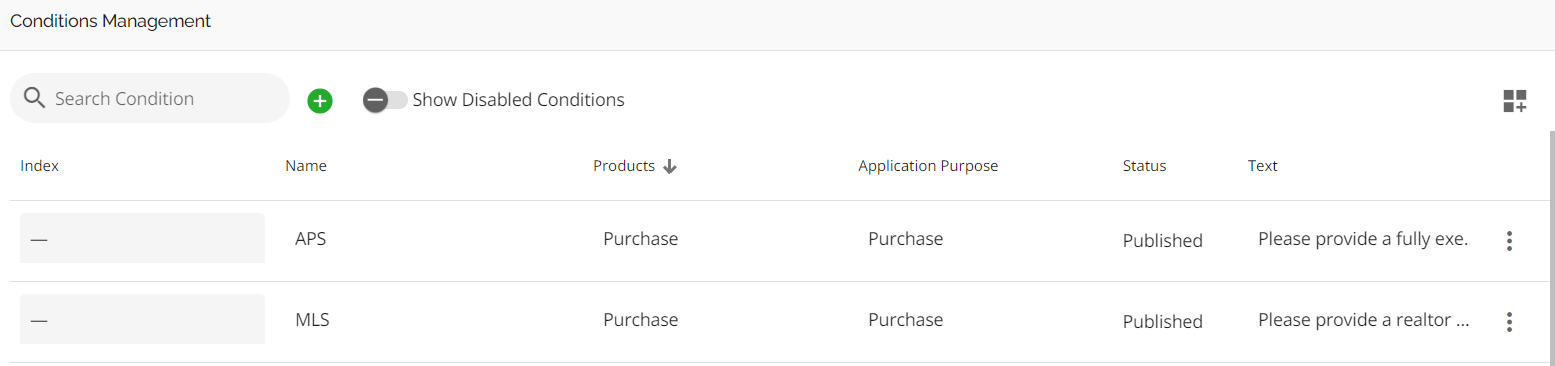
Manager Portal Setup:
Within the Conditions Management section of the Manager Portal, the “Products” and “Application Purpose” need to mirror exactly what you have selected in the deal. For example, the image below shows that the conditions called “APS” and “MLS” have the Product set to Purchase and the Application Purpose also set to Purchase.
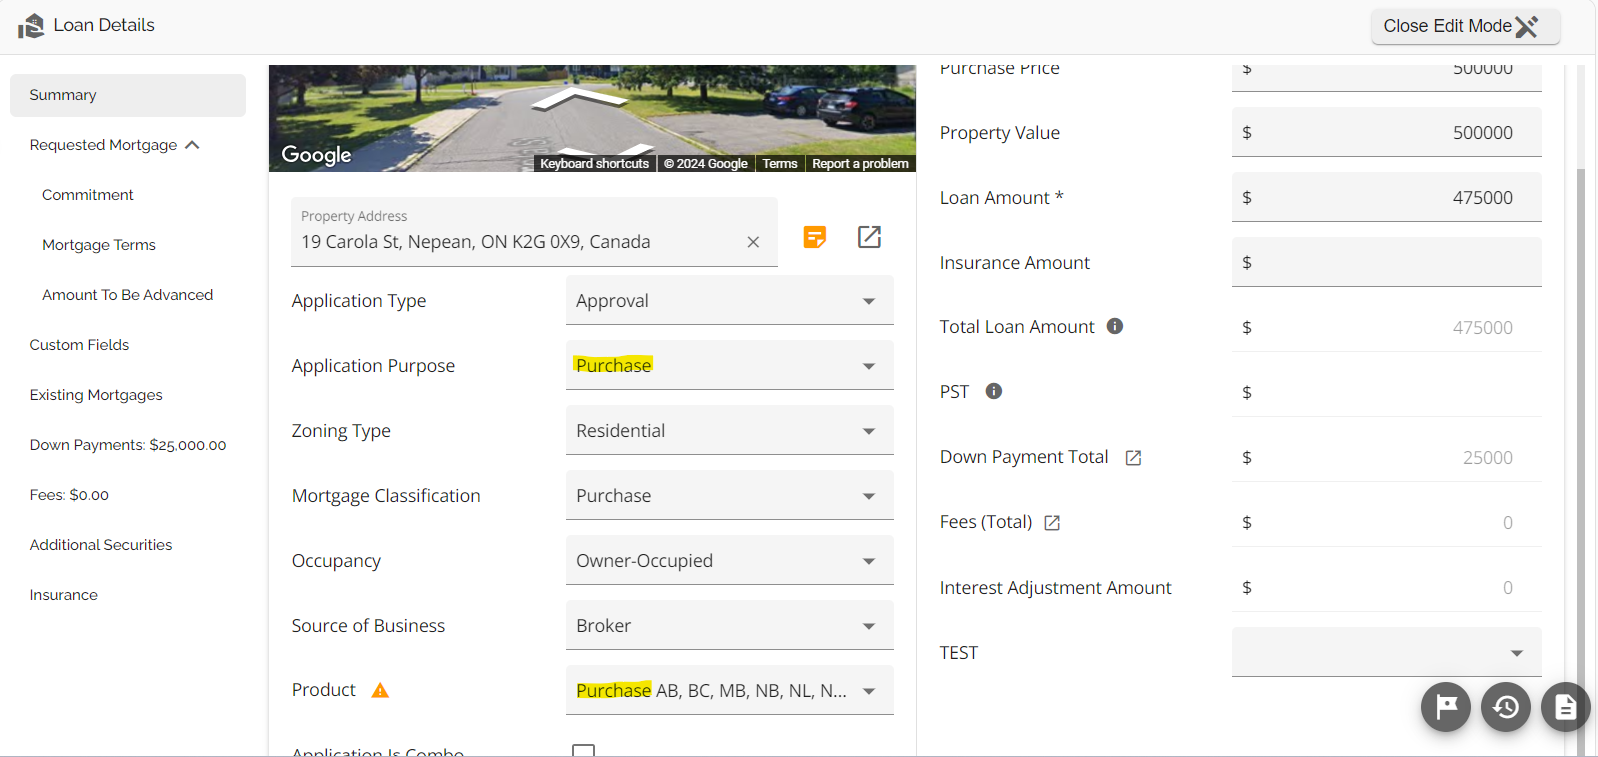
Loan Details Widget:
Within the Loan Details widget of the deal, select the desired application purpose and product. As per the example above, you would need to select Purchase as the application purpose and the product as seen below:
Conditions and Documents widget:
When you click on “Add Conditions from presets”, in the Conditions and Documents widget, the list of conditions is now filtered automatically based on the application purpose and product selected in the Loan Details widget.
Based on the filter criteria and the list of preset conditions from the Manager Portal, the conditions that will populate the list are “APS” and “MLS” as seen below:

Filters can be edited as needed, you can add or remove additional filters.
Column Headers & Conditions List - You are able to view all preset conditions within the list below the search box. Clicking on a column header will allow the user to sort the table by ascending or descending order for that column, click the header again to change sorting order. You can choose the conditions you wish to add by selecting the checkbox to the left of the Name column. On the bottom right of the pop up, you can use the page arrows to view the different pages of the conditions list. You are also able to change the amount of items you are viewing on each page using the ‘Items per page’ drop down located to the left of the page arrows. Once you have selected all the conditions you wish to associate with the stakeholder, click the ‘Add Conditions’ button on the bottom right.
‘Add Conditions’ Button → Add custom conditions - when selected a drop down will appear with the following fields: Name*, Text*, Preview Text, Text (French)*, ‘Use text from the default’ check box, Stakeholder, Responsible, Condition Type, and Linked Document. Enter the appropriate data for your condition.

Name* - A mandatory field as indicated by the red text and asterisk located to the right of the field name. It is used as a short form description of the content for that condition. It is a string text field that can be edited when in draft mode, but not after it is published.
Text* - A mandatory field, as indicated by the red text and asterisk located to the right of the field name. It is the condition text which will populate in the necessary documents exactly as written unless there are Handlebars expressions used. These expressions will be replaced with their rendered text in the Conditions widget and in any generated documents.
Icons - Hovering over these icons will display additional information described in the table below.
|
|
Text will be included in documents. Informs the user of the purpose of the text field. |
|
|
Smart Tags A menu of the tools that can be used to automatically render text:
|
|
|
This icon will display the Handlebars code that was used to render the condition text as per the condition presets. If there are no expressions in the condition text, just the text will populate. |
Preview Text - Shows you a preview of how the text will appear. This is helpful when using Handlebars in your text as the preview will show the mapped info in the text. The user can use this to ensure that the condition is pulling the appropriate information in before they add the condition. It should be noted that this text will only render properly if there is data in the application that matches the mapping (Handlebars). If there is no match, you will see the following text:
Condition text could not render. This can happen if the condition is not valid for the application.
Text (French)* - A mandatory field, as indicated by the red text and asterisk located to the right of the header. It is the french text for the condition written out completely which will populate in the necessary documents in french.
‘Use Text From Default’ Checkbox - This box defaults to checked. If checked, the Text (French)* field will populate with the same verbiage in the same language (English) as is in the Text field. If you want your text in the Text (French)* field to be in French, then you need to uncheck this box and type in the applicable French text in this field.
Stakeholder* - A mandatory field, as indicated by the red text and asterisk located to the right of the header. It is a dropdown wherein a stakeholder must be selected as the person or entity that the condition is being requested for.
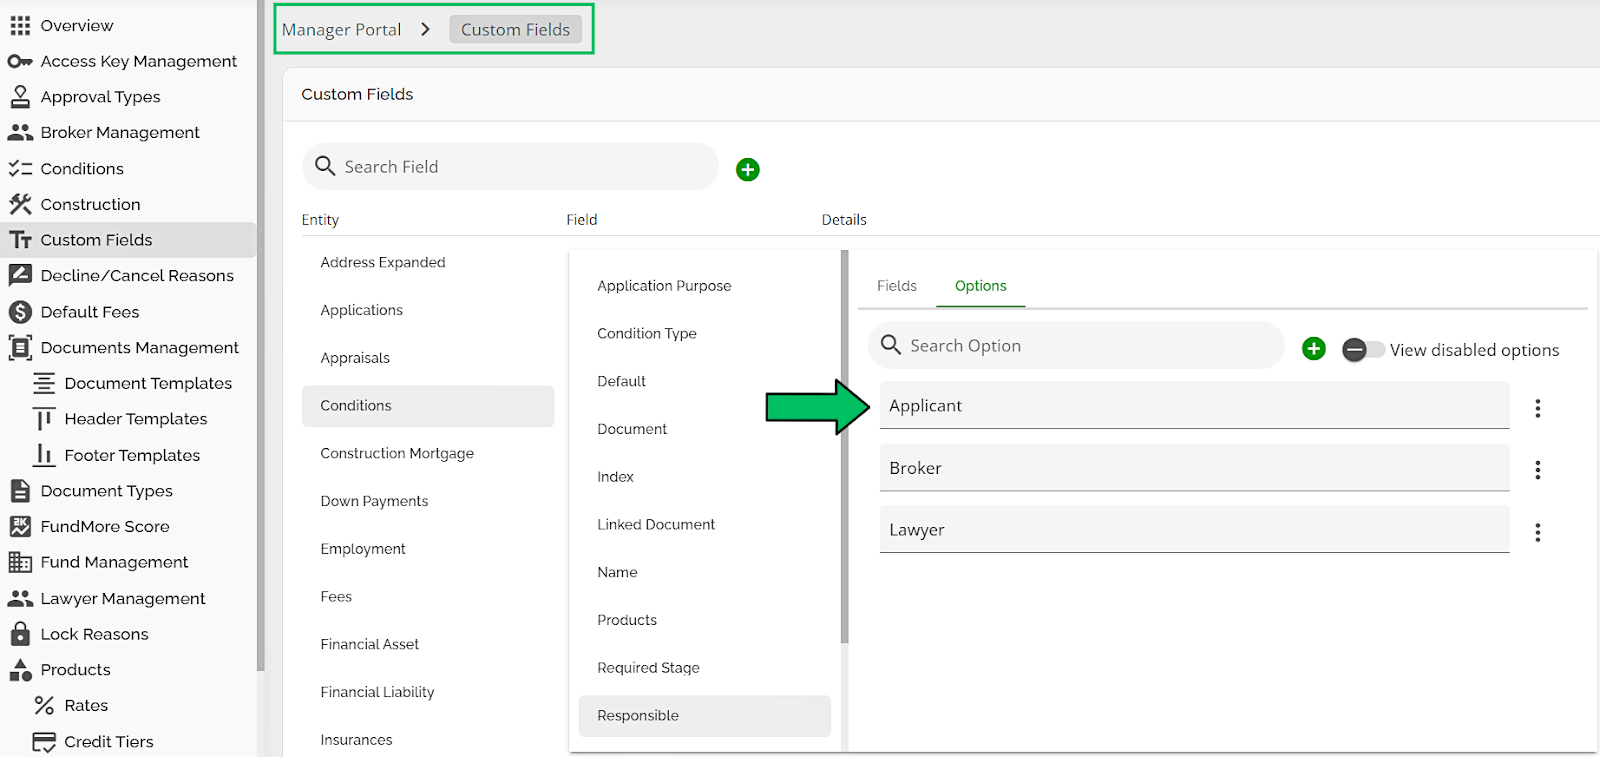
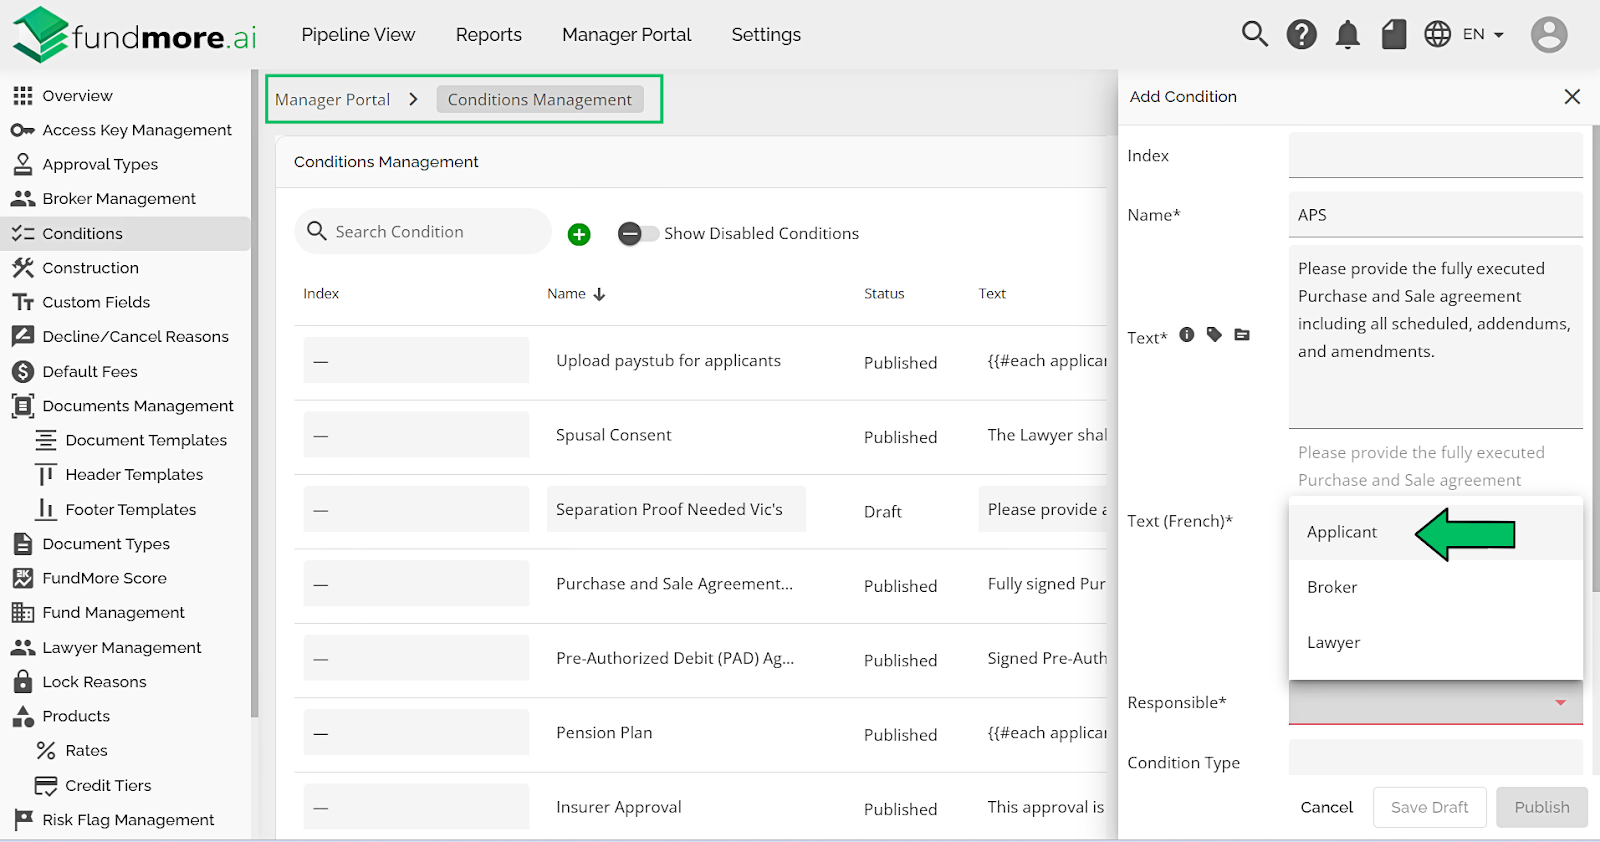
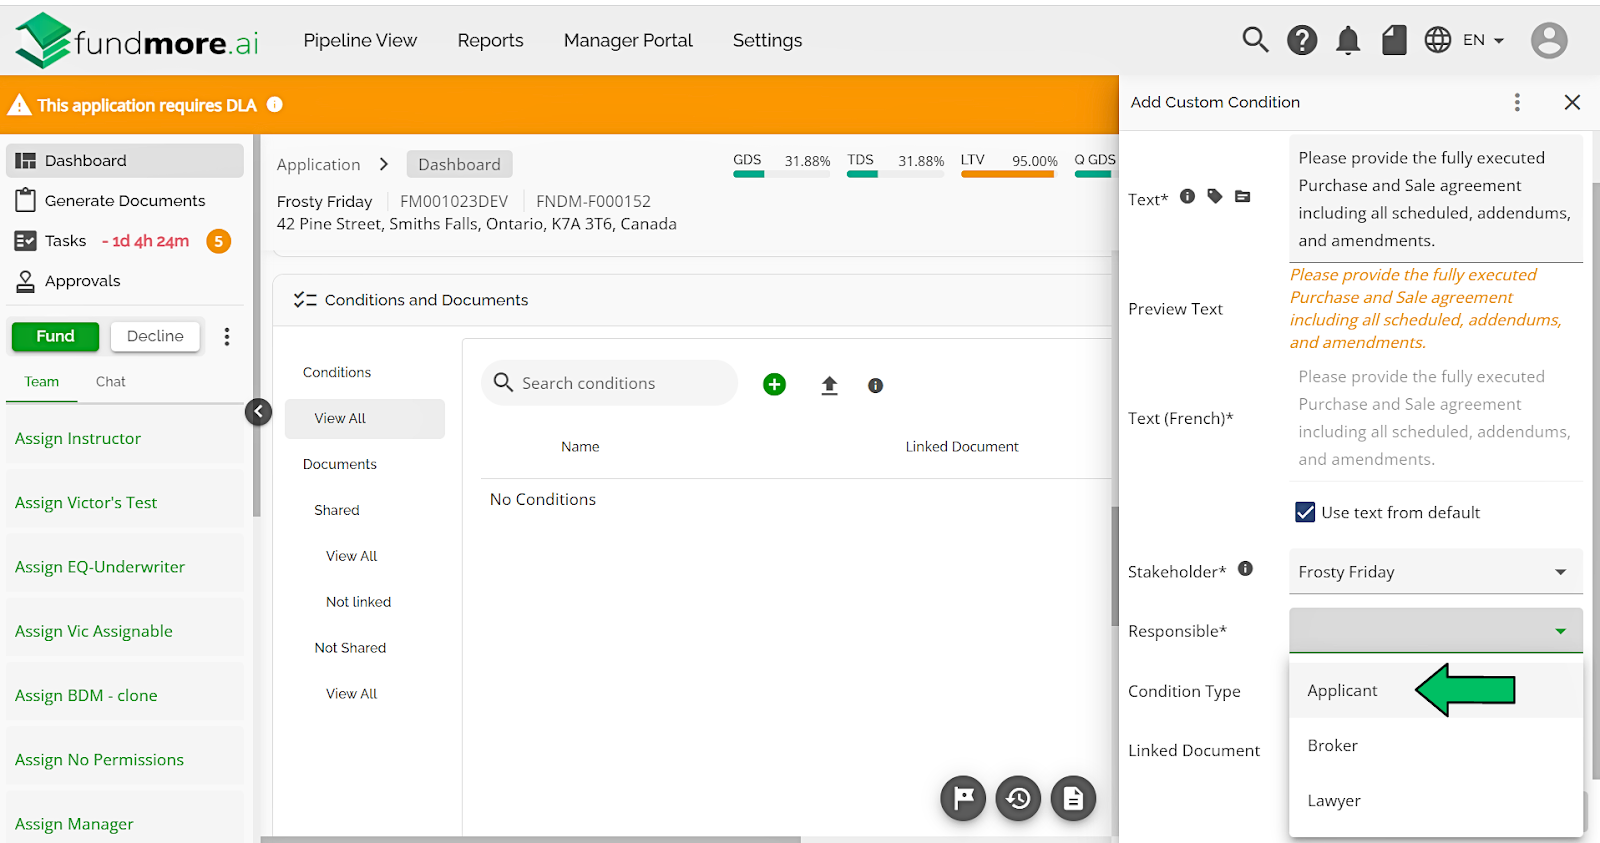
Responsible* - Who is responsible for satisfying the condition. Usually the Broker or Lawyer. Users have the ability to manage the “Responsible” field for Conditions within the Custom Fields section of the Manager Portal. The ability to access the Manager Portal and modify depends on the permissions for your role. This feature allows users to add additional options to the Responsible field, which can then be selected when creating conditions. The default options for this field are Broker and Lawyer. The options added can be disabled but they cannot be deleted. Once an option has been added, you can select it when creating conditions. In the example below, we added the “Applicant” option.
Adding to the options for the Responsible field:
Creating a condition in Manager Portal:
Creating a Condition in the ‘Conditions and Documents’ Widget:
Condition Type - The condition category that a given condition falls into. The drop down is populated with the types created in the Manager Portal. Examples of condition types might include ‘Lawyer Instructions’ or ‘Income’ conditions.
Linked Document - The specific document(s) that you want to link to your condition for collection from the borrower. You are able to leave this unlinked by leaving the default option of ‘Not linked’. The exact functionality of this linkage is dependent on the document management system your organization deploys. You can link multiple document types to one condition. This comes in handy when you have conditions which are fulfilled by multiple documents.

Once you are satisfied with the data and the required fields are filled out, click the ‘Add Conditions’ button on the bottom left.
Note: Custom conditions will only be saved within that application, not within the condition presets. They also will automatically follow any indexed conditions your company has set up.
‘Click to see Application Criteria’ Tooltip - When the tooltip (located to the right of the green plus button) is clicked, it will display the application criteria for the application you are in. This includes the criteria selected for the ‘Product’ and ‘Application Purpose’ fields in the ‘Loan Details’ widget within a given application. The warnings tie into the application criteria so the tool tip is where you can see what application criteria is populated which will assist with clearing any condition warnings.

‘Customize Table’ Button - Upon clicking the ‘Customize Table’ button, the ‘Customize Conditions Columns’ sidebar will appear to the right of the conditions section.

In the sidebar, you will see a series of checkboxes: Name, Linked Document, Linked Document Status, Text, Text (French), Products, Application Purpose, Condition Type (This property is managed within the manager portal when creating conditions and allows searching for conditions by type in the condition library), Stakeholder, and Responsible. The purpose of this sidebar is to enable you to customize which columns appear in the conditions list and what order they appear in. Checking off the headers will populate their respective columns on the screen and unchecking them will hide them.
You can also change the order of the headers by dragging and dropping them within the sidebar list. The only header that cannot be moved is Name. This is fixed to the top of the list in the sidebar and to the far left in the Conditions list. When you are satisfied with your list and order, click the X on the top right of the sidebar to exit. These settings are user specific so any edits you make will persist for you and remain for the next time you log in.
‘Mark as fulfilled’ Button - Clicking this button will change a given condition from a pending state to a fulfilled state. This can only be done while in edit mode, and can be changed from fulfilled back to pending, or to another state, using the line item ellipsis.
Condition Statuses - These are located directly to the left of the name column for each condition in the list.

Conditions Sidebar Ellipsis - The ellipsis located at the far right for each line in the condition list. When clicked, a drop down will appear with the following options to update the status of your condition.

Review Documents - This button will take the user to the review panel for a given condition.
Mark as fulfilled - This button will mark a given condition as fulfilled, it will not mark the associated documents as accepted, however.
Not relevant - This button will mark a given condition as not relevant, it will not mark the associated documents as rejected, however.
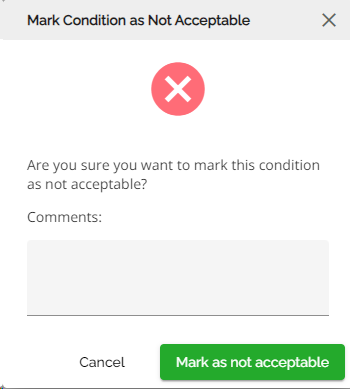
Not acceptable - This button will mark a given condition as not acceptable, it will not mark the associated documents as rejected, however.
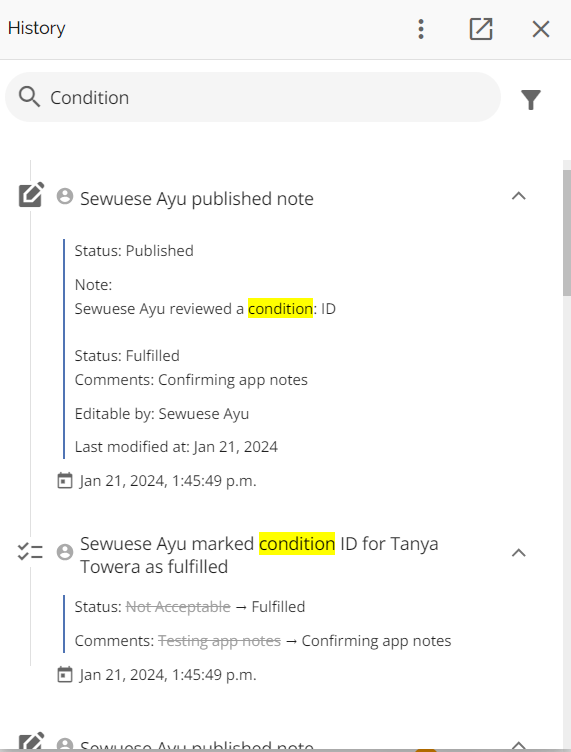
Users can add a comment when applying or changing a condition status for all statuses (Mark Condition as Fulfilled, Mark Condition as Not Relevant, & Mark Condition as Not Acceptable). Users will be prompted to add a comment when selecting any of these statuses whether that be the initial status update or changing a condition status.
|
|
|
|


Comments will be captured and displayed in the history log and in the application notes.
To watch a quick video demonstrating adding comments to all condition statuses and changing condition status, click on this link.
Duplicate as custom condition - This button will enable you to create a condition that is a duplicate of all of the data from an already existing condition and opens the duplicate condition in the ‘Duplicate Custom Condition’ sidebar. You can then edit the condition as needed and press the green ‘Add Condition’ button once you have completed the edits. This is an easy way to quickly add similar conditions if needed.

Note: The mapping must match the data in the application for the condition to render properly.
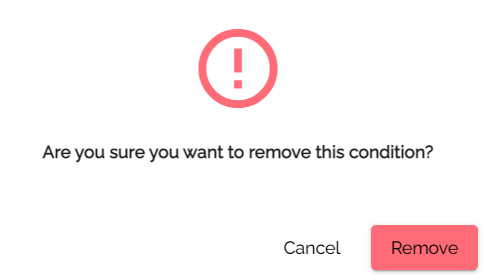
Remove - This button will delete the condition from the ‘Conditions and Documents’ widget. Clicking on this will prompt a warning to the user asking them if they are sure they wish to remove this condition. Click “Remove” and the condition will be deleted from the application.

Note: There will be a history entry noting which condition was deleted, by who, and when.

Editing Conditions - All conditions can be edited if necessary. In order to be able to edit the condition text users need to first enter edit mode from the widget. Then, simply hover over and click on the Sidebar indicator within the condition you wish to edit (located directly to the right of the condition name in the condition list). This will open up the Conditions Details sidebar. Edit the fields as necessary and click “Save Condition” Your edits will be saved.
If this condition was originally created from a preset, you are only editing this condition in this application. You are not editing the original preset condition as these are managed within the Manager Portal. When editing the condition, the text will show to the user exactly as it would have shown when printing on the commitment letter. Once the condition is saved, the new text will populate on the commitment when that is generated.
Once a condition has been updated, it will not automatically fill the information from the deal anymore. When editing a condition, users can employ the handlebars syntax, if they want to, to automatically pull data from the context.

‘Show Documents’ Drop Down - The drop down arrow on the far right for each line item. When clicked it will expand the condition to display any documents that have been uploaded and linked to that condition based on their assigned document type.
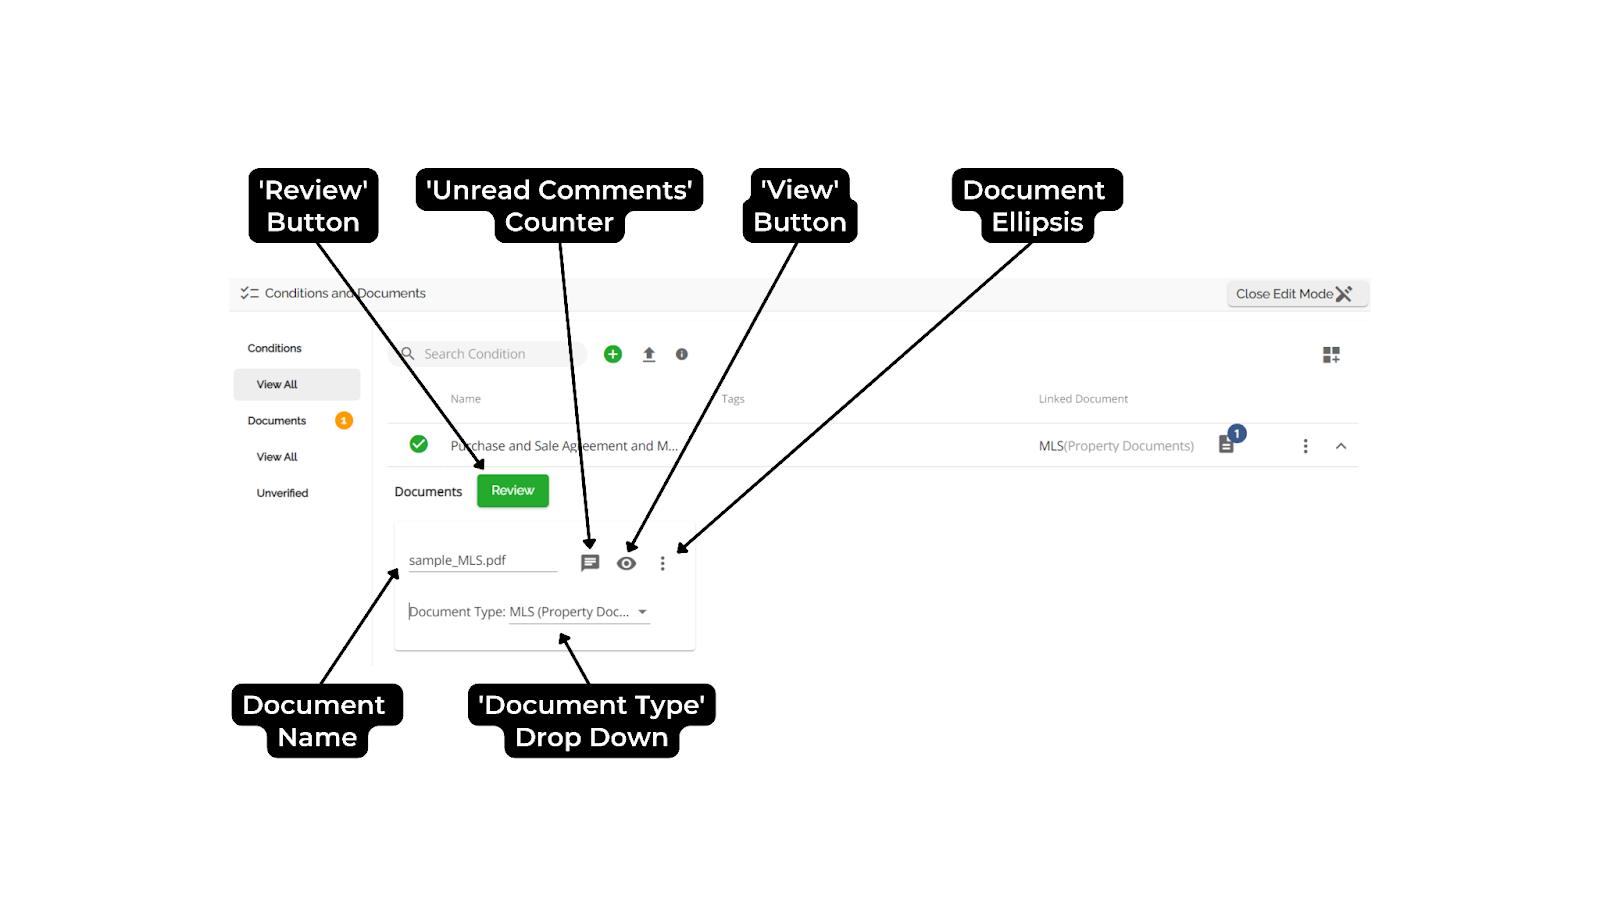
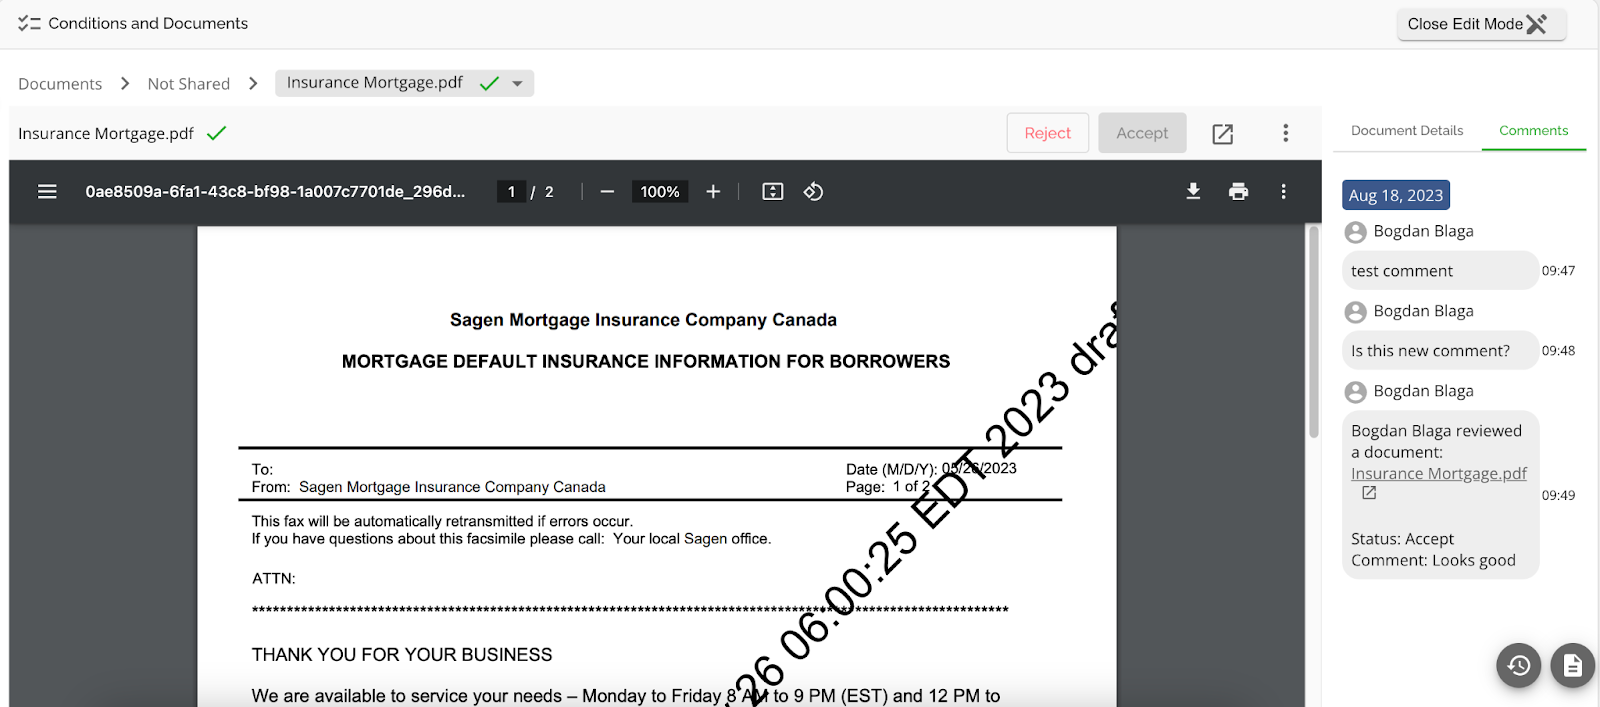
‘Review’ Button - This button will take the user into a document review panel for all of the documents linked to the associated condition.

‘Linked Documents’ Drop Down - This drop down allows the user to switch between the different documents that have been linked to a particular condition.

‘Reject’ Button - Used to mark a document as rejected or in need of resubmission. Selecting this button will open a pop up wherein the user can mark the document as ‘Rejected’, select a reason for the rejection, and provide a comment about the reason for rejection. This information will be added to the Application Notes and sent back to the document management system your organization deploys.

‘Accept’ Button - Used to mark a document as accepted by your organization. Selecting this button will open a pop up wherein the user can provide additional details surrounding the acceptance. This information will be added to Application Notes and sent back to the document management system your organization deploys.

‘Open in new tab’ Button - This button can be used to open the document you are currently reviewing in a new tab in your browser for easier viewing. The new tab still offers the same functionalities as the document review section within the application dashboard.
Document Ellipsis - This is the ellipsis shown within the review panel for the document currently under review. Upon clicking, a drop down will appear with options to open the document in a new window, edit the document name or type, download the document, or delete it.

‘Document Details’ Header - The stakeholder associated with the document will be listed at the top of the ‘Document Details’ section underneath this header. Following this will be a list of the conditions associated with this particular document.
‘Comments’ Header - Selecting this header will switch the right-most pane of the review panel to the ‘Comments’ section. Here all of the comments pertaining to this document will be shown.
‘Unread Comments’ Counter - This counter represents the number of comments a user has not seen on a given document. Clicking the counter will redirect the user to the review panel for that document and open the ‘Comments’ section in the right-most pane.
‘View’ Button - This button allows the user to switch to the review panel for a specific document as opposed to using the ‘Review’ button which automatically opens the first document uploaded in the review panel.
Document Ellipsis - This ellipsis offers the user the ability to review, download, or delete the document while in edit mode.
Document Name - This field can be updated by clicking the text while in edit mode. The file type will remain unchanged.
‘Document Type’ Drop Down - Selecting this drop down while in edit mode will allow the user to change the document type that a given document has been categorized as. This may mean that it will no longer be associated with the current condition that you are looking at and will therefore disappear from the condition’s view. It is still available in the ‘Documents’ section, however and it was assigned a Type that is linked with another condition, the document will move to that condition. You are able to change the Type as often as you like.
‘Documents’ Section - This section allows the user to view all of the documents that have been uploaded for an application in one place. The associated stakeholder will be displayed in the column furthest to the right. Below the ‘Documents’ header, you will see that ‘View All’ is the default viewing mode, but users can also filter documents to only review those that have not been verified. Verification in this context means that an uploaded document is classified and attached to a condition. Unverified means the document is not classified and therefore not tied to any condition.

All documents uploaded into the system go through an automatic antivirus scan. Behind the scenes, FundMore leverages the ClamAV solution for detecting trojans, viruses, malware and other possible malicious threats which could be sent through our system. Furthermore, we have also added an automatic periodic update of the antivirus engine with common definitions.
‘Documents require actioning’ Counter - The number shown in this counter is the total number of documents that are still in a pending state or have not been reviewed. Upon acceptance or rejection of a document, the counter will decrease by one.
Search Box - The search box can be used to search for documents while the user is within the ‘Documents’ section of the widget.
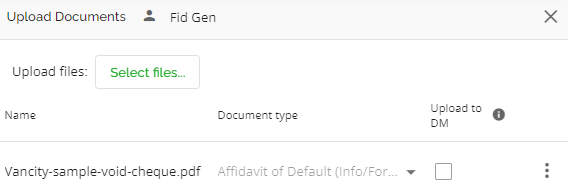
‘Upload documents’ Button - This button will first request that the user select a stakeholder to associate with the document(s) being uploaded. It will then open the ‘Upload Documents’ sidebar. Here you can upload multiple documents and assign them a Document Type. When you’re finished uploading and assigning, you can select the ‘Upload’ button in the bottom right corner of the sidebar to add them to the application.

We have included an “Uploaded At” column in the Conditions and Documents widget for FundMore DM documents, Private Documents and ezidox documents. This allows users to quickly identify the upload date for a document. This column only appears when you are in the Documents section of the widget after a document is uploaded.
‘Comments’ Button - This button will take the user to the document review panel and open the ‘Comments’ pane on the rightmost panel.
‘View document’ Button - This button will take the user to the document review panel and open the ‘Document Details’ pane on the rightmost panel.
Line Item Ellipsis - This ellipsis offers the user the ability to review, download, or delete the document while in edit mode.
Not Shared - This is tenant specific. Enables users to upload documents only in FundMore without sharing them with Brokers/Borrowers in DM.
When uploading documents in FundMore AI, the system will default to unchecked for “Upload to DM”. This means that the document will upload in FundMore AI only. If you want the document to upload in FundMore DM as well, the user will need to check off "Upload to DM" option.

You are able to act on these documents as you would any others. You can accept the document, reject the document, add notes to the document, download it, delete it and pop it out in another window to review.

This functionality may be useful when reviewing internal documents such as Commitment Letters or CAFs. This way team members can comment on the documents generated before having them sent out to Brokers/Borrowers.
Furthermore, if a document request has not yet been created or the stakeholder you are uploading documents for has not yet been created, your document will automatically upload as Not Shared. If you hover over the shared checkbox you will see a message that reads “Selected stakeholder does not exist in FundMore DM.

The uploaded document will automatically save the current stage in which the document uploaded however, this stage can be edited where necessary. The documents will the Note Shared section will be ordered by "Stage". If documents are in the same stage, the list will be ordered according to upload date, and then by name the documents have the same upload time. This is the default sorting but, users can modify the sort criteria using the column headers.

Note: The Stage column will only show for tenants with FundMore DM integrated.
Finmo Document Ingestion
This section will cover how Finmo and AI work together to sync documents. Documents that are uploaded to an application Finmo are brought over into AI and automatically categorized within the ‘Conditions and Documents’ widget. This means that they are matched upon ingestion based on the Document Types library in AI. Each document type in the library has a canonical name that must come from the corresponding document type in Finmo. These canonical names must be identical to those in Finmo in order for AI to appropriately categorize incoming documents.

Within Finmo, the canonical name is not readily visible. As such, the matching between systems is managed by our development team. Should new document types be added in Finmo, a request can be made through our support ticketing system to create the corresponding document types in AI. Below we can see the document list in Finmo that is used to build out a document request for a given application. Each of the documents in this list have canonical names as discussed previously.


This is how AI is able to consistently match documents; it is not evaluating the documents uploaded to a particular file, but instead evaluating how they were categorized in Finmo and mirroring this categorization. Let’s use the 2016 - T4 Slip(s) as an example. Whatever you upload into the ‘Files’ section will be categorized in Finmo as a ‘2016 - T4 Slip(s)’ which has an alternative name stored in the backend - this is its canonical name. This canonical name might be something like ‘2016_T4_slip’ and this is what will be matched against the Document Types library in AI.

If the ‘Linked Document’ field of a condition on the application has a document type that
matches the ingested document, it will be matched to this condition. Changing the document type in AI, should there be an incorrectly matched document, will not change the document type in Finmo since data only flows out from Finmo and into AI, not the reverse direction.
Below we can see that documents that are ingested will create a flag that shows up inline with their associated conditions. If there are multiple documents that are linked to one condition, upon ingestion the flag will display the total number of documents needing review for that condition. In the ‘Conditions’ section, other important things to note are the name of the condition, the linked document(s).
Condition Notifications

Top Warning Badge - The warning badge appears on the top of the widget, to the right of the ‘Application Criteria’ button. It indicates there are conditions that no longer fit the application criteria and how many conditions do not meet the application criteria.
Inline Warning Badge - This warning badge found inline of the listed conditions indicates the condition does not meet the application criteria. Hover over the warning badge to see additional information about which application criterium does not match the application

In the ‘Documents’ section, we can see the ingested documents, their names, their document types as determined from Finmo’s data, and the stakeholder that is associated with the document.

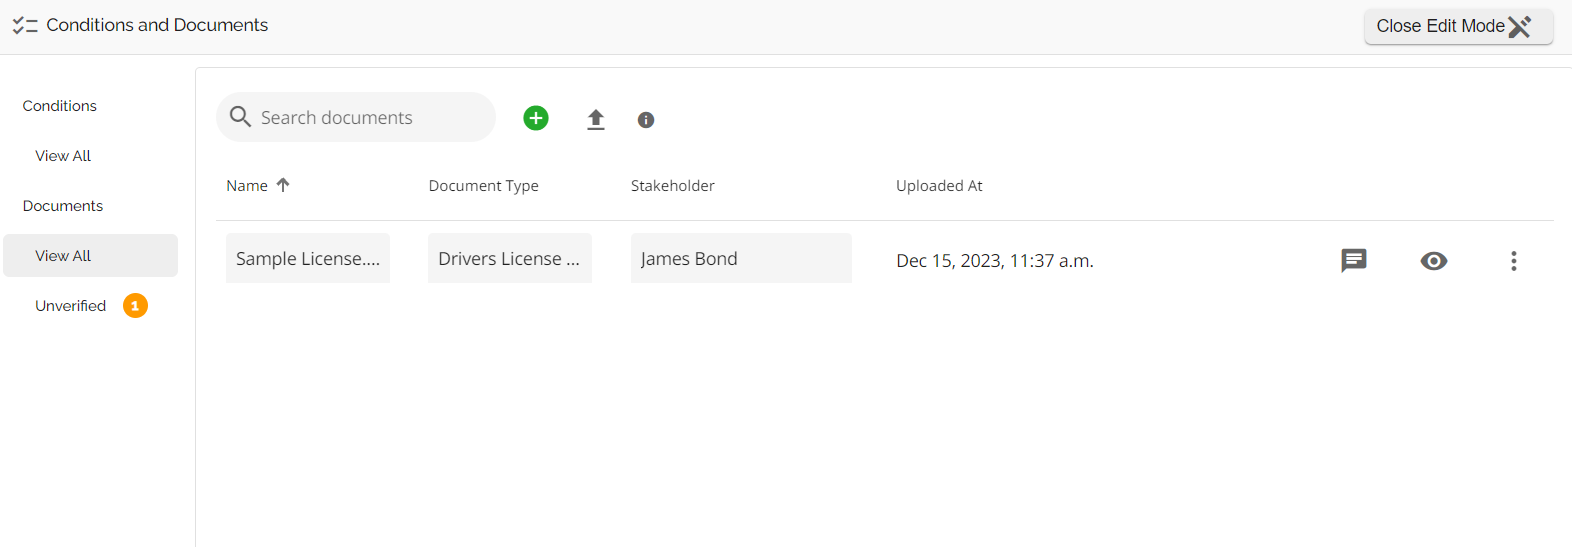
Update Stakeholders on Documents
You are able to edit the stakeholder a document is attached to. A good use case for this would be if a document is uploaded under the incorrect stakeholder. To ensure a good user experience, we allow you to update the stakeholder associated with the document directly in the Conditions and Documents widget. To do so, follow these steps:
- Navigate to the ‘Conditions and Documents Widget’.
- Select ‘Documents’ from the sidebar on the left.
- Locate the document you wish to update.
- Click on the Stakeholder field, which reveals a dropdown menu with a list of stakeholders.
- Select the desired stakeholder for the document.
- Click on the ‘Close Edit Mode’ button at the top right corner once completed.

Moving Documents
Unnecessary Document Uploaded - This can occur when multiple documents are identified by the same document type. Should a document be uploaded and attached to a condition that is not required or not relevant, while it cannot be deleted, it can be moved. You can either move it to another more relevant condition or to the unverified list. A good example would be when a signed commitment is requested but the agent uploads the signed commitment, signed disclosure, and signed amortization schedule together.

All you need to do is go to ‘View All’ under ‘Documents’ which will show you a list of all documents that have been uploaded and the document types assigned to them.

Find the documents within the list you want to move and change the Document Type to match either the condition you want that document to attach to or to Unclassified which will move it to the Unverified List.

A warning popup will appear asking if to confirm you want to proceed - click ‘Yes’. You will see the document disappear from the condition it was attached to and in the above example the document will now appear in the Unverified list.
Duplicate Documents Uploaded to Multiple Conditions - If a document is uploaded (once) that has a document type that applies to multiple conditions, the document will automatically attach to all conditions that have the matching document type. Any actions taken on the document in either condition will automatically apply to the same document in all conditions it is attached to which may not be relevant for one of the conditions. The solution is to remove the document from the condition it does not apply to.
The workaround for this is to open up the sidebar for the condition which has the document you do not need. Change the Linked Document for that condition removing the document type for the document you want to remove. Close the sidebar and you will see that the document disappears.
A note of caution though: Ensure when you change the linked document in the sidebar that there are no other documents attached. Your action will affect all documents attached to that condition, not just the document you want to remove.
If you have a situation where there are multiple documents and you only want to remove one or two, we suggest you move all of the documents in that condition to the unverified list first. Then, go in and update your document type for the appropriate condition to only the linked documents you want attached. Because you moved a document that is applied to multiple conditions, you will have to move those documents back to the appropriate conditions once you have corrected the other condition.