Table of Contents
Custom Field Location, Features and Functionality
List Headers: Entity, Field and Details
Editing Fields & Field Details
Where to Find Custom Fields within the Dashboard
Application Entity Custom Fields
Stakeholder Entity Custom Fields
Property Entity Custom Fields (Property Details Pop Up)
Overview
This section allows you to view, manage and define all application fields. You can customize existing field names or drop-down options in the UI and add new "custom" fields as needed. Adding custom fields is useful if you, as a lender, need to capture specific data points within your applications. While most options in the "Entity" column can be edited, only four specific entities currently allow you to add your own custom fields: Stakeholder, Application, Mortgage, and Properties.
You can edit all default custom Field names, but Field types are not editable. Default custom fields cannot be deleted. However, all custom fields added by you can be edited (including Field type) or deleted.
Note: We typically do not map custom fields due to their dynamic nature. Since these fields can be created, changed, and deleted at any time, we cannot count on them to be reliable inputs for mappings in general.
API Exposure
It is important to note that custom fields are exposed to APIs. This means that any data captured through custom fields can be accessed and utilized through application programming interfaces (APIs). This capability allows for seamless integration and data retrieval.
Custom Field Features and Functionality
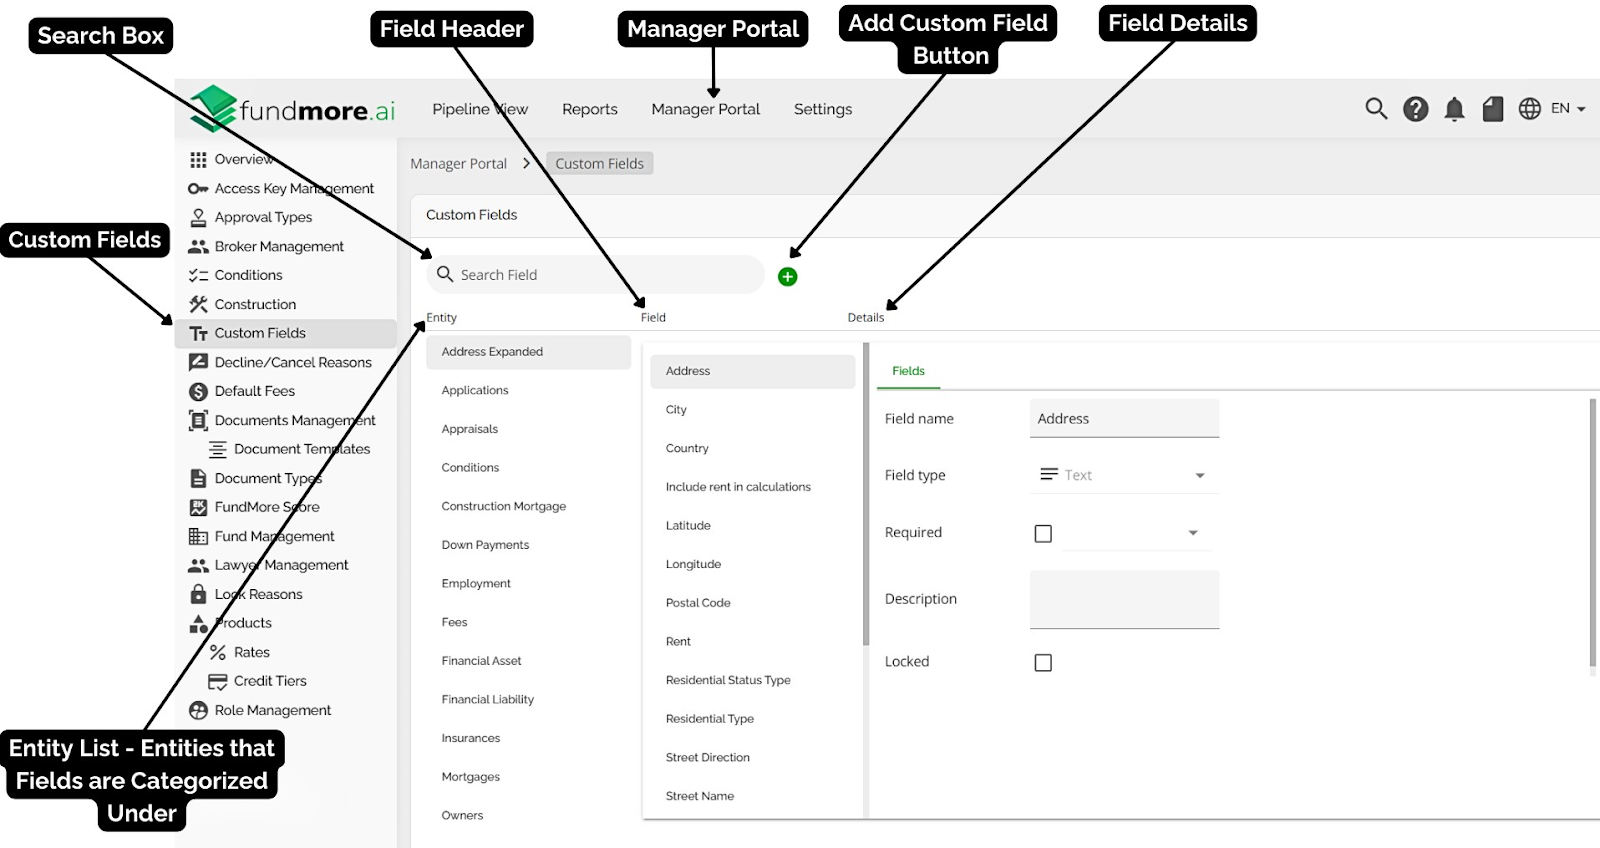
Location
The Custom Fields management section can be found in the Manager Portal. To find it:
- Navigate to the Manager Portal using the top menu.
- In the Manager Portal, select Custom Fields from the left sidebar.
Features & Functionality
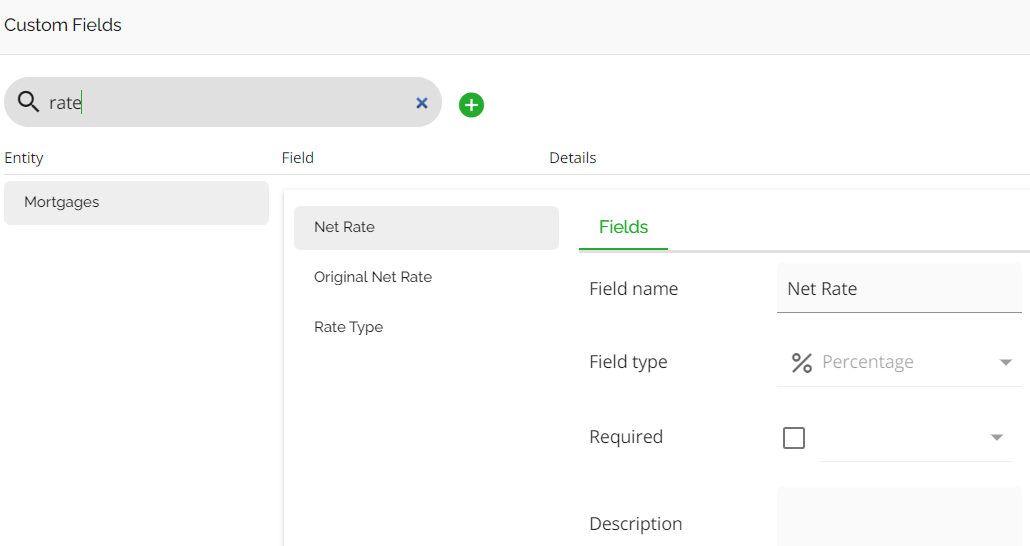
Search box - Located on the top left corner of the section. In the search box, you are able to enter text/keywords related to the previously created custom fields. All custom fields with the search criteria in them will appear in a list view.
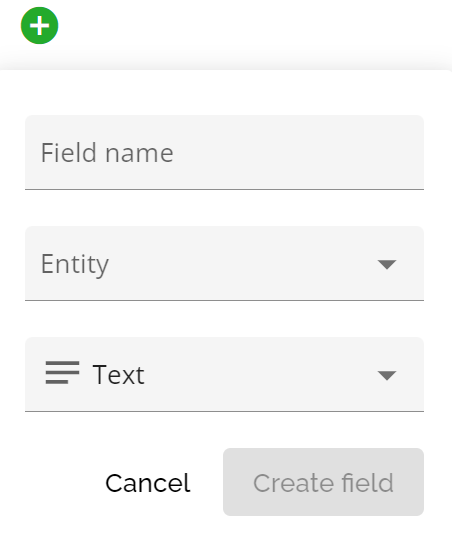
‘Add Custom Field’ Button - This button can be used to create a new custom field. To create a new custom field, follow these steps:
- Click on the ‘Add Custom Field’ button.
- Enter the relevant information for the custom field, i.e. Field Name, Entity and Field Type.
Field Name - The name of the field.
Entity - The Matrix Entity the custom field is categorized under (either Stakeholder, Application, Mortgage or Properties).
Field Type - The input type of the field (defaults to Text).
- Click on the ‘Create Field’ button once all the necessary information has been entered.
List Headers

These are the sections that related application fields are grouped in. They relate back to widgets and tabs within the application, i.e. the Conditions entity contains all fields contained within the Conditions and Documents widget. Think of the entity as the top layer of organization of the application data.
‘Field’ Section
This section identifies all Fields contained within each Entity. You can view all fields by scrolling up & down. By clicking on the field name, you can see the details associated with it (which will show up directly to the right).
Default custom fields and added custom fields will populate within the Fields list, with added custom fields appearing at the top of the list* (*only within the Stakeholder, Application, Mortgage and Properties entities). Any Fields that have an ellipsis directly to the right of the name indicate that they are custom fields added/created by you.
-png.png?width=500&height=390&name=Untitled%20design%20(2)-png.png)
‘Details’ Section
These are the details associated with the field selected in the Fields column. There are two possible tabs available within this section - Fields & Options. The options tab will only populate if a field has a field type associated with it of either single select, single select numeric, or multi select indicating a drop down list.
‘Fields’ Tab - Shows the Field name, field type, enables you to indicate a field as required and tie the requirement to a stage, offers a description field and enables the Lender to lock the field to editing.

Field Type Options:
|
Boolean |
Allows a “true” or “false” value entry |
|
Currency |
Dollar amount numeric value, i.e. $1,000.00 |
|
Date |
Allows a date entry in year, month & day format |
|
Disabled |
Disables entry into the field while leaving the field visible |
|
Multi-Select |
Allows the user to select multiple choices from either a numeric or text list |
|
#Number |
Allows the user to enter a numeric value in the field without applying any formatting |
|
Percentage |
Numeric percentage value |
|
Single-Select |
Allows you to choose one option from multiple text options |
|
Single-Select Numeric |
Allows you to choose one option from multiple numeric options |
|
Text |
Allows free text within the field including letters, numbers, & punctuation |
Marking a Field as Required:
Checking this box will block the user from stage transitioning until the required field has been completed. You are required to select a stage for which this field will be required to be completed by. If the user attempts to stage transition and there are required fields that have not been completed, the user will get a pop up warning indicating there are items that need to be reviewed. The expectation is that they go back to the indicated fields, complete them, and then attempt stage transition again. Users that have been given the permission “Force stage transition with uncompleted tasks” are able to stage transition without completing the required fields.

You are able to set any field within the Custom Fields lists as a required field if you so choose.
Note: Custom fields added to entities with multiple entries (like Stakeholders, Properties, or Existing Mortgages) will apply to each individual entry. Therefore, marking such a custom field as "required" mandates completion for every Stakeholder, Property, or Existing Mortgage within the application.
Here's how custom fields appear and behave within the Loan Origination System (LOS) based on the entity:
- Application: Custom fields are located in the Summary Tab and Custom Fields Tab within Loan Details and pertain only to the subject property.
- Mortgage: Custom fields appear in both the Requested Mortgage and Existing Mortgage sections. Those in the Existing Mortgage section apply to all properties in the application, and if marked as required, they must be completed for all properties.
- Properties: Custom fields are shown in the Custom Fields Tab within the Property Details pop-up and apply to all properties in the application. Required fields must be completed for every property.
- Stakeholder: Custom fields are found in the Custom Fields tab within the Stakeholder widget and apply to all Stakeholders. Required fields must be completed for each Stakeholder.
Marking a Field as Locked:
Fields within the LOS can be locked. Some are locked by default (by FM) and the remainder can be locked by the Lender if they so choose. To enable you to do so, we have added a checkbox within the Fields tab in Custom Fields. When “Locked” is checked, then that field cannot be edited within the UI from anywhere it is present. This means that a user cannot change the data in the field that is ingested from the POS. If there are any associated calculations for the locked field, they will continue to work as expected.
Note: Custom fields added to entities with multiple entries (like Stakeholders, Properties, or Existing Mortgages) will apply to each individual entry. Therefore, marking such a custom field as "locked" prevents editing for every Stakeholder, Property, or Existing Mortgage within the application.
Here's how custom fields appear and behave within the Loan Origination System (LOS) based on the entity:
- Application: Custom fields are located in the Summary Tab and Custom Fields Tab within Loan Details and pertain only to the subject property.
- Mortgage: Custom fields appear in both the Requested Mortgage and Existing Mortgage sections. Those in the Existing Mortgage section apply to all properties in the application, and if marked as locked, they cannot be edited for any properties.
- Properties: Custom fields are shown in the Custom Fields Tab within the Property Details pop-up and apply to all properties in the application. Locked fields cannot be edited for any property.
- Stakeholder: Custom fields are found in the Custom Fields tab within the Stakeholder widget and apply to all Stakeholders. Locked fields cannot be edited for each Stakeholder.
Click the link below to see a video demonstrating this: How to Lock a Field in the Application
Some fields are, by default, locked/disabled (i.e. PST). These fields will have the Locked checkbox checked and are not editable from the Manager Portal. Such a field will be grayed out:

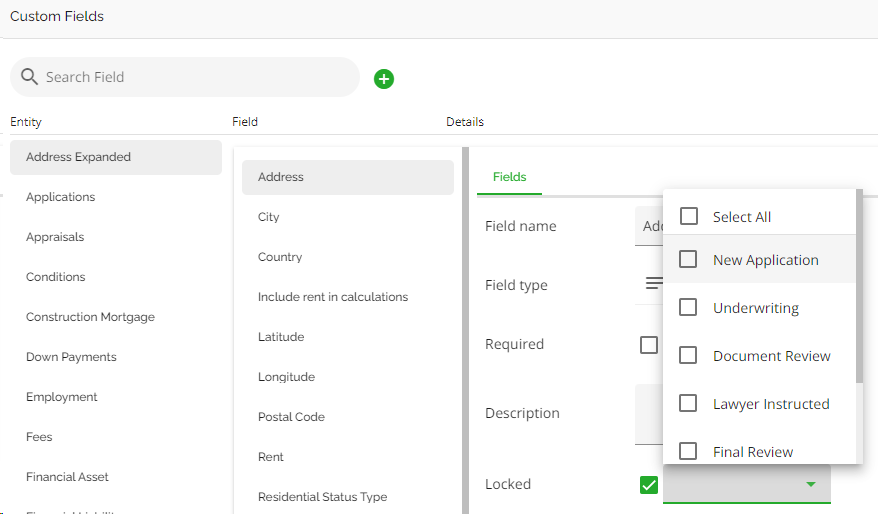
Lock Fields by Stage
We offer functionality where lenders can lock fields at identified stages instead of locking them upon ingestion. This allows changes to selected fields up until the stage(s) indicated offering users more flexibility to make edits if necessary. This functionality will allow lenders to select the stages where a field is locked from within Custom Fields. This is a single or multi select option. Lenders have the option to lock the field from ingestion or later in the workflow. To be able to select the stage(s) the field should be locked at, the locked checkbox must be checked first, at which point the stages can be selected. When a deal is in the selected stage, the field will be locked.
‘Options’ Tab - In the details section, when selecting the field types of (Single Select, Single Select Numeric, or Multi Select), you will have an options tab appear. The Options tab associated with these fields is where the drop down list is created with all the options for this field. Some Options lists are locked/disabled by default. This is done in the back end to preserve mapping logic etc.; these options are not editable.
You may have enabled and disabled options. You will only see the enabled options in the list if the “View disabled options” toggle button is toggled off (toggled to the left and gray). If you toggle the “View disabled options” button on (toggled to the right and in color) you will see all options. The enabled options will populate at the top of the list and have a shaded background. The disabled options will populate at the bottom of the list and have no shaded background.


Disabling options will remove them from the list of available selections visible to the users. If disabled, they can always be re-enabled. To disable or enable an option, follow these steps:
- Click on the ellipsis to the far right of the option you wish to disable or enable.
- Click on either enable or disable.
The option will be moved to the appropriate options list. If disabled, it will be removed from the user’s view and if enabled, it will be visible to the users.
Adding a New Field
Note: There is a hard limit of 255 characters and a soft/functional limit of 128 characters (except for Application Entity, where the soft limit is 48 characters). You can get away with more than the soft limit but UI components may start to stretch and look weird.
To create a new field, follow these steps:
- Click the ‘Add New Field’ button to the right of the search box.
- Enter the Field Name, Entity and Field Type.
- Click on the Create Field button.

The new field will be displayed alphabetically in the Field column among previously created custom fields (indicated by ellipses). You will also see the data you used to create the custom field in the Details section. If you selected Single Select, Single Select Numeric, or Multi Select in the field type, you will have an Options tab appear.
The Options tab enables you to create a drop down list for the user to select from. The Single Select options will allow you to create a list either with text or numeric values where the user can select only one of the options. The Multi Select will allow you to create a drop down list including both text and numeric values and will allow the user to select multiple choices from that list. Once options are created they can not be deleted but they can be disabled using the ellipsis to the right of the option. To add to your options list, follow these steps:
- Click on the options tab opening up a screen where you can add options.

- Click on the ‘Add New Option’ button.
- Input your option name in the option name field.

- Click on the Create button.
Repeat this process until you have created all your options.
Editing Fields & Field Details
Custom Fields
To edit a custom field created by a user within your company, follow these steps:
- Find the field in the custom field list or enter the field name into the search box.
- Click on the field name you wish to edit. You can change the name and associated details by clicking on any of the fields within the details section (including the options, if applicable),
- Once you have updated the data in a field, it will automatically save.

To delete a custom field created by a user within your company, click on the ellipsis to the right of the Field Name. A drop down with the option ‘Delete’ will appear. Click on delete, to delete the field.
Note: All custom fields created by users will be found in either the Application, Mortgage, Stakeholder, or Property entities and will be at the top of the field list with an ellipsis to the right of the field name. Any custom field edits (i.e. field label name changes) made by the Lenders will not be changed during system updates.
Reminder: As noted above, there is a hard limit of 255 characters and a soft/functional limit of 128 characters (except for Application Entity, where the soft limit is 48 characters). You can get away with more than the soft limit but UI components may start to stretch and look weird.
Default Fields
For default custom fields, users can edit the Field Name, toggle ‘Required’ and/or 'Locked' on or off, set a stage the field is required or locked by, and modify the description. The Field type is not editable. If there is an options tab visible (meaning the Field Type is set to Single-Select, Single-Select Numerical, or Multi Select), you may also have the ability to add, disable, or enable options, however, most of the time these options are not editable. The process to edit is the same as above in the Custom Fields section.
Note: You can not delete default fields.
Where to Find Custom Fields within the Dashboard
Application Entity Custom Fields
Data entered in the Application Entity custom fields automatically populates in the other tabs where these fields are located. However, data entered in the Mortgage Entity custom fields will not carry through to the other tabs. In the example below, the data was entered in the Summary Tab and automatically populated in the Custom Fields.


To view the Application Entity Custom Fields in the Application Dashboard, click on the Overview tab in the Loan Details Widget and scroll down to the bottom. You will find the Application Entity custom fields updated at the bottom of the section. You can also navigate to the Custom Fields tab (also located in Loan Details Widget menu) to see all custom fields created in the Application Entity.
Mortgage Entity Custom Fields
Data entered into the Mortgage Entity custom fields will not carry over to other tabs where these fields are present. Although the Mortgage Entity custom fields appear in both the Requested Mortgages and Existing Mortgages tabs, the data entered in one tab does not automatically populate to the other. This is evident in the example below.


To view the Mortgage Entity Custom Fields in the Application Dashboard, click on the Requested Mortgage tab in the Loan Details Widget and scrolling down to the bottom right. You will find the Mortgage Entity custom fields updated at the bottom of this section. You can also navigate to the bottom of the Existing Mortgages tab to see these custom fields.
Stakeholder Entity Custom Fields
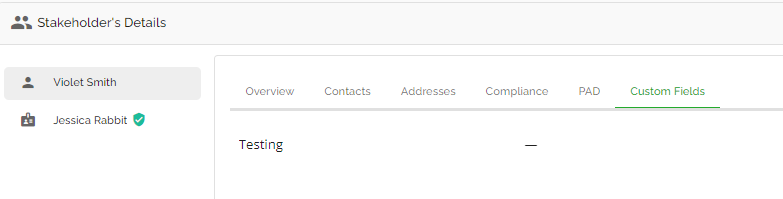
To view the Stakeholder Entity Custom Fields in the Application Dashboard, follow these steps:
- Navigate to the Stakeholder Widget within an application.
- Select a Stakeholder from the list on the left.
- Click on the Custom Field Tab.
Any custom fields created will appear in this tab for all Stakeholders. Custom fields will apply to all Stakeholders. We can not segregate based on Stakeholder and any rules set for custom fields created in the Stakeholder widget will apply across all Stakeholders, i.e. indicating the field is Required or Locked. Updates to Stakeholder custom fields will not create history entries in the history log.
Property Entity Custom Fields (Property Details Pop Up)


To view the Property Entity Custom Fields in the Application Dashboard, click on the Property Details Pop Up for any property - this can be found in the Loan Details or the Net Worth (Property Tab) widgets. Any custom fields created will appear in this tab for all properties.
Custom fields will apply to all properties. We can not segregate based on property and any rules set for custom fields created in the Property Entity will apply across all properties, i.e. Indicating the field is Required or Locked. Updates to Property custom fields will not create history entries in the history log.
Custom Fields are displayed alphabetically in ascending order, making it easier to identify the position of a specific field within the list.
