Table of Contents
‘Conditions & Documents’ Widget
‘Stakeholder’s Details’ Widget
Introduction
The dashboard is divided into sections that organize actions and information within the application for user convenience. On the left side of the dashboard, there is a menu list that includes the application menu, quick action buttons, and two tabs for the Team and Chat features. At the top of the dashboard, there is a brief summary of the application, and directly below the summary, you will find the deal stages and widgets of the application.
Left Side Navigation Menu
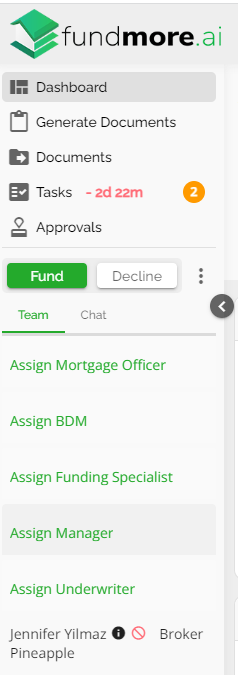
Application Navigation Menu - This feature is designed to assist you in easily identifying the section of the menu you are currently in and offers a range of options for navigating to different sections. You will also receive a visual indication of the number of items that require attention in each section through orange circles with numbers inside them.
Quick Action Buttons -These buttons, labeled as 'Fund' and 'Decline', enable users to easily perform actions within the application with a single click. Adjacent to these buttons, there is an ellipsis icon that provides a drop-down list of additional quick action items.
Team - In the team section, you have the ability to view and assign team members to an application. The teams are created based on the roles you have set up in the Manager Portal, and you can assign one or multiple team members to a role. This section also provides information about the submitting broker, including their status and brokerage.
Note: Only roles that have been set to "Assignable" in the Role Management section of Manager Portal will display in the Team list.
Chat -Within the chat feature, you are able to communicate with team members assigned to the application. You can tag any team members assigned to the application using the 'commercial-at' (@) symbol. By doing this, the user will receive a notification that they have been tagged in a chat message.
Learn more about the Team and Chat features by reviewing our Team, Chat, and ‘More Actions’ Ellipsis Product Feature Guide.
Users have the option to minimize the left side menu by clicking on the left arrow minimize option ![]() . This will create more screen room for the application. To open the menu again, simply click on the right arrow maximize option
. This will create more screen room for the application. To open the menu again, simply click on the right arrow maximize option ![]() .
.
Priority Setting for Deals
We have implemented a feature that allows users to identify per application the priority level of that deal. Users can set the priority from directly within the application, or within the pipeline view (i.e. both board and list views). There are four priorities to choose from: Critical, High, Medium, and Low. The priority can be reset to None after it is initially set if need be. Each priority level is visually represented by a distinct color-coded icon. To set the priority within the application dashboard, follow these steps:
- Navigate to the left-hand navigation menu.
- Click on the ellipsis next to the Decline button.
- In the pop-up that appears, hover over the “Set Priority” option.
- Select the appropriate priority level from the list (i.e. Critical, High, Medium, and Low).
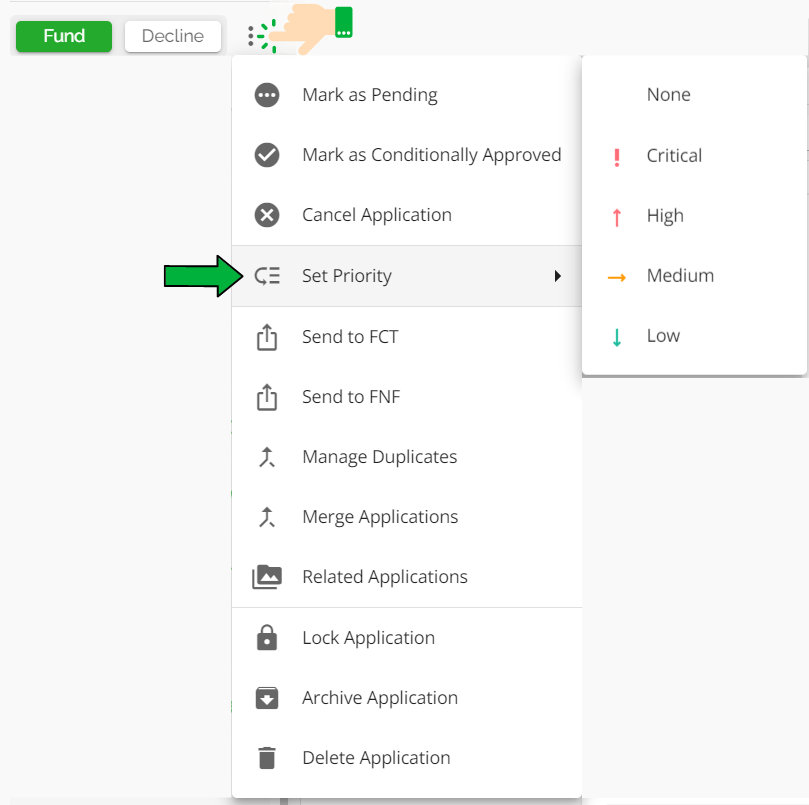
The priority will be displayed at the top of the application dashboard as well as in the pipeline view.

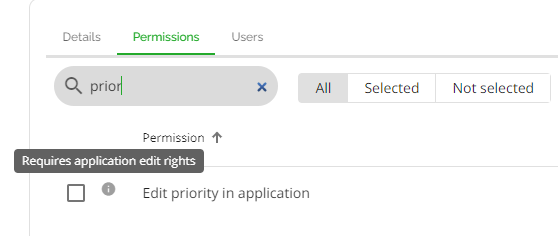
This feature allows users to quickly identify and address high-priority items, and also allows for the sorting of applications according to the priority level within the pipeline view.The permission required to utilize this feature is called “Edit priority in application” permission. If a role has this permission enabled, the users assigned to that role are able to edit the priority status of applications. The permission defaults to toggled off for all roles.
Whenever a priority status on a file is added, removed, or changed, users will receive an in-app notification, unless they have muted their notifications.
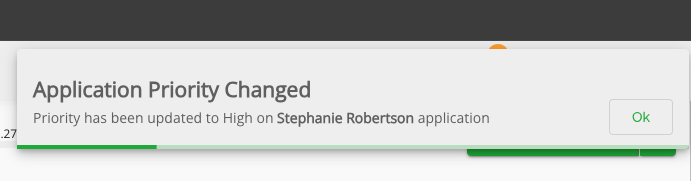
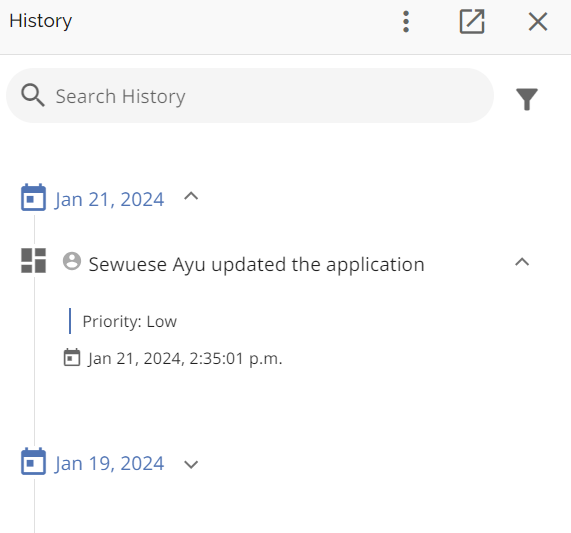
When the priority for a deal has been updated, a history log is created to indicate the change.
Summary Information

The application summary provides a quick snapshot of the pertinent information of the deal. It includes information such as: the DLA required banner (if applicable), the current section of the application navigation menu, the applicant names, loan number(s), the subject property address, closing date, creation date, application source, insurer status (if applicable), statistics and their corresponding tool tip (GDS, TDS, LTV, Q GDS, Q TDS), and a quick action "Generate Documents" button.
DLA Approval Banner - If the loan amount exceeds the user's loan authority limits, a banner will be displayed at the top of the dashboard to inform the user that they need to obtain DLA approval. There is a tooltip within the DLA banner. When a user clicks on this tooltip, they will see their lending limits in comparison to the relevant amounts on the deal. There will be a warning icon next to the amount that is below the user’s lending limit. In the example below, the user’s lending limit for Mortgage Secured deals is $500,000. However, the Requested Loan Amount on the deal is $780,090. As a result, the user must obtain DLA Approval. When the user clicks on the tooltip, they can see their lending limits and a warning icon is next to the amount that is below their limit.
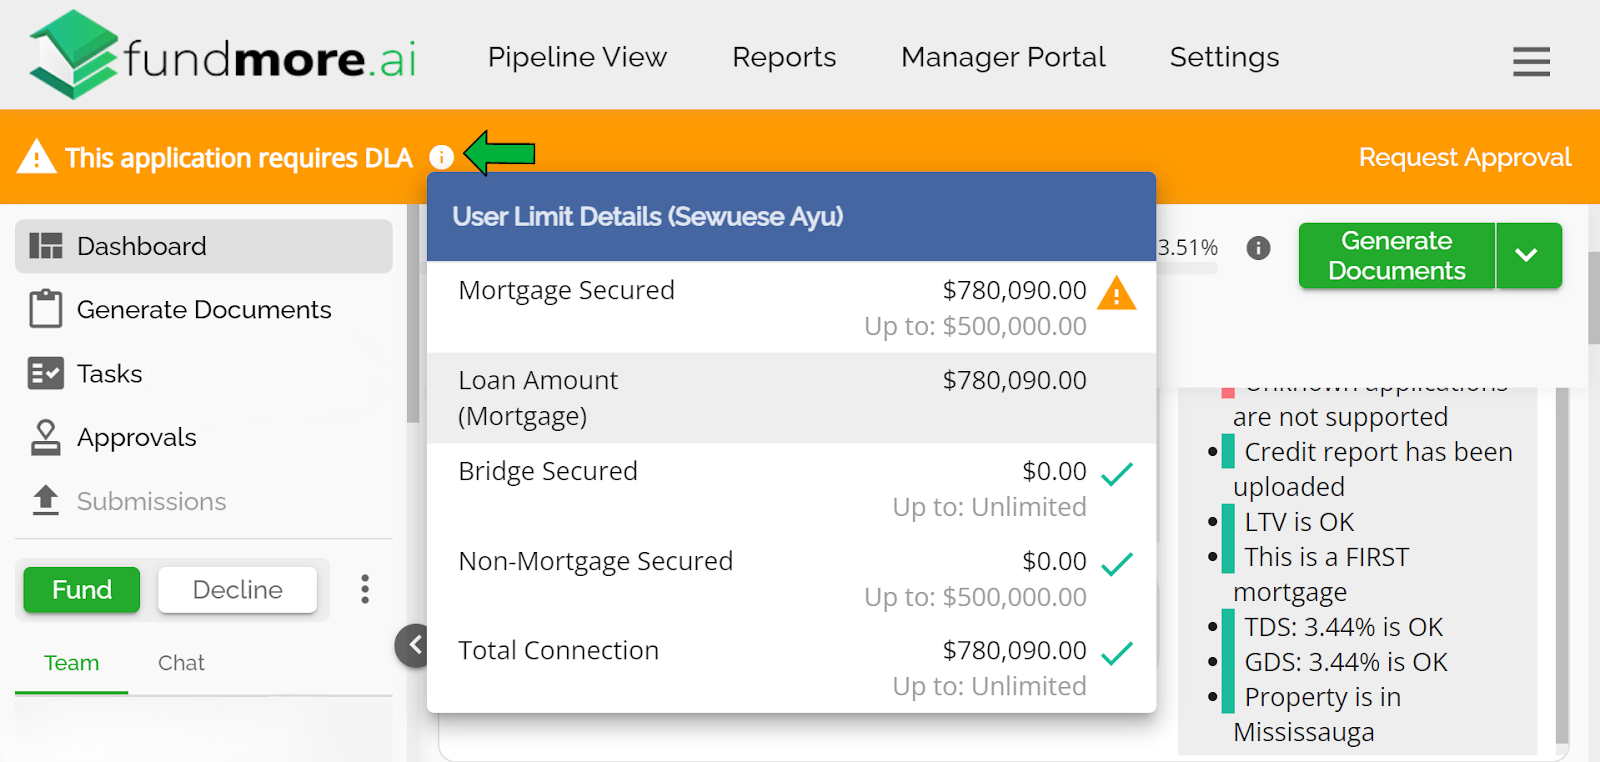
To initiate the approval request process, the user can simply click on the "Request Approval" option within the banner.
Primary Applicant - Indicates the main borrower on the application. This can be found in a larger text just below the header ‘Dashboard' on the top left.
Co-Borrowers - Other applicants on the application. Their names can be found in smaller text to the right of the primary applicant's name.
Subject Property Address - The property being considered for the mortgage application.
Loan Number - The loan number associated with the application. This is customized by the lender and is specific to the system.
Closing Date - This is the scheduled date for the mortgage deal to be closed.
Creation Date - The date the application was created or ingested from a POS system.
Application Source - Indicates the origin of the application, i.e. ingested from a POS system or manually created.
Insurer Status - Indicates the status of the insurance request. This allows the underwriter to see at a glance if the insurance request was approved, pending, error or declined. It also allows the user to see the number of resubmissions, if applicable.
Decision Status - Indicates the status of an application. This allows the underwriter to see at a glance if the application is pending or conditionally approved.
Note (FundMore DM and Tenant specific): We have implemented an enhancement that synchronizes the Decline Status with the Document Request. This means that when a file is marked as declined in FM's AI, the status in DM will automatically update to declined as well. To learn more about this, watch this video.
DM Status - Once a Document Management (DM) request has been created, all DM statuses, including ezidox updates, will be displayed on the application dashboard in the LOS. Users will receive notifications of any updates through the notification system. These statuses correspond to the configurations set by ezidox in the tenant's environment. Examples of statuses include "In Progress," "On Hold," and "Declined."
Note: This only applies if your organization also has our DM product.


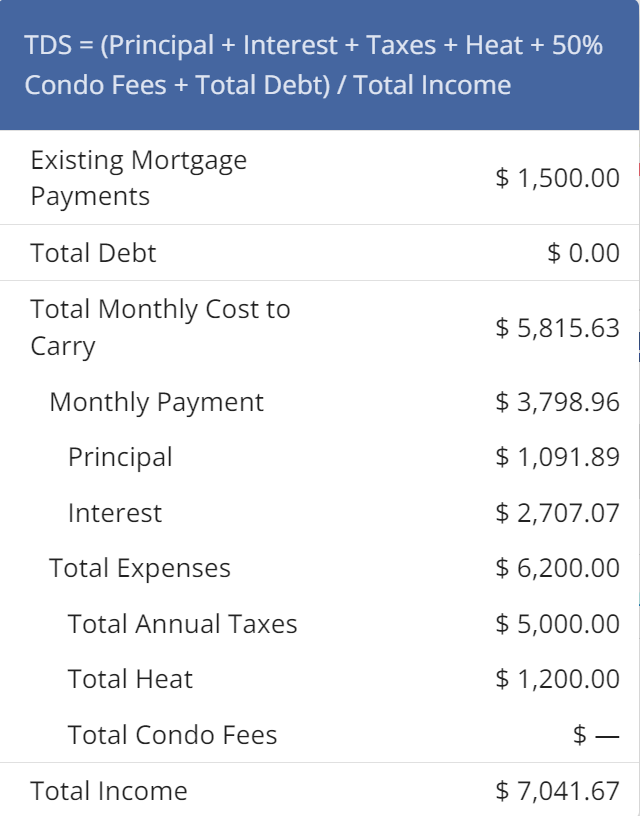
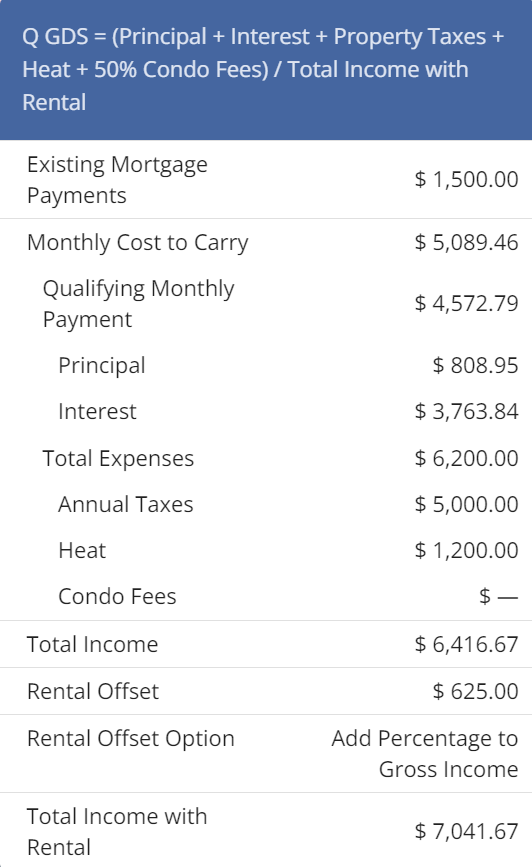
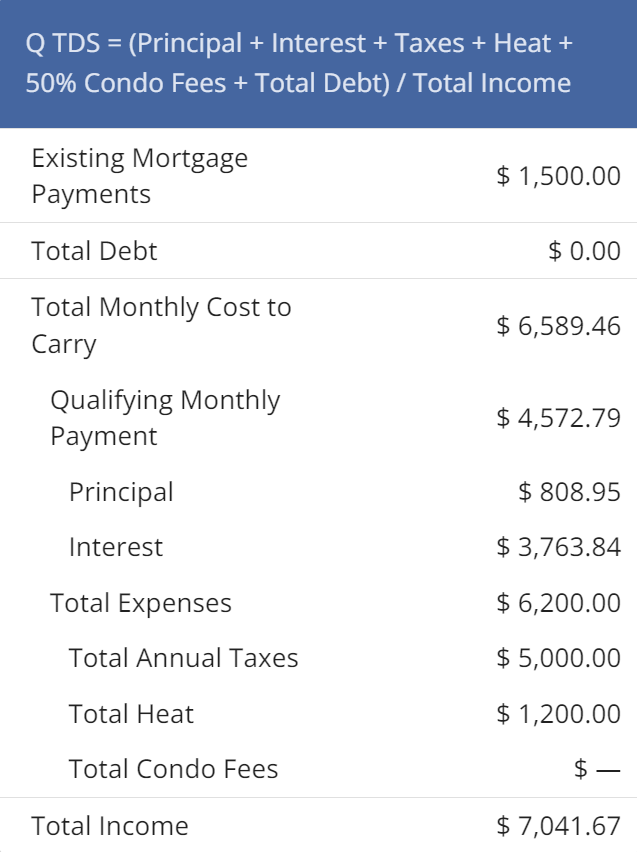
Statistics - A color-coded summary of the application metrics, with the calculated results of each metric. The results displayed will be rounded to two decimal places. The debt service calculations will include a breakdown of the values used in the calculations. Thus, the tooltip for GDS, TDS, QGDS an QTDS will include the following parameters (in the same order and indentation):
- Existing Mortgage Payments
- Total Debt*
- Monthly Cost to Carry
- (Qualifying) Monthly Payment
- Principal
- Interest
- Total Expenses
- (Total*) Annual Taxes
- (Total*) Heat
- (Total*) Condo Fees**
- (Qualifying) Monthly Payment
- Total Income
- Rental Offset**
- Rental Offset Option**
- Total Income with Rental**
*For TDS and QTDS only
**If applicable
The metrics include the following:
GDS - Gross Debt Service ratio, using the actual interest rate. The formula used is:

Note: We include rental income from other properties in the total income.
Clicking on ![]() will display this formula and the values used in the calculation. It will also display the monthly mortgage payment as seen below:
will display this formula and the values used in the calculation. It will also display the monthly mortgage payment as seen below:

TDS - Total Debt Service ratio, using the actual rate. The formula used is:

Clicking on ![]() will display this formula and the values used in the calculation. It will also display the monthly mortgage payment as seen below:
will display this formula and the values used in the calculation. It will also display the monthly mortgage payment as seen below:
Q GDS - Qualifying Gross Debt Service ratio, using qualifying rate. The formula used is:

Note: We include rental income from other properties in the total income.
Clicking on ![]() will display this formula and the values used in the calculation. It will also display the difference between the CTC and the monthly mortgage payment based on the qualifying rate and the actual rate as seen below:
will display this formula and the values used in the calculation. It will also display the difference between the CTC and the monthly mortgage payment based on the qualifying rate and the actual rate as seen below:
Q TDS - Qualifying Total Debt Service ratio, using qualifying rate. The formula used is:

Clicking on ![]() will display this formula and the values used in the calculation. It will also display the difference between the CTC and the monthly mortgage payment based on the qualifying rate versus the actual rate as seen below:
will display this formula and the values used in the calculation. It will also display the difference between the CTC and the monthly mortgage payment based on the qualifying rate versus the actual rate as seen below:
LTV - Loan to Value ratio. The formula used is:

Note: In the case of a purchase transaction, the LTV calculation will take the lesser of the Property Value or the Purchase Price for the subject property.
For example, the following shows that the GDS is 30.86% and the LTV is 74.90%.
The tool tip to right of the metrics tells the user to click on each bar to see the formula and actual calculation for that metric.
Clicking on might show:

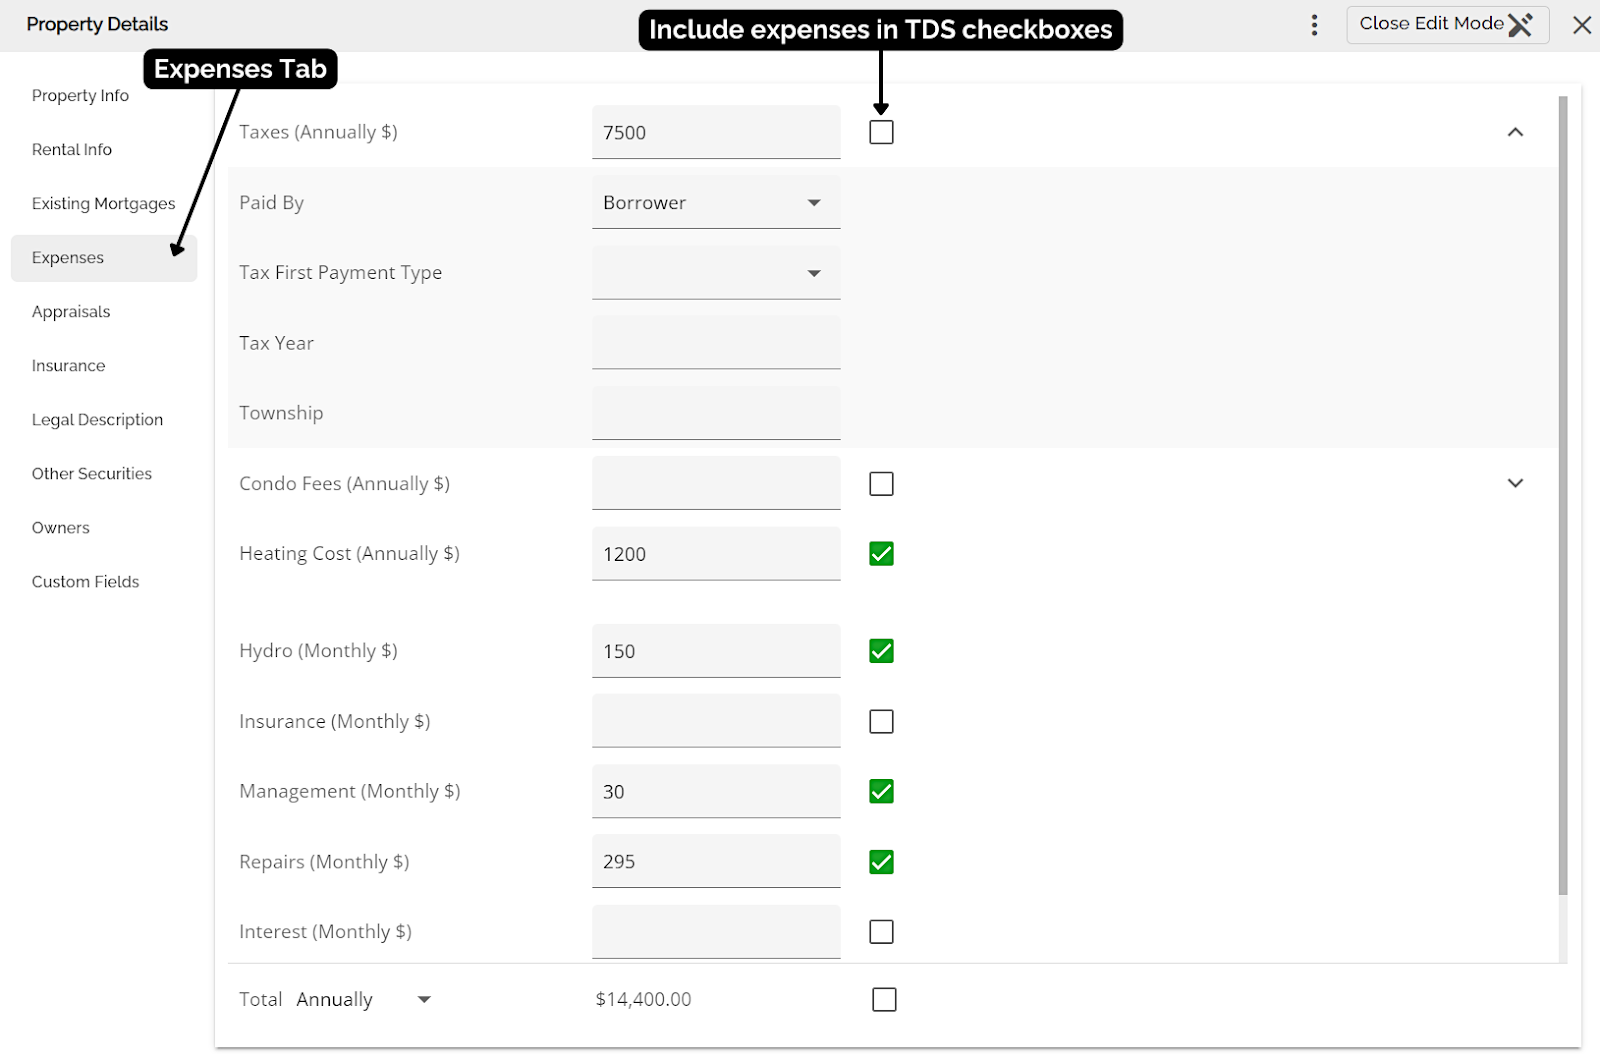
Include Expenses in TDS Calculations
Rental Property expenses input into the POS systems by brokers will automatically ingest into FundMore’s LOS. Upon ingestion, expenses such as Taxes, Condo Fees, and Heating Costs, will default to “Include in TDS calculation. The remaining expenses, such as Insurance, Hydro, Management, Repairs, Interest, and Other Expenses, will not be included in the TDS calculations by default. However, users have the option to manually include them in the TDS calculation.
Users can flag which property expenses should be included in the TDS calculation within the Expenses tab of the Property Details Pop Up. This includes expenses such as Hydro, Insurance, Management, Repairs, Interest, and Other Expenses. If these expenses need to be included in the TDS, the user simply needs to check the box to the right of the expense line.

Primary Property Support for GDS Calculations
Users have the ability to identify a property as the primary property, independently from the subject property. This functionality is useful when expenses from the primary property need to be used to calculate GDS, instead of those from the subject property. If there is a primary property indicated, both the GDS and QGDS calculations will only consider costs from that property. The calculation being (Principal + Interest + Property Taxes + Heat + 50% Condo Fees) / Total Income.
Users can easily differentiate between the subject and primary property. The subject property is identified both on the Dashboard, directly below the applicant's name, and in the Property tab of the Net Worth widget. It will have a star icon to the left of the address.

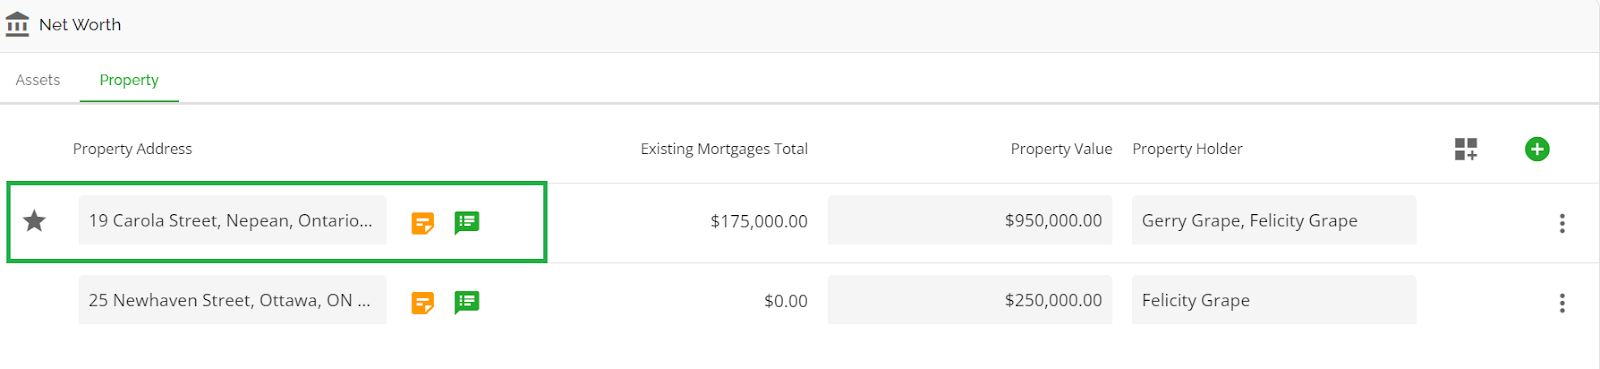
Users can identify a property as the ‘Primary property’ in the Property tab of the Net Worth widget.
To do so, click on the ellipsis to the far right of the property you wish to assign and select the “Mark as Primary Residence” option.
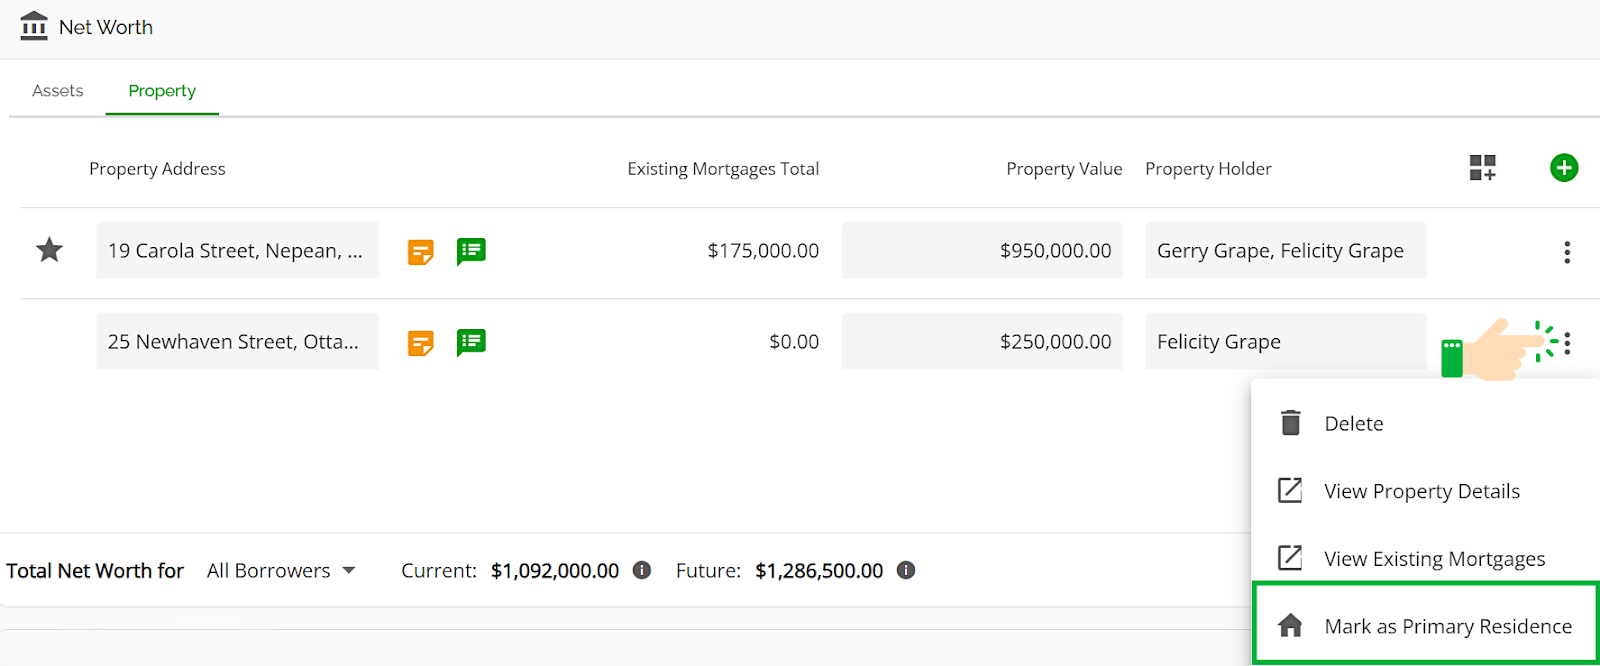
A house icon will be added to the left of the property, this is the indicator of a Primary Residence.

If the primary property and subject property differ, the GDS will consider the expenses from the primary property in the calculation. If the primary property is not identified or is the same as the subject property, the GDS will take the expenses from the subject property into consideration.
Filter Cancelled and Declined Mortgages from Calculations
In multi-mortgage applications, when the status on a mortgage segment is set to Decline or Cancel, the system will automatically update its calculations accordingly. This entails removing the payment from debt servicing calculations and deducting the balance from both Loan-to-Value (LTV) and future net worth calculations. Here is a video demonstrating this functionality: Filter out canceled and decline mortgages from calculations.
Deal Stages
Below the application summary information, you will find the deal stages. By default, these stages include New Applications, Underwriting, Document Review, Lawyer Instructed, Final Review, and Closed. Clients can customize these stages to fit their specific mortgage application process but, the general rule of thumb is that they will follow the standard progression of a mortgage application from receipt to funding. We can also add Post Funding Stages if the lender requires. Post Funding stages do not require the user to follow a sequence to transition. All stages are color-coded to provide a visual indication of previous, current, and upcoming stages. The colors used for the stages correspond to the client's branding. Darker stages represent previous stages, while the lighter color represents the current stage. Upcoming stages are not colored.
All new submitted applications, whether they are ingested via a POS system or manually created, will initially appear in the "New Application" stage. The system runs a check every 10 minutes to detect any new applications that have been submitted via POS. As a result, there may be a delay of up to 10 minutes between submitting the application in the POS system and it being visible in FundMore.ai.
Stage transition is sequenced. This means that you can only move forwards or backwards one stage at a time. We have chosen to do this in order to prevent any possible skipping of tasks and ensure a tighter process for lenders.
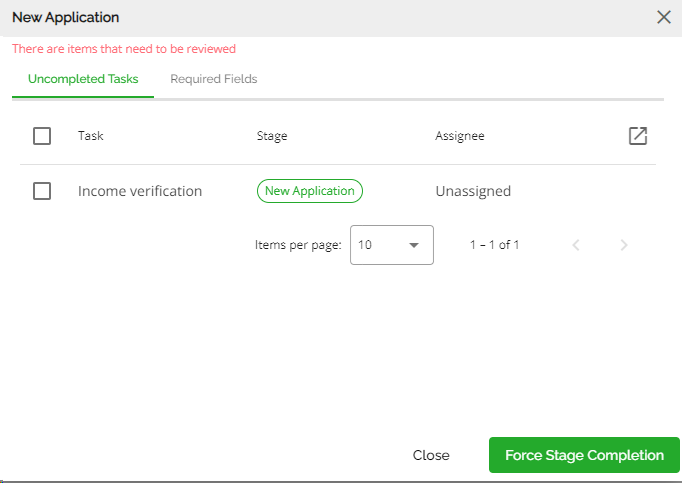
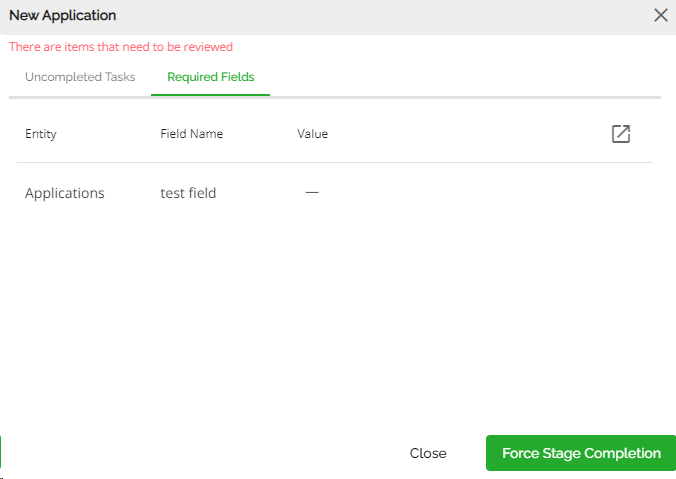
It is important to note that stage transitioning may be restricted if there are outstanding tasks e.g., a pending income verification. The system also blocks stage transition when a required field is incomplete. .
The stage headers will show a counter indicating the outstanding tasks for that stage. It provides a visual representation of the number of tasks that are still incomplete within the stage. In the example below, there are 2 outstanding tasks in the ‘Lawyer Instructed’ stage.

The task counter starts at deal ingestion for the initial stage. It resets at each stage transition to the tasks within the current stage presuming of course that all tasks for the stage you are transitioning from have been completed. When you force a stage transition, any incomplete tasks from the previous stage will carry over to the new stage.
Force Stage Transition is the act of transitioning stages without completing the outstanding tasks. This is permission based and not all users can force stage transition.
In addition to outstanding tasks, it is important to mention that incomplete required fields can also impact stage transitioning. A warning pop-up will appear, showing two tabs - one for incomplete tasks and another for incomplete required fields. This pop-up will feature the "Force Stage Transition" button if users have the appropriate permission. For users with the appropriate permissions, they are able to force a stage transition despite the outstanding tasks or incomplete required fields. Users without the appropriate permission must complete any tasks or required fields before they can transition to the next stage.
Block Stage Transition: When a Product is No Longer Applicable
Note: This is a tenant specific setting that defaults to disabled. If a tenant wishes to enable it, they need to submit a request to FundMore.
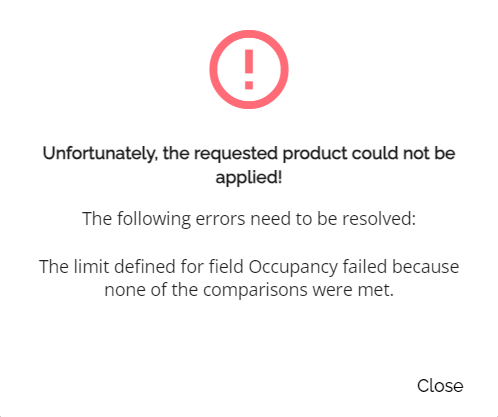
Another factor that could block stage transition is the changes to a product. Changes to a product's limits and conditions within the Manager Portal may occur after the product has already been assigned to an application, rendering it unsuitable for that particular application. Lenders may wish to implement a system check that alerts users when such changes occur. This check will happen at stage transition, letting users know that the product has changed and is no longer applicable.
Block Stage Transition: Adjudication
Note: This is a tenant specific setting and may not apply in your environment.
The system will block an application from moving past the Adjudication stage if a deal has not been conditionally approved. This will occur both within the application dashboard and the Pipeline View.
In addition, marking an application as “Pending” after the adjudication stage will also prevent it from advancing further. In that instance, the application can still move forward but not backward.
Finally, if an application has progressed past the adjudication stage after being conditionally approved and is subsequently moved back to adjudication, you will notice the appearance of a "re-adjudication" icon at the top of the dashboard.

Click on this link to watch a video demonstration of this functionality.
Widgets
The entirety of the application is summarized into a series of widgets. Each widget contains all the necessary information specific to that application and provides functionality to perform actions such as calculations, generate conditions, generate a document request, etc. The default order of the widgets from top left to bottom right is: FundMore Score, Results (5 C’s of Credit), Loan Details, Credit, Income, Net Worth, Conditions & Documents and Stakeholders Details. Each of these widgets has its own Product Feature Guide.
Customizing Your Dashboard Widgets
Our platform offers a flexible and personalized dashboard experience through the use of widgets. To optimize your workflow, you have the ability to rearrange these widgets according to your preferences. This customized layout is designed for convenience; once you've arranged your widgets, this configuration will be automatically saved and will persist as you navigate seamlessly between different applications within our platform during your current login session. This means your carefully chosen widget placements will remain consistent, providing you with a tailored and efficient view each time you access different sections of the platform.
It is important to understand the behavior of your customized widget layout upon logging out. When you log off the platform, the system will automatically revert the widgets to their original, default positions. This ensures a consistent starting point for all users upon each new login session. Therefore, upon your next login, if you wish to work with your previously personalized widget arrangement, you will need to rearrange them once more to suit your needs for that session. This cycle of customization within a session and reverting to default upon logout allows for both individual workflow optimization and a standardized initial view for all users.
‘FundMore Score’ Widget
The FundMore Score widget shows the decision recommendation that FundMore.ai assigned to the application based on data input. These decisions are either Approve, Decline, or Manual Review. The score is calculated based on the measures defined for each lender in FundMore.ai, this means it is customizable. They system will identify which factors in the score passed or failed. A red bar signifies measures that did not meet the lender's criteria, while a green bar represents measures that met the criteria. This provides a visual cue to the user telling them immediately which areas of the application they need to focus on. Please keep in mind that modifying the application data or including additional documentation from the borrower can lead to adjustments in the application's score.
Note: This is a tenant specific configuration. Please reach out to us if you would like this widget enabled or disabled.

‘Results’ Widget
The Results widget shows the borrower’s score on the five key elements necessary for a successful application: credit, collateral, character, capacity, and capital (the 5 “C”s). The score is shown on a bar chart. Simply hover the mouse pointer over a bar to see the numeric score.
Note: This is a tenant specific configuration. Please reach out to us if you would like this widget enabled or disabled.

‘Loan Details’ Widget
The Loan Details widget provides information about the loan being requested and the property. The top section of the widget displays detailed property information, including a visual representation of the property using a Google Maps image. The widget is organized into tabs, which can be easily accessed from the left side menu within the widget.

‘Credit’ Widget
The Credit widget contains all the relevant credit information for the applicants. This includes their credit scores, along with the reasons behind those scores as reported in the credit report. In addition, the widget provides access to copies of all credit reports that have been either ingested or pulled from within the application. It also presents details of tradelines, collections, and judgments associated with the applicants' credit history. If an application is submitted via a POS, the credit report will ingest along with that application. Users also have the option to request a credit report directly within the application if necessary. All data from the credit reports will populate this widget. Users can view the credit bureau information within the application and compare it side by side with the application data. They can also make any necessary edits, and liabilities to be excluded from the ratios can be indicated.

‘Income’ Widget
The income widget houses all employment and income sources for all applicants. You are able to indicate the current and previous employment and income sources. Based on the entries, the system will identify which amounts are being used to calculate the debt service ratios. It will also identify which stakeholders are associated with each income source.


‘Net Worth’ Widget
The Net Worth widget provides information about the assets and properties owned by the borrowers, individually or collectively. It enables the system to calculate the borrower's Net Worth using two different calculations: Current and Future. The widget organizes the assets and properties into separate tabs for easy navigation and reference. The asset tab is where you can view all assets that are not properties. This tab allows you to identify which of those assets, if applicable, are being used either in full or in part to form the down payment. When calculating the borrower's net worth, the system takes into consideration the total value of all assets listed, including properties. The borrower's net worth is then displayed in the far right-hand side of the widget in the Net Worth boxes.

‘Conditions & Documents’ Widget
This widget allows the user to list and manage all conditions selected for a given application. It allows you to add from the list of preset conditions or create new custom conditions. It also presents users with the option to duplicate an existing condition in order to create a new custom condition based on a preset. Each condition must be associated with a stakeholder and a party responsible for fulfillment. The user is able to customize the arrangement of the ‘Conditions and Documents’ table via the ‘Customize Table’ button in the top right corner of the widget. If conditions are linked to documents, any updates made in the ‘Documents’ section of the widget will be reflected in the ‘Conditions’ section. This allows the user to manage the status of all conditions and their associated documents directly within the application. Conditions can be linked to documents and vice versa, so that when documents are uploaded, they link directly to the appropriate conditions making it easier for the user to review.

‘Stakeholder’s Details’ Widget
The Stakeholder’s Details widget is where the personal identifying and contact information for all stakeholders on the application is contained. This includes all applicants, guarantors, lawyers, brokers, etc. There is also a compliance section and a section to document PAD information. There is also the ability to add Brokers and Lawyers to the application, as long as they are already listed in the relevant sections within the Manager Portal.

Multi-User Presence Icon
There is a presence icon that notifies users if there are other people accessing the same application simultaneously. When you are in an application, you may notice a profile circle below the "Generate Documents" button at the upper right-hand corner of your screen. It may display the user's profile picture, or initials if they have not set up a profile picture. This indicates that someone else is also working on the application. For more information on the user, click on the profile icon, and a pop-up will appear showing their name, role, email address, and phone number. Each additional user working on the application will have their own profile icon. For example, if there are three other users in the application besides yourself, you will see three profile icons. Once they exit the application, the profile icons will disappear.
 |
 |
Application Notes
The application notes feature serves as a centralized repository for important information related to a given application. They are easily readable and accessible while you are working in an application. They provide a convenient way to compare and view important information throughout the underwriting process. All notes will indicate the author of the note, their role and the time the note was captured. Large notes can be collapsed for easy navigation or popped out to another screen by the simple click of a button.
The notes feature allows users to manually create and store notes that provide additional context or relevant details about the application. In addition to manually created notes, the application notes feature also automatically appends document comments and approval/decline comments. This ensures that all relevant information is captured in a single location, making it easier for team members to stay informed and up-to-date on the status of the application. Furthermore, all broker notes are automatically pulled in and shown at the top so underwriters can easily compare them with the application information or fill any data point which was not transferred with the deal during ingestion.
To open notes within any application simply hover and click on the notes icon in the bottom right hand corner of your screen.

