![Fundmore-Logo.png]](https://help.fundmore.ai/hs-fs/hubfs/Fundmore-Logo.png?height=50&name=Fundmore-Logo.png)
Table of Contents
Introduction
Key Terms
Indicators
DocStage Legend
Accessing IDP from the LOS
Opening the IDP File
DocSet Review
Data Review
Correcting Extractions via the CUI Tool
Additional Features
Introduction
Intelligent Document Processing (IDP) is FundMore's AI-powered document review capability. IDP reads the documents uploaded to an application, classifies each one by document type, extracts the key data fields configured for your organization, and compares the extracted values against the data in the FundMore Loan Origination System (LOS). Instead of reading every page to find a value, your team reviews the values IDP found and the places where the documents and the application disagree.
IDP is built into the LOS. Documents uploaded through the POS or directly into the LOS sync to IDP automatically, and users open the IDP file for an application straight from the Conditions and Documents widget. There is no separate login.
The IDP review workflow runs in the following order:
- Classification Review: IDP classifies and indexes the documents and assigns a confidence score to every document. Confirms each document has been identified as the correct document type and its pages are grouped correctly.
- Borrower Management: confirm the borrowers on the file, including any name aliases, and the documents assigned to each borrower.
- Document Management: IDP extracts the configured data fields from each document. Confirm which version of each document is active.
- Data Review: compare the extracted document values against the LOS values and resolve any discrepancies.
Supporting tabs (Issues, Documents, Events and Requirements) let you manage issues, view the full document set, review the audit trail, and reference your organization's requirements.
Everything IDP produces is decision support. A user still reviews and confirms the results, and IDP records who took each action. IDP is not a fraud detection tool. It runs some document checks, for example for font changes or edited files, but fraud screening is handled by FraudIQ.
Note: Access to IDP is configured at the tenant level. The document types and data fields IDP extracts are set up for your organization during onboarding. Please contact your FundMore Client Success team to enable IDP or to request changes to your configuration.
Key Terms
The following terms are used throughout the IDP workflow.
|
Term |
Description |
|
DocSet |
A group of one or more documents sent to IDP for an application. |
|
DocSet ID |
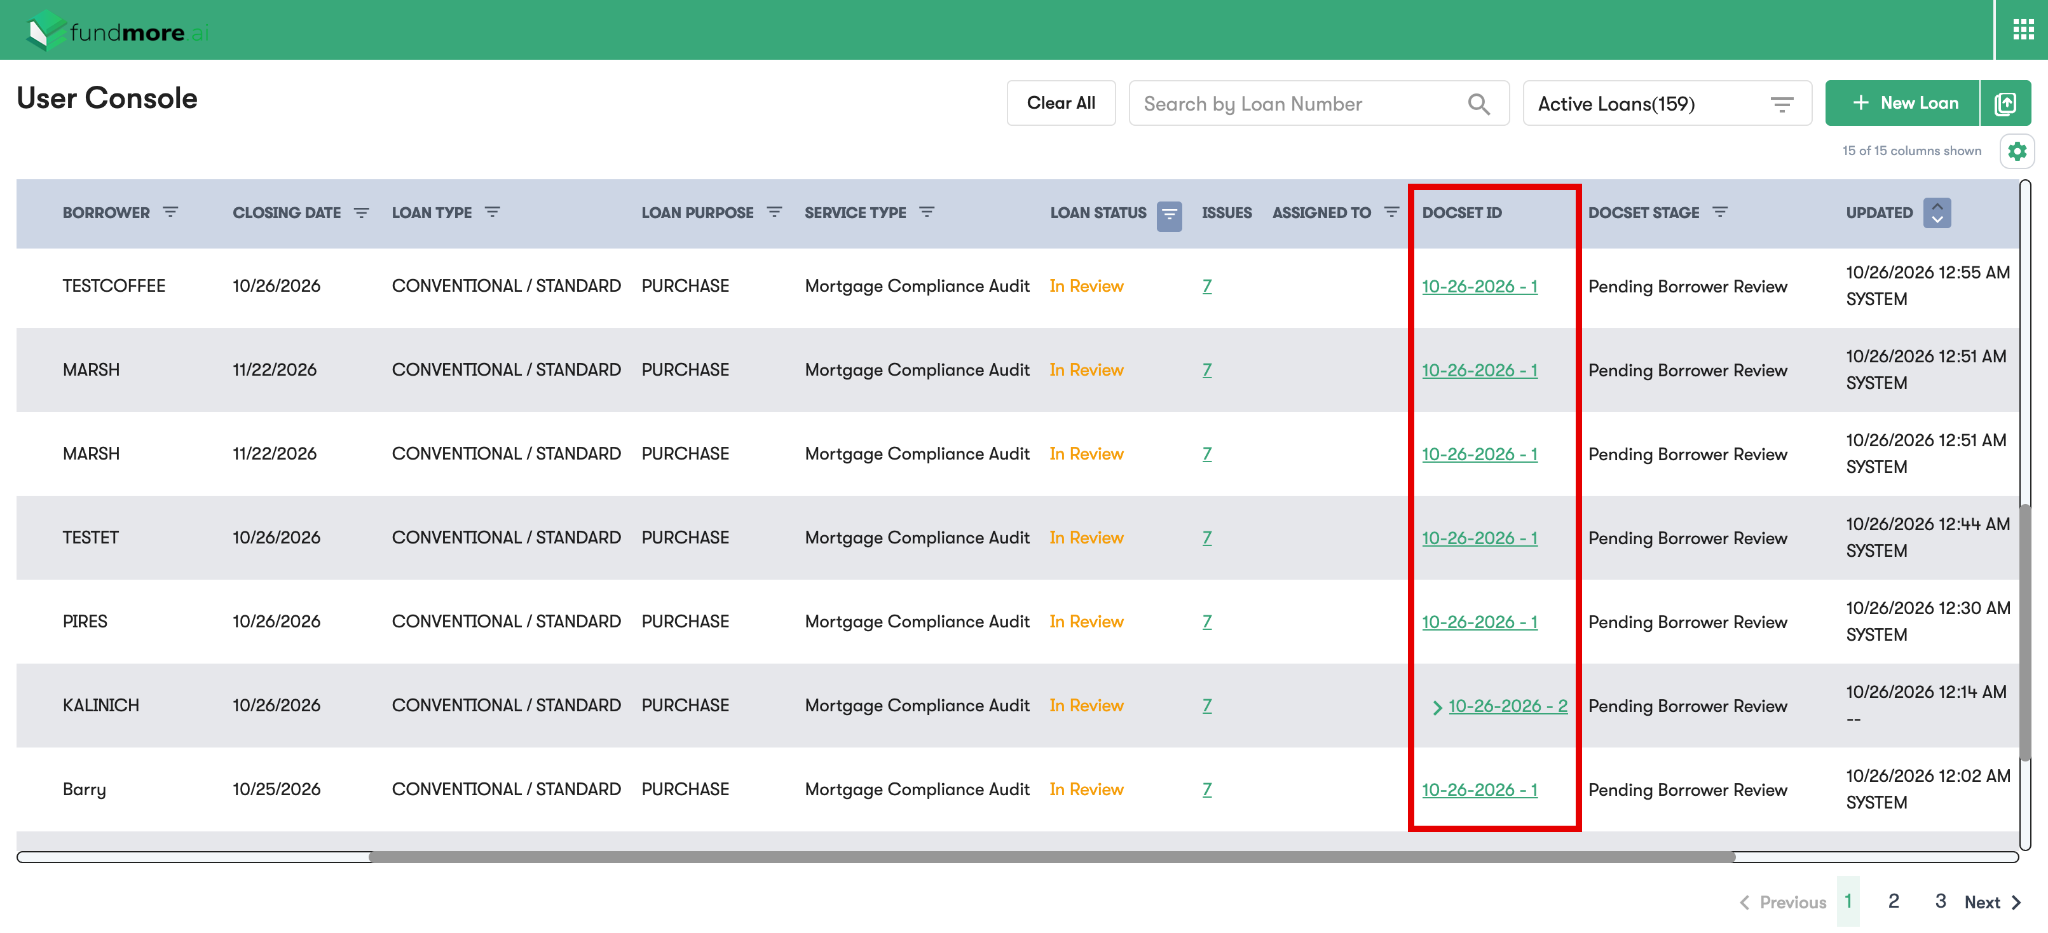
An identifier assigned to each DocSet, made up of the date the DocSet was received and a sequence number (for example, 10-12-2026 - 1). A new DocSet ID is created each time a new set of documents is sent to IDP for the same application. |
|
DocStage |
The review stage a DocSet is currently in. The DocStage tells you what action, if any, is required next. |
|
LOS (Loan Origination System) |
The FundMore LOS. In IDP, LOS data (shown as the Business Value) is the application data that IDP compares against the values extracted from documents. |
|
Doc Type |
The main category of a document, for example Job Letter, Bank Statements or MLS. |
|
Doc Tag |
A subcategory within a Doc Type that adds detail where it is configured. |
|
Confidence Score |
How confident IDP is that a document has been classified correctly. Documents scoring below the threshold are flagged for review. |
|
Document Value |
The value IDP extracted from a document. |
|
Business Value |
The value for the same field as it currently appears in the LOS application. |
|
Discrepancy |
A field where the Document Value and the Business Value do not match. |
|
Multiversion Doc |
A document type that has more than one version uploaded to the same application.
|
Indicators
The following icons appear in the LOS and in IDP to show the status of documents and data fields.
In the LOS (Conditions and Documents widget)
|
Icon |
Meaning |
|
|
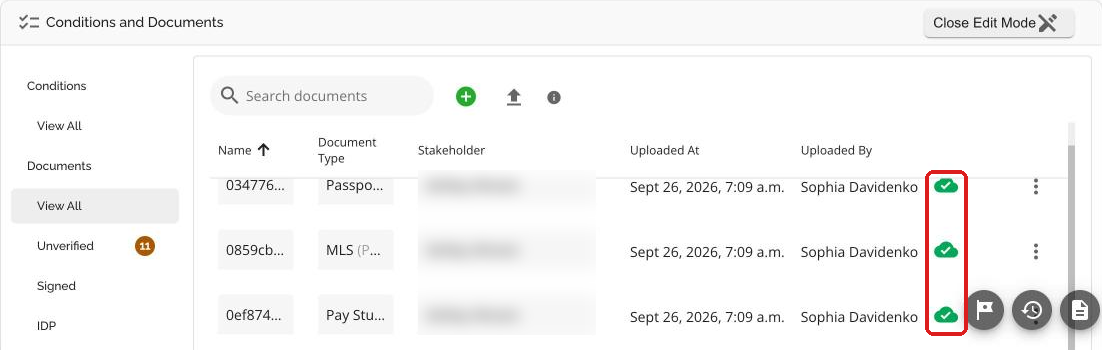
Green cloud: IDP has finished processing the document. While a document is still processing, the cloud is orange. |
|
|
Sync deal data to IDP: sends the latest application data from the LOS to IDP. |
|
|
Open in new tab: opens the IDP file in a new browser tab. |



In IDP
|
Icon |
Meaning |
|
|
Confidence Score: IDP's classification confidence for the document. Hover over the icon to see the score and the threshold. |
|
|
DocSet details: hover over the icon to see the DocSet ID and the date it was last modified. |
|
|
Active Discrepancy: the Document Value does not match the Business Value from the LOS, or a borrower or field group contains a discrepancy. |
|
|
Latest Version: the most recently received version of a document. |
|
|
Active / Inactive: the version IDP uses for the file is Active. Other versions are Inactive. |
|
|
Moveable Row: drag the row to change its position. |
|
|
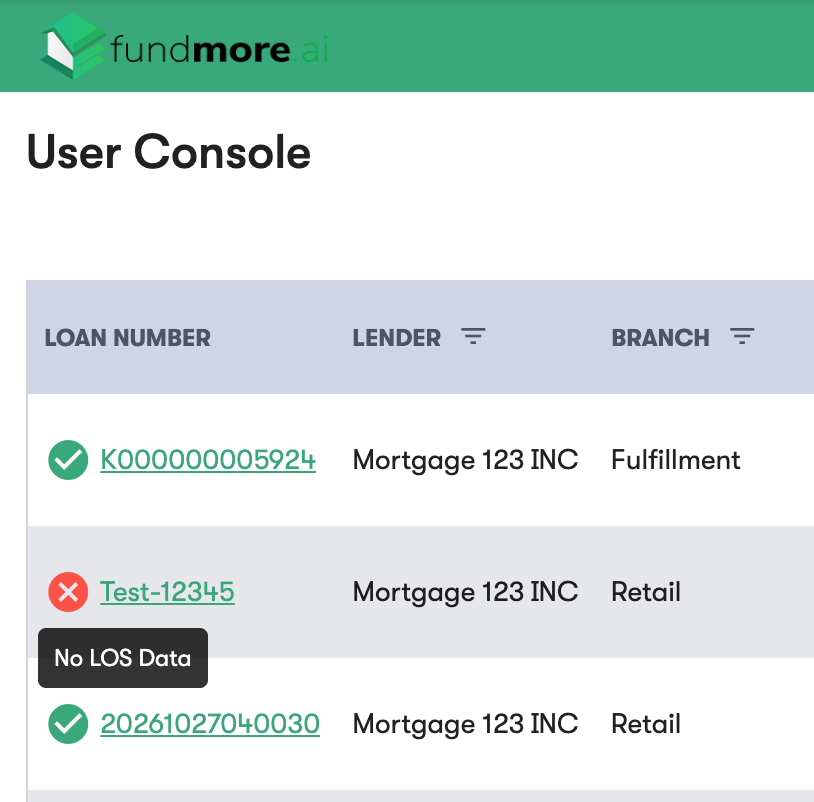
LOS data received (green tick) or not received (red cross) for the file, shown beside the loan number in the User Console. |





DocStage Legend
Each DocSet moves through the following stages. A green tick appears beside each stage at the top of the Docset Review tab once it is complete.
|
# |
Stage |
Description |
|
1 |
Classification Review |
IDP classifies each uploaded document by document type and indexes its pages. If IDP is not confident about a document, it stops so the user can review the classification. |
|
2 |
Borrower Management |
IDP checks the borrower names on the documents against the borrowers in the LOS and identifies any name aliases. The user confirms the borrowers and the documents assigned to them. |
|
3 |
Document Management |
IDP extracts the configured data fields from each document. The user confirms which version of each document is active. |
|
4 |
Data Review |
IDP compares the extracted values against the LOS values. The user reviews and resolves any discrepancies. |
Note: When IDP classifies every document with confidence, the file moves on from classification automatically without stopping for a review.
Accessing IDP from the LOS
IDP is accessed from the Conditions and Documents widget on the application dashboard in the LOS. Any user with access to the LOS application can open the IDP file. No separate IDP permission or login is required.
Uploading Documents
Documents reach IDP in the same way they reach the application:
- Uploaded through the POS by the mortgage specialist or the borrower, which sync to the LOS when the application is submitted.
- Uploaded directly into the Conditions and Documents widget in the LOS.
IDP begins processing once all requested documents for the application have been uploaded. Sending the full document set together lets IDP review the documents as a single package. Documents generated in the LOS, such as commitment letters, are not processed through IDP.
Note: If a requested document is still outstanding, IDP will not begin processing and IDP will not appear in the widget. Check the Conditions and Documents widget for any outstanding document requests.
For more information on uploading documents and managing conditions, please refer to the Conditions and Documents Widget Product Feature Guide.
Checking Processing Status
Once the requested documents have been uploaded, they sync to IDP automatically. To check their status:
- Open the application in the LOS and navigate to the Conditions and Documents widget.
- Review the cloud icon beside each document. An orange cloud means the document is still processing in IDP. A green cloud means IDP has finished processing the document.
- When processing is complete, IDP appears under Documents in the left-hand menu of the widget. You can also click the green cloud beside a document to go straight to IDP. The cloud icon does not show classification issues or discrepancies, so always open the IDP file to check whether anything needs review.
Opening the IDP File
To open an application's file in IDP:
- In the Conditions and Documents widget, click IDP under Documents in the left-hand menu. The IDP file for the application opens inside the widget.
- For a full-screen view, click the Open in new tab icon at the top of the widget. IDP opens in a new browser tab, signed in automatically, directly in the file linked to the application. The loan number at the top left in the IDP screen will match the LOS application loan number. Depending on how confidently IDP classified the documents, the file may open at Classification Review, Borrower Management or Document Management.
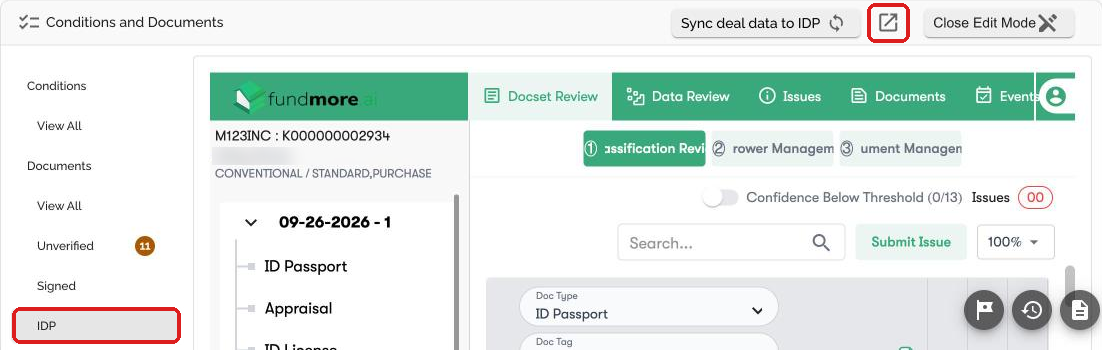
In the IDP file you will see all of the documents from the LOS application that have been processed by IDP.
Note: Opening IDP in a new tab is recommended for review. You can move between IDP and the LOS application without losing your place, which is useful during Data Review when you may need to update fields in the LOS.
Note: If you update a field in the LOS application after the documents have been processed, for example to correct a discrepancy found in Data Review, click Sync deal data to IDP at the top of the Conditions and Documents widget. Then, in IDP, go to Document Management and click Save & Next to see the updated LOS data in Data Review.
DocSet Review
The Docset Review tab covers the steps that confirm every document has been correctly identified, assigned to the right borrower and versioned before Data Review. It includes Classification Review, Borrower Management and Document Management.
Every IDP file shows the file details (lender and loan number, borrower name, loan type and purpose) in the top left, the main tabs (Docset Review, Data Review, Issues, Documents, Events and Requirements) across the top, and the file status, for example In Review, in the top right. An Issues counter and a Submit Issue button are available on every review screen.
Classification Review
Classification is the first step IDP completes. During classification, IDP indexes the uploaded documents: it identifies the document type of each document, assigns a Doc Type and a Doc Tag, and groups the pages that belong to each document.
- If IDP classifies every document with confidence, the file continues automatically. No action is required.
- If IDP is not confident about one or more documents, it completes classification and stops so that you can confirm or correct the result.
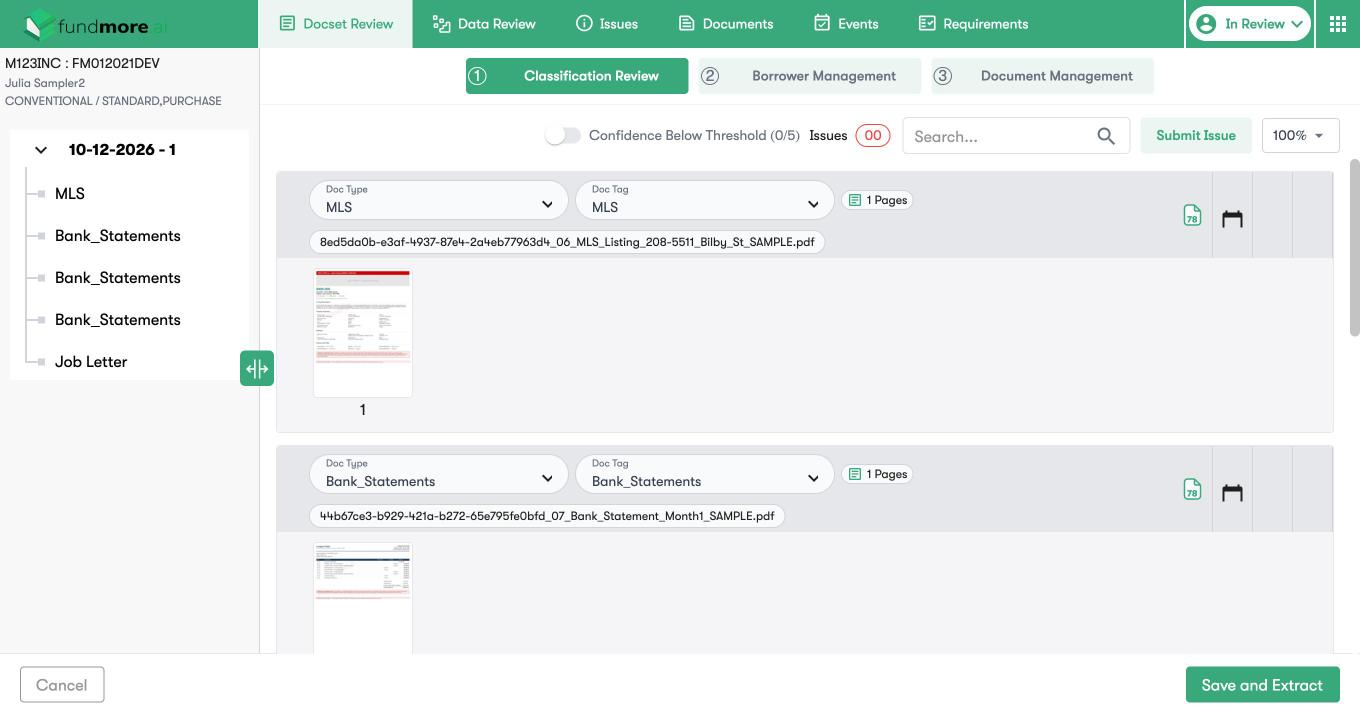
Classification Review functionality includes:
- Document list (left panel): the documents in the DocSet, grouped under the DocSet ID. Click a document to jump to it.
- Doc Type and Doc Tag: dropdowns on each document row to review and update the classification.
- Page thumbnails: the pages grouped into each document. A page grouped into the wrong document can be dragged into the correct document row.
- Confidence Score: the icon on the right of each document row shows its confidence score. Hover over it to see the score and the threshold. Scores are out of 100. A blurry or poor-quality document receives a low score and is flagged for review. Accuracy improves over time as IDP processes more of your organization’s documents and learns from user corrections.
- Confidence Below Threshold: a toggle that shows only the documents classified below the threshold. The counter shows how many documents are below the threshold.
- Search and zoom: find a document by name and adjust the thumbnail size.
When a file has stopped at Classification Review, follow these steps:
- Open the IDP file from the LOS (see Opening the IDP File). Make sure the Docset Review tab and the Classification Review step are selected.
- Turn on the Confidence Below Threshold toggle to see the documents that need review.
- Review the Doc Type assigned to each document. Update it using the dropdown if needed.
- Review the Doc Tag assigned to each document. Update it using the dropdown if needed.
- Review the page thumbnails. If a page is grouped into the wrong document, drag it into the correct document row.
- Submit an issue if needed.
- Click Save and Extract to send the file on to the next stage.
Borrower Management
After classification, IDP runs a borrower check. It compares the borrower names on the documents against the borrowers on the LOS application and identifies any name aliases or mismatches, for example a shortened first name, a middle name, or a different spelling. Borrower Management has two sub-tabs: Borrowers and Borrowers Assignment.
Borrowers
The Borrowers sub-tab lists every borrower IDP identified and how each one matches the borrowers in the LOS.
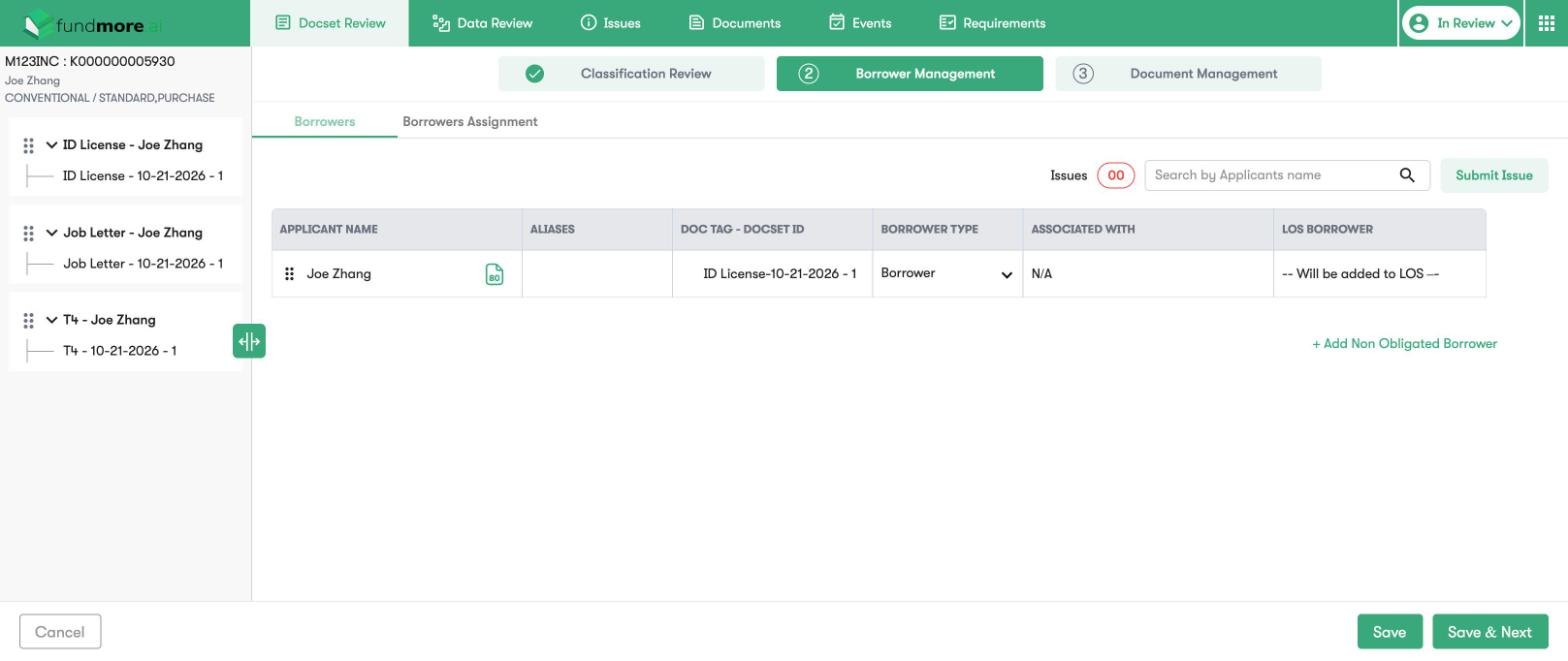
|
Column |
Description |
|
Applicant Name |
The borrower name IDP identified. Click the document icon to view the source document. |
|
Aliases |
Other versions of the borrower's name found on the documents. |
|
Doc Tag - DocSet ID |
The document the borrower was identified from. |
|
Borrower Type |
The borrower's role on the file. Update it using the dropdown if needed. |
|
Associated With |
The borrower this person is associated with, where applicable. |
|
LOS Borrower |
The matching borrower in the LOS application. |
Drag a row using the handle on the left to change the borrower order. Click + Add Non Obligated Borrower to add a borrower who is not already listed.
Borrowers Assignment
The Borrowers Assignment sub-tab shows which borrower each document belongs to.
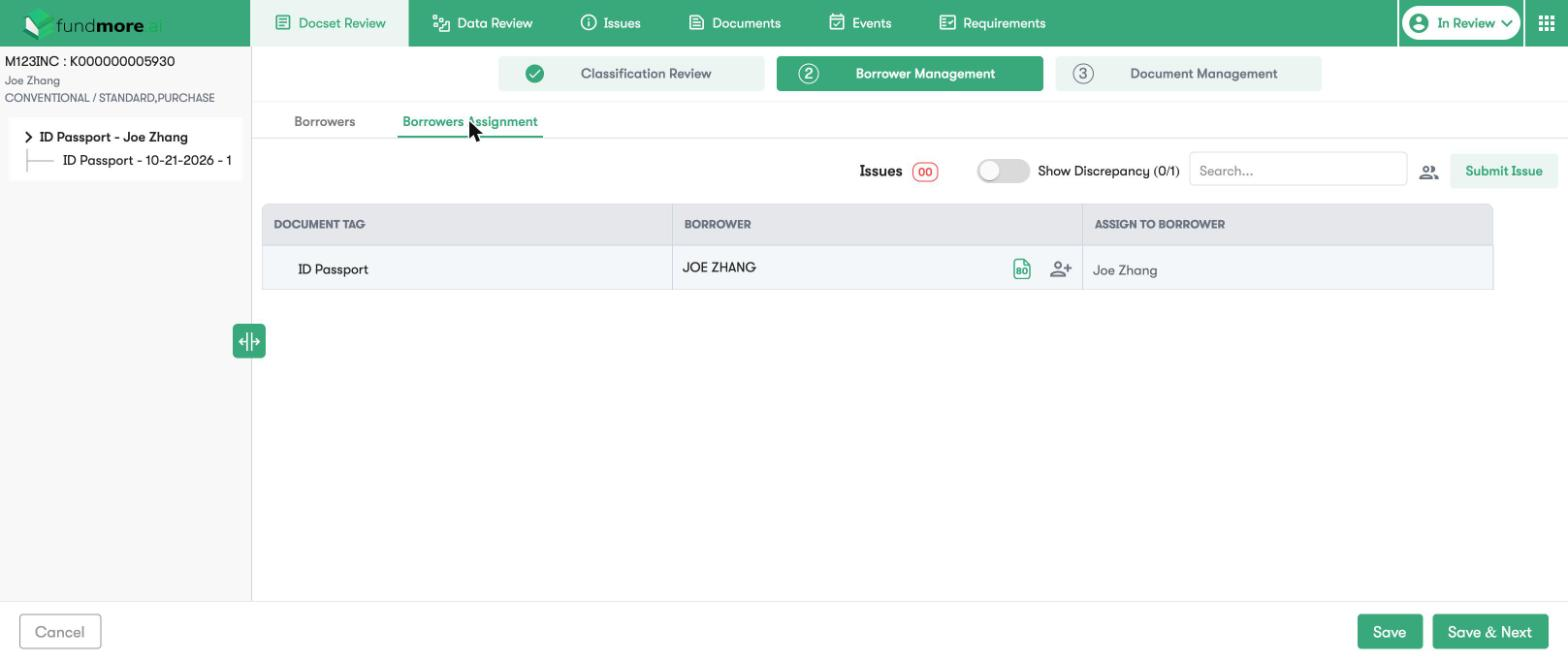
- Document Tag: the document.
- Borrower: the borrower name found on the document.
- Assign to Borrower: the borrower the document is assigned to. Change the assignment here if the document belongs to a different borrower.
- Show Discrepancy: a toggle that shows only the documents where the borrower name does not match.
To complete Borrower Management:
- On the Borrowers sub-tab, confirm each borrower IDP identified matches the correct borrower in the LOS, and review any aliases.
- On the Borrowers Assignment sub-tab, turn on Show Discrepancy and confirm each document is assigned to the correct borrower.
- Click Save to save your progress, or Save & Next to continue to Document Management.
Note: Assigning documents to the correct borrower matters for Data Review. If a borrower name on a document is not matched to a borrower in the LOS, the LOS values for that borrower cannot be shown next to the extracted values.
Document Management
Document Management is where IDP extracts the data from the documents. For each classified document, IDP extracts the data fields configured for that document type, for example employer name and start date from a job letter, or the client name and address from a bank statement.
Document Management also shows every version of each document. Documents are grouped by document type and borrower.
Document Management functionality includes:
- Latest Version: a label marking the most recently received version of a document.
- Active / Inactive: the version IDP uses for the file is marked Active. Other versions are marked Inactive.
- Filters (left panel): show only Multiversion documents, New Uploads, Overrides or System-validated documents.
- Search: find a document by tag or name.
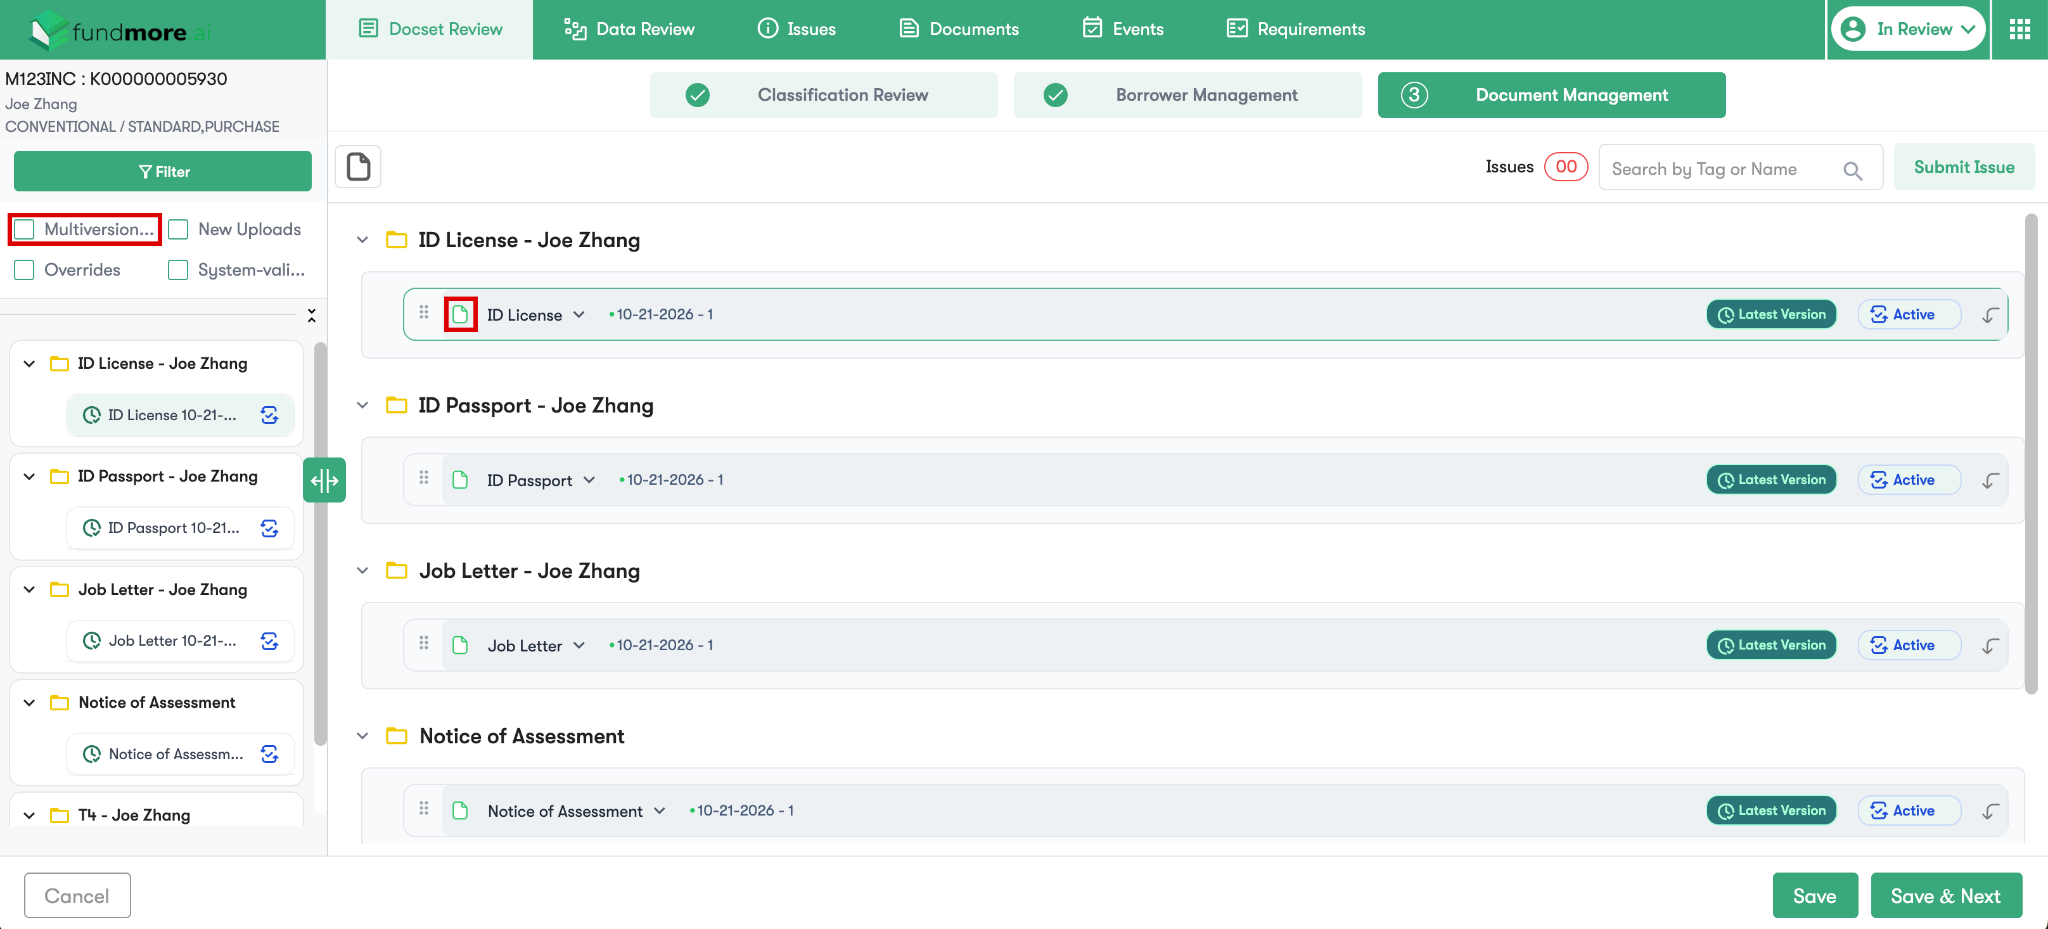
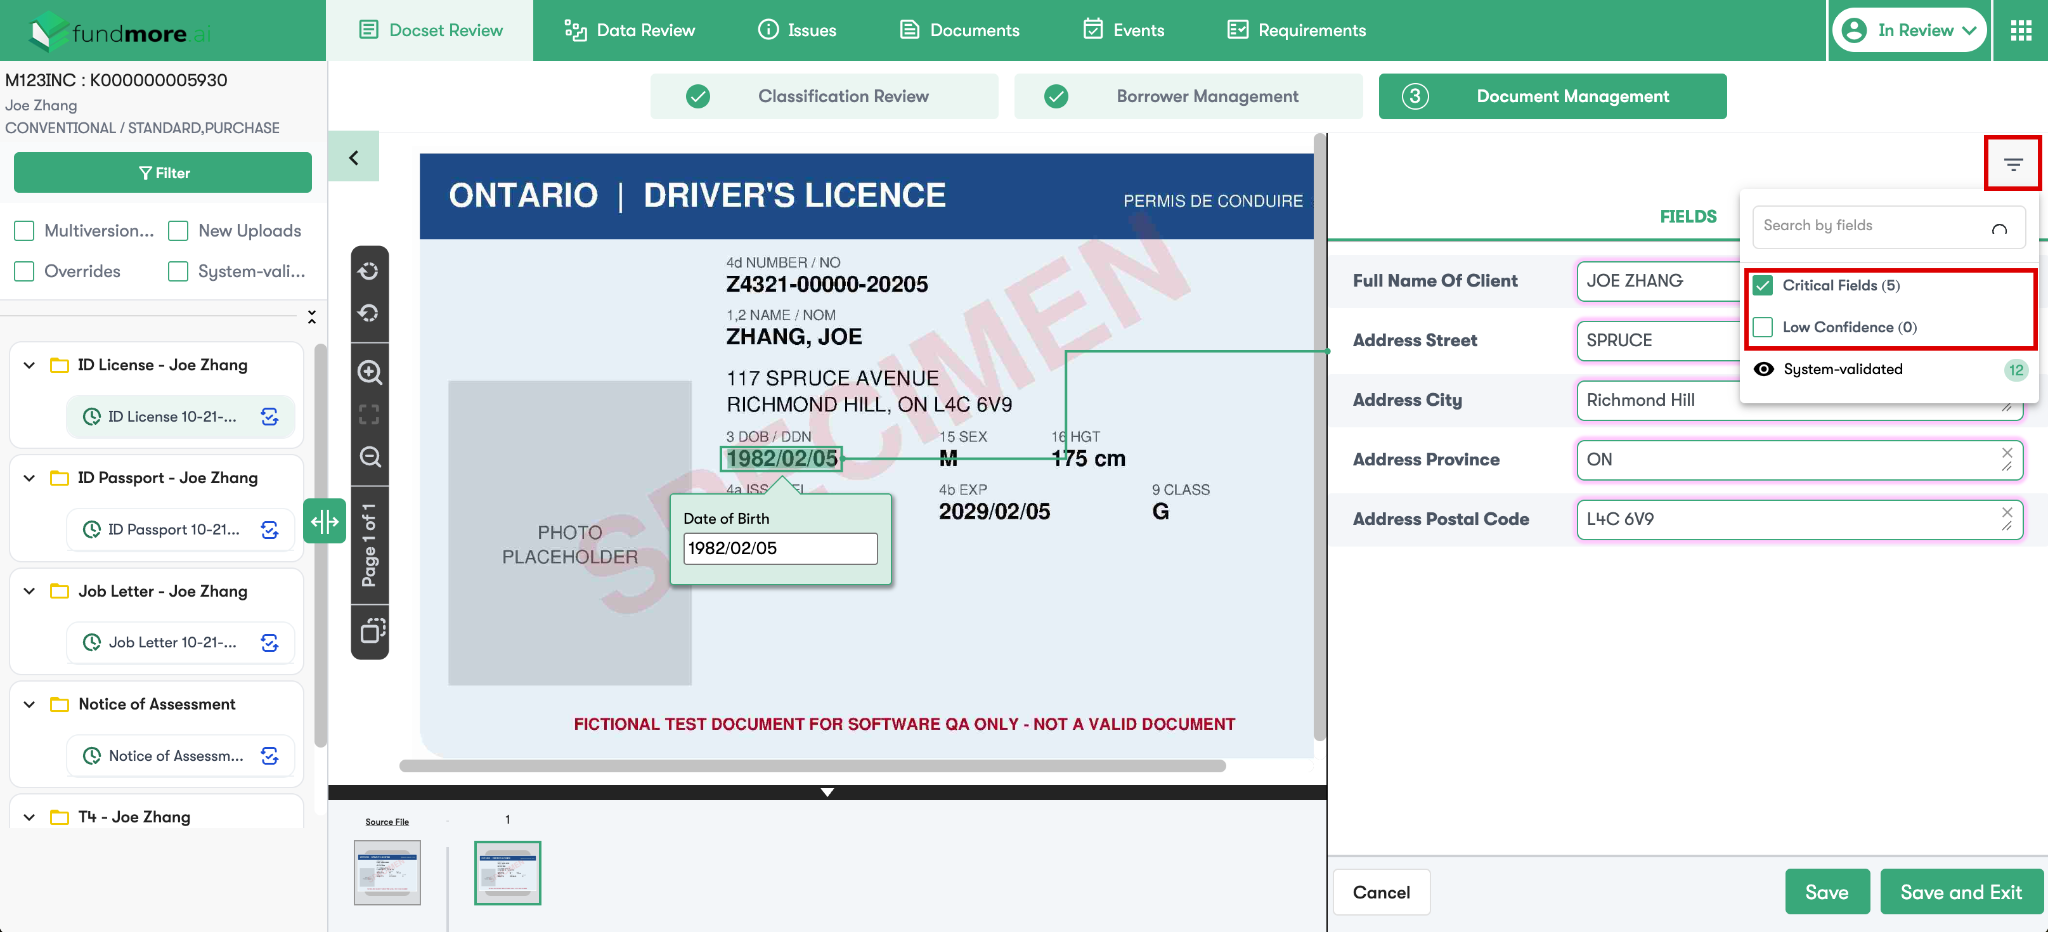
- View on CUI: click the green document icon beside the document name, then click View on CUI to see every field IDP extracted from that document and where it appears on the page. This is useful for reviewing specific fields on long documents without reading every page. If IDP is not confident that a field was extracted correctly, it will request a manual review.
- If only some documents are showing, turn off the Multiversion filter to see every document on the file.
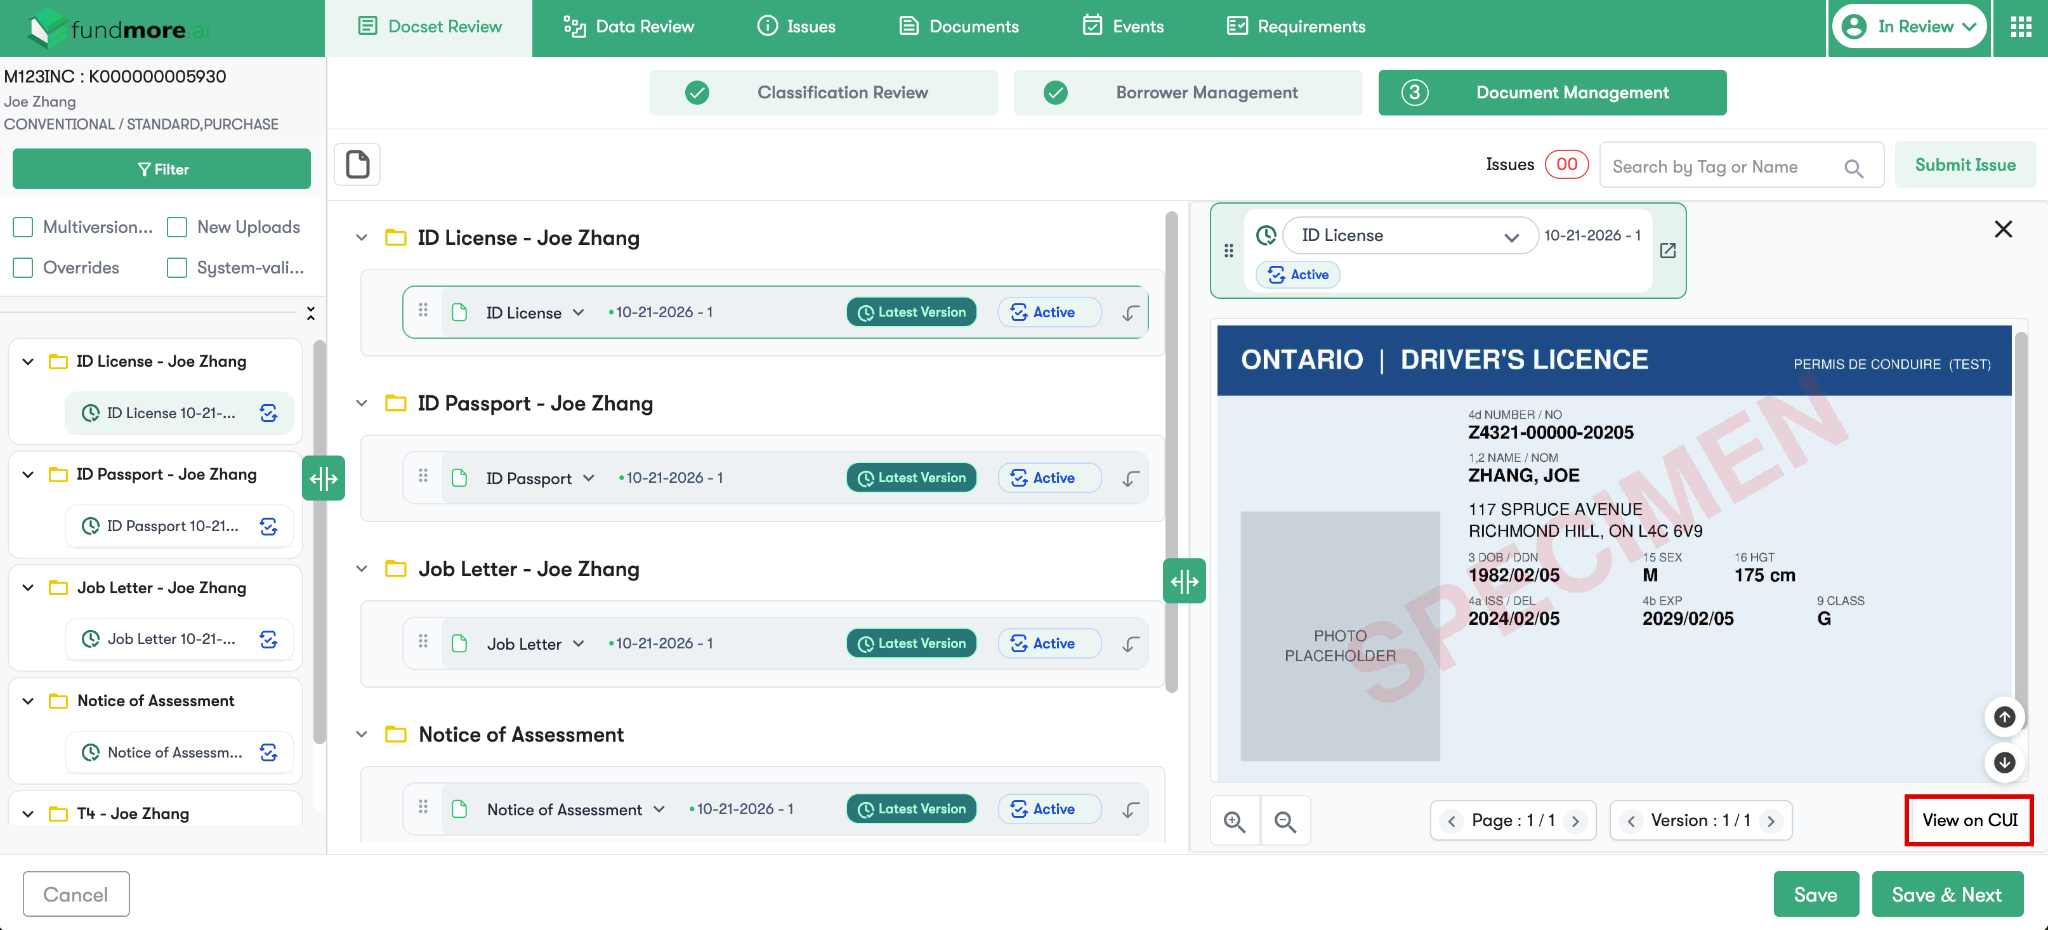
The CUI Tool shows the full list of fields IDP extracted from the document. The fields extracted for each document type are configured for your organization during onboarding. To narrow the list, click the filter icon (three horizontal lines) at the top right of the Fields panel. You can filter by Critical Fields, or by Low Confidence fields, which need manual review.
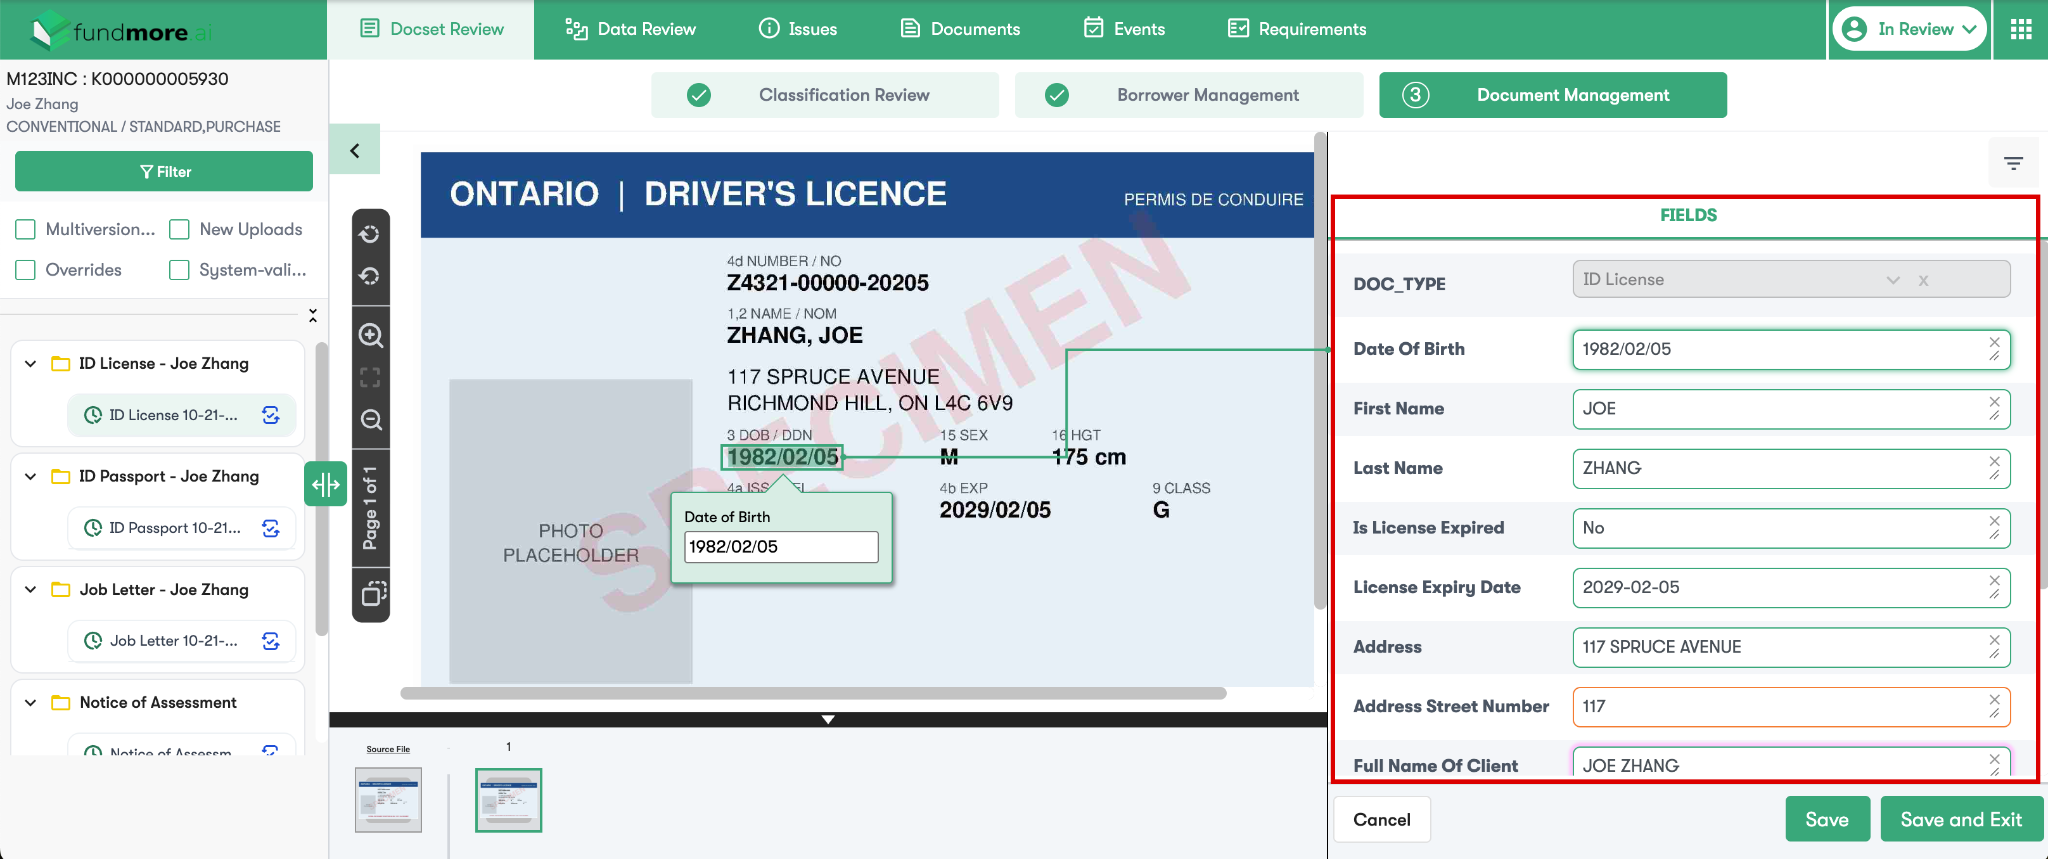
To complete Document Management:
- Review each document.
- Click Save to save your progress, or Save & Next to continue to Data Review.
Note: IDP can only extract information that appears on the document. It does not look up information from outside sources. The data fields extracted for each document type are configured for your organization during onboarding.
Data Review
Data Review is where you validate the data IDP extracted. IDP pulls the current data from the LOS application and cross-references it against the values extracted from the documents, so you can see where the documents and the application agree and where they do not.
Data Review Screen
The Data Review screen opens when you click Save & Next in Document Management. You can also open it at any time from the Data Review tab.
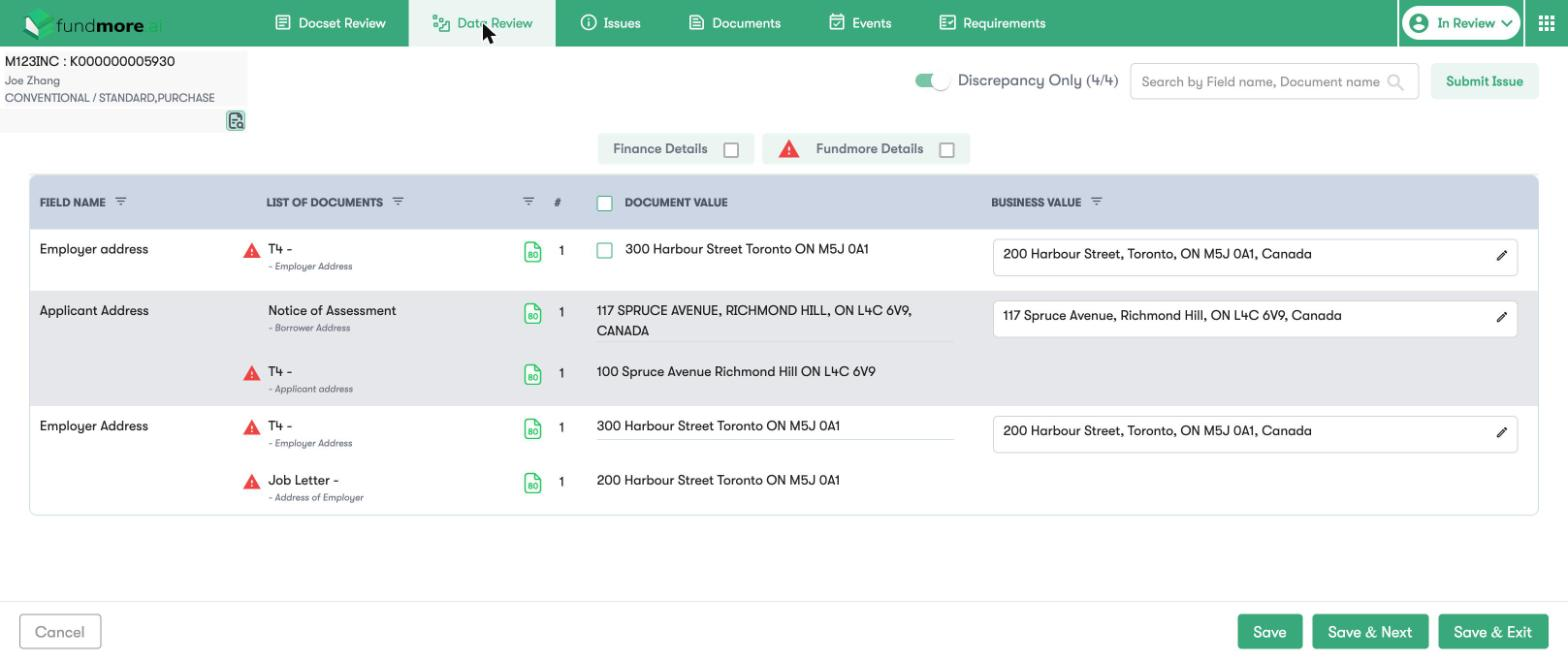
Data Review functionality includes:
- Field groups (top of the screen): A red warning icon shows the group contains a discrepancy. Tick a group to filter the list to that group.
- Discrepancy Only: a toggle that shows only the fields with a discrepancy. The counter shows how many fields are displayed.
- Search: find a field by field name or document name.
- Field Name: the field being compared.
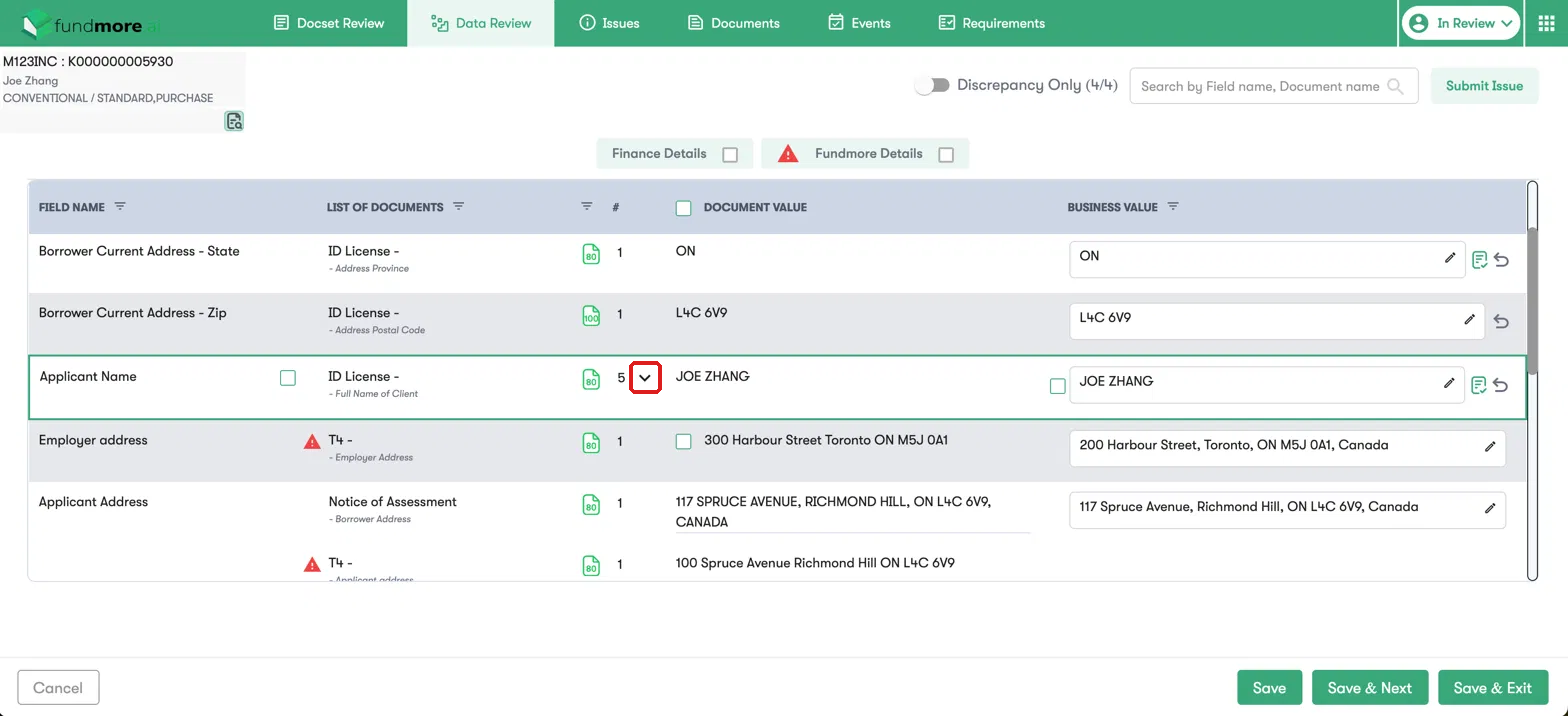
- List of Documents: the document the value was extracted from, with the field label used on that document. The document icon shows the confidence score, and clicking it opens the source document. Click the arrow on a row to see every document the field was cross-referenced against.
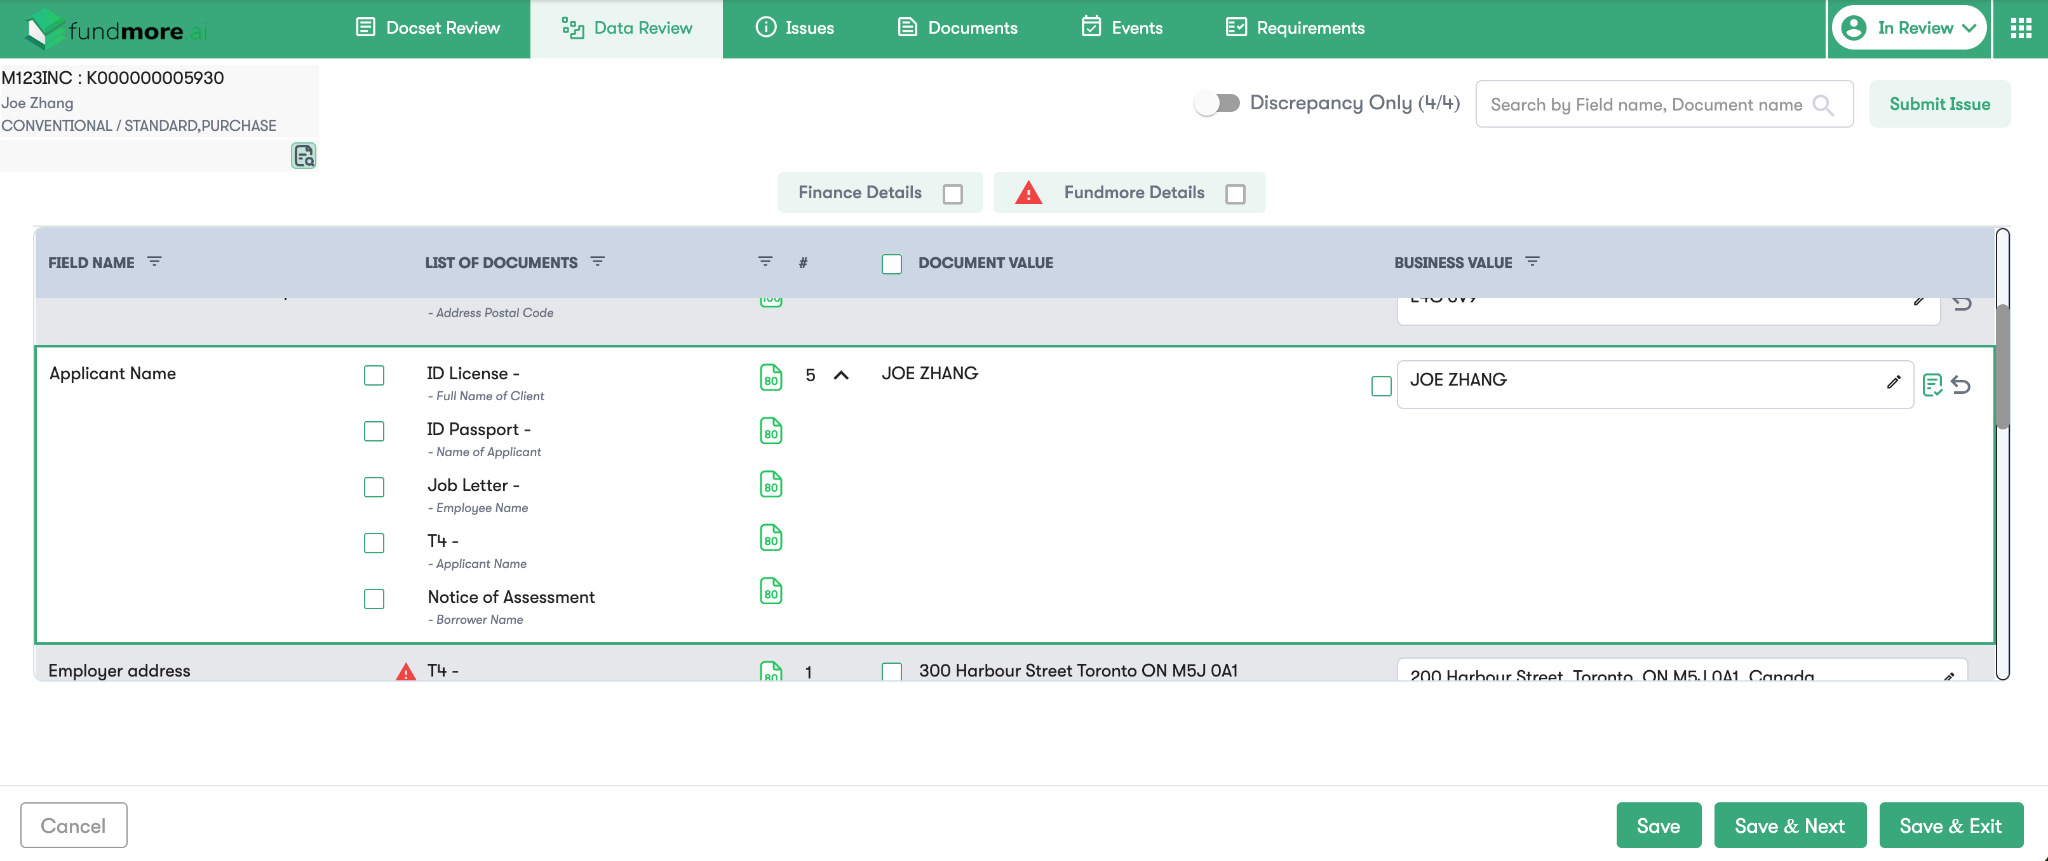
- Document Value: the value IDP extracted from the document.
- Business Value: the value currently in the LOS application.
- Submit Issue: log an issue directly from Data Review.
Note: Some extracted fields do not have a matching field in the LOS. For these fields, IDP shows the Document Value only, with no Business Value to compare against. If the Business Value is blank for fields that should have LOS data, open the User Console and check the icon beside the loan number. A red cross means LOS data was not received for the file. Please contact your FundMore Client Success team.
Reviewing Discrepancies
To review and resolve a discrepancy:
- Turn on the Discrepancy Only toggle to show only the fields where the Document Value and the Business Value do not match.
- For each row, compare the Document Value and the Business Value.
- Click the document icon in the List of Documents column. The source document opens in a panel on the right so you can confirm the value.
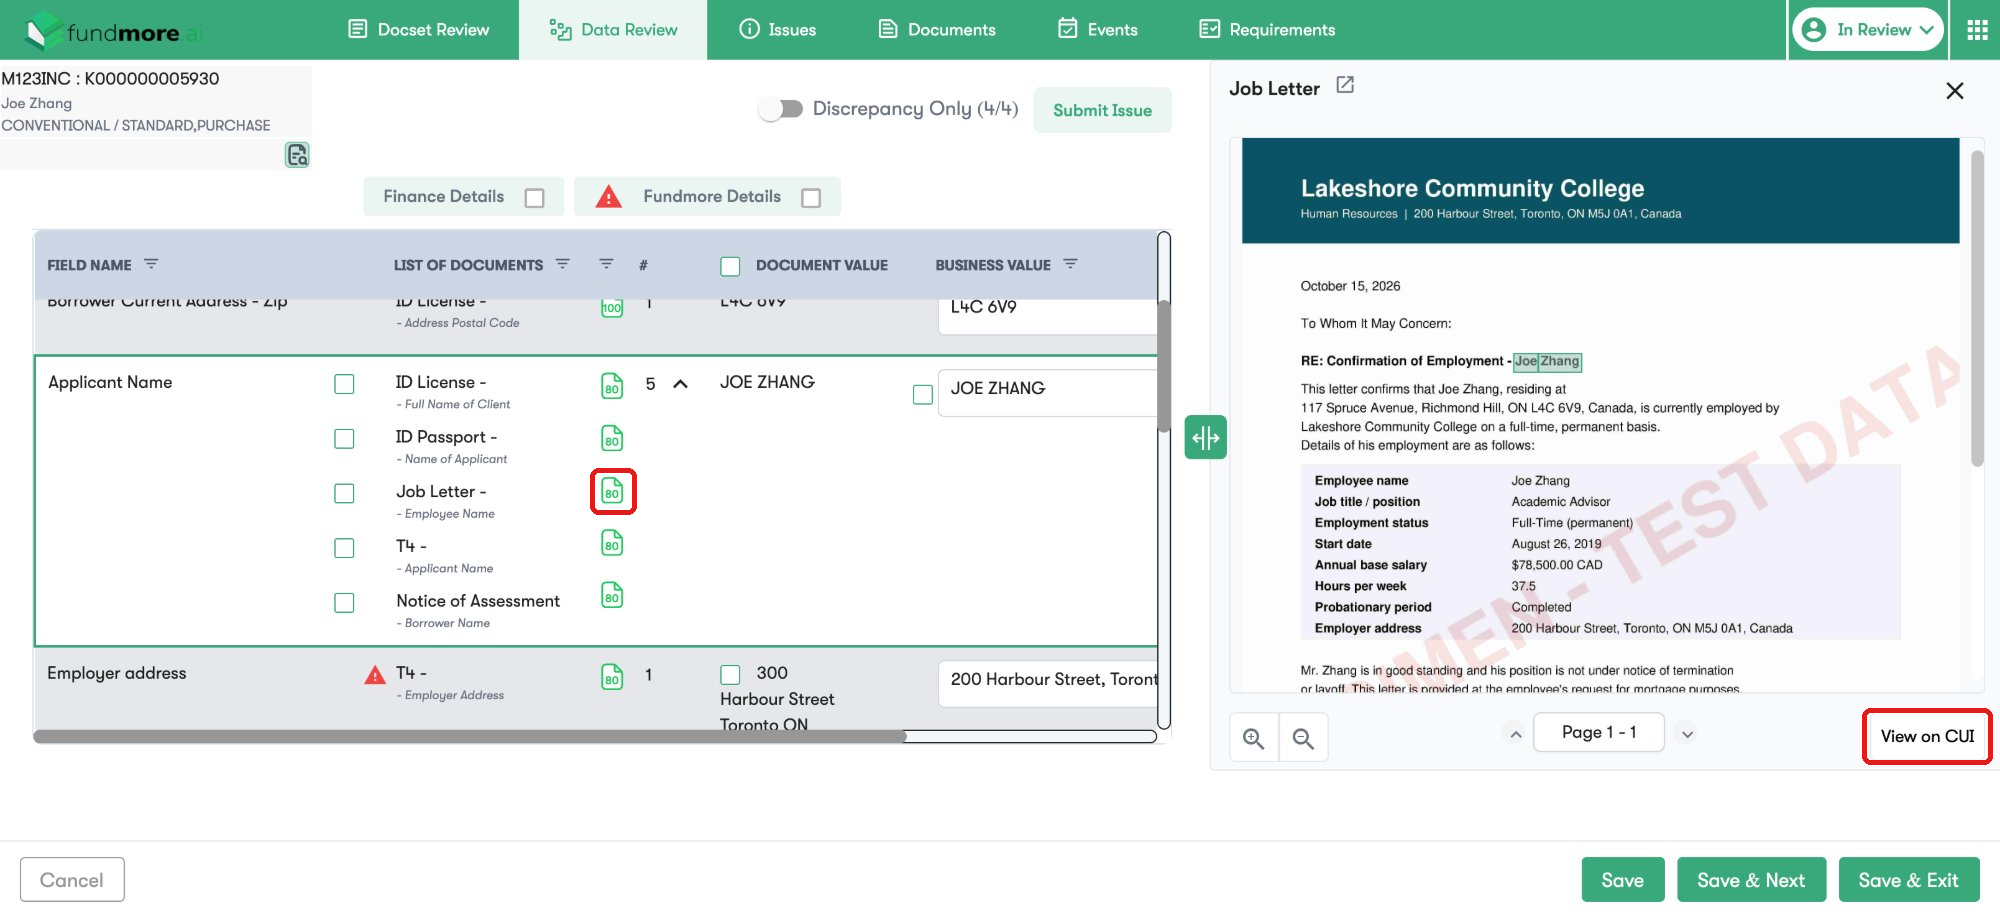
- Decide which value is correct. If the extraction is wrong, correct it in the CUI Tool by clicking View on CUI (see Correcting Extractions via the CUI Tool). If the LOS value is wrong, update the field in the LOS application. Then click Sync deal data to IDP at the top of the Conditions and Documents widget, go to Document Management in IDP and click Save & Next to see the updated Business Value in Data Review.
- Continue through all flagged rows. When complete, click Save, Save & Next or Save & Exit.
Important: Changes made in IDP are not written back to the LOS. If the correct value is the one on the document, you must update the field in the LOS application yourself. Keep the LOS application open in a separate browser tab so you can make the update as you review. Updating the LOS does not update IDP automatically. To see the change in Data Review, click Sync deal data to IDP, then click Save & Next in Document Management. IDP does not include a field for recording review decisions, so record your findings and any changes you made in the application notes in the LOS.
Note: IDP flags discrepancies but does not block the application workflow in the LOS. Users are responsible for deciding the correct value and taking the appropriate action. IDP discrepancies are reviewed in the LOS and are not shown in the POS.
Correcting Extractions via the CUI Tool
The CUI (Correction User Interface) Tool lets you correct a value that IDP extracted incorrectly.
To correct an extraction:
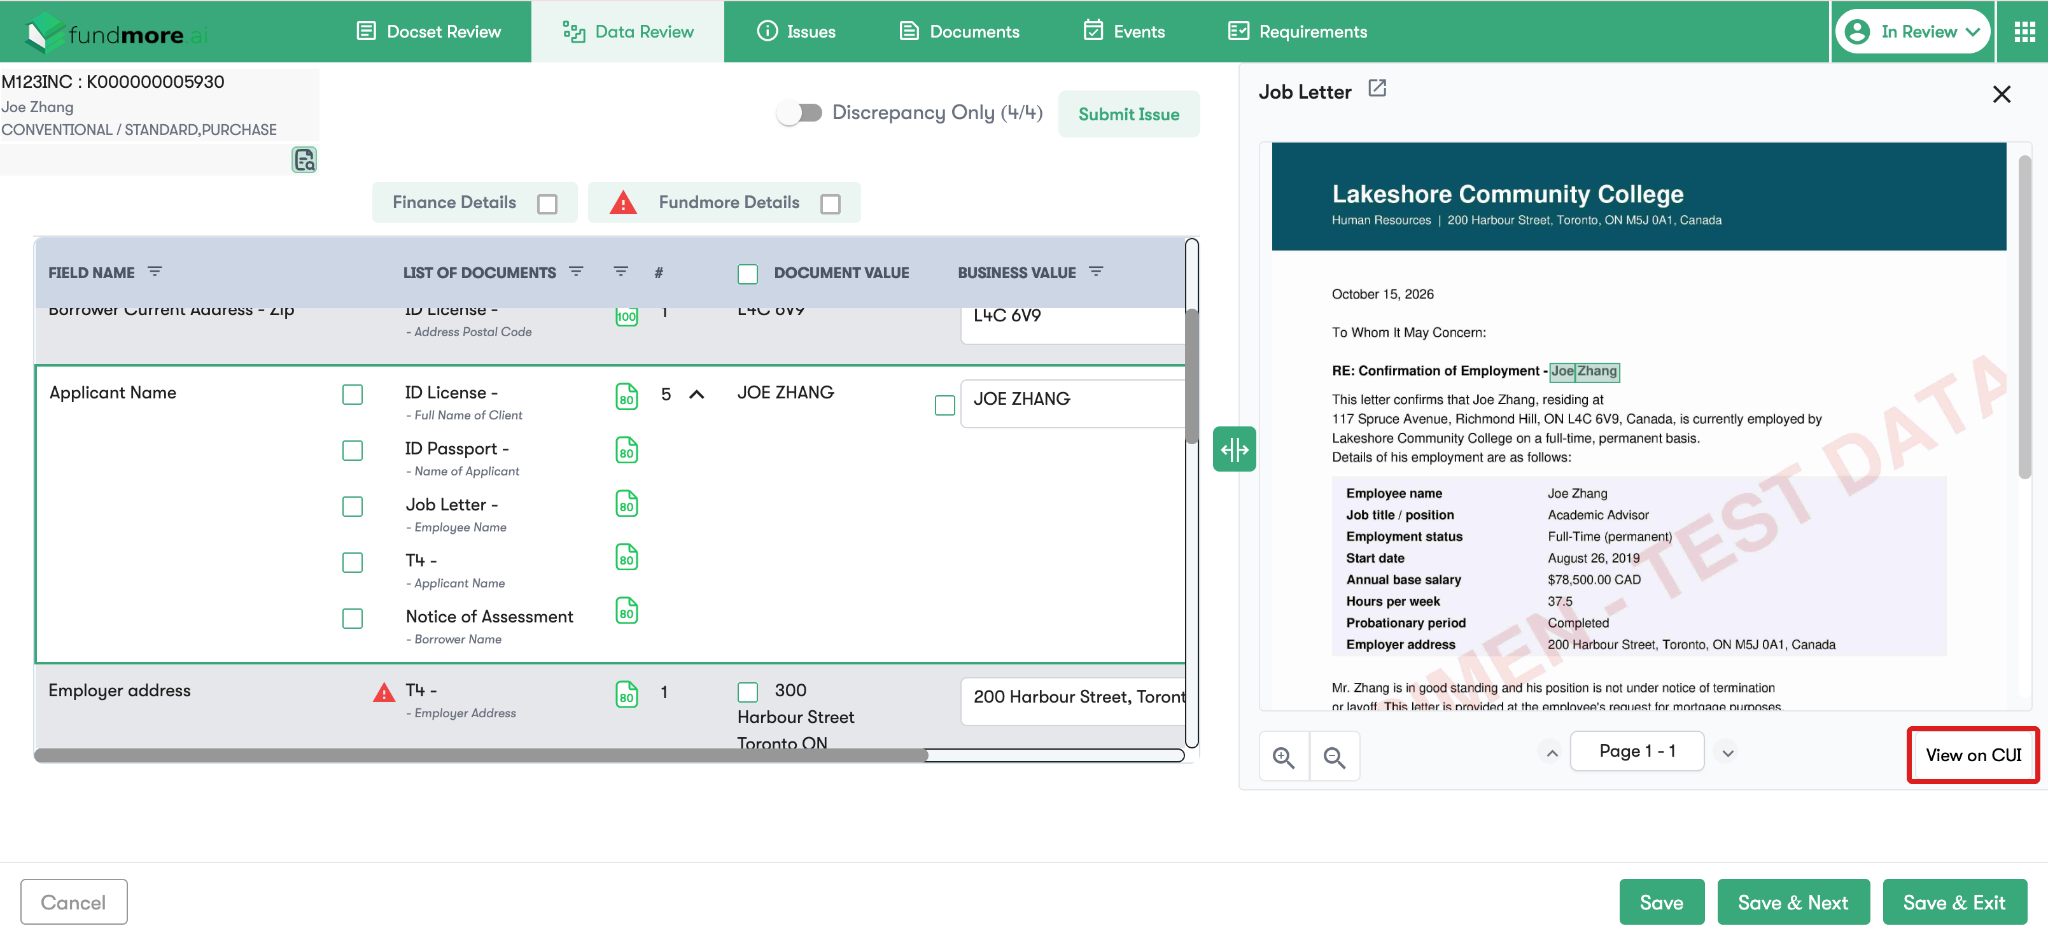
- On the Data Review screen, click the document icon on the row with the incorrect value. The source document opens in a panel on the right.
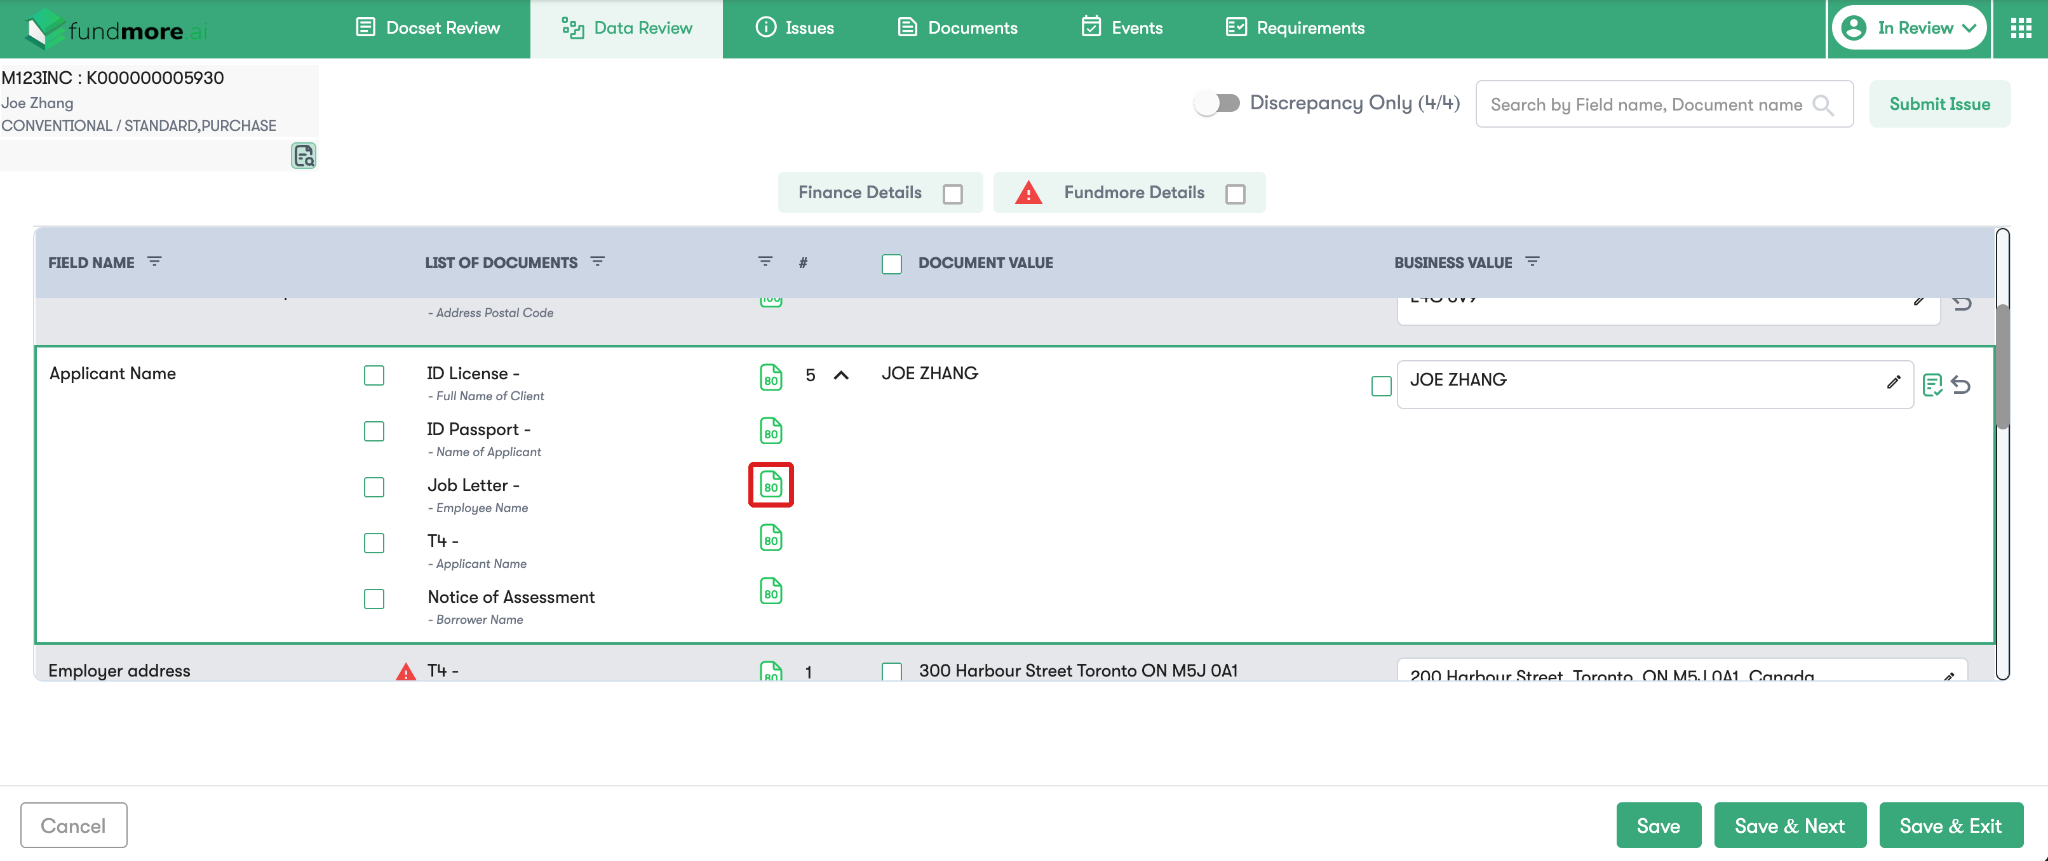
- Click View on CUI. The CUI Tool opens, with the document on the left and the extracted field on the right.
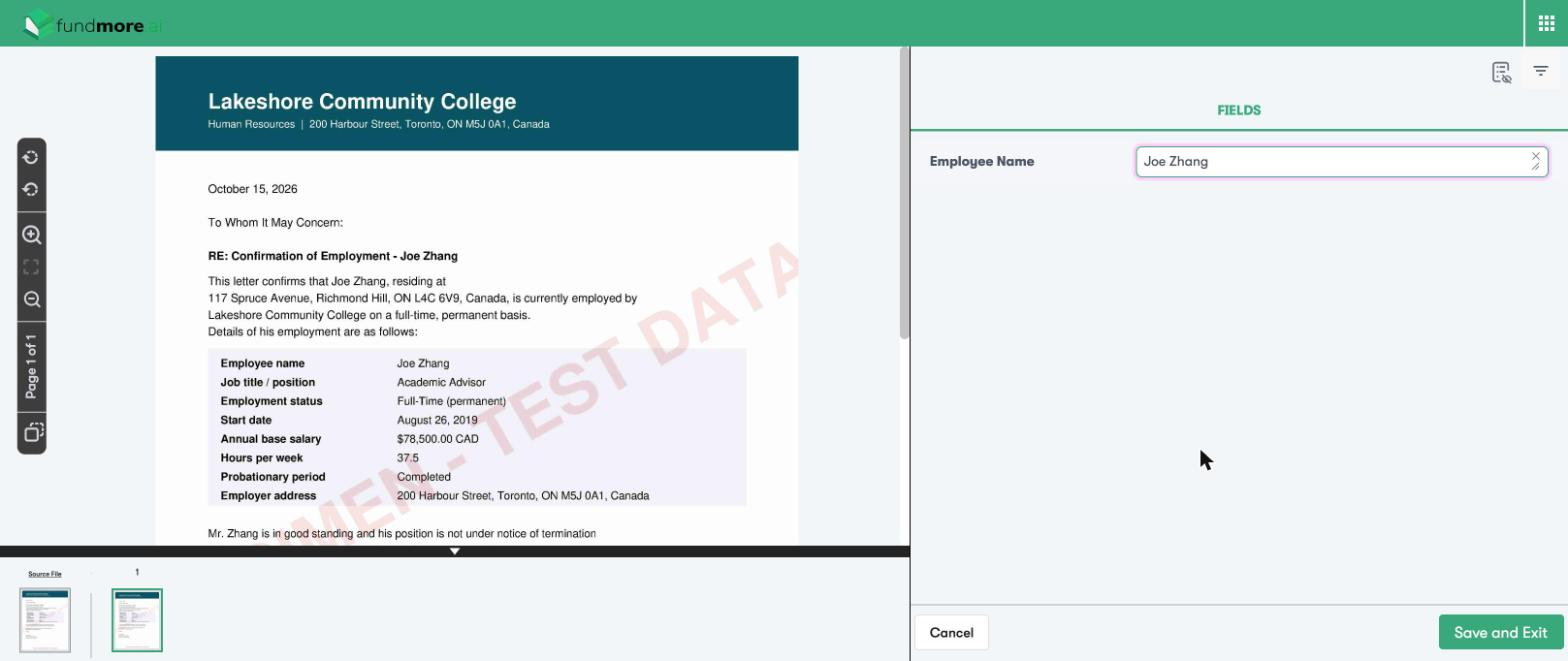
- Use the toolbar on the left of the document to rotate, zoom and move between pages.
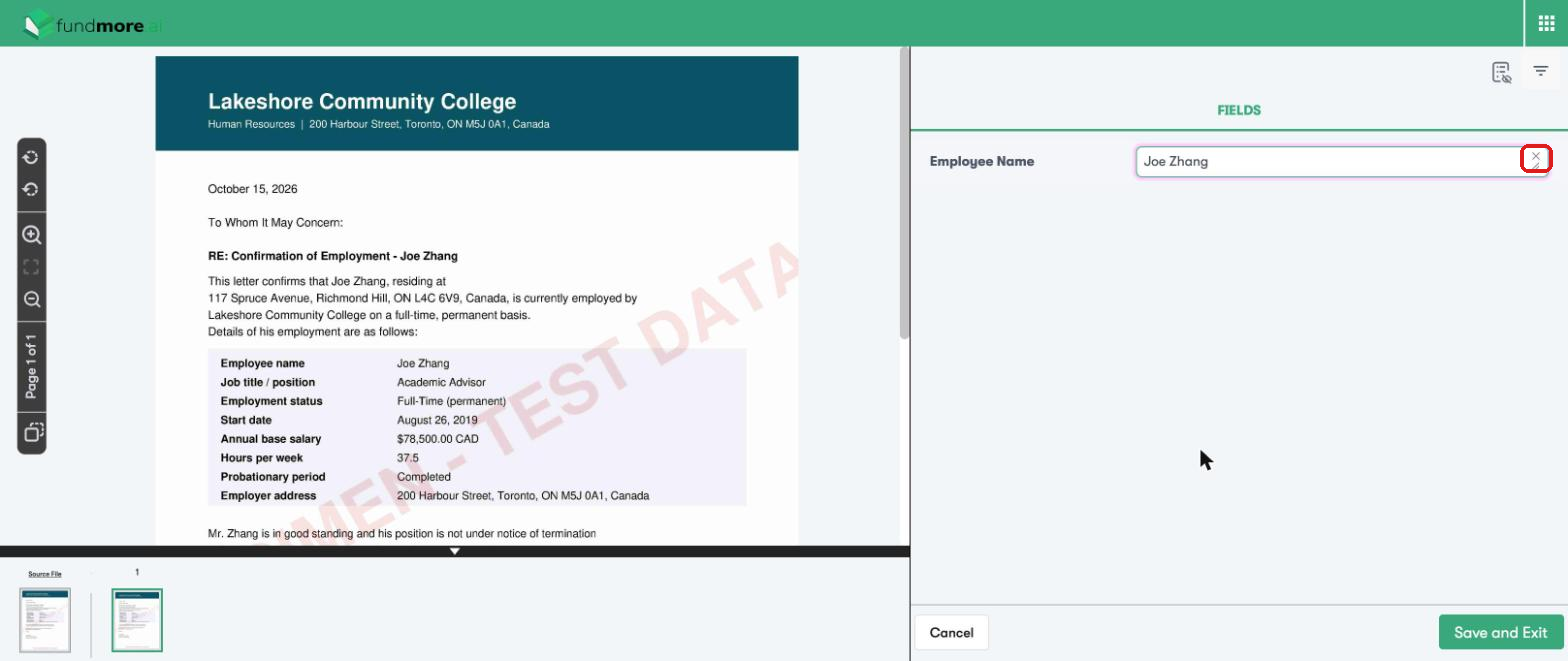
- Enter the correct value in the field on the right. If the extracted value is incorrect, click the X in the field to clear it. Then click the matching words (tokens) on the document to fill in the field, so you don’t need to type the value.
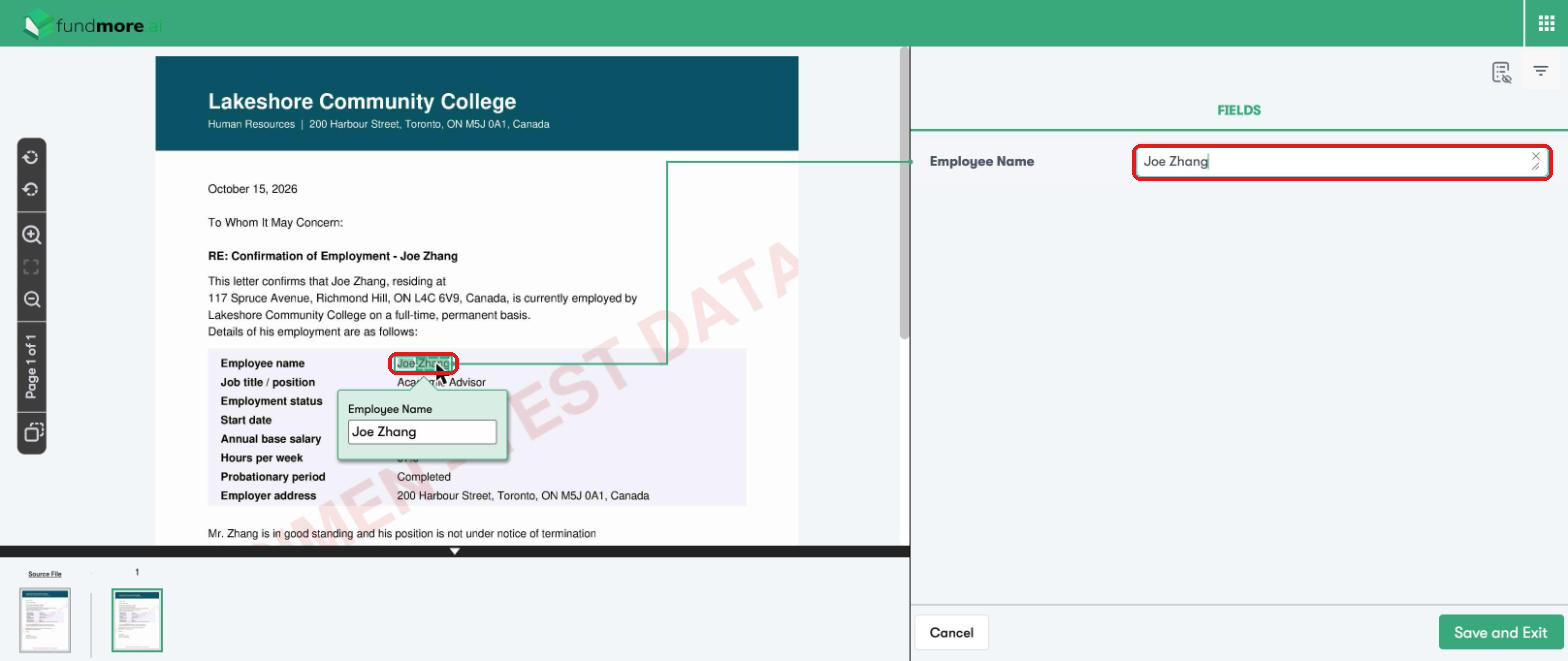
- Click Save and Exit to save the correction, or Cancel to close without saving.
Additional Features
Each IDP file includes four supporting tabs: Issues, Documents, Events and Requirements.
Issue Review
The Issues tab lists the issues submitted on the file in IDP using the Submit Issue button, for example a problem with how a document was classified or extracted. Discrepancies between the documents and the LOS application are not logged in IDP. Record your discrepancy findings, and any changes you made, in the application notes in the LOS. IDP also does not check the file for missing documents. Outstanding document requests are tracked in the Conditions and Documents widget in the LOS.
Documents (DocSet Overview)
The Documents tab shows every document received for the file in one place, organized in stacks by category.
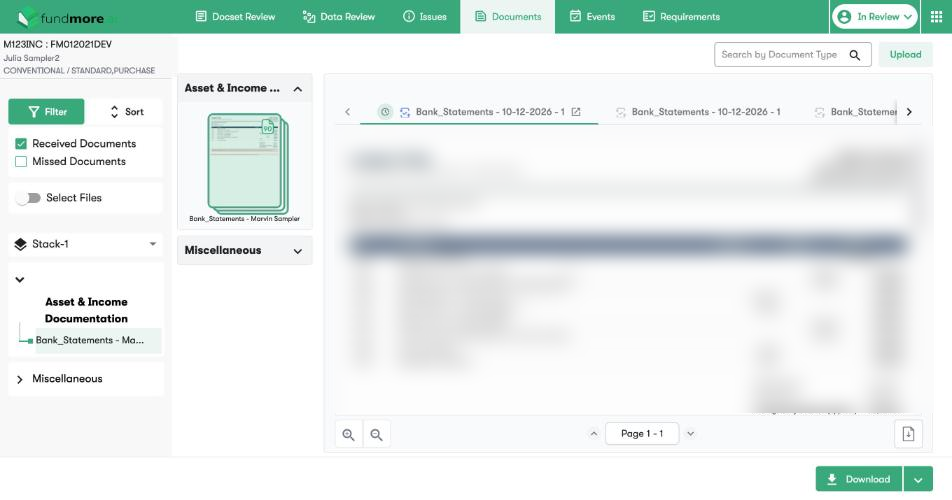
- Filter: show Received Documents, Missed Documents, or both.
- Sort: change the order of the document list.
- Stack: documents are grouped into categories, for example Asset & Income Documentation. Use the stack dropdown to switch stacks where more than one is configured.
Note: Stacks are not configured for every organization. If you do not see stacks for your documents and would like them set up, please contact your FundMore Client Success team. - Document viewer: view each document, move between versions using the tabs above the viewer, zoom, and page through.
- Select Files and Download: download one or more documents.
- Upload: add a document to the file.
Loan Events
The Events tab is the audit trail of the actions, changes and stage transitions on the file. It is used mainly for reporting and audit rather than day-to-day review.
For each event, the log shows the Time, who it was Submitted By, what it was a Change In, the Event, the Document Tag and Field Name where applicable, and the Initial Value and Updated Value. Use the search bar to find an event, initial value or updated value.
Requirements
The Requirements tab displays your organization's requirements document for reference during review. Click Done to close it and return to the file.
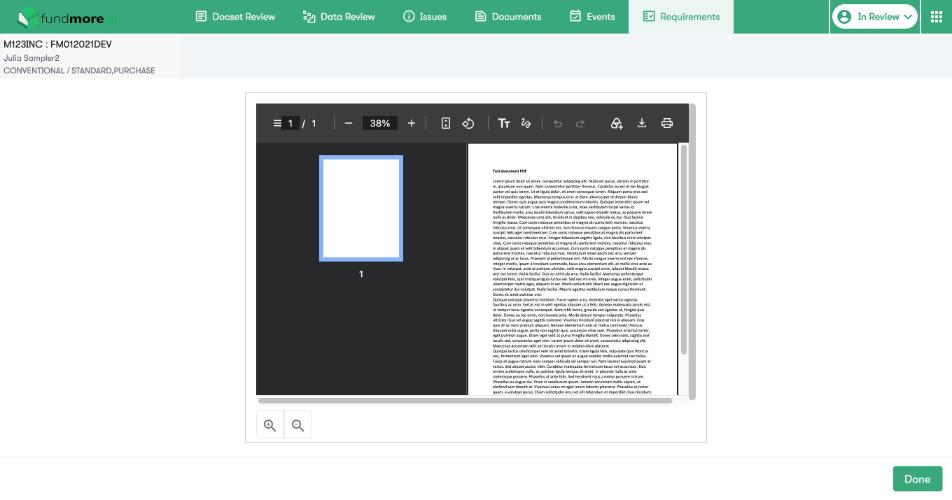
Note: The Requirements tab is read-only. To add or update the requirements document, please contact your FundMore Client Success team.
User Console
The User Console is the IDP dashboard listing every file in IDP, with the loan number, lender, branch, borrower, closing date, loan type, loan purpose, service type and loan status. A green tick beside the loan number confirms LOS data was received for the file.
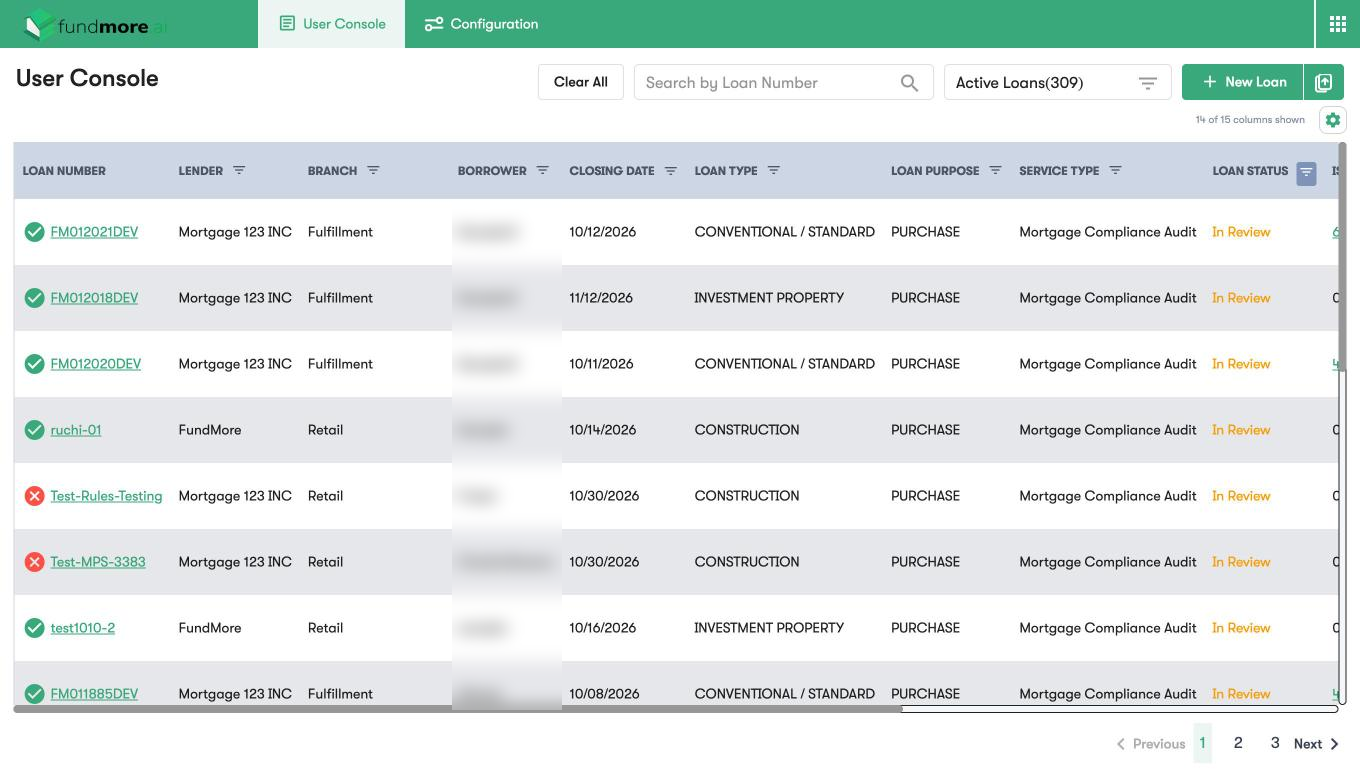
Because IDP opens directly in the file linked to the application from the LOS, you do not need to use the User Console as part of the regular workflow. To open the User Console, click the FundMore logo at the top of the IDP file. Search for a file by loan number then click the DocSet ID (not the loan number) to open the file. Use the User Console to check whether LOS data was received for a file, or to open other files processed by IDP.
For additional assistance, please contact your FundMore Client Success team.