Advanced product change recognition and warnings
Application Purpose versus Mortgage Classification
System Value Updates (Purchase Application Purpose only)
Max Borrowing Limit Field Logic Update for Line of Credit Products
On Hold, Cancel, Decline, & Lock States on Products
Base Rate, Final/ Net Rate and Original net rate
Understanding Variable & Adjustable Rates and Rate Holds
Adjustment of First Payment Date and Impact on Amortization
Custom First and Second Payment Dates for Semi-Monthly Payments
Insurer Programs and Automatic Premium Recalculation
FTHB/New Construction - Amortization Greater than 25 years
Low Ratio Insurance (Insurable vs Insured)
Other Requested Mortgages Fields
Closing Date / Restricted Dates
Introduction
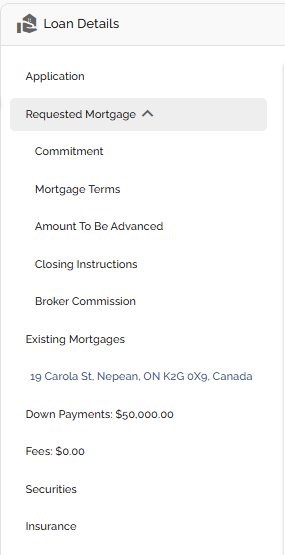
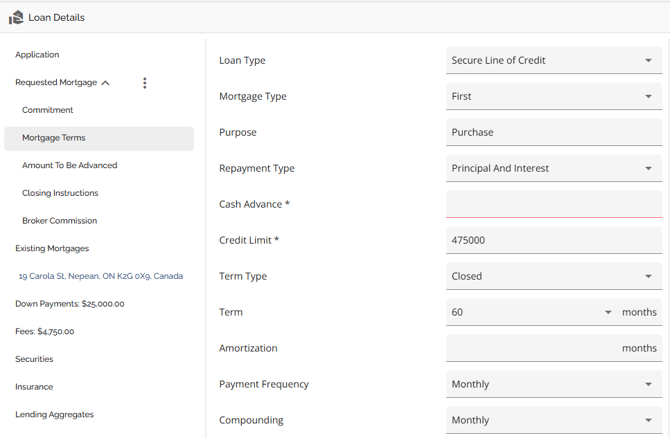
The Loan Details widget is a central source for all critical information related to the subject mortgage. It efficiently gathers and displays essential data, including the requested mortgage specifics, associated terms (mortgage and commitment), closing instructions, broker commissions, existing mortgages, down payments, fees, securities, insurance, and, where applicable, lending aggregates.
Designed for optimal usability, the widget features an intuitive layout and dynamic tools that significantly simplify navigation and boost efficiency. This empowers lenders to quickly access, analyze, and act upon key details. This guide offers a comprehensive breakdown of the widget's components, covering tabs such as Application, Requested Mortgage, Fees, and Insurance. Utilizing this document will provide the necessary insights and tools to streamline workflows and support well-informed decision-making.
Please note that this document is 1 of 2, you will find further information on this widget at Loan Details Widget - II .
The Loan Details Widget offers several key features for effective loan management:
Loan Details Widget Tabs
These tabs provide a structured way to navigate the widget's comprehensive features. Each tab focuses on a specific aspect of loan management, allowing users to view relevant fields and content by clicking on it. The specific tabs available may vary depending on client requirements. Detailed explanations of each tab are provided within this guide.
Edit Mode Button
To modify information within the widget, users must activate Edit Mode by clicking the pencil icon![]() located in the top-right corner. Once changes are complete, clicking the Close Edit Mode
located in the top-right corner. Once changes are complete, clicking the Close Edit Mode ![]() button saves updates and returns the widget to view-only mode, which helps maintain data integrity and prevents accidental modifications.
button saves updates and returns the widget to view-only mode, which helps maintain data integrity and prevents accidental modifications.
Tool Tips
Represented by an information icon ( ), these on-screen prompts offer contextual information for selected fields. Clicking the icon displays concise explanations or formulas, clarifying functionality and expected data inputs.
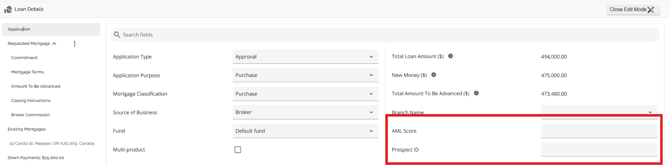
‘Application’ Tab

The Application tab is essentially a high level summary of the application indicating the application type, purpose, classification, source of business, fund (if applicable), whether it is a multi product or not, the Total Loan Amount, and any custom fields added to the application entity.
Custom Fields
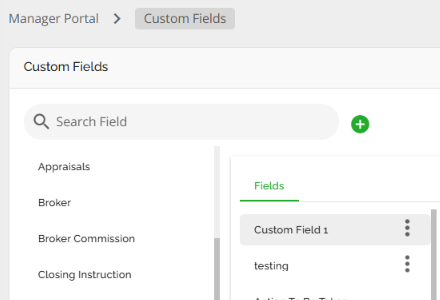
The application entity is one of the few places in the application Lenders can configure Custom Fields. These are configured via Custom Fields in the Manager Portal. Custom fields added in the application entity in the Manager Portal will be identified by an ellipsis to the right as seen below.

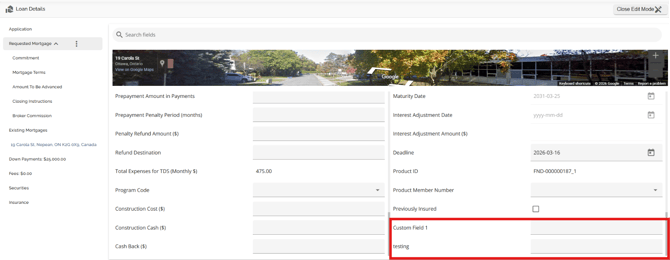
Any that are configured with the application entity will appear in the Requested Mortgage tab below the hardcoded fields in alphabetical order making it easier to identify them.
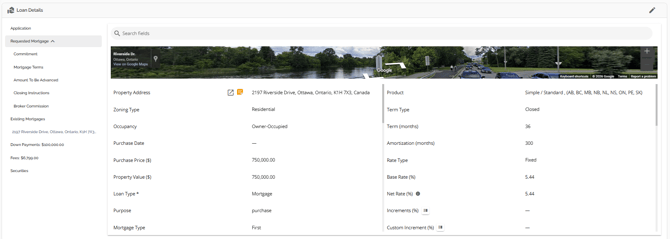
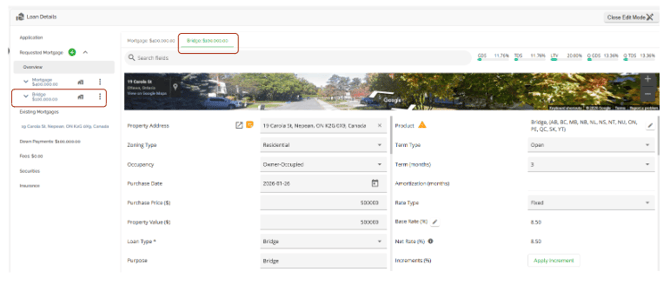
‘Requested Mortgage’ Tab

The requested mortgage tab houses information about the mortgage being applied for. This information consists of the mortgage terms, applicable dates (Closing Date, First Regular Payment Date, Maturity Date, & Interest Adjustment Date), and product information. The requested mortgage tab is further segmented into sub tabs consisting of Commitment, Mortgage Terms, Amount To Be Advanced, Closing Instructions, and Broker Commission. These sub tabs break down the data in the Requested Mortgage tab. To show or hide the housed tabs, simply hover to the right of the Requested Mortgage tab until an arrow appears. Click on the arrow to hide the tabs when it is pointing up, or to view the tabs when it is pointing down.
An asterisk beside the labels in the Loan Type and Loan Amount fields indicates that these fields are mandatory.

Requested Mortgage Field Name Search Box - This is located above the Google map section. In the search box, you are able to enter text/keywords related to the name of the fields. All fields containing the search criteria will be highlighted in the details section.

For additional information on relevant automations, refer to our Deal Ingestion PFG
Custom Fields
The mortgage entity is one of the few places in the application Lenders can configure Custom Fields. These are configured via Custom Fields in the Manager Portal. Custom fields added in the mortgage entity in the Manager Portal will be identified by an ellipsis to the right as seen below.
Any that are configured with the Mortgage entity will appear in the Requested Mortgage tab below the hardcoded fields in alphabetical order making it easier to identify them.
Note: We do not map custom fields due to their dynamic nature. These fields can be created, changed, and deleted at any time so we cannot count on them to be reliable inputs for mappings in general.
Note: The Rate Type field from Finmo submissions that previously appeared as "Variable" is now mapped to "Adjustable" in FundMore during ingestion. This ensures that the correct rate type is reflected in the UI and reporting, addressing issues where "Variable" was incorrectly displayed due to the absence of an Adjustable option in the Finmo dropdown.
Google Maps View
FundMore AI is integrated with Google Maps. As you begin typing an address into the system, a list of options will typically appear below, similar to what you are entering. With the integration of Google Maps, the system not only pinpoints the address but also provides a Google Street view of the property's location in the Property Details pop-up. If Google Street view is not available for the property, the map will default to Google Satellite view instead
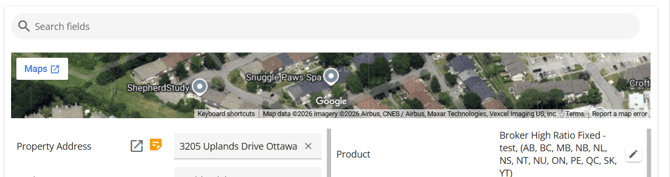
What is visible in the Requested Mortgages tab is a minimal view of Google Maps. If you choose ‘View in Google Maps’ you will be redirected to a street view of the property in Google Maps with full Google maps functionality.

The Google Maps feature offers a variety of options for users to utilize. These options include toggling to full screen, dragging and dropping to move around the map, rotating the view, zooming in and out, moving forward and backward, and viewing other Google Maps options.
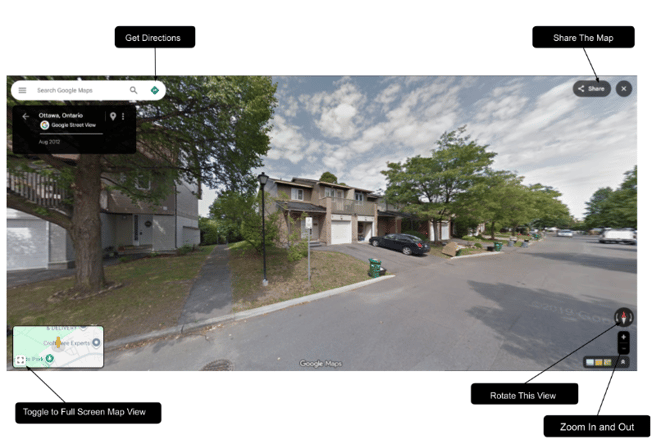
Drag and Drop View ![]() - To navigate to a different location on the map, simply hover over it until an arrow appears. You can then click on the arrow and drag it around to explore the map.
- To navigate to a different location on the map, simply hover over it until an arrow appears. You can then click on the arrow and drag it around to explore the map.
Rotate View ![]() - Select the arrows in the icon to rotate the map with the compass clockwise or counterclockwise.
- Select the arrows in the icon to rotate the map with the compass clockwise or counterclockwise.
Zoom In ![]() - Click this button to zoom in.
- Click this button to zoom in.
Zoom Out ![]() - Click this button to zoom out.
- Click this button to zoom out.
Arrow Pointing Left ![]() - Clicking on this arrow provides the user with additional view options for Google Maps (as seen below). You can select the option that you would like to view from the available choices.
- Clicking on this arrow provides the user with additional view options for Google Maps (as seen below). You can select the option that you would like to view from the available choices.

Show Location On Map ![]() - When this button is clicked, a new tab will open and the user will be redirected to a location viewable on Google Maps.
- When this button is clicked, a new tab will open and the user will be redirected to a location viewable on Google Maps.
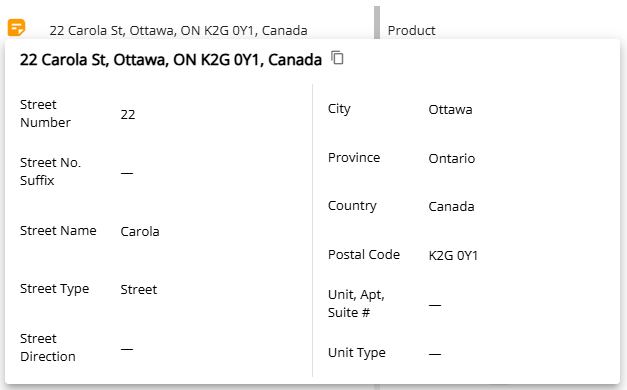
Address Details
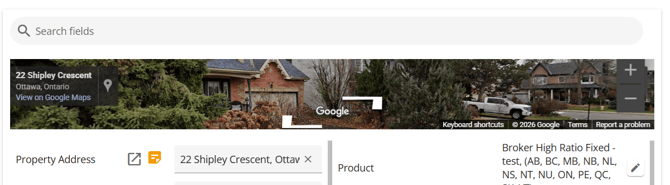
The orange note icon located to the right of the address field opens a pop up screen that displays the address broken out into individual fields. When you are in the 'Loan Details' widget's edit mode, clicking on the orange icon will open a pop-up window containing an editable version of the Address Details. This feature allows you to edit specific fields without having to retype the entire address. After making your changes, click the 'Save' button in the bottom left corner to save and close the window, or you can choose to cancel if needed.
For lenders using FCT:
Please note that FCT imposes a limit of 10 characters in the Street Number field. This count includes numbers, spaces, and special characters.
If the street number exceeds this limit, an error will occur when attempting to send the file to FCT. For example, “1234 - 1238” contains 11 characters because the spaces on either side of the dash are included in the count.
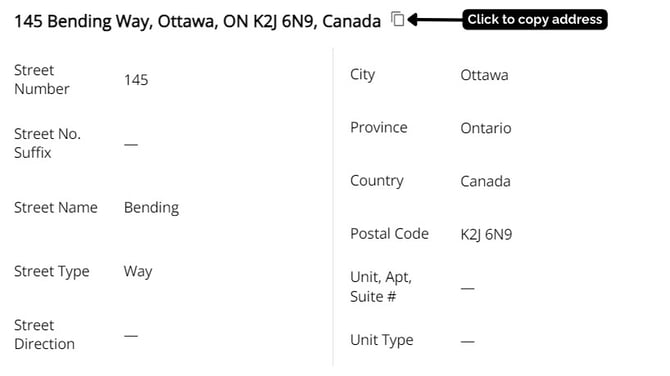
Click on the icon next to the address to copy it.
View Property Details Pop-Up
To view detailed information about each property listed in the application, you can access the corresponding Property Details pop-up. This pop-up contains different tabs that provide all the necessary information specific to each property.
For the subject property, you can access the Property Details pop-up by clicking on the 'expand' icon (![]() ) in the Requested Mortgage tab in Loan Details or in the property tab within the Net Worth widget in the details column. For all other properties owned, you can access the details through the Net Worth widget in the "Property" section.
) in the Requested Mortgage tab in Loan Details or in the property tab within the Net Worth widget in the details column. For all other properties owned, you can access the details through the Net Worth widget in the "Property" section.
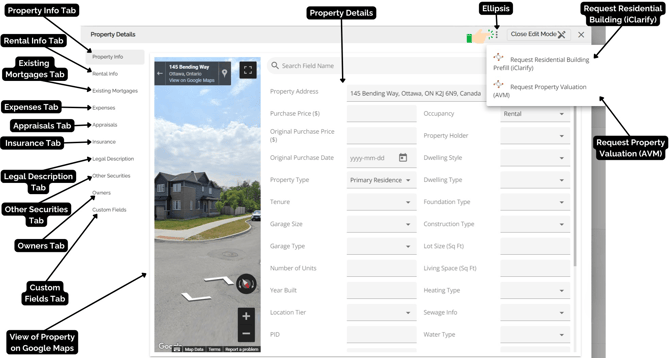
In addition to viewing property information, you can also request a Property Valuation using 'Verisk' or verify and update property details using the 'iClarify Request Residential Building' information. To access the AVM or Building info, simply click on the ellipsis located in the top right-hand corner. For more detailed information on the functionality of this section, please refer to our Property Details Pop Up Product Feature Guide.
Tooltips - Tooltips can be found throughout the application. The tooltips icon (![]() ), if applicable, is located to the right of the field name as seen below.
), if applicable, is located to the right of the field name as seen below.
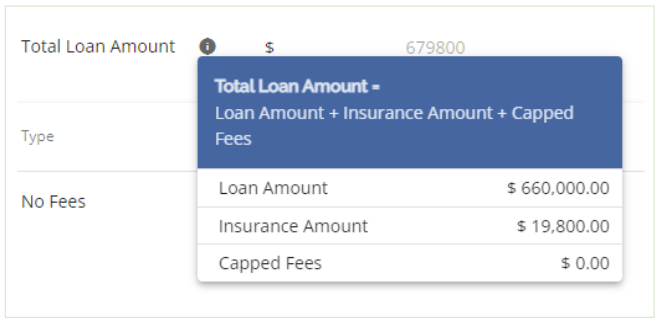
When you click on the tooltip, a drop-down menu will appear providing information about the field. This includes details such as the formula and values used in the field, or a brief description of the field itself.
Product Field
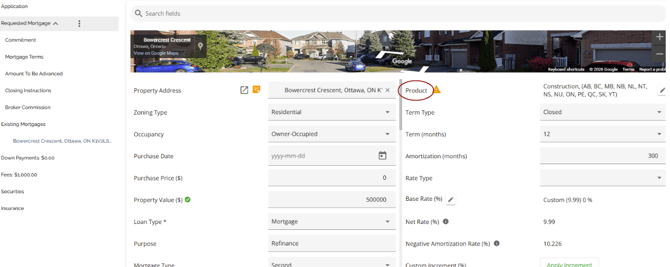
If your company has set up a product matrix in the Manager Portal, you have the option to choose from a list of eligible products in this field to apply to your application.
The rate and terms of your selected product may automatically update depending on the level of configuration.
Note: If there is a province indicator on the product set up, it is used to distinguish between different products due to varying pricing by province. The system does not have the functionality to automatically recognize if the product location matches the property location. Users are responsible for selecting the correct product.
Once you select a product to apply, you should see a pop up similar to this :
It is important to carefully read the information in this pop-up as the text may vary depending on how the products have been configured in the Manager Portal and the date within the application. For example, if there is no matching terms or rates in the product set up, you might see something like:
Credit Tier Custom has no defined entries for the term of 24 months! There is no Fixed Rate defined for the Custom Credit Tier and term of 24 months. Rate will not be updated!
This message indicates that the product does not have a specified term or rate, which means that those values will not be updated in the application if you choose to apply that product.
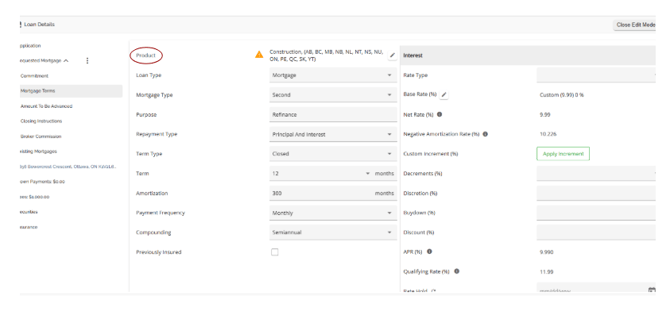
Product can be applied in either the Requested Mortgage Tab or the Mortgage Terms Tab.
The same functionality exists in both sections (Requested Mortgage and Mortgage Terms), i.e. If your company has set up a product matrix in the Manager Portal, you have the option to choose from a list of eligible products in this field to apply to your application. Depending on the level of configuration, when selecting your product, the rate and terms may update automatically.
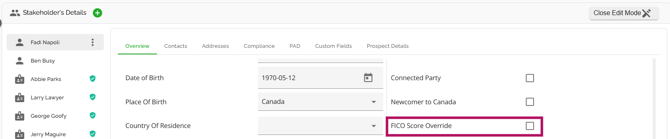
Note: Particular to pricing, the system defaults to using the FICO score of the applicant with the highest income, regardless of their score. However, you have the ability to override this and use the highest score for pricing, regardless of income. This can be done by checking the 'FICO Score Override' checkbox in the Stakeholder widget during the application process. If you select this option for a specific stakeholder, the system will consider the highest score between the primary borrower and that stakeholder as the main FICO score for pricing.
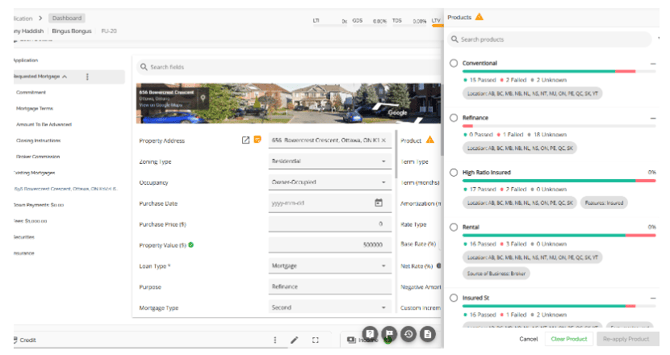
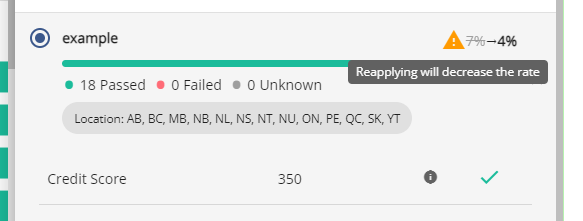
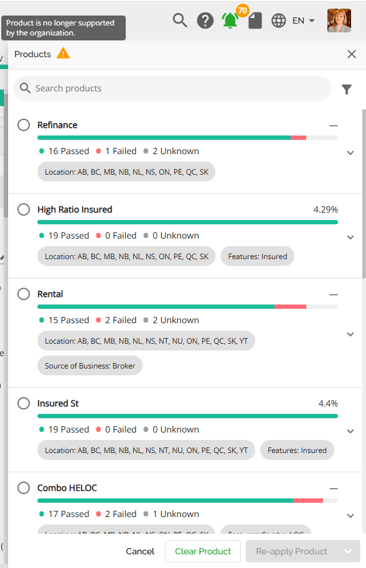
Once the Product button is clicked, a sidebar containing a list of active products will open. Each product will show the rate as set up in the Manager Portal, and it will have a coloured bar to provide a visual indication of the number of product attributes compatible with the application. This includes the number of attributes that have passed, failed or are unknown, the location (i.e. the province) the product is available in, and the features attributed to that product (Combo, Edge, Insured, Line of Credit).
Each product can be expanded by clicking on the downward facing arrow to the right of the product tile. Expanding the product will display all the attributes and default values applied to that product, what the corresponding value within the application is to that attribute and default value, a tooltip which when hovered over displays the attribute and default value requirement for that product, and an indication if that attribute and default value was a pass or fail. A pass means the value in the application met the product requirements. A fail means the value did not meet the product requirements, and an unknown means there is a missing value in the application so the system could not evaluate it.
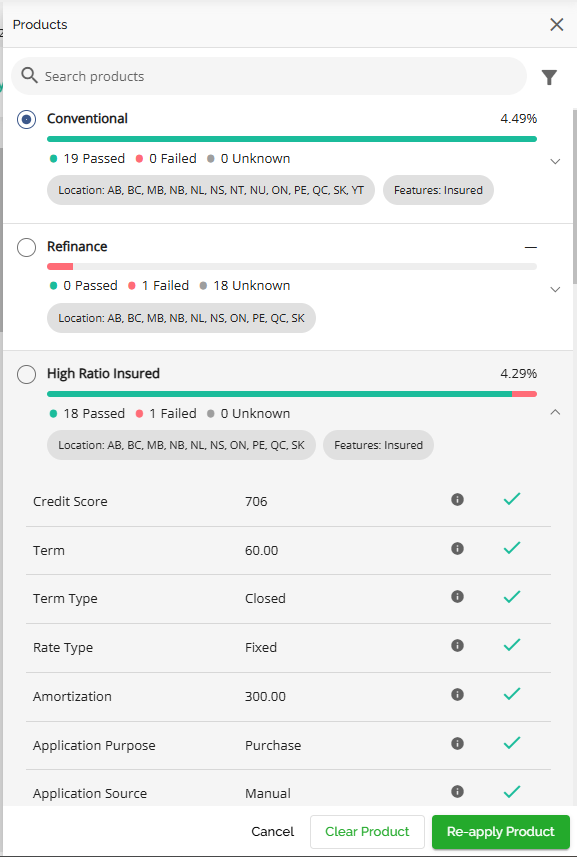
From here users can select the product that best suits the application. After a product has been selected, underwriters can update products during underwriting/adjudication stages.
Re-applying Products
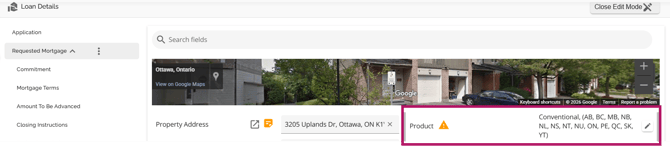
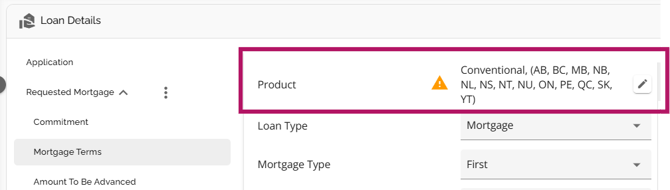
If products are updated in the Manager Portal, the system will apply a warning flag beside the product in Requested Mortgage and Mortgage Terms indicating there has been a change in the product.
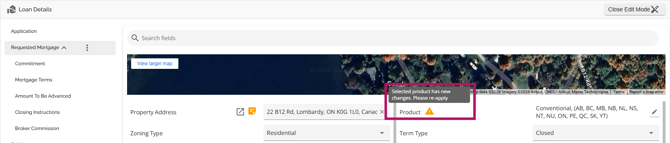
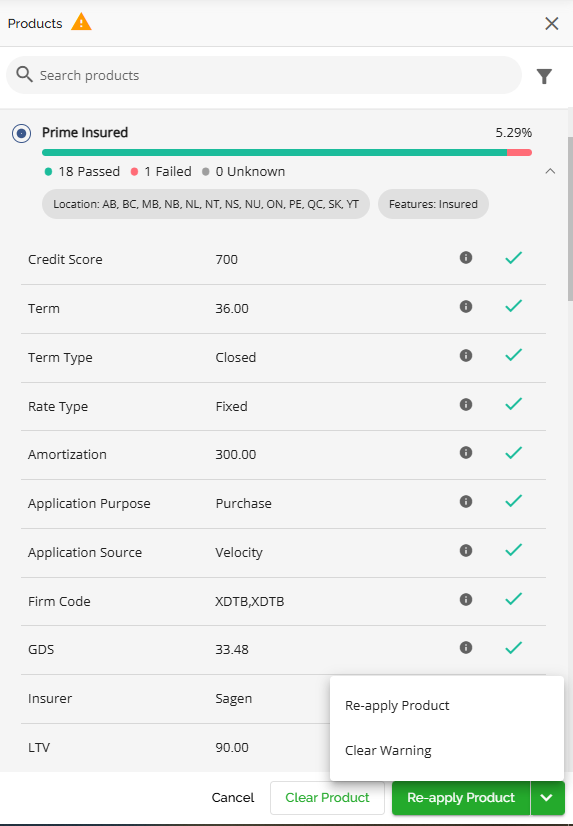
The user can click on the warning icon to open the product selection side panel which will display the updated attributes of the selected product.
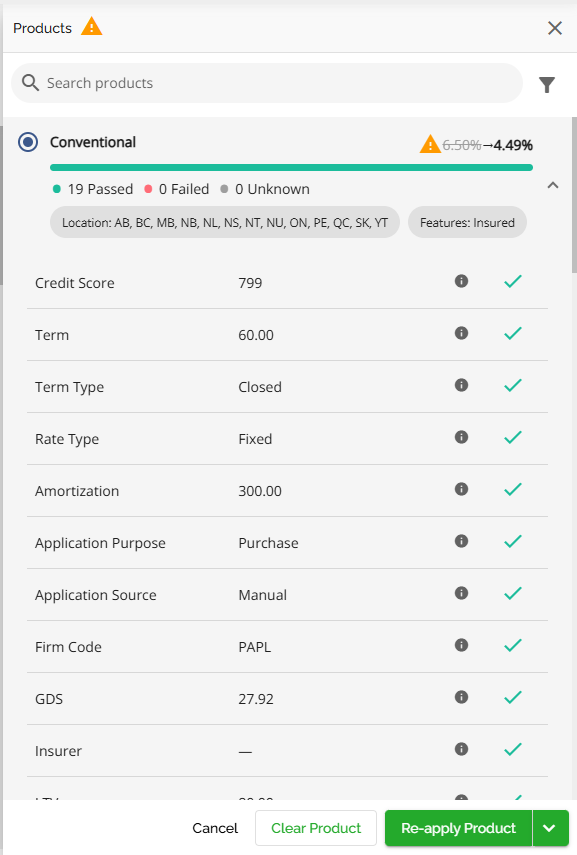
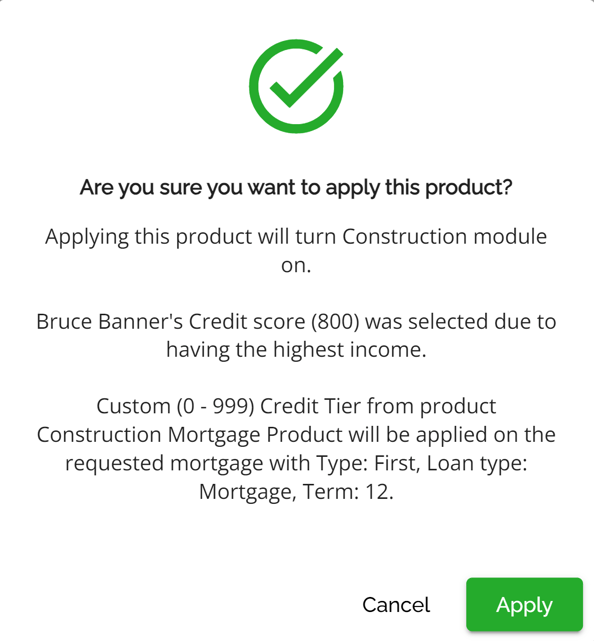
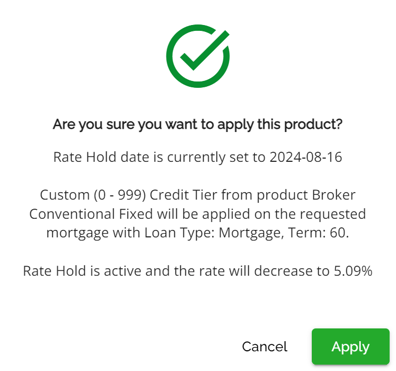
They can choose to cancel, clear the product, reapply the product, or clear the warning. By choosing to cancel the flag and the product will remain however the flag will not interfere with workflow. Selecting Clear will clear the product application, the warning symbol disappears and there is no product applied. Selecting Re-apply Product enables them to select the same product or another one, updating the rates and terms for their selection. Users will get this confirmation pop up. If they want to proceed when selecting Re-apply Product. By doing so, the application will be updated with the updated terms and the warning will disappear.
Users can clear the warning sign to have it removed, without having to commit to any changes made to the product. This action is done from the products sidebar, by clicking the Clear Warning button, as seen below.
Rate Increase or Decrease in Product Offerings
Note: This is a tenant specific feature and may not be applicable in your environment.
The system will also offer warnings when the rate on the applied product has changed. These are displayed directly in the Product Offerings menu (i.e. the sidebar listing active products). The warnings will vary depending on whether it is a rate increase, rate decrease, or if it is an increase in the active rate hold. Below are some illustrative examples:
Rate Hold Active, Rate Increase: When a rate hold is active and there's a rate increase, you will receive a warning as shown in the image below.
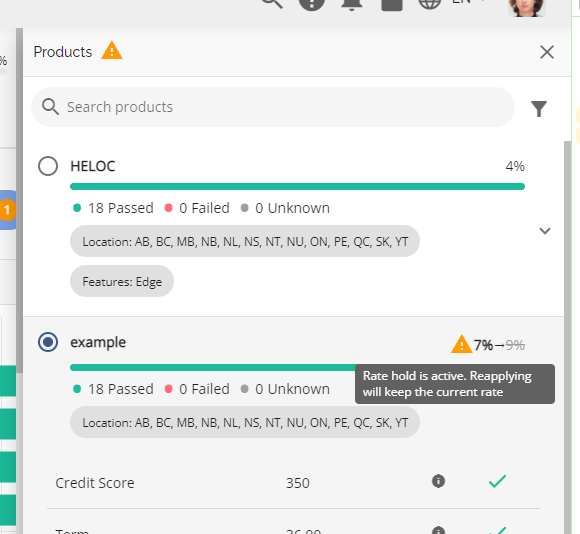
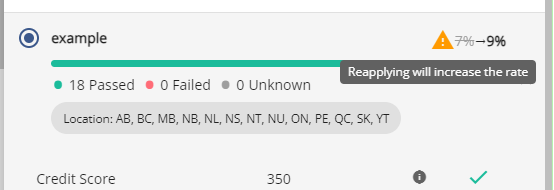
Rate Hold Inactive, Rate Increase: If a rate increase occurs while there's no rate hold active, a notification will be displayed as depicted in the image below.
Rate Decrease: In case of a rate decrease, a notification similar to the one above will be presented regardless of whether there is a rate hold in place or not.
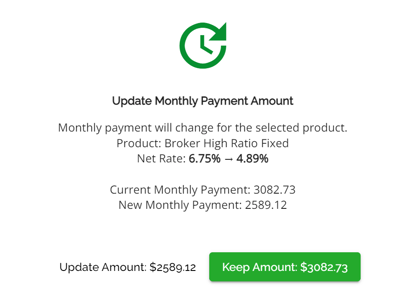
When applying a product on a conditionally approved mortgage with an active rate hold, the user will have the option to select if they want to keep the current payment amount or update it to the new payment, thus updating the amortization period as well. Click on this link to watch a video demonstration of this functionality.
Note: Amortization can appear as a decimal in DB. This is relevant for any lenders that pull reporting from the DB.
This is an intended behavior as it was built to support recalculation of the amortization period when the rate changes and the payment is kept the same. In this case the amortization will not result in an integer given that the payment has to be kept the same. On the UI we do round to show the integer value.
The scenario where this happens is when the rate is decreased when applying a product and the user selects to keep the payment as is. This popup only shows up if the deal is conditionally approved and the rate-hold is active.
If they chose to update payment instead of keeping as is, then the amortization won't be recalculated and it will not update to have decimals.
Within the Settings section of the Manager Portal, there is an automation to overwrite application values with product defaults when applying a product.

When this automation is enabled, it is important to remember the following:
- The system will not let you change the Default Values if they differ from those of the product applied until you clear the product.
- The system will let you change and apply a product with Attributes that do not match. When selecting the product, there will be an indication that there are attributes that do not match which serves as a visual indication for the user.
- If any of the default value fields in the UI are blank or do not match the product the system will update those fields with the values in the product when the product is applied or re-applied.
When this automation is not enabled, it is important to remember the following:
- Products can be reapplied if the Attributes and the Default Values do not match.
- The system will let you change and apply a product with Attributes that do not match. When selecting the product, there will be an indication that there are attributes that do not match which serves as a visual indication for the user.
- The system will let you change and apply a product with Default Values that do not match. There will be an indication in the product selection process that there are unknown values.
Term or rate update check on product, Note: This is a tenant specific configuration.
When a product is applied, the system will attempt to match the selected product with the input terms. If the Net Rate is updated to a value that is not offered based on the rate matrix for the selected Product/Credit Tier, the user will receive a soft stop error message with the options to Apply or Cancel.

If you select 'Apply', the system will allow you to save the Net Rate even if it does not match the Rate matrix, and there will be no warning flag. However, if you decide to cancel, the Net Rate will not be saved.
If the user goes back and selects a term that matches the selected product, the rate will automatically update based on the selected term. As a result, the warning message will disappear, and the product will be successfully applied.
Advanced product change recognition and warnings
Note: This is a tenant setting and is disabled by default. To enable this setting, please contact our Client Success Team.
A Product Change warning sign appears in the application (with the same icon placement and appearance) next to the product field when information from the product affects the application in the following situations.
Logic will be available only for applications which have product applied after deployment (no data migration needed)
Product-Level Triggers
Summary
- Product Name is updated.
- Features are updated.
- Rate Hold (days) is updated.
- Deactivating Product
Rate Matrix-Level Triggers
Note: The following updates are considered triggers only if they are made to the currently applied Credit Tier.
Overview
Credit Tier or Credit Score is changed.
Terms & Rates
The following updates are considered triggers only if they are made to the term, term type and rate type applied to the application, to entries that are active.
- Term is updated
- Term Type is updated
- Rate is updated
Special Rates
The following updates are considered triggers only if they are made to the term, term type and rate type applied to the application, to entries that are active.
- Term is updated
- Term Type is updated
- Rate is updated
Note: Users are notified if changes are made to either standard or special rates (if available), no matter which one is used in the application.
Handling Disabled or Deleted Products
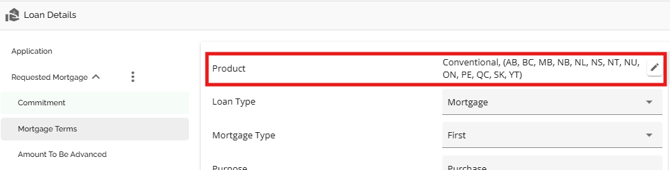
- If a product is disabled or deleted from the Manager Portal, all deals that have already selected that product will still display the product snapshot.
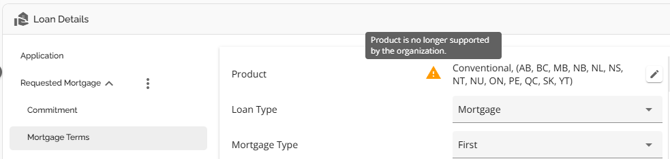
- A warning message will be displayed on deals indicating that the product is no longer supported by the organization. There is no option to reapply the same product if this warning appears.
- If there are changes to the terms or if the product has been disabled or deleted, an error message will be shown stating "Product is no longer supported. Please clear the product or select another one."
Original with product:
Warning after Product is disabled in Manager Portal:
If a user tries to reapply the disabled product a warning icon will appear beside products which will alert the user that the product is no longer supported and the re-apply button will be greyed prompting the user to select a new product. A user can also leave the disabled product “as is”.
Application Purpose versus Mortgage Classification
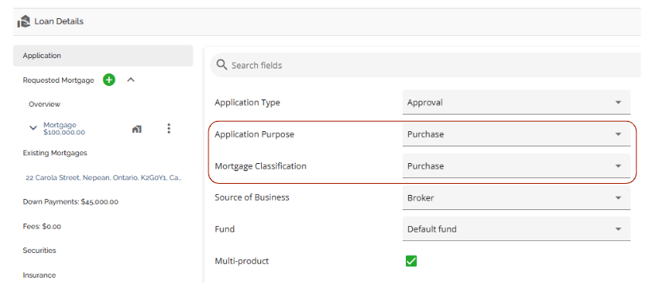
A frequently asked question pertains to the differences between mortgage purpose and mortgage classification. Mortgage Purpose refers to the reason or objective behind obtaining a mortgage. It describes how the borrowed funds will be used, such as for Purchase, Refinance, ETO, Bridge Financing, Switch, or Purchase plus Improvements.
Mortgage Classification refers to how mortgages are grouped or categorized based on specific criteria. This classification can vary depending on the context, but some common categories include Purchase Plus Improvements, Reverse, HELOC, Construction, and Commercial mortgages. The available options in the dropdown lists for these fields are managed by users with the appropriate permissions through the Manager Portal.
It should be noted that the Application Purpose field may ingest blank sometimes. This will occur when a purpose selected in the POS is not an option enabled by the Lender in the LOS. I.E. ETO is selected in the POS but it is not an option the Lender has enabled within the LOS.
System Value Updates (Purchase Application Purpose only)
There is functionality within the system to automatically update some values or provide warnings to users that values have been changed therefore, other values may need to be recalculated. The values that are tied together are Purchase Price, Loan Amount, Insurance Premium, Down Payment, and Property Value. Here is how the system handles changes to these fields:
- Purchase Price changes
- Loan Amount recalculates (New Purchase Price - Down Payment)
- Insurance Premium recalculates (New Loan Amount x Ins Prem %) if applicable
- LTV recalculates (New Loan Amount/New Purchase Price)
- PST recalculates (New Ins Prem x Tax %) if applicable
- Down Payment changes
- Loan Amount recalculates (Purchase Price - New Down Payment)
- Insurance Premium recalculates (New Loan Amount x Ins Prem %) if applicable
- LTV recalculates (New Loan Amount/Purchase Price)
- PST recalculates (New Ins Prem x Tax %) if applicable
- Loan Amount Changes
- A warning flag appears beside Loan Amount (Loan Amount + Down Payment is not equal to the Purchase Price)
- Insurance Premium recalculates (New LA x Ins Prem %), if applicable
- LTV recalculates (New LA/PP)
- PST recalculates (New Ins Prem x Tax %), if applicable
Normally if the changes made to the Down Payment or Loan Amount fall within guidelines, only the values will be updated. Depending on client configuration, If the changes fall outside guidelines, the values will still update but a risk warning may also populate, i.e. If reducing the down payment causes the LTV to exceed 95%, all values will update but there will also be a risk warning listed in the FundMore Score stating that the LTV > 95% presuming the client/lender has that risk warning configured.
- Property Value Changes
- > Purchase Price = Nothing happens. All values remain the same.
- < Purchase Price = A risk warning appears indicating the LTV exceeds the threshold (dependent on client/lender configurations). Also, LTV recalculates (New Value/Loan Amount)
- Insurance Premium Changes
- Any changes made to the application that affect the insurance premium will update the premium amount and percentage (if applicable). The percentage will only update if there is a LTV change impacting the insurer premium pricing (insurer’s price based on LTV buckets). For example, if the LTV ratio changes from 95% to 90% by adjusting either the loan amount or the down payment, the premium will change from 4% to 3.1% based on standard pricing.
- To ensure accuracy, it is recommended to have a verification process in place where underwriters validate insurer percentages and premiums against the LOS upon receipt of insurer approval. This verification should be conducted for any insurer resubmissions as well.
- Additionally, tasks should be added to prompt underwriters to check for any risk warnings before conditionally approving or approving the application if applicable.
Source of Business
We have included a field called “Source of Business” which is sent to all insurers (i.e., Sagen, CG and CMHC). Previously when sending an application to the insurer, we set that field as ‘Broker’ by default. We no longer send the default to the insurers. Instead, we will send what the underwriter selects in the Source of Business field within the Summary Tab of the Loan Details widget.

Purpose Code Field
Note: This field is tenant specific and may not be visible in your environment.
The Purpose Code field acts as a sub purpose to the Application Purpose field. It is located with the Requested Mortgage tab in the Loan Details widget.
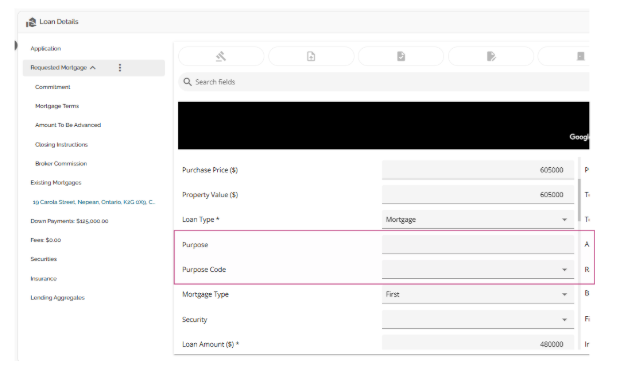
This field will auto populate for the “Switch/Transfer” and “Future Use” Application Purpose types but can be manually overridden. Switch Transfer will default to a Purpose Code of Mortgage Assignments and Future Use will default to Future Use.
For other Application Purpose types such as “Purchase” and “Refinance”, the user will have to manually select the most appropriate Purpose Code from the drop down menu.
If the Application Purpose field is amended, the Purpose Code will also be amended. The Purpose Code will automatically update to Future Use or Assignment Transfer if changed to Future Use or Switch/Transfer respectively. For other fields such as Purchase or Refinance, it will default to blank ensuring that the user updates it accordingly.
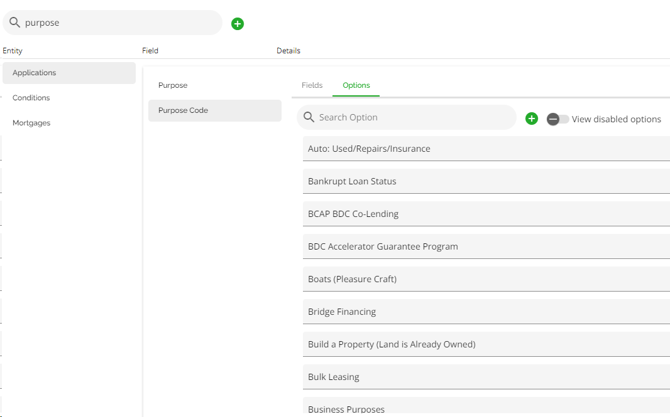
The Purpose Code options are extensive and can be managed in the Custom Fields section of the Manager Portal.
We have enhanced the system to ensure that Purpose and Sub-Purpose now apply at the product level rather than the overall application.
Key Changes:
- In multi-product applications, Application Purpose and Purpose Code are now independent for each product.
- For POS-submitted deals, Application Purpose maps to Purpose, while Purpose Code maps to Sub-Purpose.
- Purpose Code can be found in the Mortgage, Commitment, and Mortgage Terms tabs within the Loan Details widget for each requested product.
- Entering a purpose in one tab automatically updates it across all three tabs—but only for that specific product.
- Other products within the application remain independent and require their own Purpose Codes.
- The sub purpose is accurately mapped to the lender’s banking system on upload.
This enhancement improves data accuracy and alignment with banking system requirements.
Adding Multiple Products
Users are able to add multiple products on the same deal. When specifying the type of mortgage being requested for the products, users have the option to select different “Mortgage” types, allowing for two or more types on the same security. This gives users more flexibility and control over their mortgage requests.
To add multiple products on a deal, follow these steps:
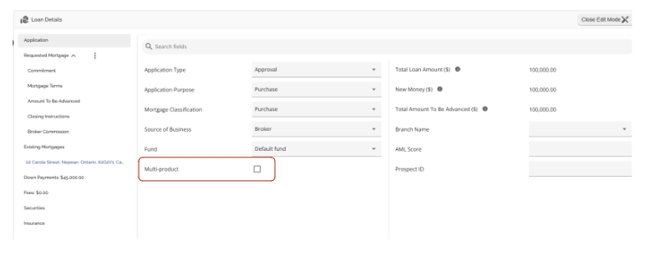
- Navigate to the Application tab in the Loan Details widget.
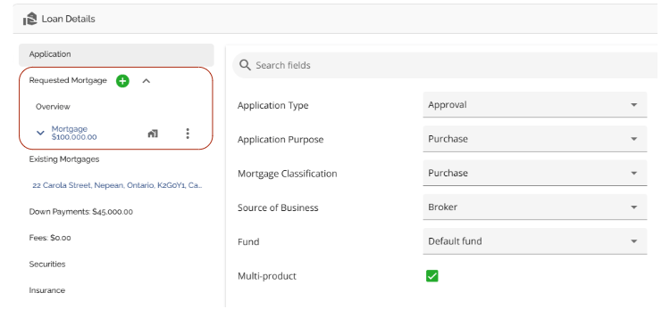
- Select the checkbox next to the “Multi Product” field.
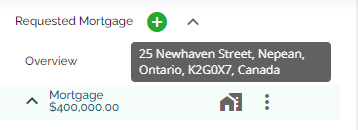
3. A green plus button will appear next to the Requested Mortgage tab. This allows you to add another Mortgage/Product to the deal.
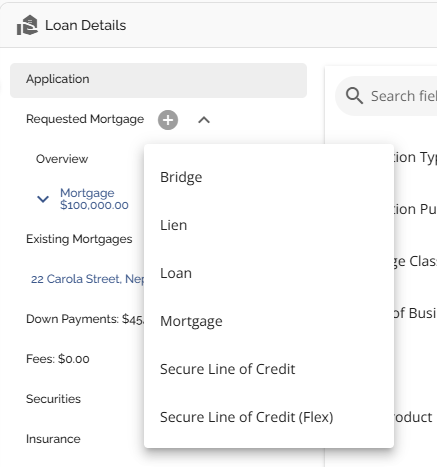
4. Click on the Add Mortgage button next to the Requested Mortgage tab (i.e. the green plus button).
5. Select the appropriate Mortgage Type from the dropdown menu.
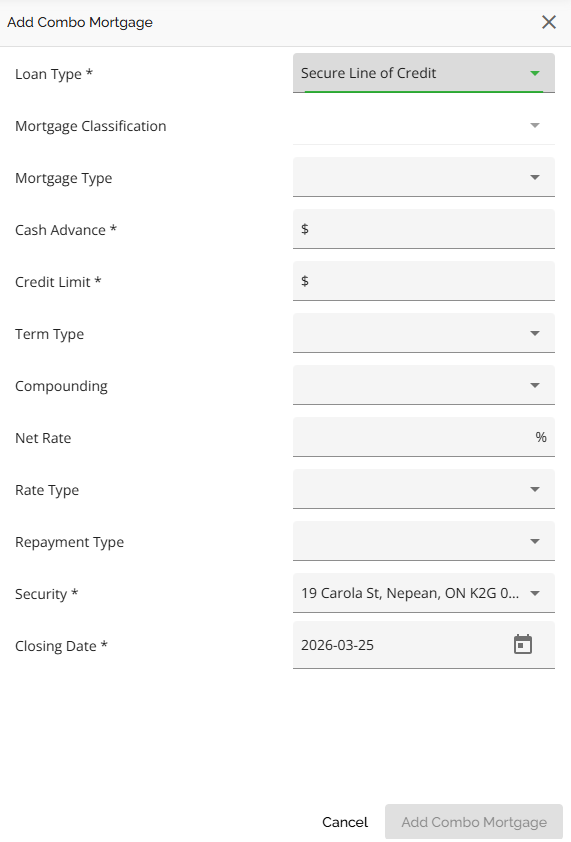
6. Complete the appropriate field in the sidebar that pops up. Note: Depending on the product selected, your field labels may differ slightly.
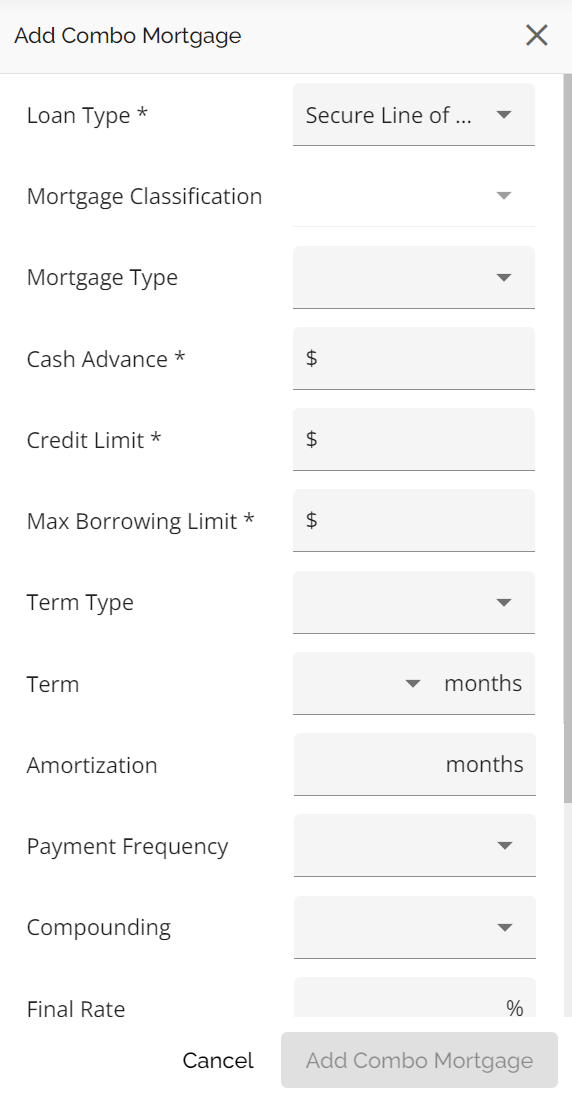
7. Click on the Add Combo Mortgage button when completed.
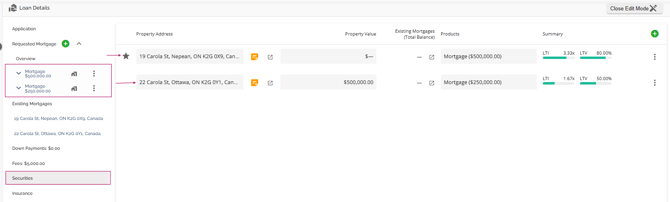
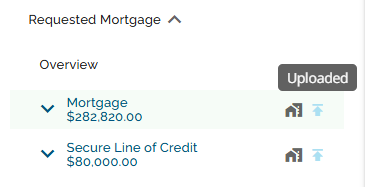
When an additional product is added to the deal, it will have its own section in the Requested Mortgage tab.
Furthermore, when looking at the security (property) you can see the individual products that have been attached to that security.
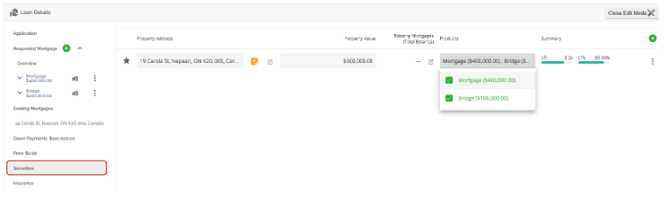
If a product is linked to a security, an icon will be displayed next to it in the Requested Mortgage tab. Hovering over this icon will display a tooltip showing the appropriate address.
The subject property will automatically display beneath the Existing Mortgages tab and within the Securities tab in the Loan Details widget.
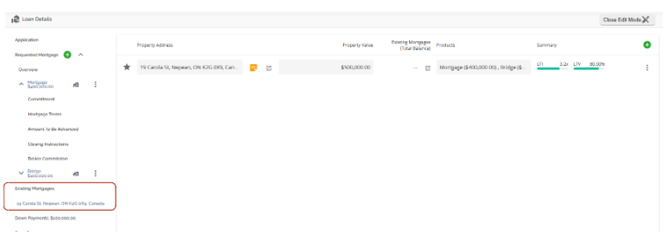
When additional properties are added as additional securities they will populate beneath Existing Mortgages and within the Securities tab in Loan Details. The Overview tab will list all products. When you click on one, the rendered view displays a list that is filtered to the existing mortgages on that property.
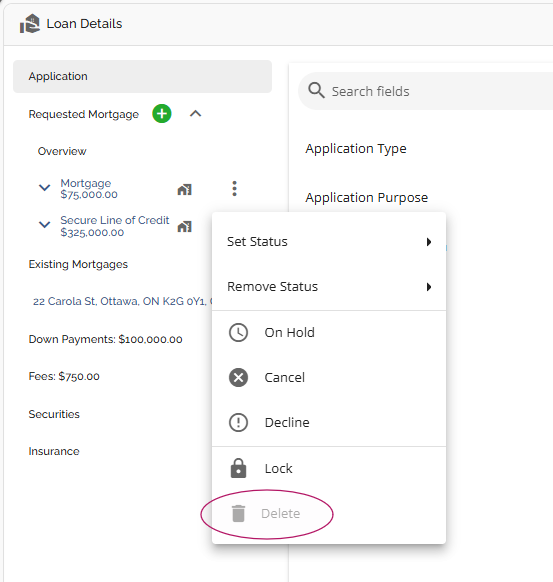
You can delete a product from a deal if necessary however, this must be done before the deal is conditionally approved. To delete a product, click on the ellipsis located to the right of the product in the Requested Mortgages tab. Select the Delete option from the dropdown menu.
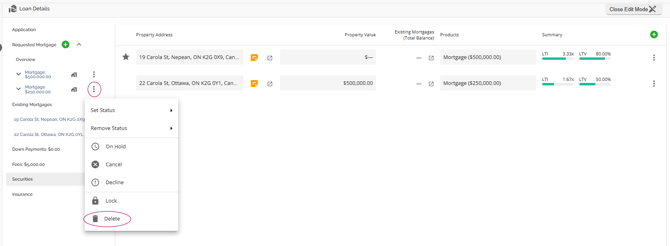
Once an application is conditionally approved, the deletion of a product is no longer possible, and the delete button for the product will show as disabled.
Max Borrowing Limit Field Logic Update for Line of Credit Products
This is lender specific and may not apply to your organization.
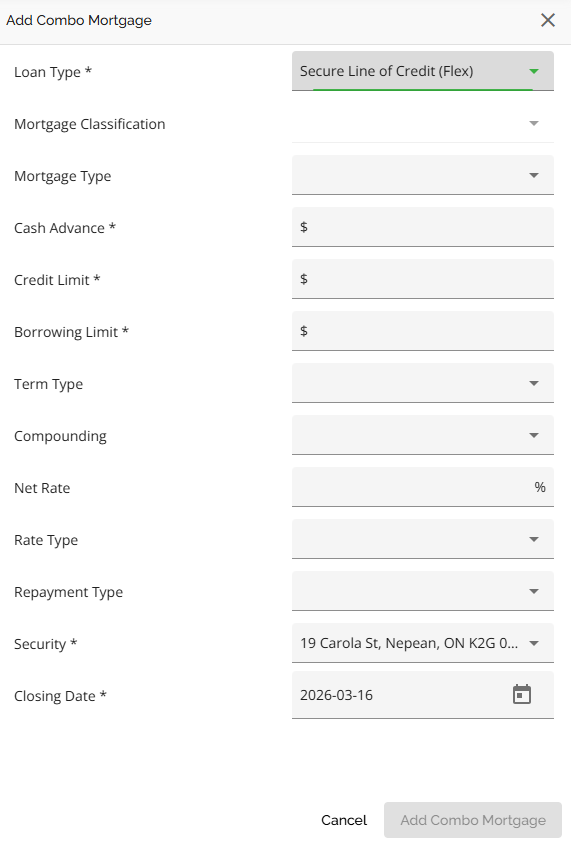
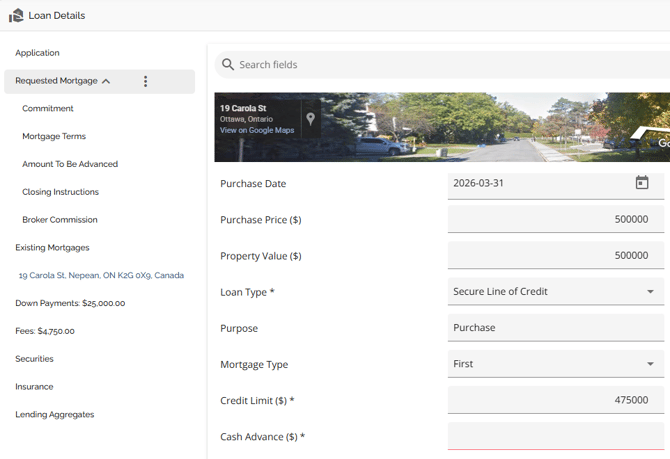
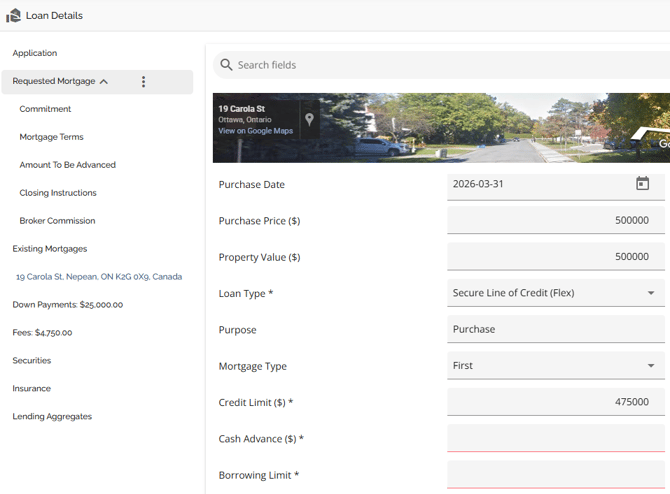
The "Max Borrowing Limit" field logic has been updated to enhance clarity within the LOS. This field is now mandatory only for Flex products (e.g., Broker HELOC - Flex) and disabled for Secure Line of Credit products to prevent confusion. Additionally, when a Secure LOC (Flex) is selected, the max borrowing limit will be sent to the banking system. Loan type changes will now clear cash advance and borrowing limit values and can only be modified if required fields are completed.
|
Add Mortgage Secure Line of Credit: Secure Line of Credit (Flex): Requested Mortgage Overview Secure Line of Credit:
Secure Line of Credit (Flex): Mortgage Terms Secure Line of Credit:
Secure Line of Credit (Flex): |

Mortgage Status
Note: This is a tenant specific feature. It only applies if your organization has this functionality enabled.
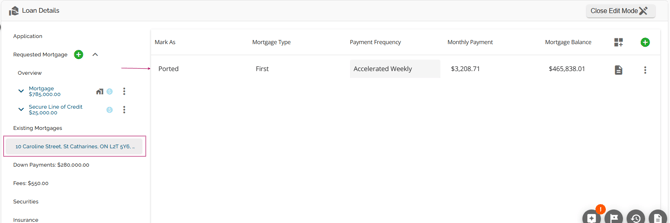
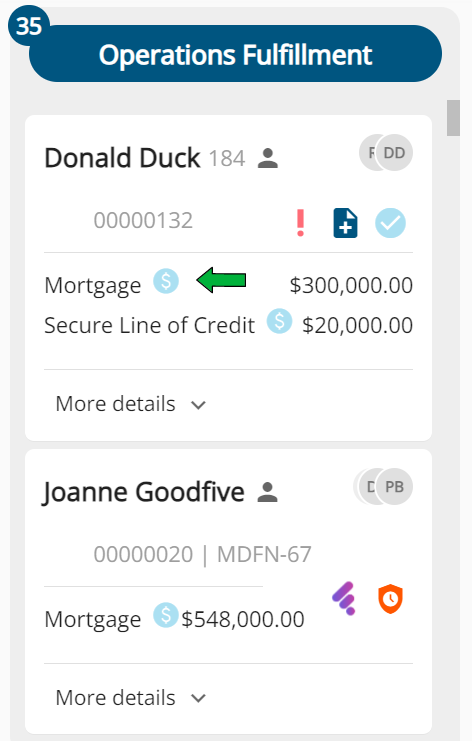
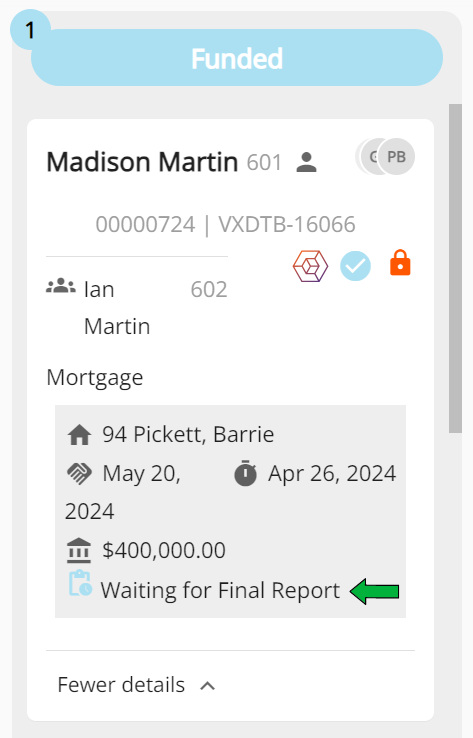
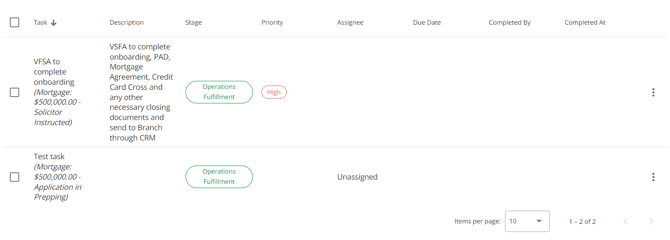
We have included a status bar in the Requested Mortgages section. This is used to indicate the Mortgage Status, and applies to the Operations Fulfillment and Funded stages. If there are multiple products, users can conveniently monitor the status of each individual product through separate product cards in the Overview section.
Statuses are similar to Stages. Each status is represented by a unique icon accompanied by a tooltip, offering guidance on the current status and indicating whether the user is in the appropriate stage to apply it to the deal. These statuses align with specific stages such as Operations Fulfillment or Funded. To view the tooltip, simply hover over the status icon.
![]()
Based on the image above, the statuses from left to right are:

To apply a status, simply click on the appropriate status icon in the status bar. The status will be added to the deal as long as it is in the appropriate stage. Alternatively, you can add or remove a status by clicking on the ellipsis to the right of the product, as seen below. The status can be removed while in any application stage.
Users have the flexibility to individually select statuses for each product, and the system retains a record of all selected statuses rather than just the last one. Statuses can be chosen in any order. Users can select any applicable status, even if a previous status has not been applied yet, as long as they pertain to the stage the user is currently in. Refer to this video for a demonstration of this functionality: Product Status Selection.
Removing a status acts like reverting, it will simply remove the indicated status from the deal.
The most recent status applied will be visible in the pipeline view as indicated below:
Pipeline Board (Kanban) View:
Pipeline List View:

Regarding stage transitioning, the system blocks Funding until all active mortgages have the status “Funds Disbursed” applied. If any product on the file does not show this status, the Fund button will be disabled, and the user cannot fund the deal. In this case, if a user hovers over the greyed out Fund button, a message will be displayed indicating that "Not all products have the Funds Disbursed status”.
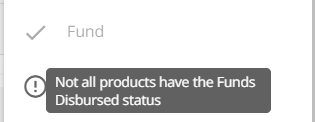
Once the status is updated to Funds Disbursed, the Fund button will become enabled. With the button enabled, the user can proceed to fund the deal.

When tasks are configured in the Manager Portal and have statuses assigned to them, the applicable task will automatically appear in the task list when the corresponding status is activated.

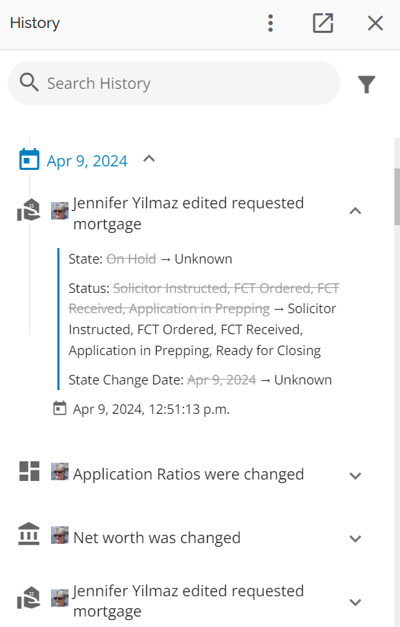
All status updates are tracked and recorded in the history log.
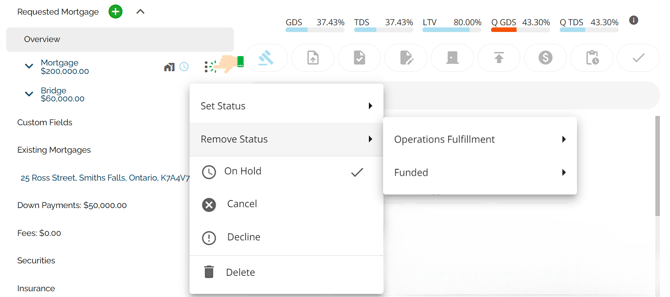
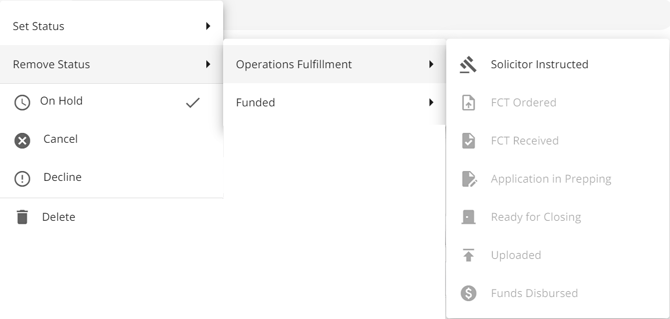
On Hold, Cancel, Decline, & Lock States on Products
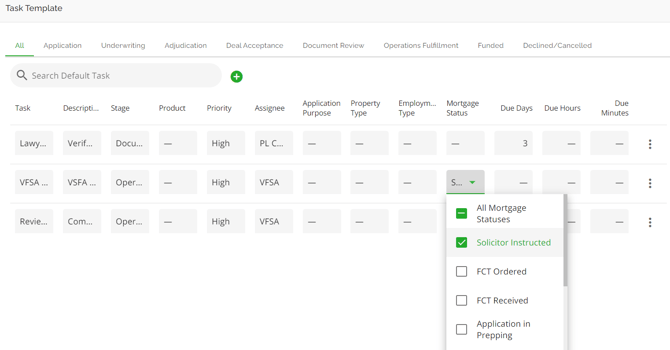
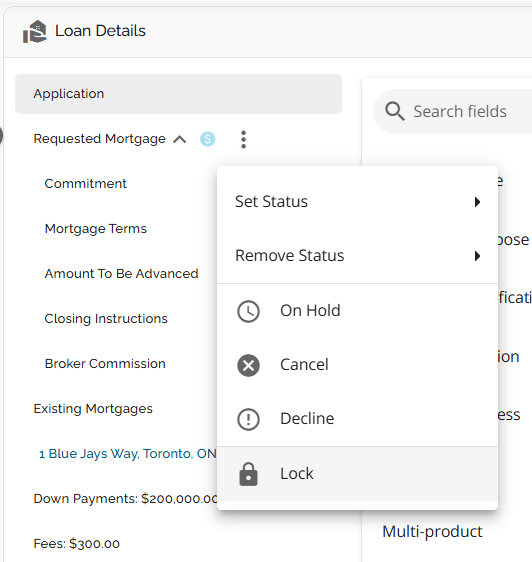
In addition to the Mortgage Status, users have the ability to add or remove the states of “On Hold”, “Cancel”, “Decline” & “Lock” on products. These states can be added or removed at any stage. A state (On Hold, Cancel, Decline) is reset when a status (Solicitor Instructed, FCT Ordered, etc.) is set or removed. The Lock state is the exception, it will remain in place when a status is set or removed. In this case, the Lock state would need to be manually removed. However, a status (Solicitor Instructed, FCT Ordered etc.) is not reset when a state (On Hold, Cancel, Decline, Lock) changes. As info, the cancelled or declined products are not selectable under securities.
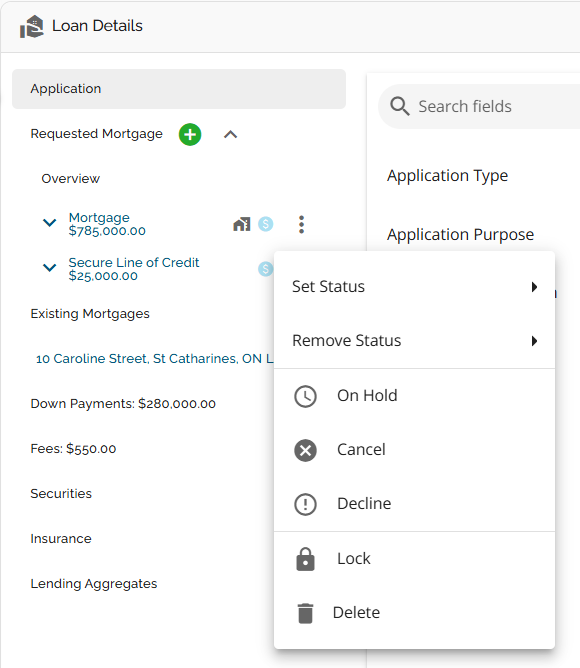
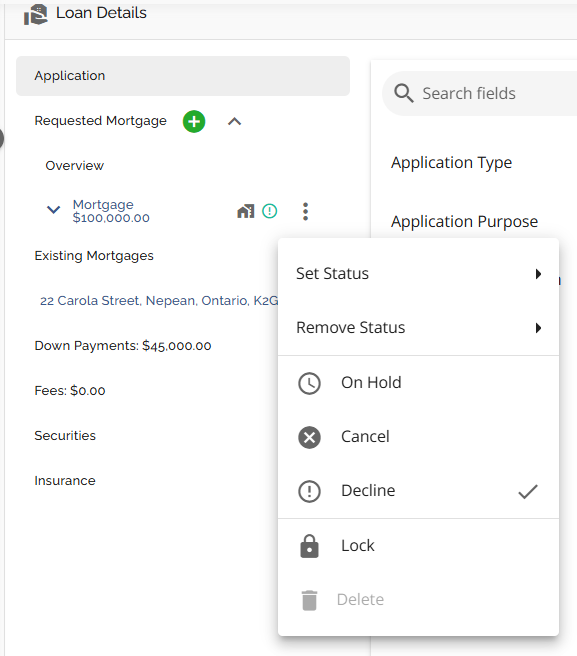
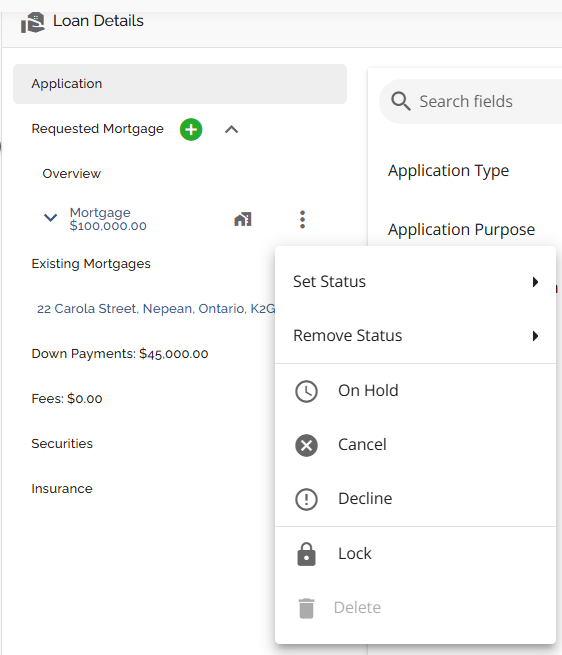
States are accessible via the ellipsis located to the right of the Requested Mortgage tab. When you click on the ellipsis, a dropdown menu appears for the user to select the appropriate option. The options vary slightly depending on if there is just one product on the deal or there are multiple products. In the case of multiple products, there will be an option to delete a product.
Single Product:
Multi Products:
All state updates are tracked in the history log and have their own icon with an accompanying tooltip. The icons for these states only appear to the right of the product. They will not show at the top of the dashboard or within the status bar in the Overview section of the Requested Mortgages tab.
On Hold is represented by a clock icon:

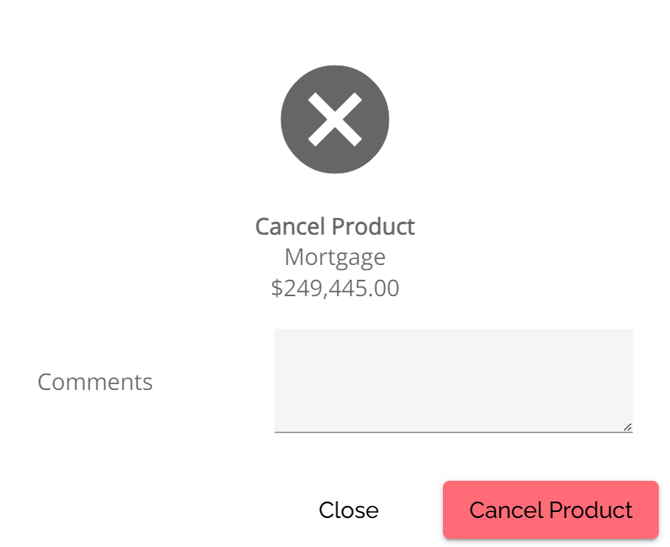
Cancel is represented by an “x” icon.

When the cancel option is selected, a confirmation pop up will appear. Enter any relevant comments then click on the Cancel Product button:
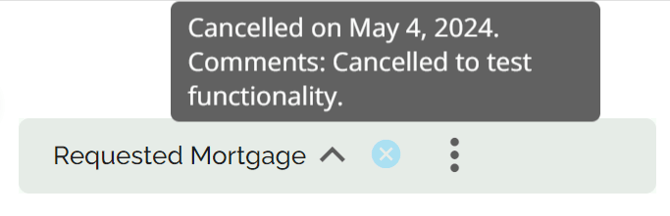
Once cancelled, the cancel icon will appear next to the Requested Mortgages tab. When you hover over the icon, it will provide information on when it was cancelled and any comments included by the user who cancelled it.
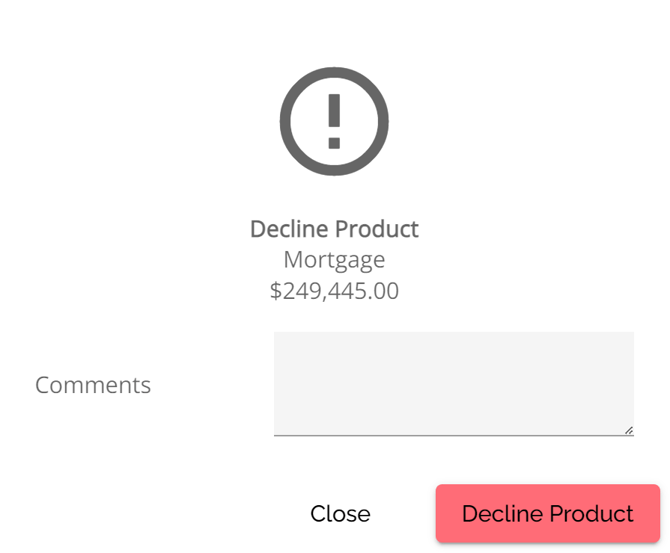
Decline is represented by an “!” icon.
![]()
When the decline option is selected, a confirmation pop up will appear. Enter any relevant comments then click on the Decline Product button:
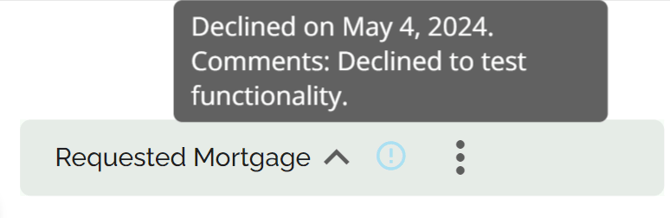
Once declined, the decline icon will appear next to the Requested Mortgages tab. When you hover over the icon, it will provide information on when it was declined and any comments included by the user who declined it.
Lock is represented by a “lock” icon.

These states can easily be cleared if needed. To do so, click on the ellipsis next to the Requested Mortgages tab. A checkmark will be displayed next to the option that has been applied on the deal, i.e. "On Hold", "Cancelled", "Declined" or “Locked”. Simply click on the state and it will be cleared from the deal and the check mark will be removed.
All actions relating to the On Hold, Cancelled, Declined and Locked states will be logged in the application history.

Base Rate, Final/ Net Rate and Original net rate
The Original Net Rate represents the initial rate that was ingested with the application as submitted by the broker. It reflects the original rate that was requested on the application.
The Base Rate is the rate the lender applies either automatically via Product selection or by manual entry before any Buydowns or Discounts are applied.
The Final or Net Rate is the actual rate after any Buydowns, Discounts, Increments, Discretion or Decrements are applied. The net rate is used to calculate payment. It serves as the basis for the Qualifying Rate, which is determined as the net rate + 2% or 5.25%, whichever is greater.
In the example below, you will see an Original Net Rate of 4%. This is the rate the application ingested with. The Base Rate of 3.8% is the rate the lender applied before the Buydown of 0.05% and the Increment of 0.25% were applied. After applying the Buydown and the Increment, the Final/ Net Rate becomes 4%. This rate will be used when populating any generated documents, is the rate that the payments are calculated on, and is what the Qualifying Rate is based on.


Users can edit the Base Rate directly within the Loan Details widget. To do so, follow these steps:
- Click on the pencil icon to the right of the Base Rate field. This will open a pop-up sidebar.

2. A pop-up sidebar will appear. It will display the Standard Rate as selected (i.e. the Base Rate), an option for a Custom rate, and a summary of the product terms selected or applied on the deal.
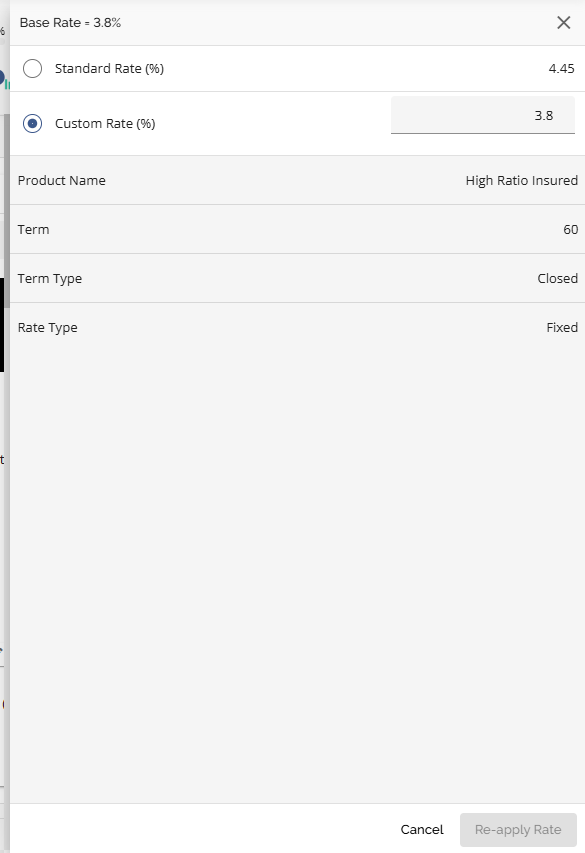
4. Click on the Re-apply Rate button once completed.
Once applied, the Base Rate and the Net Rate will automatically be updated.

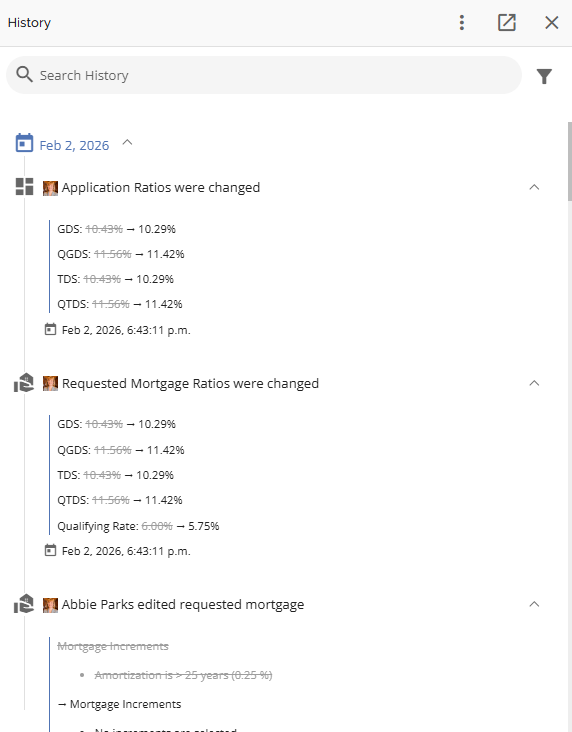
A history log noting the rate change and the ratio changes will be created in the application history.
Understanding Variable & Adjustable Rates and Rate Holds
When the mortgage has a variable or adjustable rate, then what the borrowers are “buying” from the lender is the spread or what we call the modifier, not the net rate. This is because the lender does not control how the Prime rate is going to fluctuate from the Bank of Canada.
In these scenarios, when there is an active rate hold, the system should not look at holding the base rate but holding the smaller modifier.
The scenarios below only apply to variable/adjustable mortgages and only when products have a variable/adjustable rate.
|
Requirement |
Current Rate |
New Rate |
|
When,
Then
|
(A) Prime Rate: 5.45 (B) Modifier: -0.85 (C) Base Rate (A+B): 4.6 (D) Discount: 0 (E) Net Rate: (C-D): 4.6 |
(A) Prime Rate: 5.2 (B) Modifier: -0.85 (C) Base Rate (A+B): 4.35 (D) Discount: 0 (E) Net Rate: (C-D): 4.35
|
|
When,
Then
|
(A) Prime Rate: 5.45 (B) Modifier: -0.85 (C) Base Rate (A+B): 4.6 (D) Discount: 0 (E) Net Rate: (C-D): 4.6
|
(A) Prime Rate: 5.5 (B) Modifier: -0.85 (C) Base Rate (A+B): 4.65 (D) Discount: 0 (E) Net Rate: (C-D): 4.65
|
|
When,
Then
|
(A) Prime Rate: 5.45 (B) Modifier: -0.85 (C) Base Rate (A+B): 4.6 (D) Discount: 0 (E) Net Rate: (C-D): 4.6
|
(A) Prime Rate: 5.45 (B) Modifier: -0.85 (is kept because of ratehold) (C) Base Rate (A+B): 4.6 (D) Discount: 0 (E) Net Rate: (C-D): 4.6 (does not change)
|
|
When,
Then
|
(A) Prime Rate: 5.45 (B) Modifier: -0.85 (C) Base Rate (A+B): 4.6 (D) Discount: 0 (E) Net Rate: (C-D): 4.6
|
(A) Prime Rate: 5.45 (B) Modifier: -0.9 (C) Base Rate (A+B): 4.55 (D) Discount: 0 (E) Net Rate: (C-D): 4.55
|
|
When,
Then,
|
(A) Prime Rate: 5.45 (B) Modifier: -0.85 (C) Base Rate (A+B): 4.6 (D) Discount: 0 (E) Net Rate: (C-D): 4.6 |
(A) Prime Rate: 5.5 (B) Modifier: -0.85 (C) Base Rate (A+B): 4.65 (D) Discount: 0 (E) Net Rate: (C-D): 4.65 |
|
When,
Then,
|
(A) Prime Rate: 5.45 (B) Modifier: -0.85 (C) Base Rate (A+B): 4.6 (D) Discount: 0 (E) Net Rate: (C-D): 4.6 |
(A) Prime Rate: 5.2 (B) Modifier: -0.85 (C) Base Rate (A+B): 4.35 (D) Discount: 0 (E) Net Rate: (C-D): 4.35 |
|
When,
Then,
! If the prime rate rises while the modifier decreases, the net rate may end up higher, lower, or unchanged compared to the initial rate. |
(A) Prime Rate: 5.45 (B) Modifier: -0.85 (C) Base Rate (A+B): 4.6 (D) Discount: 0 (E) Net Rate: (C-D): 4.6 |
(A) Prime Rate: 5.5 (B) Modifier: -0.9 (C) Base Rate (A+B): 4.6 (D) Discount: 0 (E) Net Rate: (C-D): 4.6 |
|
When,
Then,
|
(A) Prime Rate: 5.45 (B) Modifier: -0.85 (C) Base Rate (A+B): 4.6 (D) Discount: 0 (E) Net Rate: (C-D): 4.6 |
(A) Prime Rate: 5.2 (B) Modifier: -0.9 (C) Base Rate (A+B): 4.3 (D) Discount: 0 (E) Net Rate: (C-D): 4.3 |
|
When,
Then
|
(A) Prime Rate: 5.45 (B) Modifier: -0.85 (C) Base Rate (A+B): 4.6 (D) Discount: 0.3 (E) Net Rate: (C-D): 4.3 |
(A) Prime Rate: 5.45 (B) Modifier: -0.9 (C) Base Rate (A+B): 4.55 (D) Discount: 0.3 (E) Net Rate: (C-D): 4.25 |
|
When,
Then
|
(A) Prime Rate: 5.45 (B) Modifier: -0.85 (C) Base Rate (A+B): 4.6 (D) Discount: 0.3 (E) Net Rate: (C-D): 4.3 |
(A) Prime Rate: 5.45 (B) Modifier: -0.9 (C) Base Rate (A+B): 4.55 (D) Discount: 0.25 (E) Net Rate: (C-D): 4.3 |
Displaying the Components of the Adjustable/Variable Rate Separately
Base Rate Field and Edit Sidebar
Example:
- Base Rate = Prime Rate + Modifier, where:
- Prime Rate = 6.95%
- Modifier = 0.5%
|
Component / Field |
Displayed as |
Comment |
|
Base Rate |
Prime (6.95) + 0.5 % |
When hovering over the value, user can see the result of Prime + Modifier, in this case 7.45% |
|
Standard Rate |
Prime (6.95) + 0.5 % |
When hovering over the value, user can see the result of Prime + Modifier, in this case 7.45% |
|
Special Rate |
Prime (6.34) + 0 % |
When hovering over the value, user can see the result of Prime + Modifier, in this case 6.34% |
|
Custom Rate |
Prime (6.95) + __ % |
Only the modifier is editable, Prime rate stays as it is |
Product Selection List
|
Updated Component |
Displayed as |
Comment |
|
Prime Rate |
|
Prime Rate updates always apply to the mortgage, even if a Rate Hold is active. |
|
Modifier (decreases) |
|
Modifier updates are applicable when the Rate Hold is active, resulting in a better rate |
|
Modifier (increases) |
|
Modifier updates are not applicable when the Rate Hold is active, because it would result in a higher rate. |
Understanding Prepayments
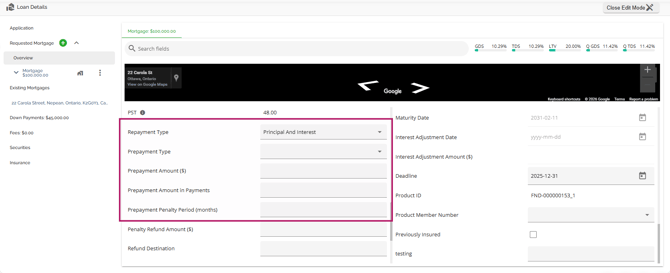
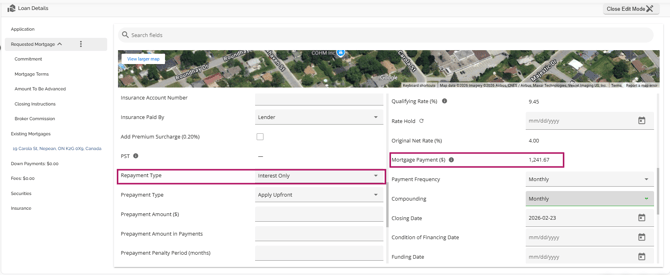
Prepayments are essentially interest reserves. These are generally used by MICs, Private Lenders and some Alternative Lenders. Interest reserves are funds that the lender sets aside in an escrow account to ensure they have enough money to cover the borrower's interest payments. Prepayments can be applied two ways: Upfront or Spread Evenly.
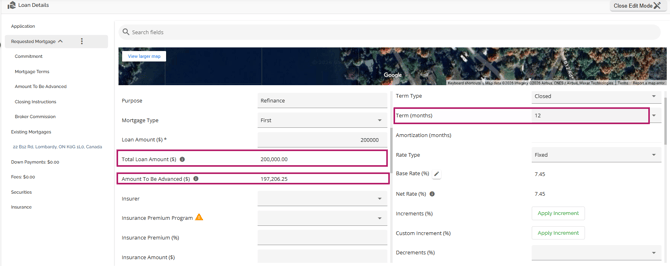
Apply Upfront - This allows the lender to hold back any number of payments which they will then apply on the payment date. Typically 12 months of payments are held back for a 1 year term however, it is possible for the number of payments held back to be fewer than the term. This ensures the lender will receive their payments with the expectation that the client will refinance and pay the mortgage off at the end of the term. To be able to do this, there needs to be sufficient funds available from the advance to cover the prepayment (holdback) amount.
Before Prepayment is Applied:
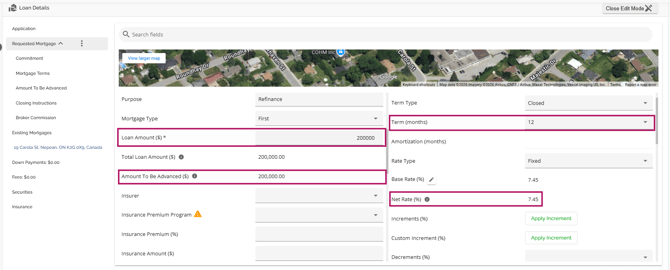

After Prepayment is Applied (Upfront Method):
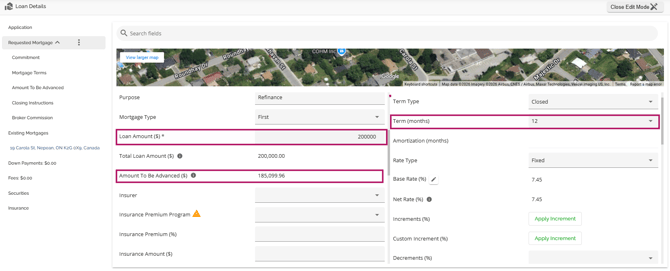
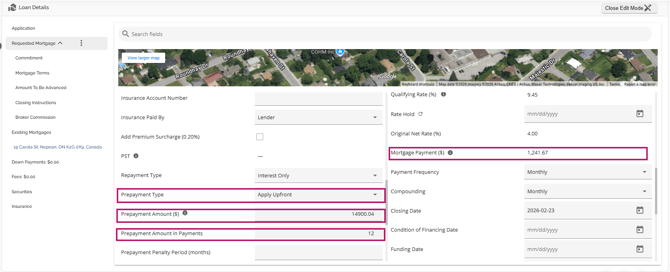
As seen in the example above, after applying the Prepayment of 12 payments, the Amount To Be Advanced decreased by the equivalent of 12 monthly payments. This amount will be held in an escrow account, and the lender will withdraw funds from this account each month to make the payment on the mortgage.
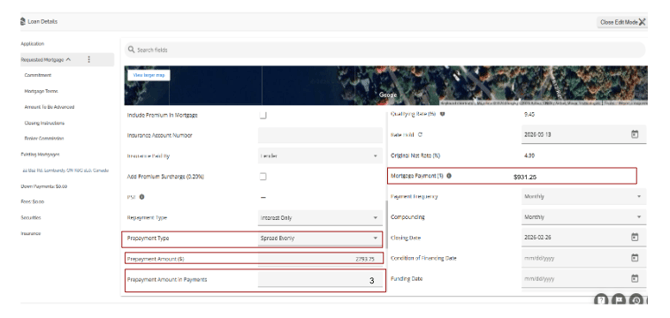
Spread Evenly - This offers the borrower the opportunity to reduce the portion of the payment they need to make, and use funds from the interest reserve to make up the difference. Spread evenly is a situation where the borrower can only afford a smaller payment than what is required by the mortgage terms. Presuming they have sufficient funds from the advance to cover the prepayment, the lender can calculate a reduced portion that the borrower needs to pay. The borrower will still make the full payment, but a portion of it will be paid by the borrower while the remaining amount will be taken from the prepayment held in an escrow account.
The calculation used for this takes the original monthly payment and divides it by the number of months in the term to come up with a value. That value is then multiplied by the Number of Prepayments indicated. The resulting value is the amount the original payment will be reduced by. This scenario occurs when the client may not have the financial capacity to afford the monthly payments, but they have funds available to decrease the payments to a more affordable amount. Using the same example as above, the original monthly payment is $1241.67. This amount divided by 12 (months in term) = $103.47. If a 3 month prepayment is applied, that will be $310.42. Finally, $1241.67 - $310.42 = $931.25.
Before Prepayment is Applied:

After Prepayment is Applied (Spread Evenly):
Automatic Date Calculations
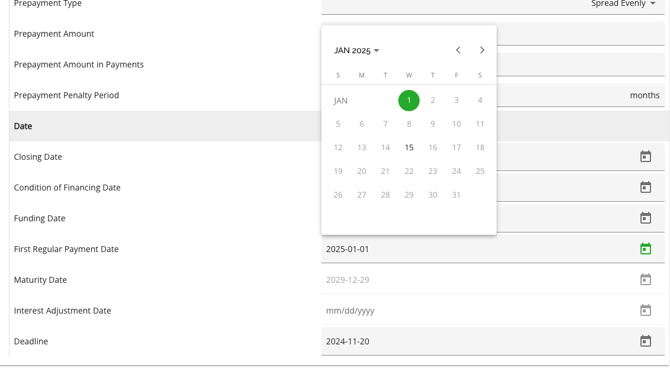
In order to automate redundant and error prone tasks, we have implemented a fully automated dates management system. Using the closing date as a starting point, our system automatically calculates the First Regular Payment Date and Maturity Date based on the Payment Frequency and Term. Additionally, when the First Payment Date is selected or updated, the system automatically calculates the Interest Adjustment Date (IAD) and amount, eliminating the need for manual adjustments by underwriters. In that case, the Maturity Date will also be automatically adjusted.
It should be noted that the system assumes an end of month payment frequency. I.E. If the closing date is March 31st, the 1st payment will be set to April 30th, with May being on the 31st etc.
The Maturity Date field is automatically calculated and cannot be edited. It is determined based on the term and closing date, or the Interest Adjustment Date (IAD) if applicable. In specific tenant environments, we have updated the system to automatically update the maturity date when a bi-weekly payment frequency is selected. With this update, the system will automatically adjust the maturity date, taking into account the remaining number of payments required. If any changes need to be made to the dates from the initial application, the user will need to adjust the Payment Frequency, and the system will update other dates accordingly. Typically, changes are required when there is a modification to the Closing Date, Payment Frequency, the customer's preferred payment date from the original submission, or a broker has input an incorrect IAD.
We also have Enhanced Maturity Date Calculations for Multi-Product Applications. We have improved the system to calculate maturity dates independently for each product within a multi-product application. This ensures the correct maturity date is populated in documents and uploaded to the banking system.
Key Enhancements:
- Each product in a multi-product application now has its own term and calculated maturity date.
- The term and maturity date for one product are no longer applied to additional products within the same application.
- The order in which products are added has no impact on the calculated maturity dates.
- Lines of Credit will continue to have no term or maturity date.
Calculation Logic:
- If the POS system provides a maturity date, it is set directly.
- If no maturity date is provided:
- With Interest Adjustment Date: The maturity date is calculated based on the IAD plus the selected term for monthly or semi-monthly payments or the IAD plus the number of payments in the term for weekly, bi-weekly, or accelerated payment frequencies.
- Without Interest Adjustment Date: The maturity date is calculated from the Closing Date plus the selected term for monthly or semi-monthly payments or the closing date plus the number of payments in the term for weekly, bi-weekly, or accelerated payment frequencies.
This update resolves incorrect maturity date calculations for multi-product applications, ensuring each product’s details are accurate and independent.
We have updated the interest adjustment date calculator to align with semi-monthly payment rules, ensuring accurate handling based on the next payment date. The system correctly calculates the First Regular Payment Date and Maturity Date for semi-monthly payment frequency when the applicable tenant settings are enabled. The First Payment Date will default to either the 15th or 30th (or 28/29 for February). A missing scenario has also been addressed to ensure that deals closing on December 30th will correctly set January 15th as the next payment date.
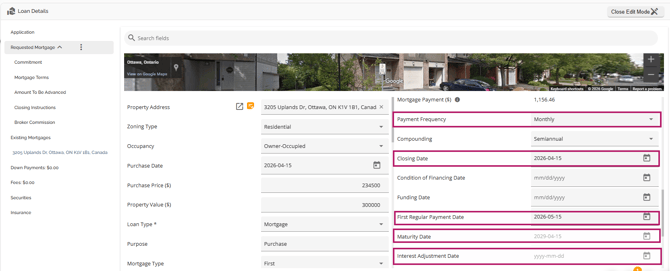
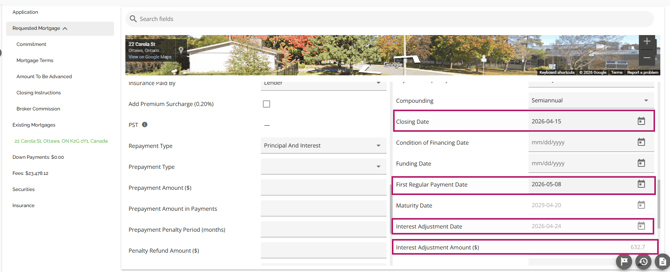
For a better understanding of the system configuration, let's consider a scenario where a deal is submitted with a closing date of April 15th, 2026, on a monthly payment frequency. The system will set the First Payment date to May 15, 2026, with a maturity date of April 15, 2029 (assuming a 3-year term). While no IAD is displayed in the user interface (UI), it is logged in the backend as April 15, 2026.
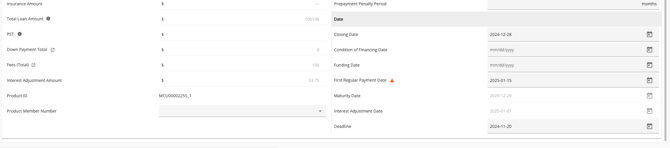
Assume the client requests biweekly payments on Fridays to coincide with their pay dates, with the first payment due on April 24th. Since this date is more than two weeks from the closing date and does not represent a full payment period, the user would update the payment frequency to biweekly and set the First Payment Date to May 8, 2026 (the next closest payment date). Subsequently, the system will automatically compute the IAD as April 24, 2026, and calculate the Interest Adjustment Amount to be collected.
Adjustment of First Payment Date and Impact on Amortization
Note: This is a tenant setting and may not apply in your environment
When the first payment date is manually set earlier than the full payment frequency (e.g., earlier than one month for monthly payments), the lender’s banking system processes a full payment. However, interest is only calculated for the shortened period, with the remaining amount allocated to the principal. This results in a smaller balance after the first payment compared to a regular full-period payment, effectively altering the amortization schedule.
To address this, the system has been configured to adjust the amortization schedule accordingly, ensuring accurate calculations that reflect these early payments.
First Payment Date Rules Based on Frequency
To ensure compliance with mortgage payment scheduling, the LOS now enforces rules for the first payment date based on frequency and the closing/funding date. This prevents users from exceeding the allowed number of days between funding and the first payment.
Key Updates:
- Validation Rules by Payment Frequency:
- Weekly: First payment must be within 9 days of closing.
- Biweekly: First payment must be within 16 days of closing.
- Semi-monthly: First payment must be within 17 days of closing.
- Monthly: First payment must be within 35 days of closing.
- System Warning Enhancements:
- If the first payment date exceeds the allowed timeframe, a warning message appears.
- The existing 5-day difference warning for PAD setups from external accounts remains applicable.
- Warnings will dynamically adjust based on the payment source:
- Display the 5-day warning when there is at least one external payment source in the stakeholder PADs and the tenant setting is enabled.
- Display the 9/16/35-day limit warning based on payment frequency when no external payment source exists on any stakeholder PAD, and the relevant tenant settings are enabled.
These rules apply only to mortgage products, they have no impact on other products or processes.
Custom First and Second Payment Dates for Semi-Monthly Payments
Note: This is a tenant-setting that defaults to disabled. To have it enabled in your environment, contact FundMore’s Client Success Team.
We have introduced enhancements to support improved semi-monthly payment options, ensuring payment dates align with lender requirements.
- Available for Origination, Renewals, and Servicing (Payment Changes) deal types.
- Applies to all Mortgage and Loan products, excluding Line of Credit and Bridge.
- Supported in all applicable lender channels (e.g., Broker, Retail, MMS, Digital).
Key Enhancements:
- New Semi-Monthly Payment Options:
- The 30th has been added as a valid payment date, replacing the 1st as a selectable option.
- Users can now only select the 15th or 30th as the first regular payment date for semi-monthly payments.
- Automatic First Payment Date Selection:
- Based on the closing date, the system will automatically select the closest valid first payment date:
- Closing Date on or before the 15th → First Payment Date: 15th
- Closing Date between the 16th and 29th → First Payment Date: 30th
- Closing Date on the 30th → First Payment Date: 15th of the following month
- Only the 15th and 30th (dates after the closing date) are displayed as selectable options in the date picker.
- If the user attempts to manually type a date other than the 15th or 30th, or a date before the closing date, the system will display an error message.
- The system then calculates and displays the Interest Adjustment Date and Interest Adjustment Amount if applicable.
- Interest Adjustment Date and Amount:
- These fields will remain empty unless the user manually adjusts the first payment date.
- Manual adjustments only allow selecting the 15th or 30th; entering any other date will result in an error.
- API and Documentation Support:
- The selected 15th or 30th date will be pushed to the banking system for Product Creation.
- The system will reject any semi-monthly first payment date set to the 1st to align with lender requirements.
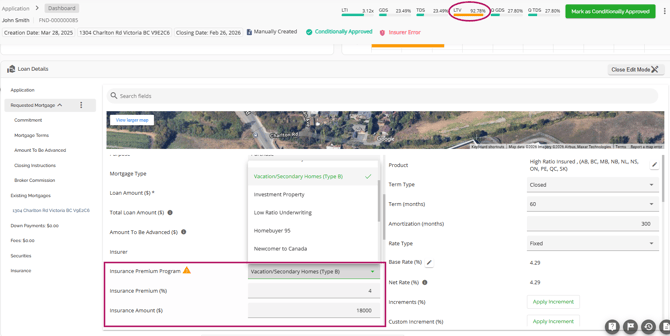
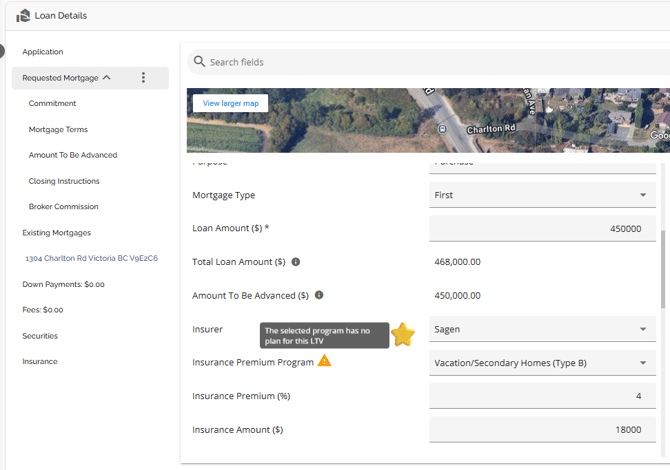
Insurer Programs and Automatic Premium Recalculation
To streamline the underwriting process and save time, we have incorporated automated features for insurance premiums. The premium is automatically updated based on the insurer program selected and the LTV. This means that as the LTV changes, the insurance premiums will automatically adjust accordingly. Moreover, if the user decides to select a different program, the premium will be automatically updated specifically for that program and transaction.
Another functionality we have incorporated is a warning indicator if the user tries to manually update the insurance premium and it no longer matches the selected program and LTV. By doing this, we ensure that the user is always kept informed.
FTHB/New Construction - Amortization Greater than 25 years
As per the regulations from the Government of Canada, mortgage amortizations of 30 years up to 35 years are available for all first-time home buyers and for any new construction purchases. The insurers will charge a Premium Surcharge on these transactions. To accommodate these regulatory changes we have created a checkbox labeled “Include Insurance Premium Surcharge (0.20%)”. The field is located with the other insurance fields:
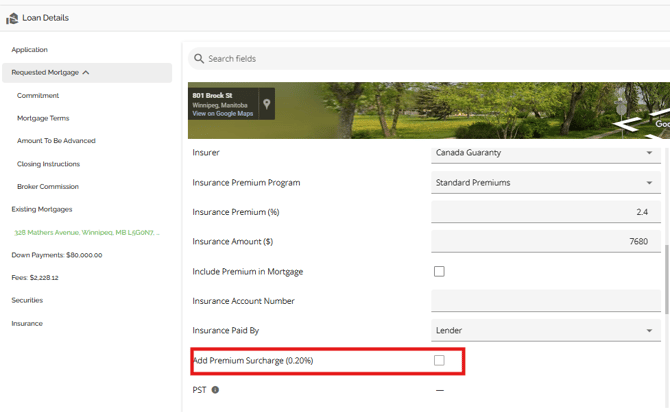
This enables the user to add the premium surcharge to the application when applicable. Note that this needs to be added manually. This feature is linked to the Loan-to-Value (LTV) ratio and adjusts the insurance premium based on preconfigured settings. Some notes on the checkbox behavior:
- The checkbox is enabled and selectable only if the LTV for the mortgage product exceeds 80%.
- To apply the Premium Surcharge, the user must manually select it.
- If the LTV is 80% or lower, the checkbox is unchecked and disabled.
- When selected, the insurance premium automatically increases by an additional 0.20%.
- If the insurance premium is updated as a result of edits made (i.e. Loan amount changes) the 0.2% surcharge may not necessarily re-apply. I.E. If the loan was at 80.01% LTV or greater and the Premium Surcharge had been applied but was then adjusted so the LTV dropped below 80%, the Premium Surcharge will be removed. If the loan amount is increased back up to over 80% LTV, the Premium Surcharge will have to be manually re-applied.
- When the insurance premium is updated automatically by the insurer and program, the 0.20% surcharge is added if the LTV is above 80%.
This update ensures that the insurance premium surcharge is applied accurately based on the LTV ratio.
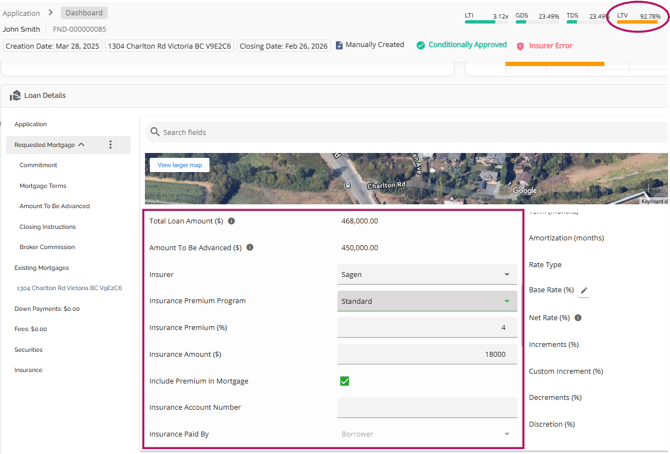
Low Ratio Insurance (Insurable vs Insured)
Lenders may want to insure applications even if the LTV is below 80%. In such cases, it is the lender's responsibility to cover the insurance premium and any applicable PST, rather than the borrower. The process remains the same, as the lender still needs to submit the file to the insurer for approval. However, there is a distinction in terms of who will be responsible for paying the insurance premium and how it will be paid.
To help lenders manage this, we have included an “Insurance Paid By” field and an “Include Premium in Mortgage” checkbox in the Requested Mortgage tab. On Low Ratio files, the user would use these fields to identify that the premium is being paid by the Lender and should not be included in the mortgage. To utilize this, simply uncheck the “Include Premium in Mortgage” box and indicate “Lender” in the “Insurance Paid By” field.
Upon doing so, the system will not include the premium in the mortgage and the Amount To Be Advanced will not be impacted as it would on a high ratio file where the premium is being paid by the borrower.
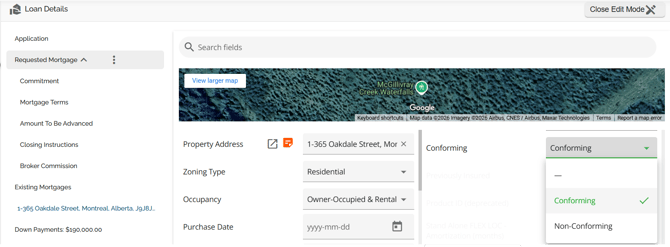
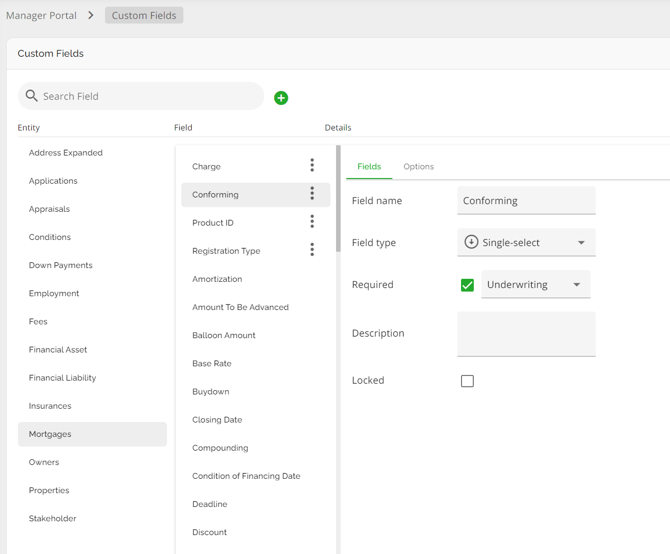
Conforming Field
Note: This feature is tenant specific and may not be enabled in every environment.
The conforming field is a single-select field with the two options in the drop-down being “Conforming” and “Non-Conforming”. The field only applies to the Mortgage Entity and as such, it is only displayed within the Requested Mortgage tab, not within the Existing Mortgages tab.
The field can be managed within the Custom Fields section of the Manager Portal. To find it, navigate to Custom Fields, click on the Mortgages Entity and click on the Conforming field. This allows you to mark the field as required.
Other Requested Mortgages Fields
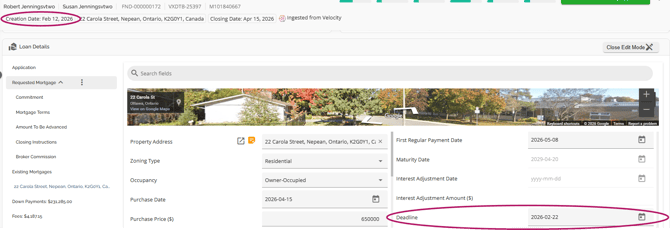
Deadline Date
This is intended to indicate the date the client is required to sign back by. The system will default to the creation date + 10 days but we may be able to configure this as needed. This field has a backend calculation to calculate the date based on the application creation date. It does not have a direct impact on any other fields.
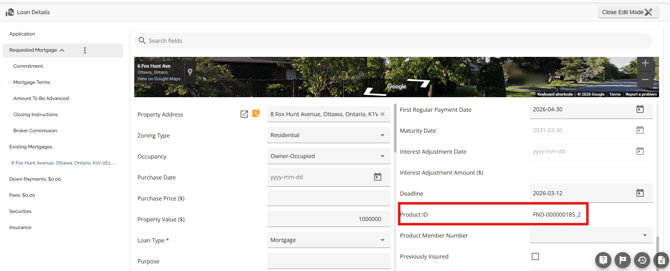
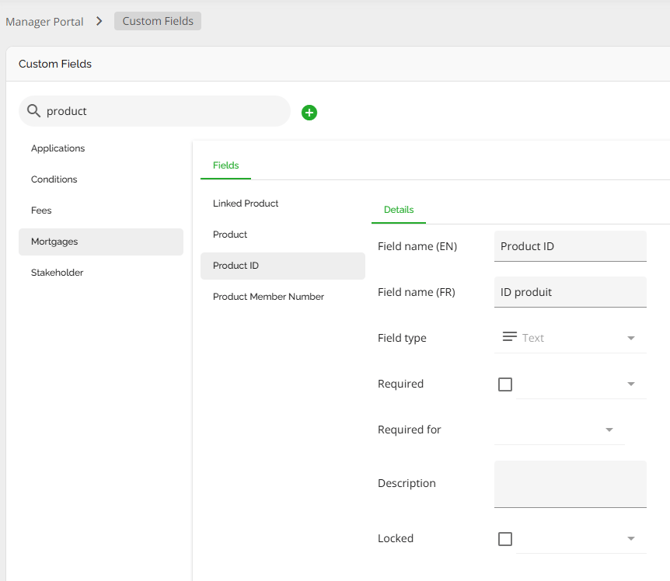
Product ID Field
We have included a Product ID field in the Mortgage Entity. It is located within the Requested Mortgage tab of the Loan Details widget. This is a system generated field that provides a unique identifier for requested mortgages. The value is the combination of the application loan number and a counter. With the exception of the ID configuration, this field can be managed or deleted in the Custom Field section of the Manager Portal. It is important to note that this field may be configured to appear only after the deal has transitioned to a specific application stage, such as Deal Acceptance. If this is the case, it will not be visible in previous stages. System administrators have the ability to adjust this configuration if needed.
Note: This field is tenant specific and may not be enabled in every environment.
Compounding Field
Automated Compounding Frequency Based on Rate Type
Note: This is a tenant setting and it defaults to disabled. To enable it, please contact our Client Success Team.
To improve loan accuracy and streamline workflows, the system now automatically assigns the correct compounding frequency based on the selected rate type. This eliminates mismatches and ensures consistency.
Key Updates:
- Automated Compounding Frequency:
- If Rate Type is Adjustable, then compounding defaults to Monthly.
- If Rate Type is Fixed, then compounding defaults to Semiannual.
- Adjusting Repayment Type will no longer trigger compounding frequency updates.
- Improved system logic to prevent the temporary incorrect switch to Monthly when selecting Adjustable Rate.
- With this tenant setting enabled, the system will not display unnecessary confirmation pop-ups when repayment type is changed.
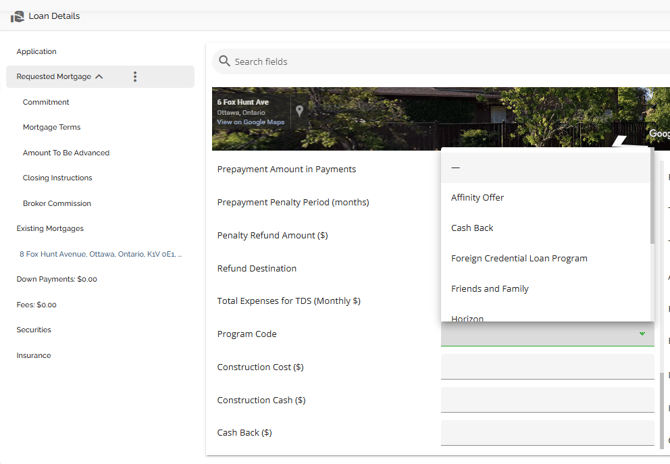
Program Code Field
Note: This field is tenant specific and may not be enabled in every environment.
This is a lender specific field. The Program code field is a single-select field located in the left hand pane of the Requested Mortgages tab. The options can be configured via Custom Fields in the Manager Portal.
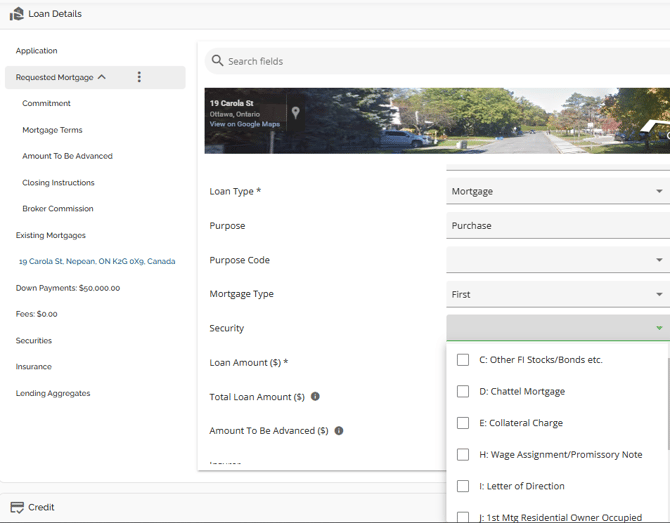
Security Field
Note: This field is tenant specific and may not be enabled in every environment.
This field is lender specific. The Security field is a multi-select field located in the left hand pane of the Requested Mortgages tab.
Closing Date / Restricted Dates
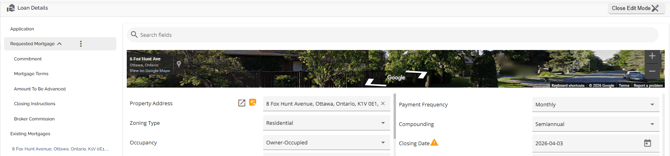
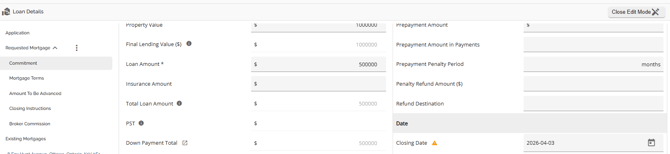
When a user selects a Closing Date that falls on a restricted date, the system will automatically display a warning to prompt the user to take action. Hovering over the warning icon reveals a tooltip message, clearly informing the user of the restriction. This allows users to take note of the conflict and make any necessary adjustments to the Closing Date.
In the example below, the restricted dates have been set from April 3, 2026 - April 3, 2026.
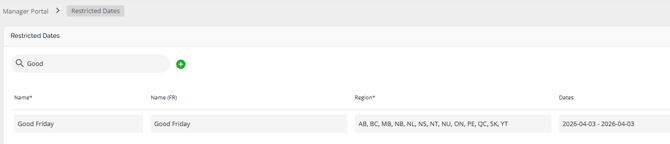
Thus, the restricted date warning and tooltip will be displayed across the following sections:
Loan Details Widget: Under both the Requested Mortgage and Commitment sections.