Table of Contents
Additional Features with the Property Tab
Primary Property Support for GDS Calculations
Introduction
The Net Worth widget can be used to enter information about assets and properties owned by the borrowers (individually or collectively), and allows the system to calculate the borrower’s Net Worth. Assets and Properties owned are split out in separate tabs. The asset tab is where all non-property assets are listed, enabling the user to identify which of those assets, if applicable, are being used for the down payment. The system takes into consideration the total of all assets listed, including properties, when calculating the borrower’s net worth which is populated in the far right hand side of the widget in the Net Worth box.

Location
The default location of the Net Worth widget is directly beneath the Credit and Income widgets, and directly above the Conditions and Documents widget.
Net Worth Widget Features
Add New Asset or Property Button - This button is used to add a new asset or property to the application within the Net Worth widget.
![]() Asset List - List of assets within the application.
Asset List - List of assets within the application.
Properties List - List of properties within the application.
Assets Tab - The fields in this tab are: Use as Down Payment, Description, Type, Value, Purchase Price, and Asset Holder. The Type field is a mandatory field.
Property Tab - The fields in this tab are Property Address, Details (opens sidebar with the property details), Property Type, Existing Mortgages (opens sidebar with the mortgage details), Existing Mortgages Total, Monthly Payment, Property Value, and Property Holder. Note: For seamless submission to MI companies you should indicate who the property holders will be on the subject property, as well as on already owned properties.
Total Net Worth Amount Box (Current & Future) - Viewable value of combined assets and properties associated with the applicants.
There are two Net Worth Calculations:
Current Net Worth

- Total Asset Value: total financial assets value
- Other Properties Total Value: other properties total estimated value
- Subject Property Value: the subject property min value between the estimated value and the purchase price - only included if the application purpose is not "Purchase"
- Total Debt: total financial liabilities amount regardless of the payoff type
- Existing and Refinance Mortgages Amount: total existing & refinance mortgage amount regardless of the payoff type
To view the calculation for the Current Net Worth and the values used in the system, click on the associated tool tip icon located at the bottom of the Net Worth widget.

Future Net Worth

- Total Asset Value: Total Financial Assets Value
- Other Properties Total Value: Other Properties Total Estimated Value
- Subject Property Value: The subject property minimum value between the estimated value and the purchase price
- Property Sales Proceeds: Proceeds from the sale of a property
- Total Debt: Total Financial Liabilities Amount of "None" payoff type
- Existing Mortgages Amount: Total Existing Mortgage Amount regardless of "None" payoff type
- Total Loan Amount: Requested mortgages Total Loan Amount. The system takes into consideration Insurance Premiums included in the requested mortgages for a more accurate calculation.
To view the calculation for the Future Net Worth and the values used in the system, click on the associated tooltip icon located at the bottom of the Net Worth widget.

Note: Both the Current and Future Net Worth calculations default to All Borrowers, however you can segment by borrower by simply selecting the appropriate borrower from the drop down list in All Borrowers (explained below). In addition, the system considers Total Loan Amount taking into account any capped fees and Insurance Premiums from requested mortgages, allowing for more accurate Future Net Worth calculations.
Individual Net Worth
Calculating the net worth for each individual applicant on the application gives underwriters valuable insight into their current and future financial standing. This feature enables more informed decisions to be made based on the net worth at the applicant level, leading to a better understanding of their overall financial situation. It also helps identify who has/brings strength to the deal.
To implement this, we split assets, properties, debts, and mortgages by owner. If one of the records is owned by multiple individuals, we split the value equally between the owners. The requested mortgage amount and down payment is also split equally between all applicants.
Here is an example that demonstrates the calculations for combined and individual net worth:


Combined Future Net Worth Calculation:

Individual Future Net Worth Calculation:

Exclude Assets from Net Worth Calculation
If you want to exclude certain assets from the net worth calculation, you have the option to indicate this and provide a reason. These reasons are managed through the Custom Fields section of the Manager Portal.
To learn more, click this link to watch a video demonstration.
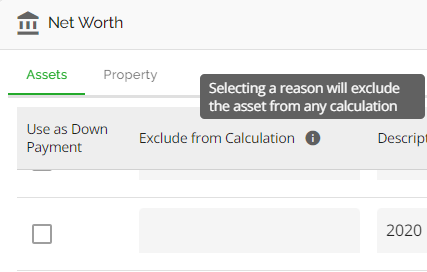
In the example below, a vehicle was submitted as an asset but the vehicle is leased. The underwriter can simply mark the vehicle as “Exclude from Calculation” by selecting the "Leased" option from the drop down menu. The value of that vehicle will then be removed from the net worth calculation. You can see once it is marked to exclude, the net worth values updated accordingly.
Before:
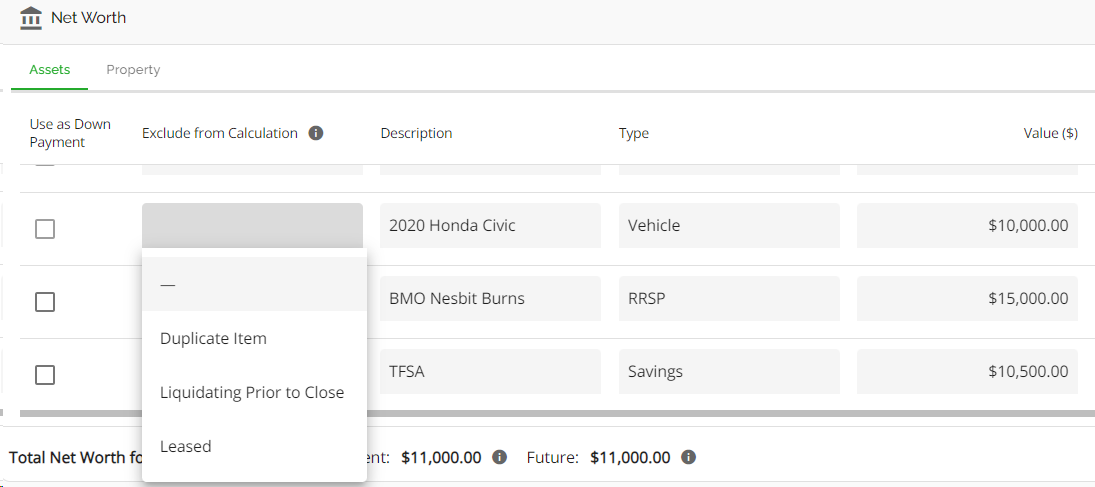
After:

Omit from TDS and Paid by Other Source
When selecting these reasons to exclude from calculation, the system will remove these liabilities from the TDS calculation but not the net worth calculation. The expectation is that even though the applicant is not required to make the payments on these liabilities, they still owe the debt therefore, the liability should be considered in their net worth calculation.
‘Assets’ Tab

The Assets tab houses the assets list. Assets are listed and associated by the applicant.
Use as Down Payment checkbox - When the check box is selected, this indicates that the asset will be used for the down payment of the subject property. Leave the box unchecked if the asset will not be used for Down Payment.
Note: Only monetary assets can be used for the down payment. If only a portion of the asset is being used for the down payment, the asset should be split into two lines as checking the “Use for Down Payment” box takes into consideration the entire asset. Alternatively, leave the box unchecked and add the down payment in the down payment tab in the Loan Details widget.
Description - A short description of the asset listed. (i.e. 2017 Toyota Rav 4)
Type - Choose the type of Asset from the drop down list. The asset options include: Cash Chequing, Cash Savings, Deposit on Purchase, GIC Term Deposits, Gift, Household Goods, Life Insurance, Mutual Funds, Other, Property, Rental Property, RRSP, Stocks, Savings, Stocks/Bonds/Mutuals, Sweat Equity, Vehicle).
Value - The monetary value of the asset.
Purchase Price - The original monetary price the item was purchased at (i.e. vehicle or trailer being purchased at a different price then the value of it currently).
Asset Holder - The applicant who owns the asset or the applicant who will be associated with the item for the purpose of the application.
Scroll Bars - Located at the bottom of the list of assets and to the far right of the widget. Use these to scroll through your list horizontally or vertically to see what does not fit on the page.
Here is an example that demonstrates how the calculations for net worth are affected depending on whether assets are included or excluded from the down payment.
To learn more, click this link to watch a video demonstration.


Adding an Asset
Select the 'Add New Asset' button () in the top right hand corner of the Assets tab. This will create a sidebar pop up with empty fields to populate. Once you have finished filling in the details, click on the “Add Financial Asset'' button in the bottom right hand corner and your asset will be added to the list.
| Assets: |
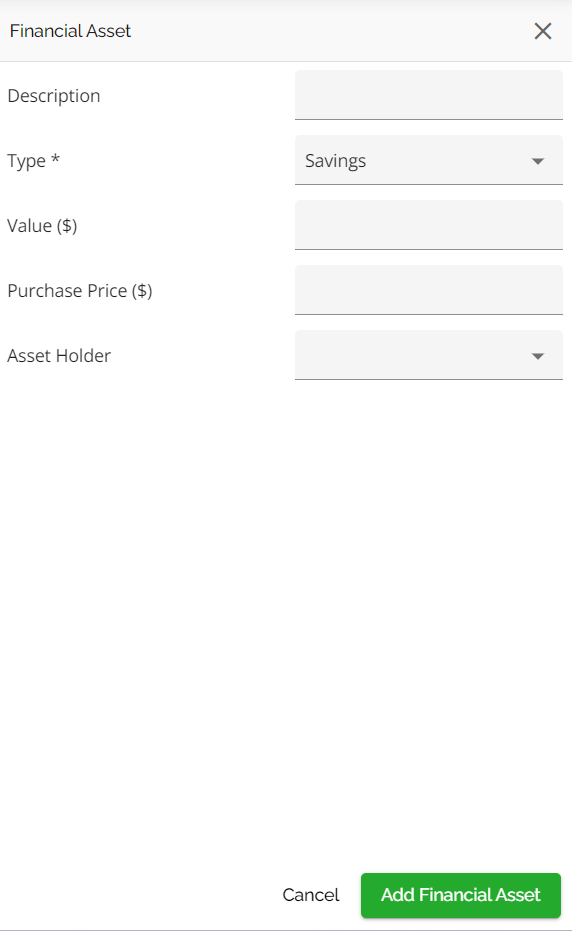 |
Editing an Asset
You can easily edit assets by simply navigating to the field you need to edit and making the necessary changes. All edits are auto saved.
Deleting an Asset
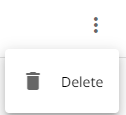
To delete an asset click on the ellipsis located at the far right of the asset and select delete. Your asset will be deleted.
‘Property’ Tab

The Property tab houses the list of all properties owned by the borrowers as well as the subject property. The subject property is marked with a star icon located to the left of the property address field, making it easy to identify.
Property Tab Features
Properties and their associated descriptors can be found in the fields of the Properties list under the Column Headers:
Property Address - The address of the properties currently owned by the applicants. To edit the information in this field, you must click on the address details () icon.
Address Details - The orange note () icon located to the right of the address field opens a pop up screen that displays the address broken out into individual fields.

You can edit and update the property address by selecting the field. Click the save () button on the bottom left corner to save and close or cancel to cancel (
) out of this action.

Details -The Details![]() icon opens up the Property Details Pop Up which contains all the details specific to the property you are looking at. To view the property details, click on the inline option for the specific property and then select the "View Property Details" option.
icon opens up the Property Details Pop Up which contains all the details specific to the property you are looking at. To view the property details, click on the inline option for the specific property and then select the "View Property Details" option.

For detailed functionality regarding this pop up, refer to the Property Details Pop Up Product Feature Guide.

Property Type - The type of Property. If it is the subject property, it will prefill with "Subject". All other properties are listed as "Other".

Existing Mortgages - By clicking on the Existing Mortgages () icon you will navigate directly to the Existing Mortgages Tab within the Property Details Pop Up. To view the existing mortgages, click on the inline option for the specific property and then select the "View Existing Mortgages" option.
You can add, edit, or delete any mortgages that are registered on this property and indicate if you are paying them out or not.
Existing Mortgages Total - This section will update automatically based on the mortgage balances entered in the mortgage balance field of the Existing Mortgages pop up. It will populate with the total mortgage balances of all mortgages.
Monthly Payment - This section will update automatically based on the monthly payments entered in the Existing Mortgages pop up. It will populate with the total of all monthly payments.
Property Value - Enter the estimated property value.
Property Holder - The stakeholder(s) who owns the property or the stakeholder(s) who will be associated with the property for the purpose of the application.
Note: For seamless submission to MI companies you should indicate who the property holders will be on the subject property as well as on already owned properties.
Scroll Bars - Located to the far right of the pop up. Use this to scroll vertically to see what does not fit on the page.
Adding a Property
Select the 'Add New Property' button () in the top right hand corner of the Property tab. This will create a sidebar pop up with empty fields to populate. Once you have finished filling in the details, click on the “Add Property” button in the bottom right hand corner and your Property will be added to the list. You should then update any other fields as required for this new property such as Property Details and Existing Mortgages via their respective pop ups.
| Property: |
 |
Editing a Property
You can easily edit properties by navigating to the field or pop up for the property that you wish to edit and make your changes. All edits are auto saved. Alternatively, you can follow these steps:
- Hover to the right of the property address you wish to edit. The open details in the sidebar icon (
 ) will appear.
 - Click on the icon to open the Property Details sidebar.

- Make any edits as needed and close when done. All changes will be saved automatically.

Note: The system will display a warning sign anytime there are duplicate addresses listed in the property tab alerting the user that some edits may be required.

Deleting a Property
To delete a property navigate to the ellipsis to the far right of the property you wish to delete. Click on the ellipsis and click on “Delete”. A warning pop up will appear ‘Are you sure you want to remove the Property?’. Select the ‘Remove’ () button on the bottom right corner to remove the property and delete it.
Note: You can only delete properties with the property type “Other”. You can not delete the Subject property.
Marking a Property as Sold
You now have the ability to mark a real estate asset as sold and indicate the date it will be sold, in order for the system to make appropriate adjustments.
When a property is marked as sold, its value and its associated mortgages will no longer be considered in the net worth or debt servicing calculations. The system will make the applicable adjustments based on the below noted rules.

Rules
|
Action |
Impact to Future Net Worth |
Impact to Future Payment Amount (GDS/TDS) |
|
Mark as Sold – Before Purchase Date |
Exclude asset record and all associated liability records |
Set adjusted payment to 0.00 and use adjusted payment amount |
|
Mark as Sold – After Purchase Date |
Exclude asset record and all associated liability records |
Set adjusted payment to 0.00 and use adjusted payment amount |
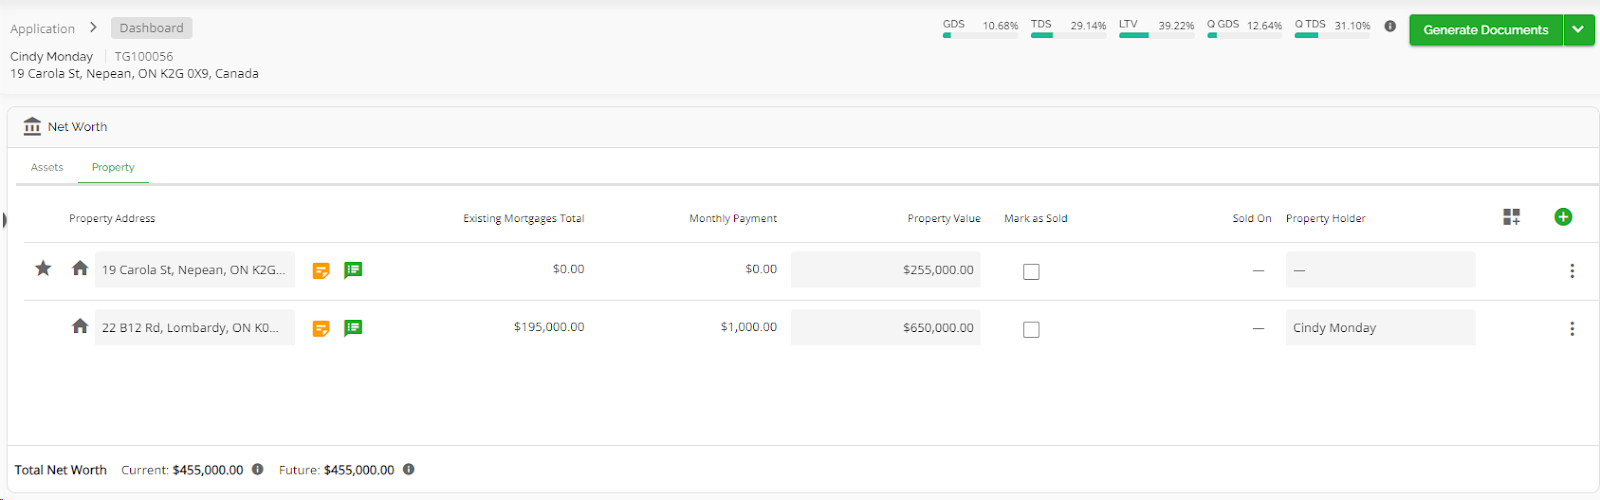
Before Marking as Sold:
Value of property is included in Current and Future Net Worth. All property expenses including mortgages are included in the debt service calculations
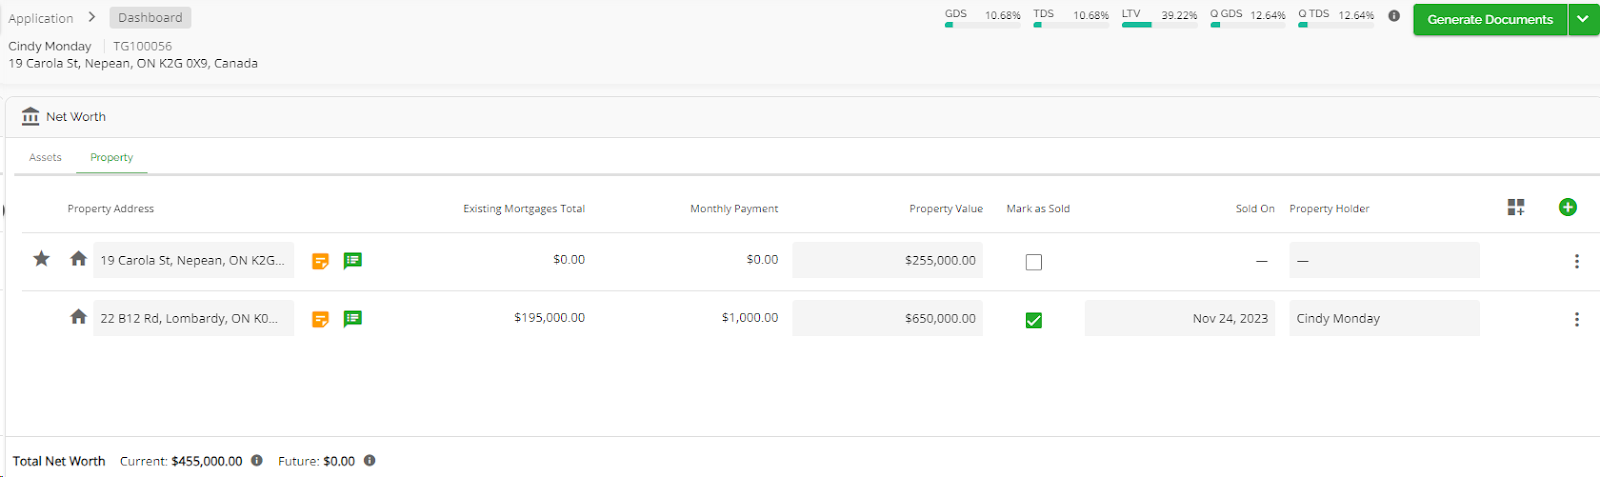
After Marking as Sold:
The property being sold is excluded from the Future Net Worth calculation and any associated expenses are also removed from the debt service calculations. However the net equity or sale proceeds will be taken into consideration. More specifically, they will be added to the Future Net Worth calculation.
Warning: Selling a property after the Closing Date
If the closing date for selling a property is after the closing date of your mortgage application, a warning sign will appear next to the property's address. For example, if the closing date of your application was November 20 and the property being sold has a closing date of November 27, the warning sign will be displayed. The warning appears as long as the sold on date is one day or more past the closing date of your application.

Additional Features with the Property Tab
Customize the Property Table
To enhance the user experience, we have implemented a feature that allows users to customize the properties table according to their preferences. This functionality enables users to select the specific columns they want to view in the table and arrange them in their preferred order. This customization option allows users to tailor their view of the property table to better suit their individual needs. To customize the property table, follow these steps:
- Navigate to the Property tab within the Net Worth widget.
- In the top right corner, click on the "Customize Table" icon.

- A sidebar will appear on the right side of the screen:

- Select which columns you want to display in the table by checking the corresponding checkboxes next to the column names.
- To rearrange the order of the columns in the property table, hover to the left of the checkbox and an icon
 will appear. Click and drag this icon to change the placement of the columns in the table.
 - Once you close the sidebar, the property table will automatically update to reflect the preferences you have selected.
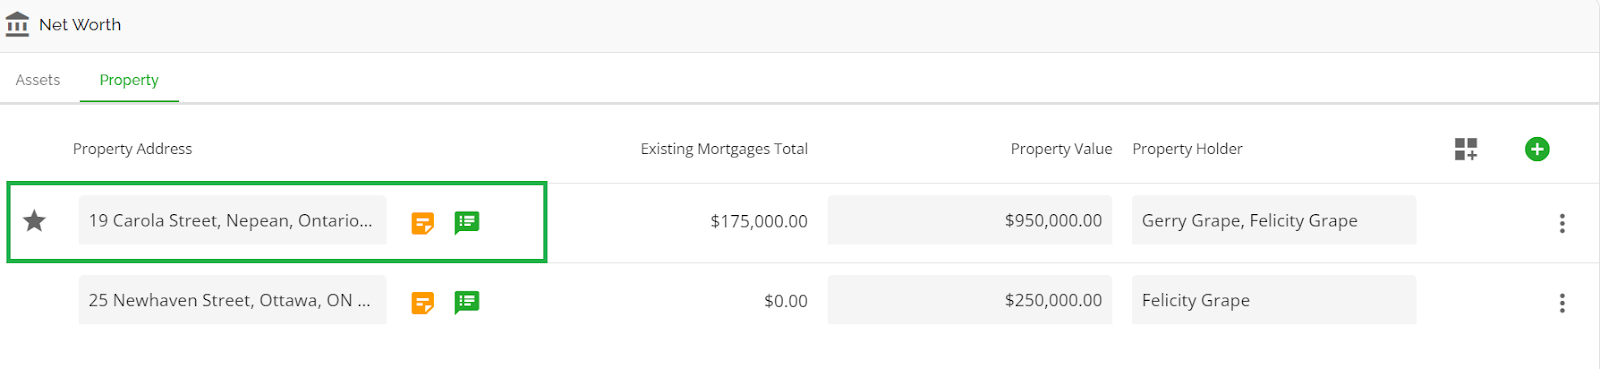
Here is an example of a customized property table:


Primary Property Support for GDS Calculations
Users have the ability to identify a property as the primary property, independently from the subject property. This functionality is useful when expenses from the primary property need to be used to calculate GDS, instead of those from the subject property. If there is a primary property indicated, both the GDS and QGDS calculations will only consider costs from that property. The calculation being (Principal + Interest + Property Taxes + Heat + 50% Condo Fees) / Total Income.
Users can easily differentiate between the subject and primary property. The subject property is identified both on the Dashboard, directly below the applicant's name, and in the Property tab of the Net Worth widget. It will have a star icon to the left of the address.

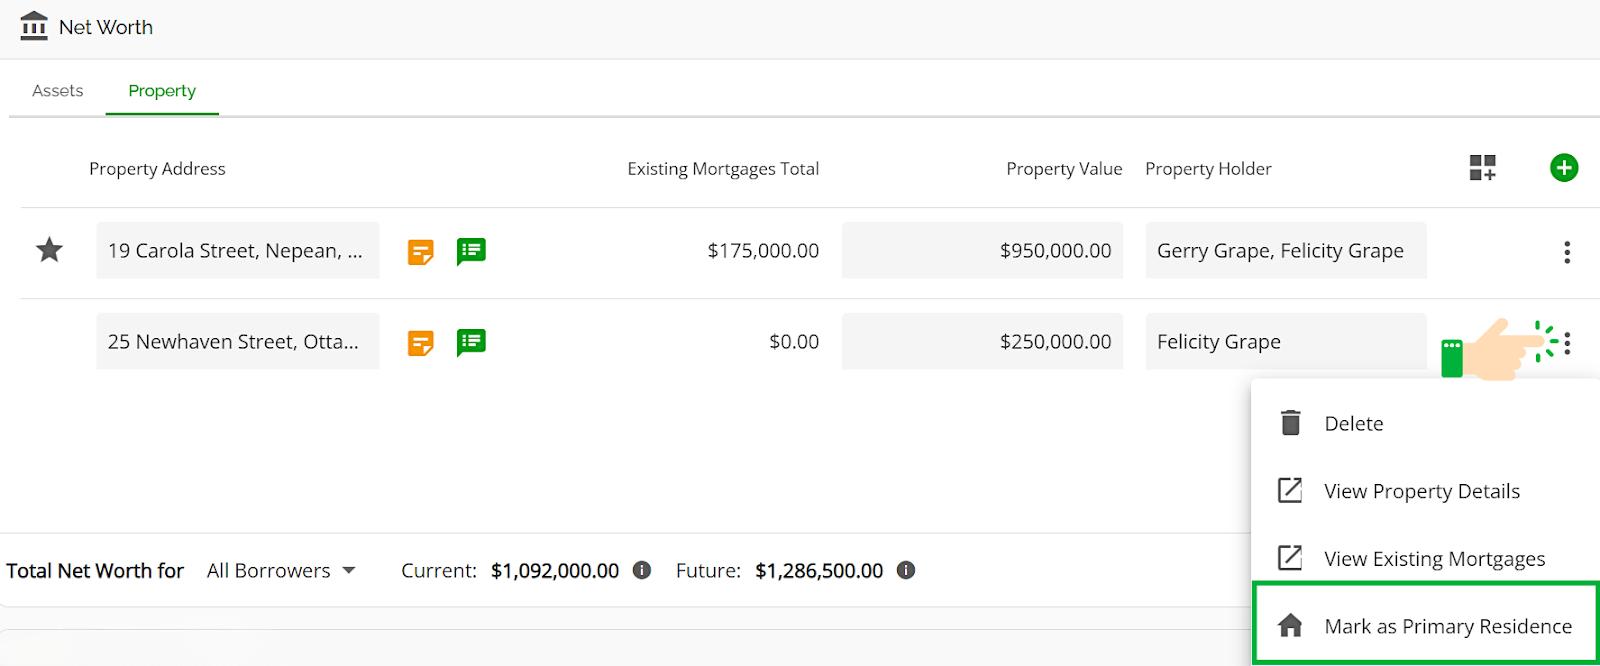
Users can identify a property as the ‘Primary property’ in the Property tab of the Net Worth widget.
To do so, click on the ellipsis to the far right of the property you wish to assign and select the “Mark as Primary Residence” option.
A house icon will be added to the left of the property, this is the indicator of a Primary Residence.
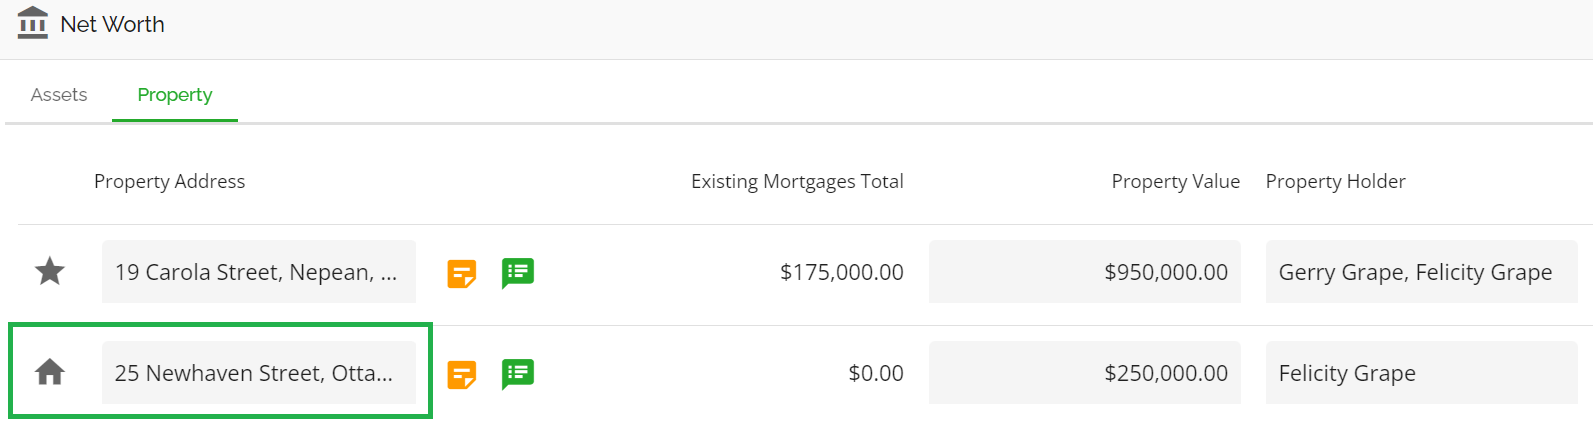
If the primary property and subject property differ, the GDS will consider the expenses from the primary property in the calculation. If the primary property is not identified or is the same as the subject property, the GDS will take the expenses from the subject property into consideratio