![Fundmore-Logo.png]](https://help.fundmore.ai/hs-fs/hubfs/Fundmore-Logo.png?height=50&name=Fundmore-Logo.png)
Table of Contents
How to Create a Combo Application
Stand Alone HELOC & HELOC within a Combo Application
Converting from a Combo to a Regular Mortgage or Stand Alone HELOC
Note: Every lender has their own terminology for referring to the individual components of a combo mortgage. Examples are step, product, leg, segment, etc. For the purpose of documentation and explanation within our product material we will call them segments.
Features
- Disable insurance fields for combo deals as these types of applications are not insurable
- Only apply fees to Loan Type of Mortgage, and not LOC
- Disable loan amount calculation for Combo deals
How to Create a Combo Application
Applications will ingest into the system as regular one segment applications since the POS systems used by brokers do not provide an option to create combo mortgages. As such, brokers will usually input the application as a standalone mortgage and indicate in their notes that they want a combo. It is then up to the lender to create the additional segment(s) and turn the application into a Combo.
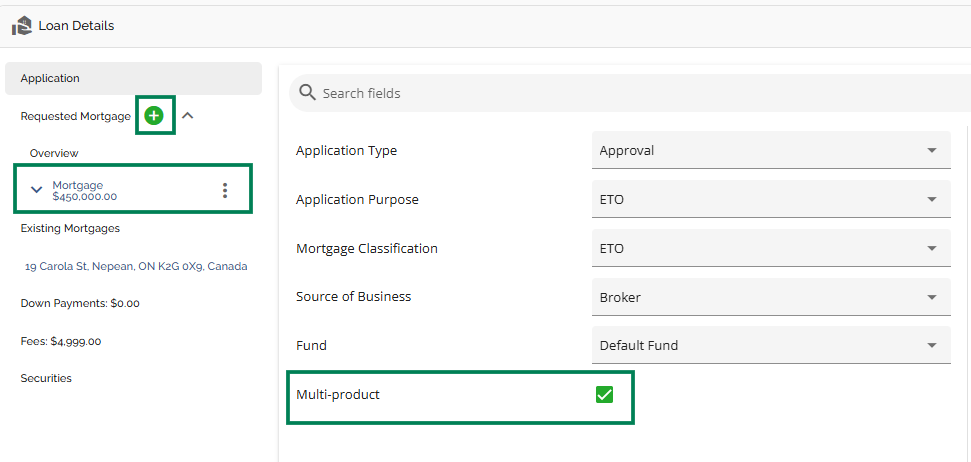
You can easily convert a regular application to a combo by simply checking the “Multi Product” checkbox in the Application tab of Loan Details.

The system will automatically convert the original product applied for to the 1st segment and open up the add button to enable the user to add additional segments as needed.
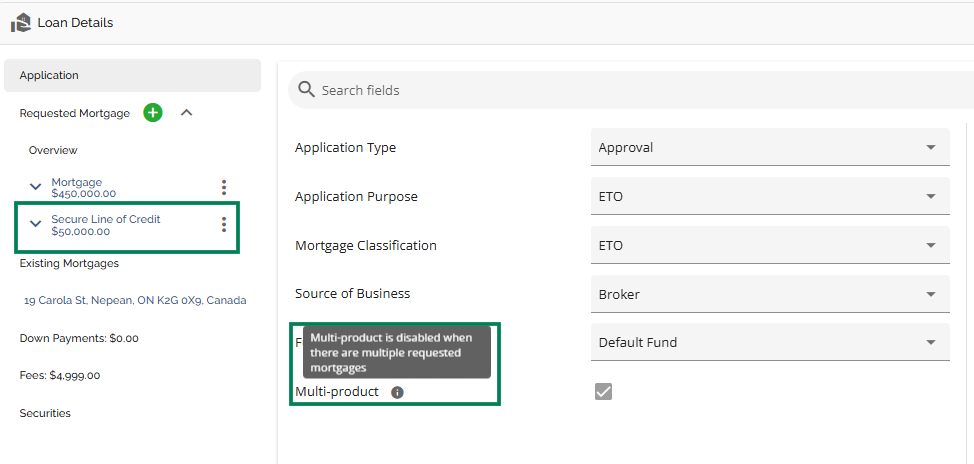
The system will lock the ‘Multi-Product’ field in the Application tab and add a tooltip explaining that it is disabled as a result of additional segments being added.
To add additional segments, follow these steps:
- Click on the edit icon located in the top right corner of the Loan Details widget to enter edit mode .
- Click on the green plus button to the right of 'Requested Mortgage'. This will open a dropdown menu of available segment types to add.
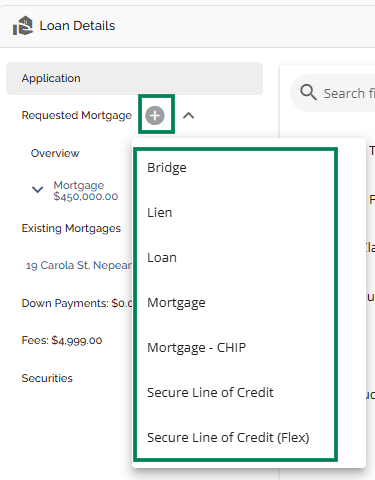
- Select the applicable option by clicking on it and a sidebar will open for you to populate the details of the next segment.
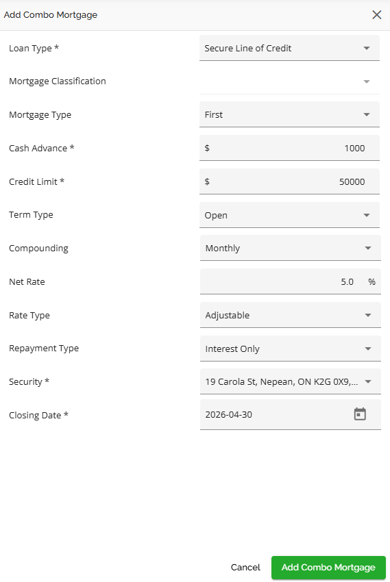
- Once you have filled in all the necessary information in the sidebar, the “Add Combo Mortgage” button will turn green at which point you will select it to add your segment.
In the Overview tab, a section will be generated for each segment. This allows you to easily access and edit the segments as needed. You can toggle between the segments by clicking on the tabs at the top or clicking on the segments in the menu to the left.
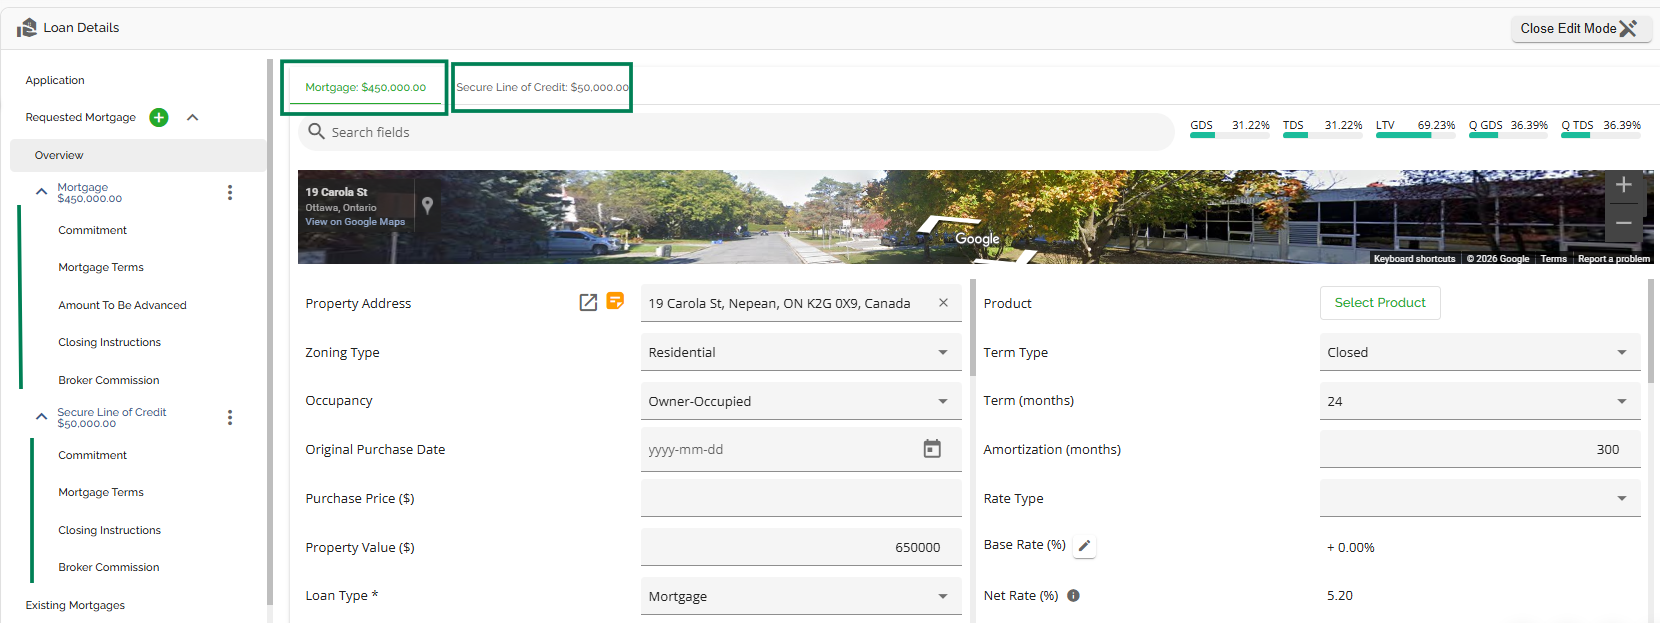
You populate the fields in each segment as it applies to that segment only.
Each segment will have its own Commitment & Mortgage Terms tab with details specific to that segment. The Mortgage (fixed) segment will have an additional tab - Amount To Be Advanced because as previously noted, fees are only applied to the Mortgage (fixed) segment. Furthermore each segment will have its own individual debt service and LTV calculations based on its details only.
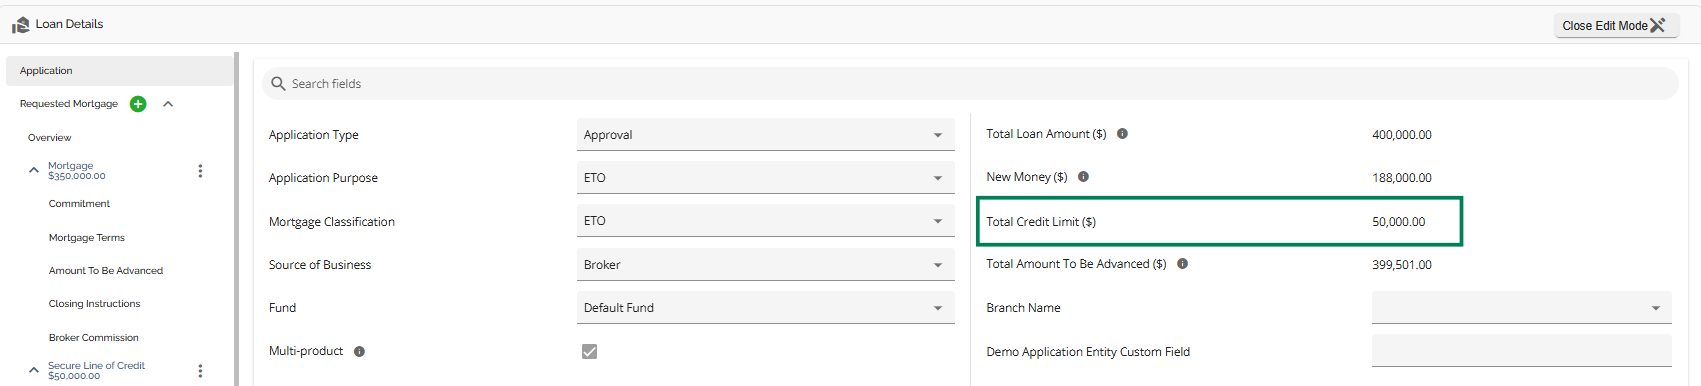
The Application tab will show an amalgamated view of the segments including Total Loan Amount, Total Amount To Be Advanced, Total Credit Limit, & the indication it is a combo. The Application tab will update as changes are made to each individual segment.
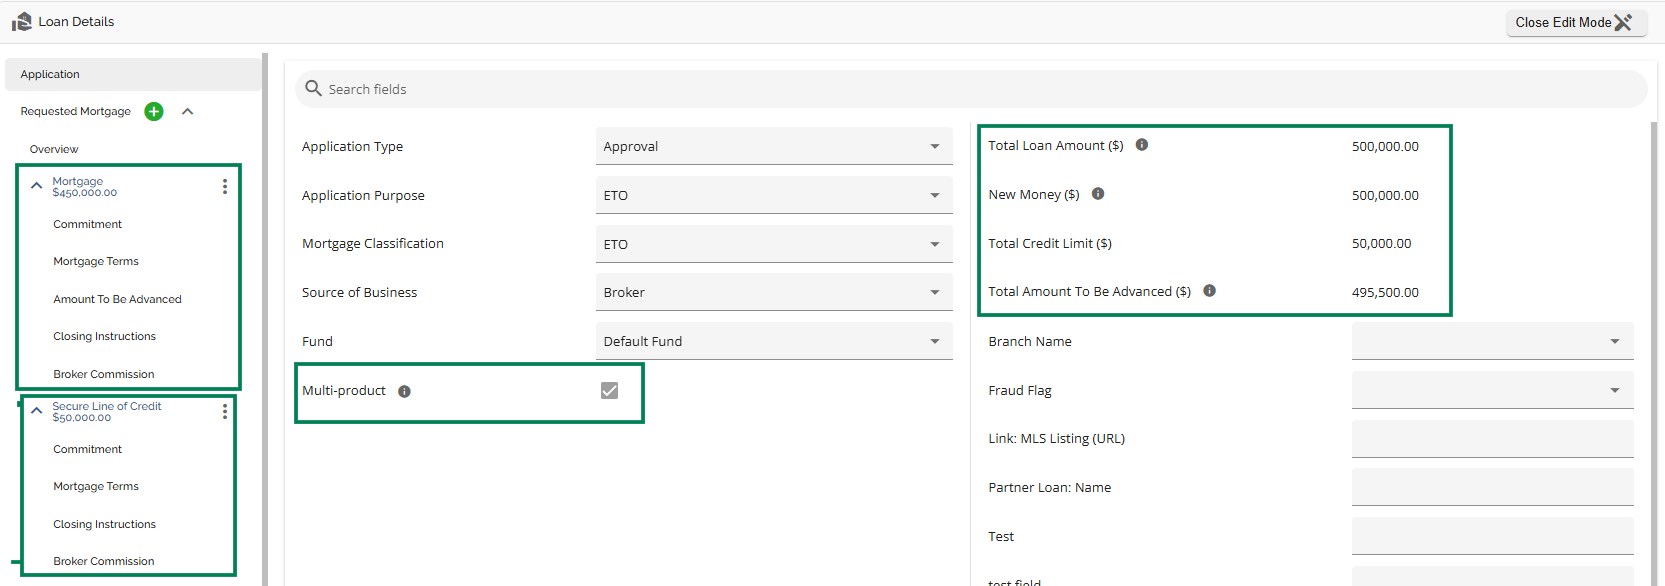
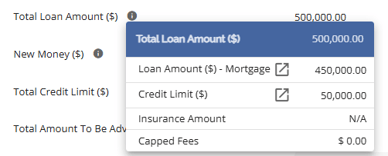
Total Loan Amount is calculated based on the total of the fixed segment, the credit limit for the LOC segment and any capped fees.
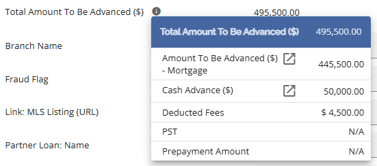
Total Amount To Be Advanced is calculated based on the amount to be advanced for the fixed segment (less any deducted fees) and the cash advance amount from the LOC segment.
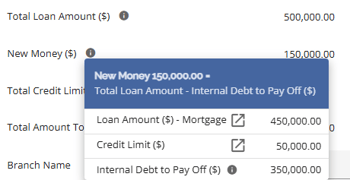
New Money is calculated taking into consideration any existing mortgages being paid off that have an FI Type of Internal, meaning existing mortgage within the organization. As such, these funds are not considered new money and are deducted from the Total Loan Amount.
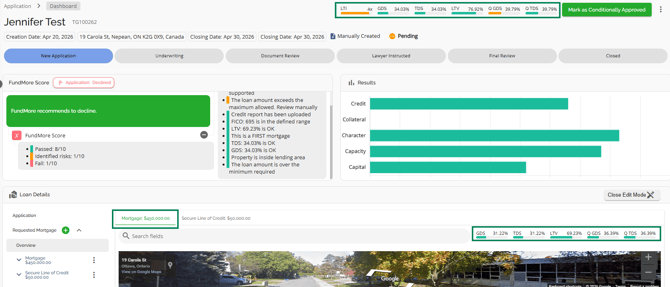
Ratio calculations are visible for both individual segments and as an aggregate.
The aggregate calculations will appear at the top of the dashboard and the calculations for the individual segments will display in the top right hand corner of the Overview tab depending on which segment you are in. Switching between the tabs of the various segments (top left hand corner of the Overview tab) will cause your calculations to automatically update to those of that segment.
Details
Application Dates
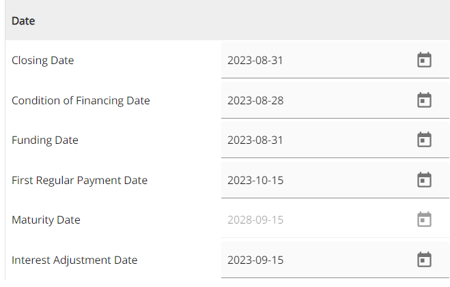
As multiple segments are added, any date fields that were completed in the original segment will copy over automatically to the newly added segment within the Commitment tab. Dates updated will be: Closing Date, Condition of Financing Date, Funding Date, First Regular Payment Date, Maturity Date (if applicable), & Interest Adjustment Date.
Dates can be manually adjusted per segment from there if needed without interfering with the dates on other segments.
Fees (Combos)
Fees are applied at the application level, not at the product level. When adding fees you are able to indicate which product the fee applies to.
Default fees indicated to apply at ingestion will apply based on the initial mortgage request (segment) that is ingested.
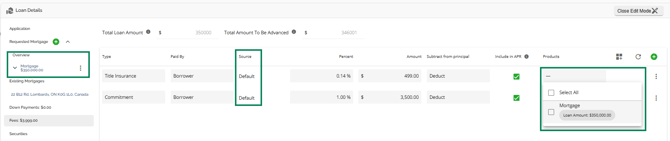
As you add segments an orange icon will appear to the left of the default fees that were added at ingestion. This is because your Loan Amount is changing therefore the system is asking you to recalculate the fees. How you proceed here is dependent on what segment(s) you want your fees charged on.
Users can go in and update which product the fee should be applied to once they convert the application and add additional segments.
Total Loan Amount and Amount To Be Advanced will initially calculate based on the totals of all segments less any (deduct) or plus (cap) fees. They will adjust as you update and indicate which products the fees should apply to.
Application Level (Summary Tab)
Total Loan Amount, New Money, Total Credit Limit, & Total Amount To Be Advanced calculation.
Product Level (Commitment & Mortgage Terms tabs per segment)
Mortgage Type = Loan Amount, Total Loan Amount, Amount To Be Advanced & APR will calculate.
Line of Credit Type = Loan Amount converts to Cash Advance. Total Loan Amount & APR calculations are disabled.
Fees (SLOC non Combo)
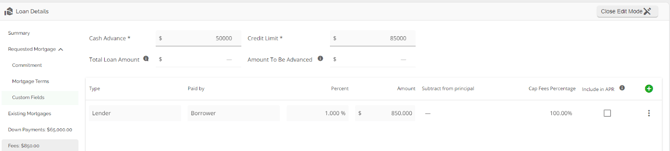
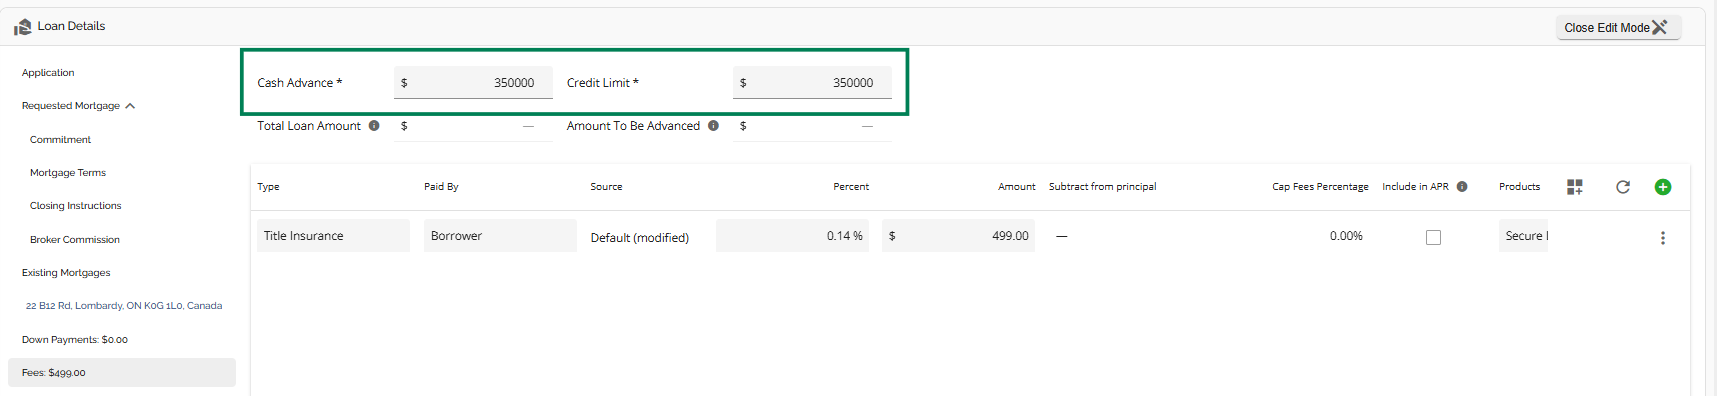
When your loan type is Secured Line of Credit (non combo), the Total Loan Amount, Amount To Be Advanced, & Include in APR (fees) fields are disabled. There is no APR calculation on Secured Lines of Credit and Total Loan Amount and Amount To Be Advanced are replaced by the Cash Advance field. In the example below, the “Subtract from Principle” and “Cap Fees” fields are greyed out and cannot be edited. Furthermore “Total Loan Amount” & “Amount To Be Advanced” are also greyed out and show no values but have the Cash Advance and Credit Limit fields above.
Custom Fields (Combos)
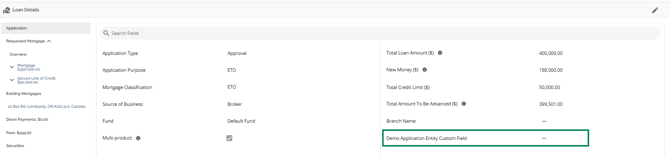
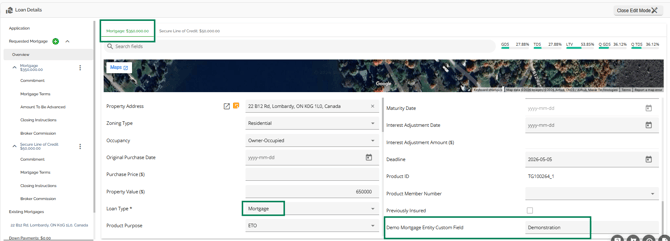
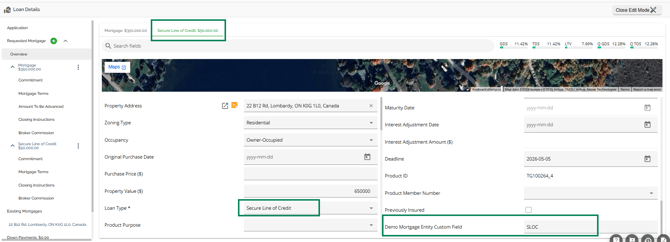
Application entity Custom fields will populate once per application in the Application tab because they are at the application level. Mortgage entity Custom Fields will appear in each segment within the Overview tab and can be filled in independently between segments because they are at the product level. See example below:
Application Entity Custom Field:
Mortgage Entity Custom Field:
Mortgage:
Secured LOC:
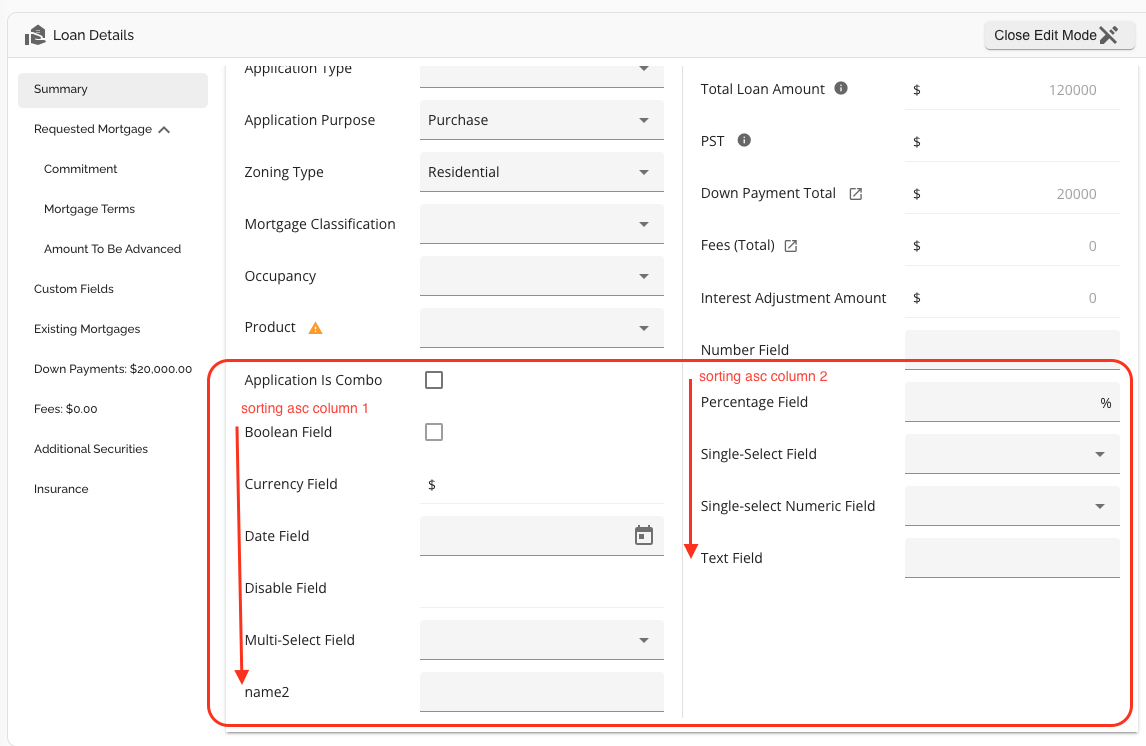
If there are multiple custom Fields they are displayed alphabetically in ascending order, making it easier to identify the position of a specific field within the list.
HELOC Application Options
Stand Alone HELOC & HELOC as part of a Combo Application
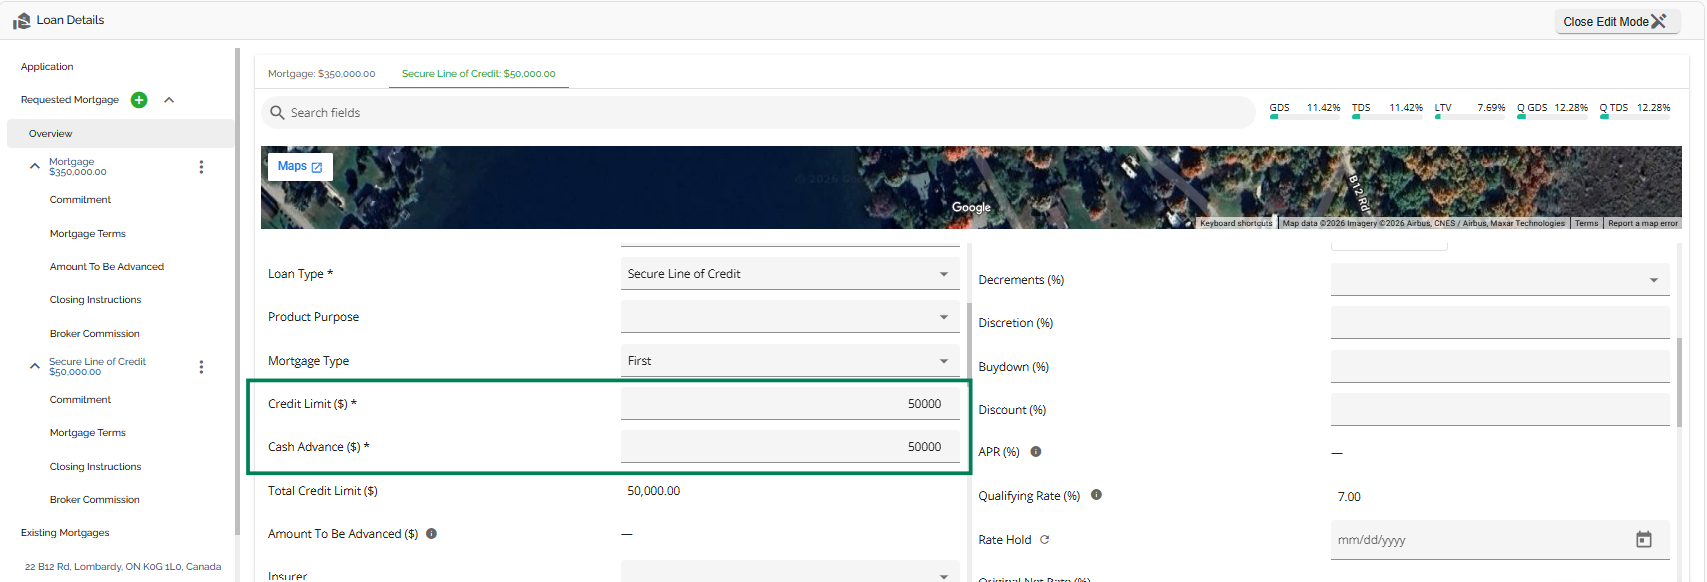
Whether you are doing a stand alone HELOC or a HELOC as a segment of a combo, once you identify the Loan Type as a Secure Line of Credit, the fields “Loan Amount” and “Total Loan Amount” that usually appear on fixed mortgages change to “Cash Advance” and “Credit Limit”. This allows you to specify both the desired credit limit and any potential initial cash advance, which may vary. These values help to drive the Total Loan Amount and Amount To Be Advanced as applicable.
It should be noted that LTV, GDS, TDS, QGDS, QTDS, & Total Loan Amount are all calculated using the Credit Limit instead of the Cash Advance amount. This will apply when those two values differ.
Converting from a Combo to a Regular Mortgage or Stand Alone HELOC
We also allow conversion of a combo application back to a regular mortgage or a single HELOC application as well. To convert a combo back to a single deal, you start by deleting the segment that no longer applies. There is a tooltip next to “Multi Product” letting the user know that to revert back to a regular mortgage they will need to delete the additional segments first.
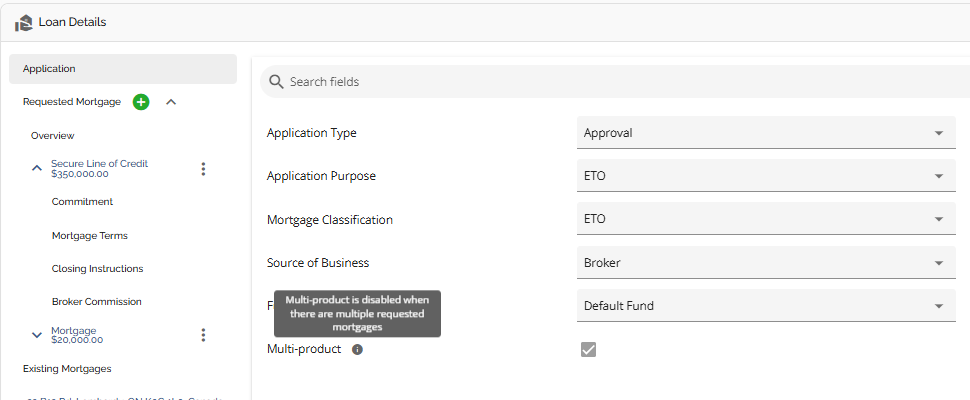
Once all unnecessary segments are deleted, the user will be able to uncheck ‘Multi Product’ and the deal will be reverted back to a regular mortgage.
To delete a segment, click on the ellipsis to the right of the segment name and click delete:
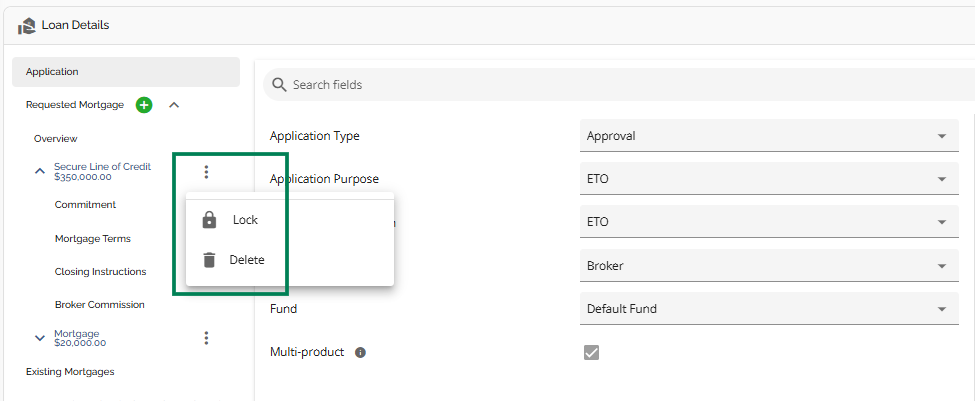
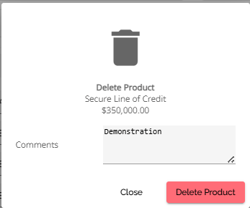
This will generate a confirmation pop up asking you to confirm you want to delete the applicable segment. Click on ‘Delete Product’ and the applicable segment will be removed.
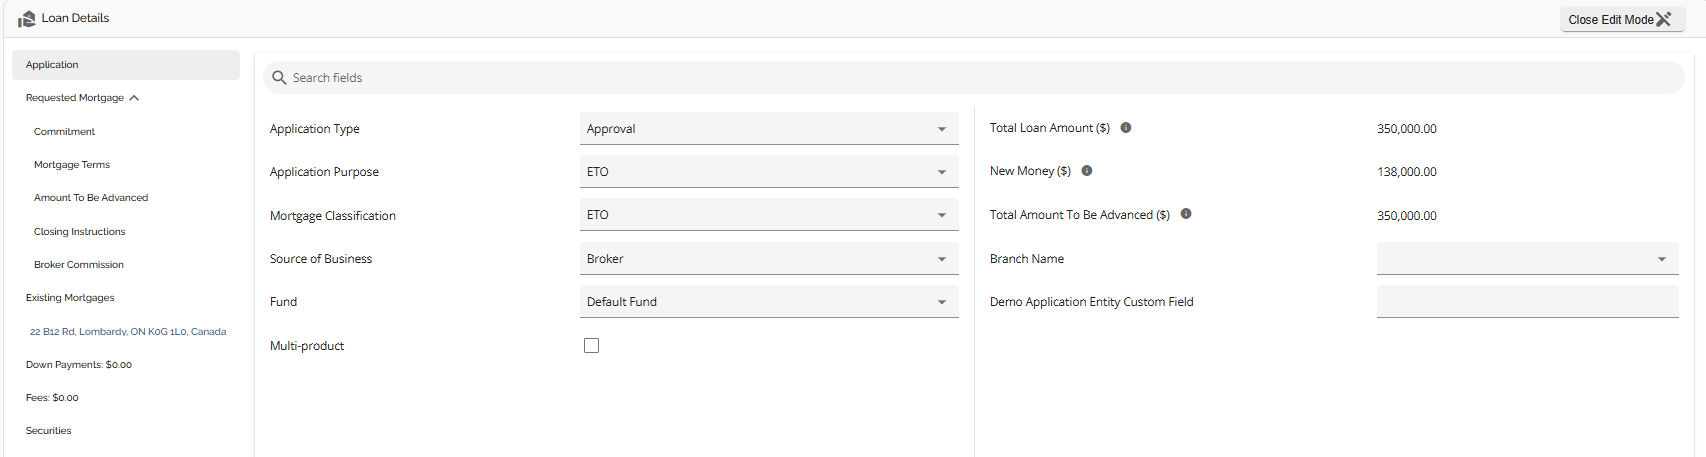
You then need to uncheck ‘Multi Product’ in the Application tab. Your application will be fully converted back to a regular deal. All calculations will update accordingly.
All actions are tracked in Application History for reference.