Table of Contents
Unable To Verify Income Feature
Adding Income in Minimized View
Editing Income in Minimized View
Editing Rental Income in Minimized View
Maximized (expanded) Income Widget View
Adding Income in Maximized View
Deleting Income in the Maximized View
Editing Income in Maximized View
Editing Rental Income in Maximized View
Introduction
The Income Widget contains all income information including current and previous employment income for all applicants on the file. It defaults to a minimized view but can easily be expanded. It will display line items for all relevant incomes added to the file and will display a total dollar figure of all current incomes. The total can be displayed in any frequency the user chooses but defaults to monthly.
Maximized Widget View
Location
The Income Widget’s default location in the minimized view is to the left of the Credit Widget, directly below the Loan Details widget. In the maximized view, the widget is located between the Credit Widget and the Net Worth widget within the application dashboard.

Income Widget Features
Add New Income (+) button - This button is used to add a new income to the application within the Income widget.
Expand/Minimize Button - To expand or minimize the income widget, click on the small box icon located in the top right corner. When expanded, you will be able to view a detailed list of incomes and make any necessary edits. In the minimized view, you will see the total monthly income and a summary tile for each income listed in the application. On each tile, there are action buttons that allow you to open the sidebar for each income source and make any necessary edits.
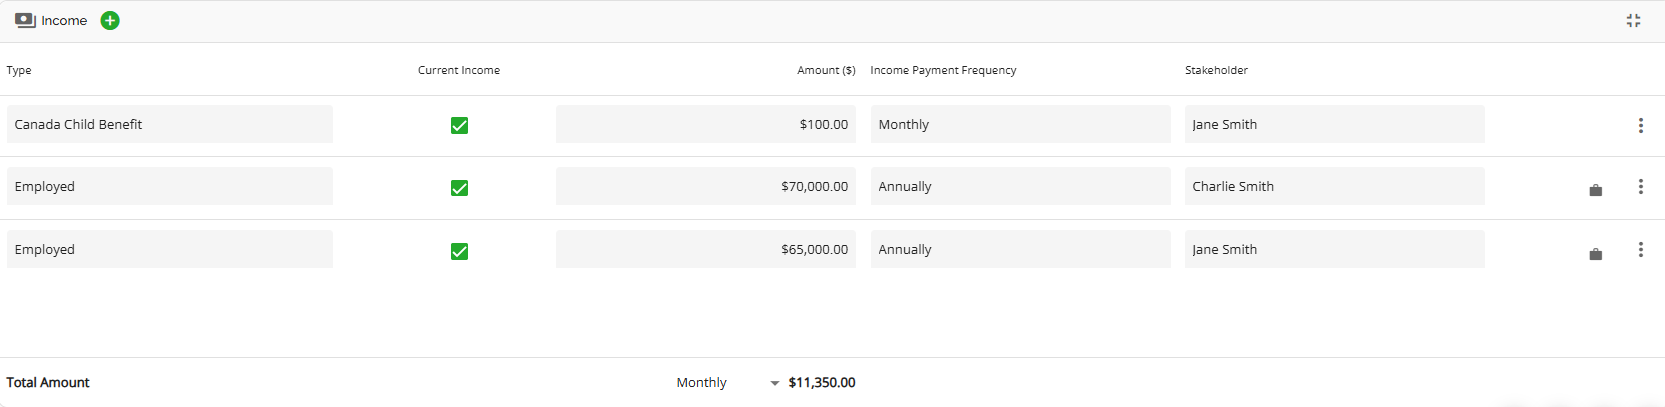
Income List Column Headers - In expanded mode, the Income List Column Headers display a list of items associated with fields within an income. This allows for quick selection and understanding of incomes.
Type - This is the type of income used to categorize the income in the list, i.e. Employed, Self Employed, or Other.
Current Income - If the checkbox is selected, it indicates that it is the current income and will be taken into account when calculating debt servicing. On the flip side, if the checkbox is not selected, it indicates that it is the previous income and is no longer being earned, therefore it will not be considered in the debt service calculations.
Amount - The dollar amount of the income which is tied to the Income Payment Frequency.
Income Payment Frequency - The frequency of when the income is paid, for example, a salaried income may be paid to the applicant bi-weekly. If this frequency is anything other than monthly, the system will automatically convert it to a monthly figure for debt service calculation purposes.
Stakeholder - The stakeholder the income line item is associated to.
Employer Name - The little briefcase icon to the right of Stakeholder. When you hover over this icon the Employer name will display. The briefcase is only visible when the income line item has an employer.

Income List Line Ellipsis - Enables the user to delete the income line if necessary.
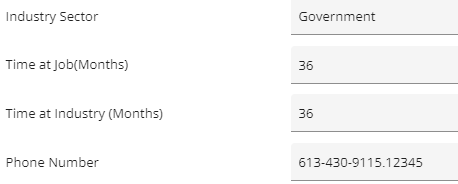
Income Details Sidebar - The income details sidebar is accessible in both the minimized and expanded views of the income widget. In the minimized view, you can access it by hovering over the top right-hand corner of the income tiles. In the expanded view, you can access it by hovering to the right of the income type field (the icon is invisible until you hover). When you click on it, the sidebar will open, providing you with all the fields associated with the selected income item. You can easily edit any of the fields directly in the sidebar. The fields in the sidebar may differ depending on the type of income. Those income types that are not tied to employers for example. The sidebar for these income types will have fewer fields as no employer information is required.

Note: All phone number fields require an area code. Where applicable, users can add a phone number with an extension. The extension needs to be added in the following format: xxx-xxx-xxxx.1234.
Unable To Verify Income Feature
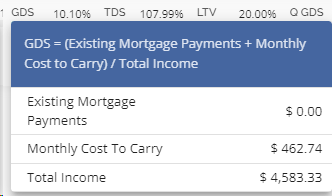
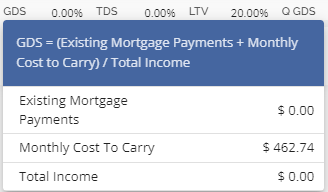
We have included a checkbox called "Unable to verify" under each income type. When this checkbox is selected, the system will exclude that income from any calculations. By default, this checkbox is not selected. This enables users to remove income from calculations if the need arises without having to remove the income amount or delete the income line item.

GDS Unchecked:
GDS Checked:
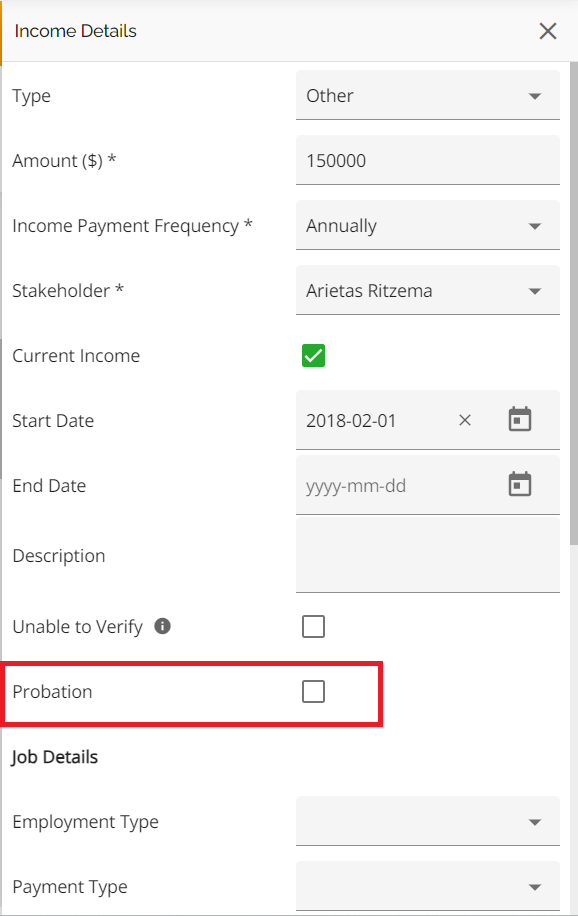
Probation Field
We have included a Probation field in the Income widget. This can be selected when adding or editing an applicant’s income, simply check the box next to "Probation" to specify whether the applicant is currently on probation at their job. Calculations are not impacted. This is an informational field only.
Minimized Widget View
In the minimized view of the income widget, users can get a summary of the information contained within the widget. They can see the total monthly income (default calculation) for all current income types in the top left corner of the widget. The user has the ability to adjust that value to various frequencies if they wish by selecting the downward arrow and clicking on the frequency of their choice. Below that, there will be a tile for each income type added, including both current and non-current income types. Users have the ability to add and edit additional income types in this view, but they cannot delete income from the minimized view.

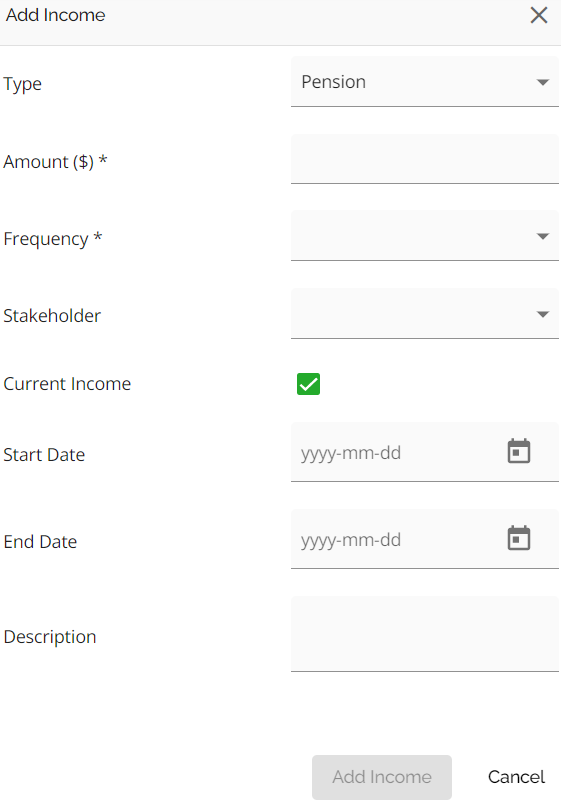
Adding Income in Minimized View
To add a new income in the minimized view, follow these steps:
- Click on the 'Add New Income' (+) button in the top left corner of the widget. A drop down list will appear with all available income types.
- Select the type you would like to add:


- Once you have selected the income type, a sidebar will appear on the right side of the widget. The income type field will already be populated, and you will need to fill out the required fields at a minimum, which are indicated by an asterisk. Complete all the fields as necessary.

Note: All phone number fields require an area code. Where applicable, users can add a phone number with an extension. The extension needs to be added in the following format: xxx-xxx-xxxx.1234.

4. Once completed, click on the 'Add Income’ button. You will see a new tile appear with the freshly created income.

Editing Income in Minimized View
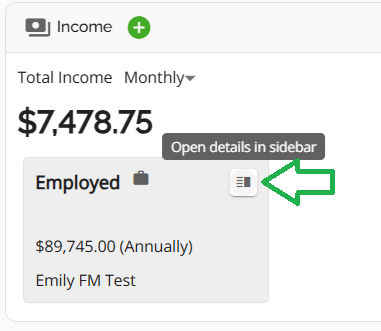
To edit an income from the minimized view, follow these steps:
- Hover over the top right hand corner of the tile for the income source you wish to edit. The "Open details in sidebar" icon (
 ) will appear.
- Click on the icon to open the Income Details sidebar.
- Make any edits as needed and close when done. All changes will be saved automatically.
Note: When making adjustments in the Income Details sidebar, please ensure that all mandatory fields are completed to successfully save any changes. The required fields can be identified by the asterisk next to the field name. These fields include Amount ($), Income Payment Frequency, and Stakeholder for employment income types and Amount ($) & Income Payment Frequency for other income types.
Editing Rental Income in Minimized View
There is one exception to the ability to edit income entries and that is Rental income. This income type can not be edited in the Income widget in either the Maximized or Minimized views. Instead, you must navigate to the Property Details pop up for the applicable property and make your edits to the rental income within the Rental income Tab. This is deliberate due to the impacts on debt servicing your changes may have. Changes made in the property details section will trigger a cash flow recalculation which will render in the income widget (presuming the result was a positive cash flow).
To access the Property Details widget for the property associated with rental income, you can navigate directly to it from the income widget. To do so, follow these steps:
1. Hover over the top right hand corner of the rental tile for the income source you wish to edit. The "Open details in sidebar" icon ( ![]() ) will appear.
) will appear.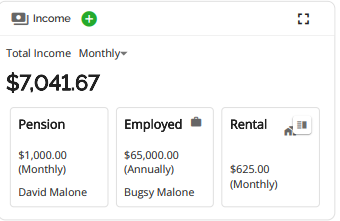
2. Click on the icon to open the Income Details sidebar.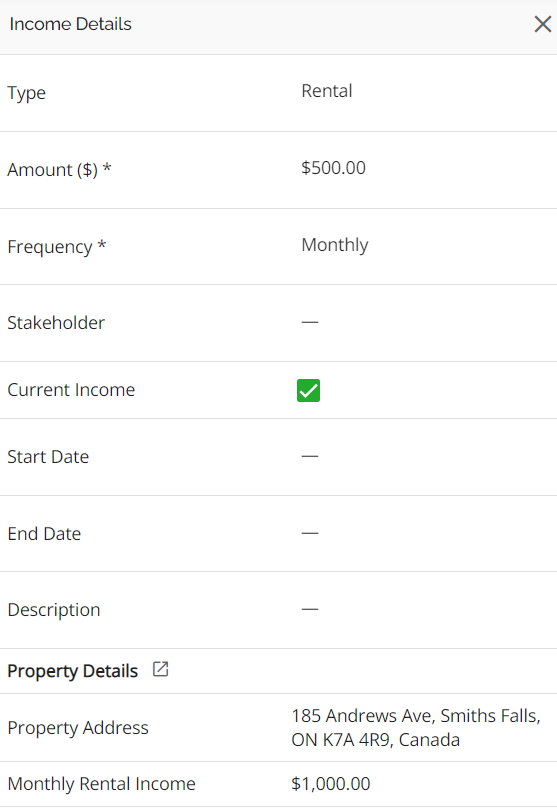
3. Within the sidebar, click on the icon (![]() ) next to the "Property Details" header. This will take you directly to the Property Details widget.
) next to the "Property Details" header. This will take you directly to the Property Details widget.
4. Once there, navigate to the Rental Info tab and make your edits as needed.

5. Once completed, close out and you will see that your edits were saved automatically in both the Property Details pop up and the income widget.
Maximized Income Widget View
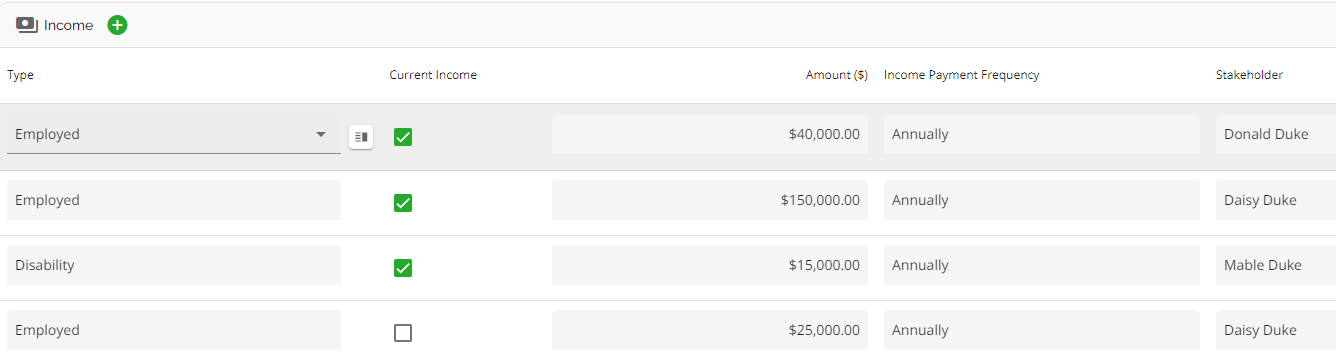
The Income widget's maximized view details all current and previous incomes, providing a clear overview of income types. Users can also see the amount and frequency of each income, as well as the stakeholder associated with it.
In the Income widget, incomes are listed in a specific order. Current incomes are displayed first, starting with the borrower's income, followed by the co-borrower's income, and then the guarantor's income. Non-current incomes are then listed in the same order. For example, in the following snippet, the first line represents the borrower's income, the second line represents the co-borrower's income, the third line represents the guarantor's income, and the fourth line represents the co-borrower's previous employment income.
You are able to add, edit, and delete an income from the maximized view.
Adding Income in Maximized View
To add a new income in the maximized view, follow these steps:
- Click on the 'Add New Income' (+) button in the top left corner of the widget.
- A drop down list will appear with all available income types.
- Select the type you would like to add.
- Once the type is added, a sidebar will appear on the right side of the widget. The "Type" field will be pre-filled, and you will need to complete the remaining required fields (indicated by an asterisk) as well as any other relevant fields.
Note: All phone number fields require an area code
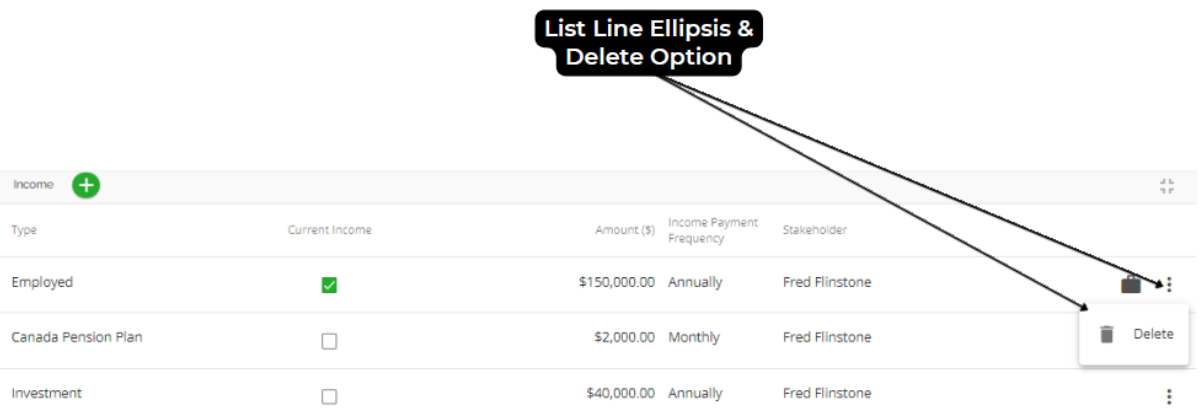
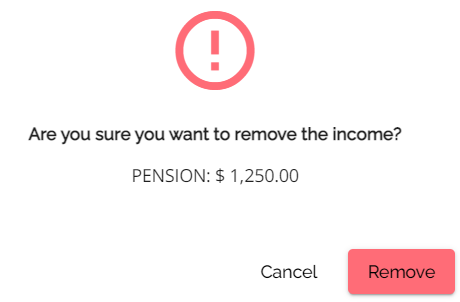
Deleting Income in the Maximized View

To delete a source of income from the application, follow these steps:
- Find the line item of income you wish to delete.
- Click on the ellipsis at the far right of that line item.
- Select the "Delete" option from the drop-down that appears.
- You will get a warning pop up asking if you are sure you want to remove the income:
Editing Income in Maximized View

To edit an income from the maximized view, follow these steps:
- Hover to the right of the income type for the line item you wish to edit. The open details in the sidebar icon (
 ) will appear.
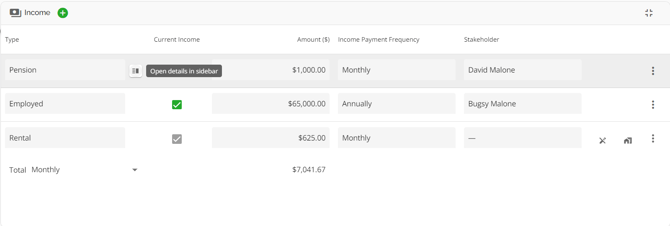
- Click on the icon to open the Income Details sidebar.
- Make any edits as needed and close when done. All changes will be saved automatically.
Note: All phone number fields require an area code

You are also able to edit the Type, Amount, Income Payment Frequency & Stakeholder fields in line without opening the sidebar.
Editing Rental Income in Maximized View
There is one exception to the ability to edit income entries and that is Rental income. This income type can not be edited in the Income widget in either the Maximized or Minimized views. Instead, you must navigate to the Property Details pop up for the applicable property and make your edits to the rental income within the Rental income Tab. This is deliberate due to the impacts on debt servicing your changes may have. Changes made in the property details section will trigger a cash flow recalculation which will render in the income widget (presuming the result was a positive cash flow).
To make edits to the Rental income within the maximized view:
- Click on the icon to open the Income Details sidebar.

2. Within the sidebar, click on the icon (![]() ) next to the "Property Details" header. This will take you directly to the Property Details widget.
) next to the "Property Details" header. This will take you directly to the Property Details widget.
3. Once there, navigate to the Rental Info tab and make your edits as needed.