Amortized LOC Payments for Debt Service Calculations
Automatic Increments Computation
Link liabilities to mortgage product
Specify refund destination in disbursement tab
Existing Mortgages Display Credit Limit on LOCs
Multiple Securities and Products
Adding Insurance on Combo Deals
Purchase Plus Improvements & Refinance Plus Improvements
Introduction
Please note that this is the second of 2 Loan Details Product Feature Guides. If you need additional information on this widget please find it at Loan Details Widget I .
The Loan Details widget is a central source for all critical information related to the subject mortgage. It efficiently gathers and displays essential data, including the requested mortgage specifics, associated terms (mortgage and commitment), closing instructions, broker commissions, existing mortgages, down payments, fees, securities, insurance, and, where applicable, lending aggregates.
Designed for optimal usability, the widget features an intuitive layout and dynamic tools that significantly simplify navigation and boost efficiency. This empowers lenders to quickly access, analyze, and act upon key details. This guide offers a comprehensive breakdown of the widget's components, covering tabs such as Application, Requested Mortgage, Fees, and Insurance. Utilizing this document will provide the necessary insights and tools to streamline workflows and support well-informed decision-making.
‘Commitment’ Tab
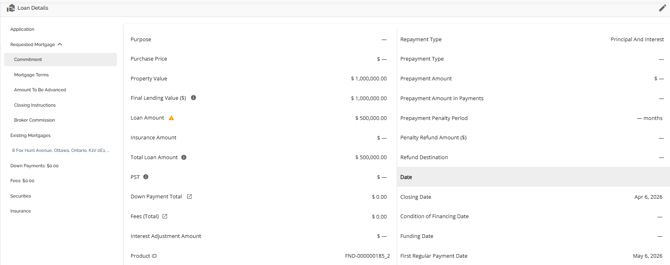

The commitment tab is housed under the Requested Mortgage tab. The commitment tab holds all the data related to the commitment of the requested mortgage, particularly the relevant dates. This includes Closing Date, Condition of Financing (COF) Date, Funding Date, First Regular Payment Date, Maturity Date, the Interest Adjustment Date & Deadline Date.. Some of these date fields will auto populate based on what was entered in the POS system and some require manual input (COF Date for example). Modifications can be made if needed, but it is recommended that the changes be made in the Requested mortgage tab instead of the commitment tab so that all the relevant fields update as necessary.
‘Mortgage Terms’ Tab
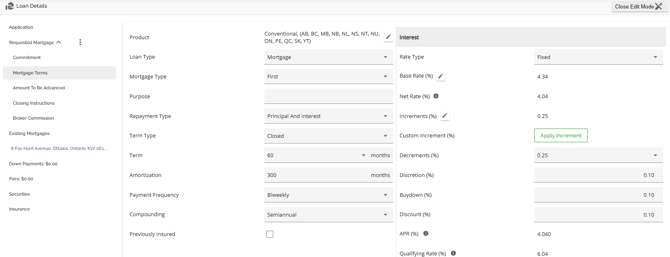

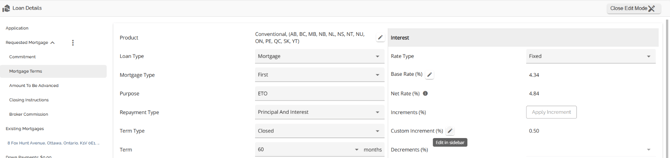
The Mortgage Terms tab is housed under the Requested Mortgage tab. The Mortgage Terms tab holds all the data related to the terms of the requested mortgage. This section is broken into the general terms (left hand pane), Interest and Cost to Carry.
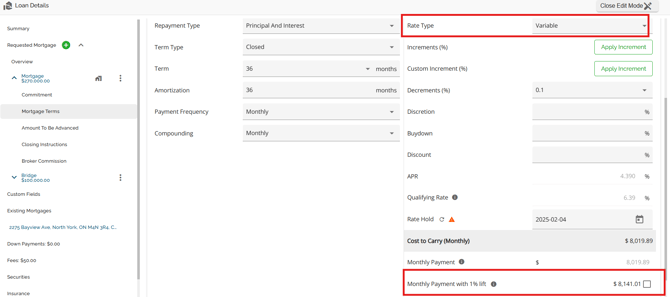
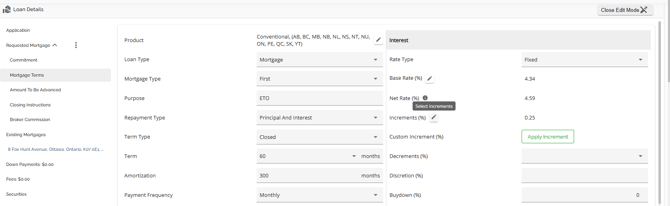
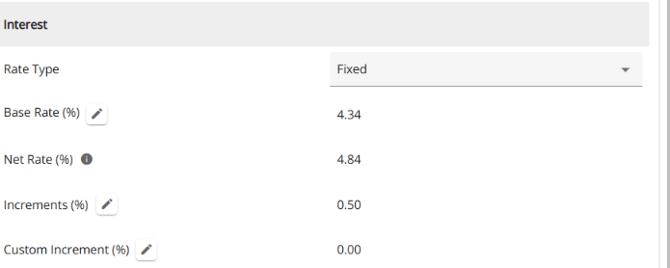
When an increment, decrement, discretion, buydown or discount are added, they will automatically be reflected in the Net Rate, APR, Qualifying Rate, and Mortgage Payment. The Base rate will remain unchanged, indicating the initial rate before any adjustments to the rate were applied. Base rate is the starting point from which any increment, decrement, discretion, buydown, or discounts are applied. The Base Rate starts at ingestion and is the rate the broker submits the application with. It is then reset when the product is applied or re-applied. The Net rate is the result of all adjustments made to the Base Rate. As you can see in the screenshot above.
Increments are added to the Base Rate, decrements, discretions, buydowns, & discounts are deducted from the Base Rate.
Furthermore, you have the ability to determine whether the expenses associated with the subject property, which are entered in the expenses tab of the property details pop up, should be included in the TDS calculation or not. Users are provided with a popout icon which will take them directly to the Expenses tab within the Property Details tab for the subject property where they can make their edits ultimately updating the Total Expense for TDS.
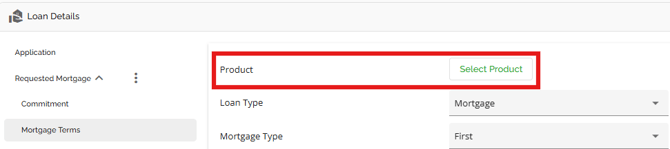
Product Field
As in the requested mortgage tab, you can also select your product in the Mortgage Terms tab. The same functionality exists: If your company has configured a product matrix in the Manager Portal, then you can select from a list of eligible products in this field to apply to the application.
Depending on the level of configuration, when selecting your product, the rate and terms may update automatically. Particular to pricing, the system’s default is to use the FICO score from the applicant with the highest income regardless of score. However, there is the ability in application to tell the system if you would prefer to use the highest score for pricing regardless of income. This is the ‘FICO Score Override’ checkbox within the Stakeholder widget. If this is checked off for a given stakeholder, it will take the highest score for that stakeholder as the main FICO score under consideration instead.
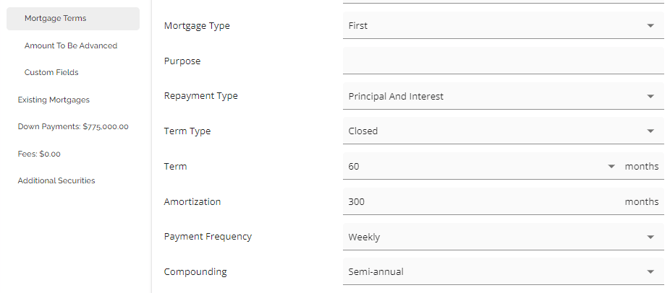
Compounding Field
We have implemented automation within the system to improve efficiency and accuracy. The compounding period can automatically default based on the selected rate type. This is a system configuration that can be customized to your preferences and is controlled by a tenant setting. For example, if you choose a fixed rate type, the system will default to semi-monthly compounding. On the other hand, if you select a variable rate type, it will default to monthly compounding. This automation is designed to minimize human error and ensure consistency. If you would like to enable or disable this feature, please reach out to our support team for assistance.
Amortized LOC Payments for Debt Service Calculations
As most lenders will typically use an amortized payment for LOC to calculate debt service ratios and not the actual payment which is usually an interest only payment, we support this functionality.
To begin with, we have a configurable setting allowing lenders to configure the amortization they wish to use for the LOC calculation (amortization in months). This is set up in the Settings section of the Manager Portal.
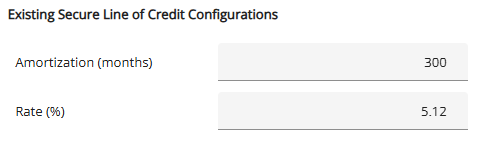
When the loan type Secured Line of Credit or a HELOC product is selected in the requested mortgage tab for the subject property (stand alone or combo), an extra field will open up in the Mortgage Terms tab called Amortized Monthly Payment.
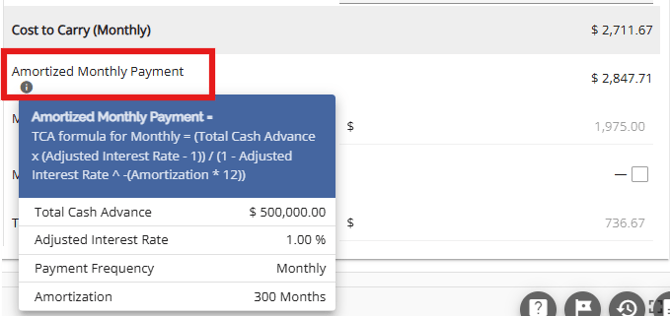
There is a tooltip which when clicked on will show the user the calculation and values used to calculate the amortized payment. It will be the amortized payment used in the debt service calculations, not the actual payment amount. The system will use the BOC rate or the rate set up in the Manger Portal + 2% (whichever is greater) when calculating the Qualifying GDS & TDS based on the amortized monthly payment amount.

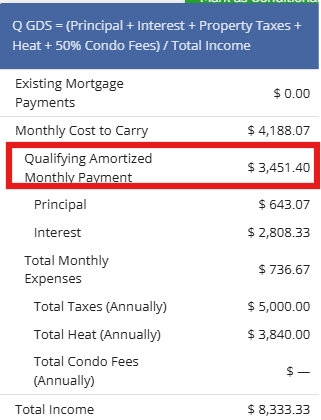
Note: The Amortized LOC payment functionality will apply on all mortgages indicated as Secured Line of Credit (requested and existing/remaining). The system will calculate an amortized payment based on the configuration in the Manager Portal and use the recalculated payment in debt service calculations.
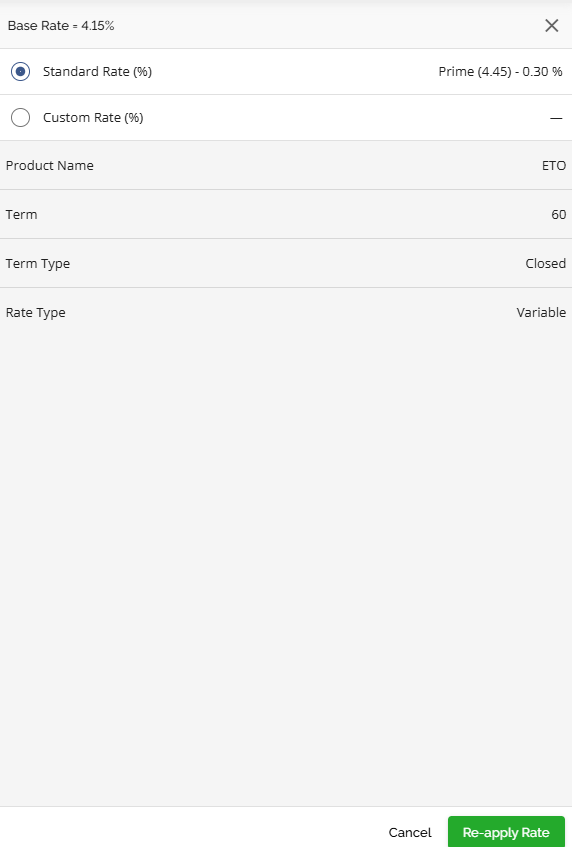
Rate Hold Field
We have included a Rate Hold field in the Mortgage Terms tab to support the Rate Hold feature. The Rate Hold feature enables lenders to effectively track and manage multiple submissions on applications. To better understand this feature, refer to the Rate Hold PFG.
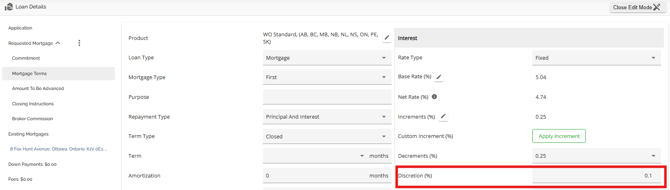
Discretion Field
We have included a discretion field in the Mortgage Terms tab. This field enables users with the permission to “Edit discretion on a mortgage” to apply discretions, which function similarly to discounts, and are immediately applied to the base rate, updating the net rate. Discretions are always subtracted from the base rate after any increments and decrements have been applied.
Negative Amortization
This applies to Variable Rate mortgages only.
For variable rate mortgages, the system will calculate a payment based on the net rate +1%. This payment will populate the field called Monthly Payment with 1% lift and is located in the Mortgage Terms tab directly below the Monthly Payment. In a negative amortization situation the user can select this payment amount and that payment will populate the commitment and loan agreement.
- The system calculates and displays a negative amortization rate when applicable, providing greater transparency.
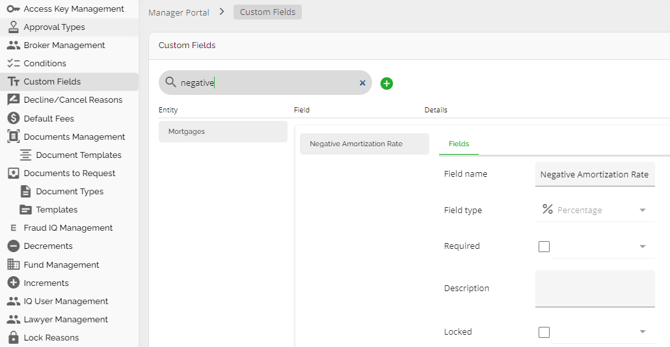
- A new field displays the negative amortization rate and populates relevant documents for variable rate mortgage products. The field is displayed within the Mortgage Terms and Requested Mortgage tabs of the Loan Details widget. This is a custom field that can be managed with the Custom Fields section of the Manager Portal.
- The negative amortization calculation uses the contract rate plus a 1% lift if applied; otherwise, it uses the contract rate.


- Users can populate documents with the rate + 1% and the respected payment amount if necessary. There is a check box to the right of the Payment with 1% Lift field. If the user checks that box, the documents will populate with the net rate + 1% and the payment calculated on that rate.

- Any changes made will be logged in the application history.
- This field can be managed within the Custom Fields section of the Manager Portal.
Rates
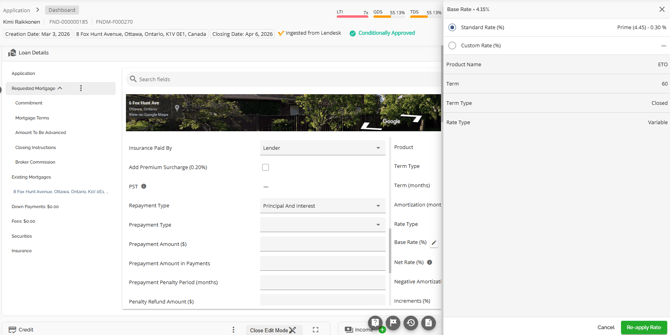
Users can manage the rates on a requested mortgage within the Mortgage Terms tab. When the mortgage is a variable or adjustable rate mortgage, the base rate side panel will show the split between the prime and the modifier as set up in the Products within the Manager Portal showing how the Base rate or Standard rate was obtained.
Note: The ability to edit the net rate within the application dashboard is tied to the permission ‘Edit base rate in application’ and therefore must be turned on for a given user in order for them to edit.
To modify your rate, follow these steps:
While in the Mortgage Terms tab, navigate to the select base rate pencil icon and click on it.

This will open up the Base Rate side nav panel showing the breakdown
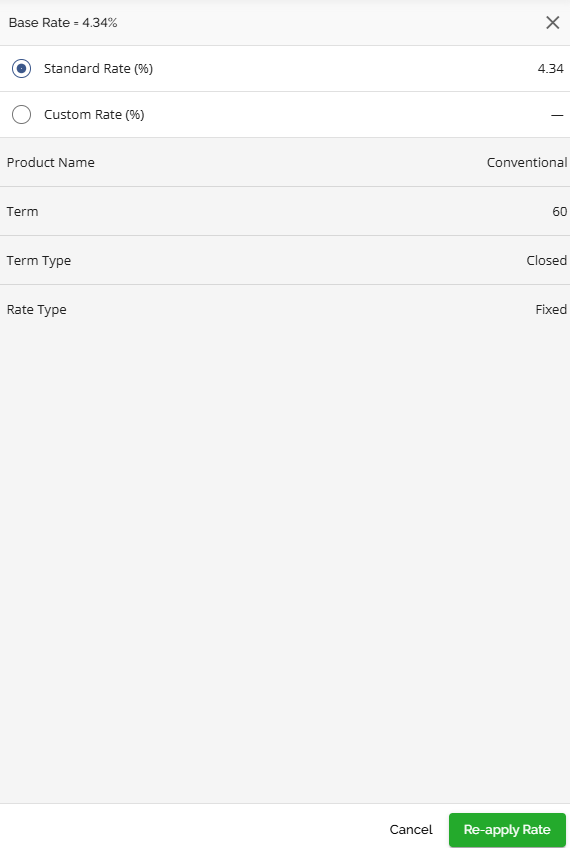
Here is how the side bar will render on a Fixed Rate:
|
Fixed rate: This is how the side bar will render for a Variable Rate: Variable rate: |
Blended Rates
This functionality is only available to certain lenders who have Fundmore integrated with their banking system. This may not be relevant to you.
A blend takes the borrower’s current rate and remaining months in their term and “blends” it with the new rate and new term to determine a new “blended rate”.
Rate blend can be used in both a rising and falling rate environment so that the borrower can get the benefit of "averaging down" their rate.
Blends are available for refinances, early renewals and new purchases where the borrower is porting an existing mortgage to a new property. This functionality is available in Origination and Servicing as a result.
The user will pick a product and term, and the LOS will apply any increments or decrements or buydown to determine the new rate needed for the rate blend.
The LOS will use the net rate for the rate blend calculation.
- Ability to indicate a "Rate Blend" is required
- Ability for user to see the increments/decrements/discounts/discretion/buydowns that went into the new net rate in the same place that they see the blended rate calculation breakdown (current Interest Rate modal)
- Ability for system to apply 0.05% increment when Rate Blend indicator is selected, specific to channel/Source of Business.
Data required to calculate a rate blend;
- Existing mortgage balance from banking system
- Existing mortgage rate (net rate) from banking system
- Existing mortgage maturity date from banking system
- New term
- New mortgage amount
- New mortgage net rate (with .05% blend increment applied
- Current date
- Current posted rate
Existing mortgage remaining term =IF(OR [Today's date] ="",I [Existing Maturity date] =""),"",ROUND(((VALUE(I[Existing Maturity date] -VALUE([Today's date]))/365*12),0))
Final Calculation:
Impact of Mortgage Increase
Existing Mortgage rate impact = (Existing Mortgage Balance/New Mortgage Amount) x Existing Mortgage Rate
New Mortgage rate impact = (100-(Existing Mortgage Balance/New Mortgage Amount)) x New Mortgage Net Rate with 0.05 increment
Rate that will apply to existing remaining term = Existing Mortgage rate impact + New Mortgage rate impact
Impact of Extended Term
Existing Mortgage term impact = (existing remaining term/new term in months) x rate that will apply to existing remaining term
Mortgage Increase term impact = (100%-(existing remaining term/new term in months)) x new net rate with 0.05% increment
Blended Rate = Existing term impact + mortgage increase term impact
Example#1: copy of Blend Test Case attached
|
Existing Mortgage Balance |
300000 |
|
Existing Mortgage Rate |
2.98 |
|
Existing Mortgage Maturity Date |
27/09/2025 |
|
New Term |
60 |
|
New Mortgage Amount |
500000 |
|
New Mortgage Net Rate |
5.29+0.05 |
|
Current Date |
02/07/2024 |
|
Current Posted Rate for the term |
6.84 |
Existing Remaining Term = 15
|
impact of Mortgage Increase |
|
|
Existing Mortgage rate impact |
1.79 |
|
New Mortgage rate impact |
2.14 |
|
Rate that will apply to existing remaining term |
3.92 |
|
Impact of Extended Term |
|
|
Existing Mortgage term impact |
0.98 |
|
Mortgage Increase term impact |
4.01 |
|
Blended Rate |
4.98 |
Blended Posted Rate 6.84 + 0.05 Increment -1.91 discretion = 4.98
System will ask if User wants to accept the new blended rate
- if yes - new blended rate is applied
- system still displays the Posted Rate for that term
- system displays a rate blend increment
- system displays Net rate
- if no the system will untick the blended rate box and remove the blend increment

The system recalculates the blended rate when the product is changed or reapplied and asks again if the user wants to accept the new blended rate.
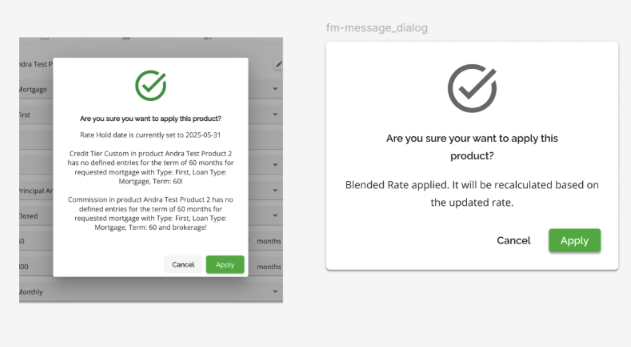
Currently, when a product with a Blended Rate is reapplied—typically due to a rate change in the Manager Portal—the system correctly recalculates the blended rate using the updated rate. However, this behavior is not clearly communicated to the user, which may lead to confusion.
Additionally, if the Blended Rate was originally selected, it should remain selected when the product is reapplied. To improve user clarity and consistency, a message should be displayed to inform users that the blended rate will be recalculated, and the selection should persist during the reapplication process.
A new increment should be applied when a blended rate is selected.
There will be no changes to how rates are calculated when a product is reapplied.
The system will display a message indicating that the Blended Rate will be recalculated when reapplying a product.
When the rate is changed in the Manager Portal, a warning appears next to the affected product in the deal.
If the product (e.g., Mortgage, LOC) has a Blended Rate applied and the user chooses to reapply the product (e.g., Broker Conventional Fixed etc.), a new message will added to the “Are yo usure you want to apply this product?” confirmation popup.
The message will be: “Blended Rate applied. It will be recalculated based on the updated rate.”
Reapplying a product should retain the Blended Rate selection. When the user clicks Reapply Product, and Blended Rate is already selected for the product, the system should keep this selection. The Blended Rate should remain applied after the product is reapplied. If the rate is changed, the Blended Rate should be recalculated using the updated rate.
There is a new increment added for Blended Rate in both Origination and Servicing and it will be applied automatically when a Blended Rate is applied to the deal. It will be re-triggered whenever the blended rate option is selected or deselected.
- Type: Blended Rate
- Category: Standard Increments
- Source of Business: One record for Broker, and another record for Retail, Digital, Mobile.
- Term: Any Term
- Provinces: Any Province
- Amount (%): 0.05
Increments and Decrements
Note: Increments are controlled by a tenant setting feature and may not be applicable in your environment.
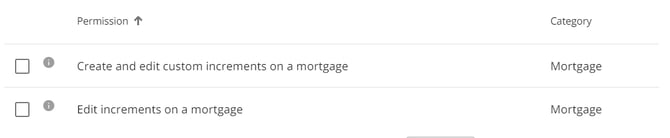
We have functionality to support Increments and Decrements within the system. When applied, the values for these fields will automatically be considered in the necessary calculations. This feature is permission-based. The two permissions tied to increments are: “Create and edit custom increments on a mortgage” and “Edit increments on a mortgage”. If a user is assigned a role with this permission enabled, they gain the ability to add or edit increments. This ensures that those who require this capability can seamlessly manage increments, empowering lenders to control access effectively.
Similarly, the permission tied to decrements is “Edit decrements on a mortgage”. If a user is assigned a role with this permission enabled, they gain the ability to edit decrements.

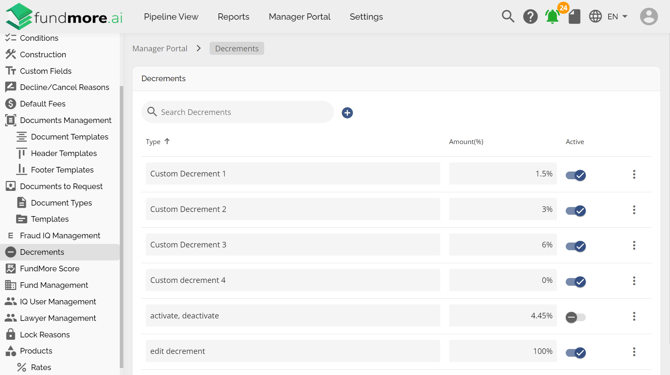
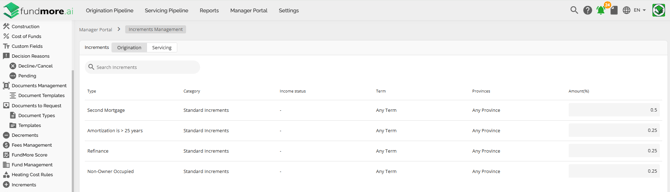
Increments and Decrements can be managed in their respective sections of the Manager Portal by admin-level users. Once configured, they can be applied within the application.
Decrements:
Increments:
Applying Decrements:
To set the decrements on an application, simply click on the dropdown and select the appropriate option.
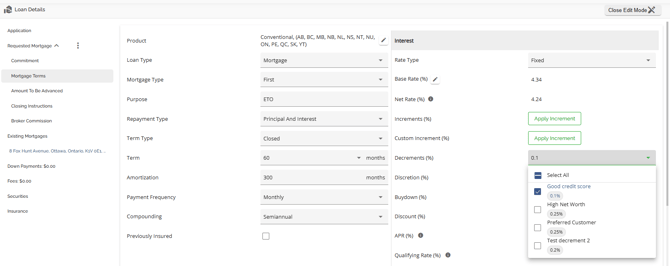
Based on the option selected, the system will automatically update the Ne Rate output. In the example above, the Net Rate was equal to the Base Rate at 4.34% before the decrement was applied.
After the decrement of 0.10% was applied, it was deducted from the Base Rate, putting the Net Rate down to 4.24%. Click on this link to watch a video of this functionality: Managing and Applying Decrements.
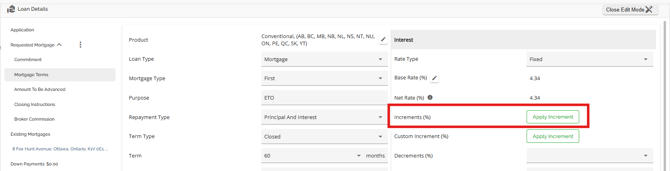
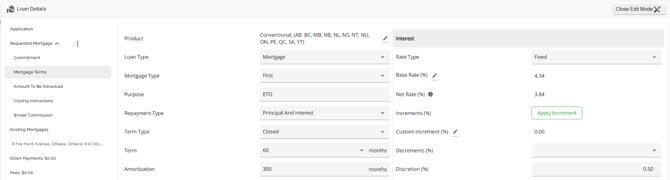
Applying Increments:
To add an increment to the deal, click on the Apply Increment button next to the Increments (%) field.
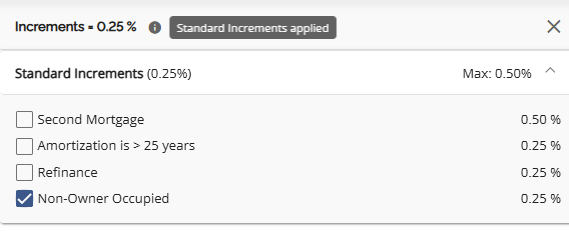
This will open a sidebar where the user can select the appropriate option from the predefined list. Depending on your organization's increment configuration, the table in the sidebar will be organized in sections based on the Increment Type and could include: Standard, Non-Income Qualifying, Horizon Credit Program, LTI, LOC and Bridge. These sections can be expanded and collapsed as necessary using the arrows next to the section headers. Simply click on the checkbox next to your desired option and the system will automatically add the increment to the deal. On the flip side, you can click on the selected checkbox to remove the increment.

There is a tooltip at the top of the sidebar that tells the user if an increment has been applied or not.
To edit the selected increments, click on the pencil icon next to the Increments (%) field. In the sidebar that opens up, select the desired option(s).
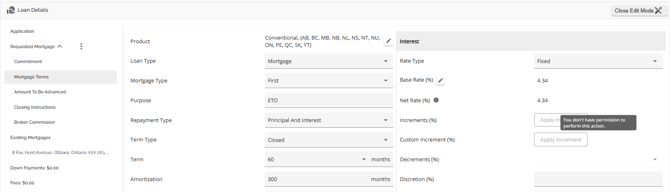
If a user does not have the necessary permissions to edit or add an increment (custom or regular) or decrement, the Apply buttons will be greyed out as will the option list for decrements. Hovering over the greyed out button tells them they do not have the necessary permissions to allow them to add or edit increments or decrements whichever the case may be.
As noted earlier there are two increment permissions. One for editing increments and the other for creating and editing Custom Increments. It is possible the user has one of the two permissions allowing them to perform one of the functions as opposed to the other. Fields will open up to edit depending on how the permissions have been set for their role.
Applying Custom Increments
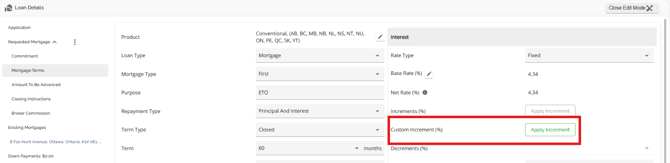
If the desired option is not available, the user has the option to apply a custom increment providing they have the relevant permission. To do so, click on the Apply Increment button next to the Custom Increment (%) field.
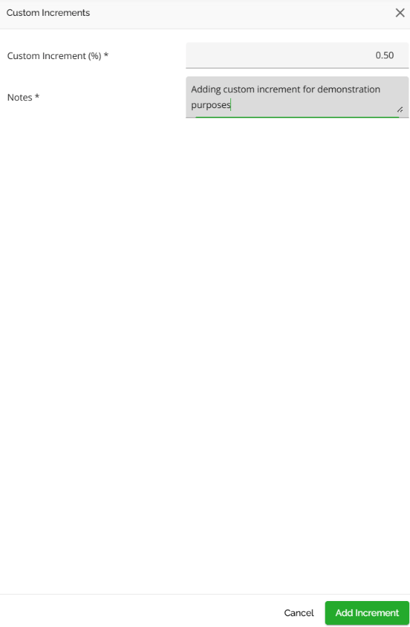
This will open up a sidebar where you can enter the details for the custom increment. Both fields i.e. Custom Increment (%) and Notes are mandatory. Once completed, click on the Add Increment button.
Once added, the only way to remove the custom Increment from the deal is to set the value to 0%. To do so, click on the pencil icon beside the custom increment field.
In the sidebar that opens, update the value of the custom increment to 0% and add your notes.
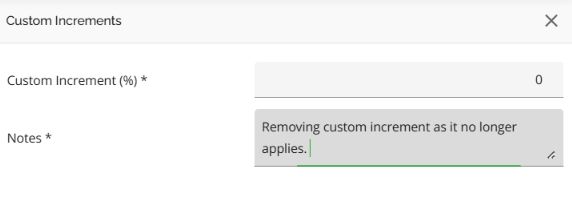
The system will update the increment and Net Rate accordingly automatically.
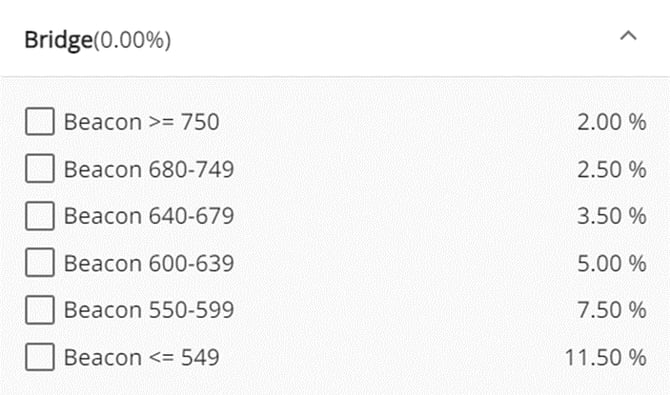
The system will only allow users to select one increment from any non standard increment categories (Non-income Qualifying, Horizon Credit Program, and Bridge for example). For Bridge Loans, we have added default increments based on the Credit Score range. When the user selects the appropriate increment, the system will automatically add it to the application and update the calculations for the Net Rate accordingly.
As increments are added to the deal, the system will automatically update the calculations for the Net Rate. In the example below, the Net Rate was equal to the Base Rate at 4.34% before the increment was applied.
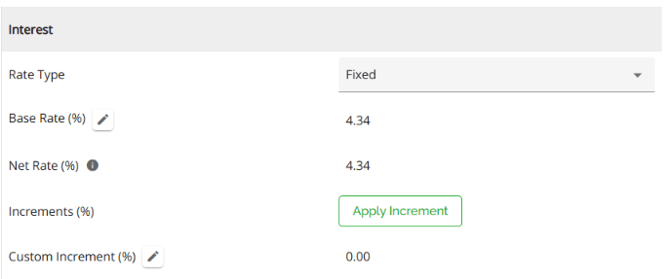
After the increment of 0.50% was applied, it was added to the Base Rate, putting the Net Rate at 4.84%.
Automatic Increments Computation
Note: This is a tenant setting and may not apply in your environment.
We can enable triggers for automatic increment computation. Increments should apply on ingestion based on increment configuration and users can continue to edit increments as needed. The system will apply increment maximums based on client configuration in the Settings tab of the Manager Portal.
Discretion
Note: This is a tenant specific feature and may not be applicable in your environment.
We have included a Discretion field under the Mortgage Terms tab in the Loan Details widget. The ability to edit this field is permission based, and it is tied to the “Edit discretion on a mortgage” permission. If a user is assigned a role with this permission enabled, they gain the ability to edit discretions.

It is further tied to whether the user has been given discretion limits. This is managed within the Manager Portal via User Management -> User Details -> Lending Limits -> Max Discretion.

To apply a discretion at the application level, click on the field and enter the discretion. The system will automatically add it to the deal and you will see it reflected in the Net Rate.
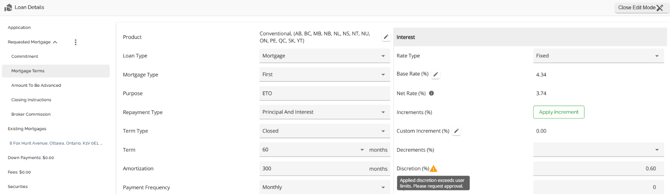
The system validates any Discretion (%) that a user applies against what their discretion approval limits are, as configured in the Manager Portal.
If the discretion applied exceeds the users limits, a warning icon will appear next to the Discretion field. The warning icon serves as a visual indicator that an approval will be required. In this case, conditional approval and funding will be blocked until the user receives the appropriate approvals.
If the user tries to conditionally approve or fund the deal before getting approvals, the following pop ups will appear:
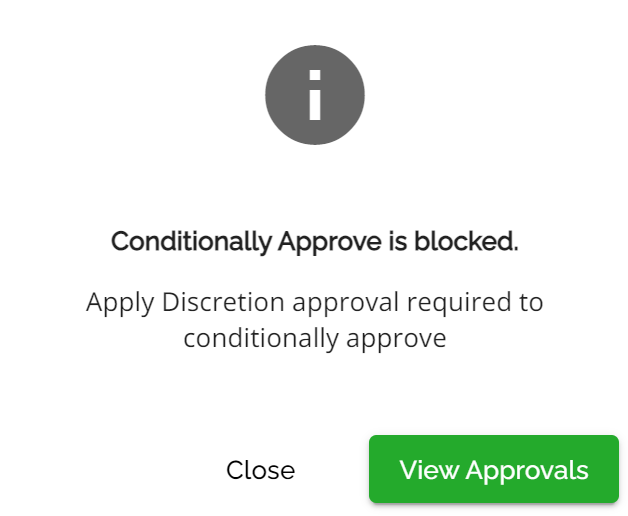
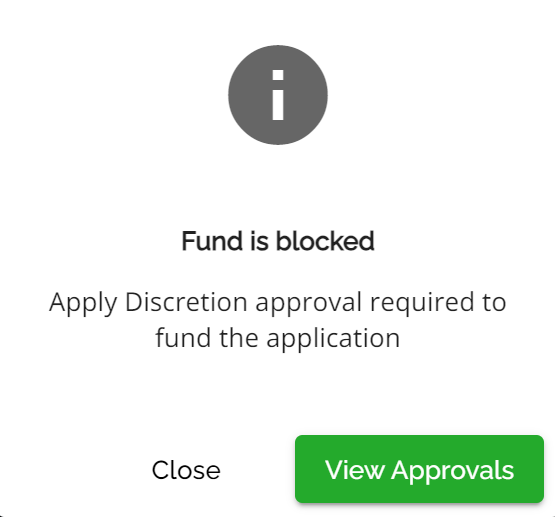
There is an approval type of “Apply Discretion” set up in the system and defaults to Active and cannot be changed by the Lender.

The user simply needs to go to approvals and request an Apply Discretion approval from a user that is authorized to approve it. Once approved, the user can proceed with either the conditional approval or fund as applicable.
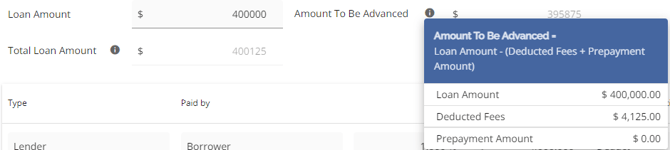
‘Amount To Be Advanced’ Tab
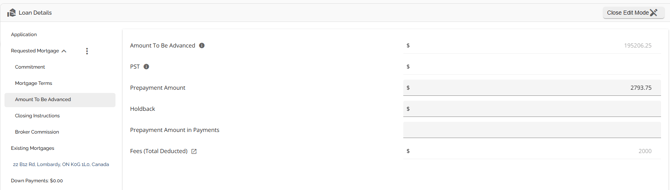
The Amount To Be Advanced tab is housed under the Requested Mortgage tab. This tab holds all the data related to the Amount To Be Advanced of the requested mortgage. The Amount To Be Advanced reflects any fees deducted from proceeds, PST, prepayment amounts, & holdbacks if applicable. It should be noted that the Amount To Be Advanced is a calculated field and is not editable. It will populate based on the data entered in the application per the formula.
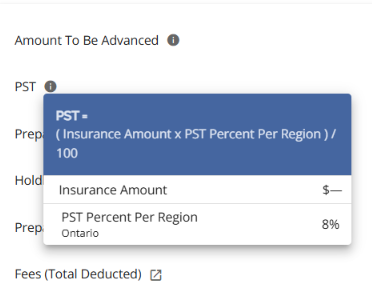
There is a tooltip beside Amount To Be Advanced and PST to show the users the formula and values used to calculate the values.
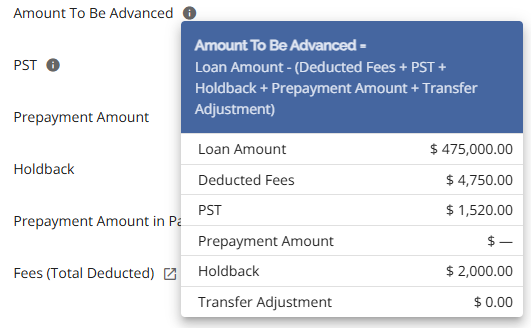
Note: Only fees that are set to be deducted from the proceeds will have an impact on the Amount To Be Advanced. Fees that are indicated to be capped do not affect Amount To Be Advanced. Instead, they impact the Total Loan Amount. Fees that are entered without deducting or capping, but are to be included in the APR, do not impact the Amount To Be Advanced or Total Loan Amount.
‘Closing Instructions’ Tab
Within The Closing Instructions tab there may be two types of closing options depending on what you have configured/integrated in your environment.
The options you might see are:
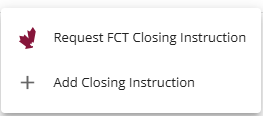
One is to use FCT for your closing instructions, the other is to deal directly with a solicitor for your closing instructions.
In this section we’ll address ‘Add Closing Instruction’. Please see the FCT PFG for information related to using ‘Request FCT Closing Instruction’.
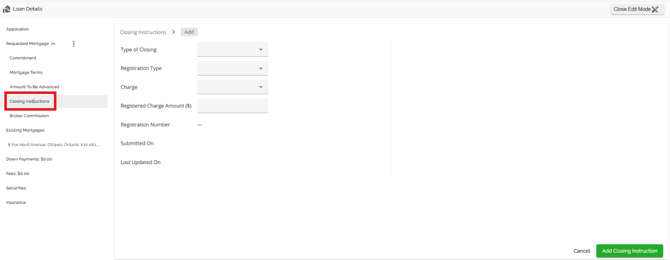
The Closing Instructions details should now include the following fields:
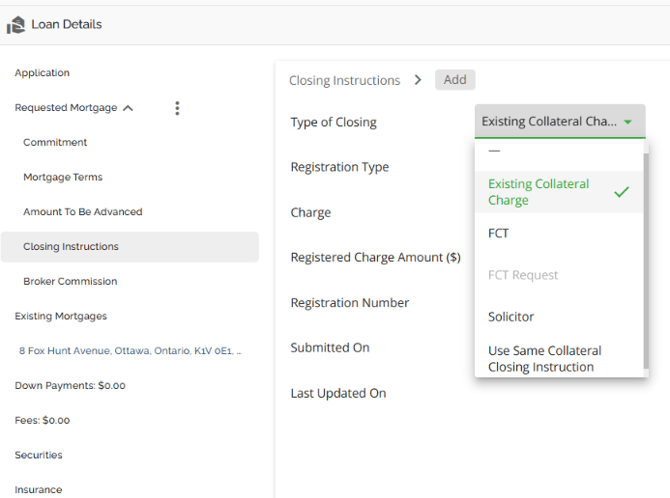
- Type of Closing = Single-select dropdown field with the following options:
- —
- Existing Collateral Charge
- FCT
- FCT Request (disabled for MCU, consistent with current behavior)
- Solicitor
- Use Same Collateral Closing Instruction
- Registration Type = Single-select dropdown field with the following options:
- —
- Collateral
- Conventional
- Charge = Single-select dropdown field with the following options:
- —
- First Charge
- Second Charge
- Third Charge
- Registered Charge Amount ($) - Numeric field
- Registration Number = Numeric field
- Submitted on = Read only date field
- Last Updated on = Read only date field
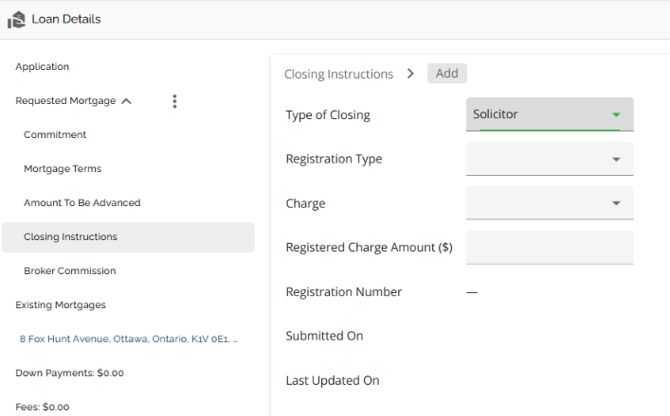
For tenants with FCT Integration, refer to the our FCT PFG. FCT would be selected on a Purchase or Refinance transaction while Solicitor could be selected for Purchase, Refinance, or Switch/Transfer transactions. If Existing Collateral Charge is selected, then the Registration Number field opens up for population in addition to the other fields. Manual entry is required for these fields.

If FCT, Solicitor or, Use Same Collateral Closing Instruction are selected, then only the Registration Type, Charge, & Registered Charge Amount fields are open to data entry.
The configuration for the five fields is managed in the Custom Fields section of the Manager Portal.
Once a closing instruction is added, you will see it appear as a line item in the Closing Instructions summary and the Submitted on and Last Updated On fields will automatically populate with the date the Closing Instructions were added.

Users will see to the far right of the line item some icons and an ellipsis. The icons are from left to right:
Notes Icon is greyed out
Comments icon is greyed out
Disbursements icon
Within the ellipsis you will see the following options:
View Details
Delete

Note: If there are multiple products, the users have the ability to indicate the closing instructions for each product independently of one another. The fields within this tab are usually completed by the underwriter(s). They are informational only to serve as a clear direction to the users responsible for sending instructions. There is no automation tied to these fields.
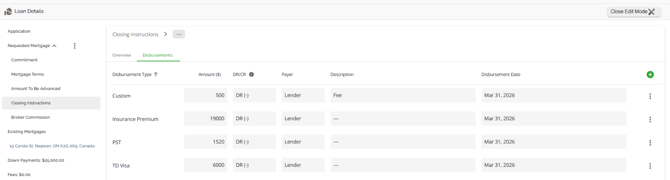
Disbursements
Disbursement Management:
There is a Disbursements tab which will contain a disbursements list as users add disbursements. Users can add, edit, and mark disbursements as complete depending on permissions their role has been assigned.
They require the Edit application permission to add, edit, or delete disbursements.
They require the "Mark Disbursement as Completed" to mark disbursements as complete.
The disbursements tab includes support for custom fields, history logs, and disbursement-specific updates.
Enables users to link disbursements to specific mortgage products if necessary.
Disbursements become read-only when marked as completed or when permissions are restricted.
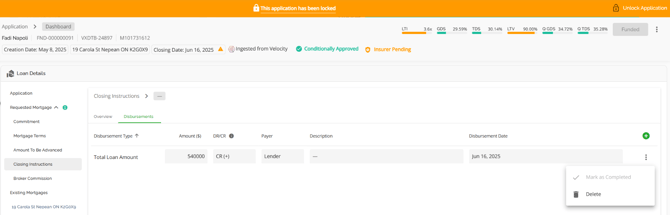
Locked Applications:
Allows updating incomplete disbursements even when the application is locked, supporting post-funding workflows. In the screenshot below you will see the application is locked but the disbursement fields are open to edit and the delete function is enabled.
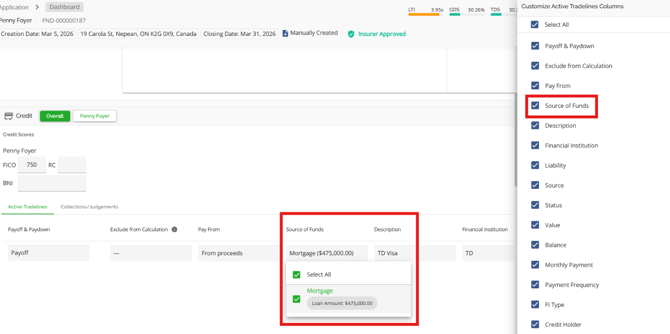
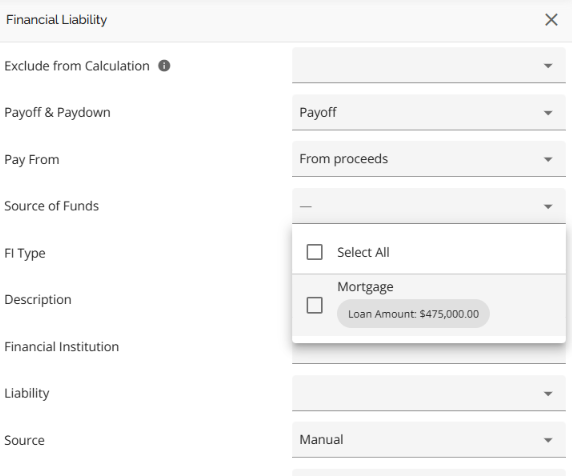
Link liabilities to mortgage product
Enables users to link disbursements to specific mortgage products if necessary.
- There is a Source of Funds field in the Liabilities section, visible in both the list view and the add/edit form in the sidenav.
- Enables the association of liabilities to specific mortgage products for improved tracking and funding instruction accuracy.
Specify refund destination in disbursement tab
Refund Destination set in the Requested Mortgage section now automatically populates the Description field when creating a Penalty Refund disbursement, ensuring consistency and reducing manual entry.
Details:
- Disbursement types now support an optional description field.
- For Penalty Refund disbursements, the description is auto-filled using the Refund Destination (if available).
- Once a disbursement is created, subsequent changes to the Refund Destination do not retroactively update existing disbursements—this aligns with current disbursement behavior.
Impact:
No changes required to existing workflows. Enhancements apply automatically when selecting the disbursement type.
To view a demonstration of this function: Refund Destination Disbursements
‘Broker Commission’ Tab
We have included a ‘Broker Commission’ tab within the Loan Details widget. The commissions are configured with Product configuration by admin-level users within the Manager Portal. They can be adjusted on a per product basis.
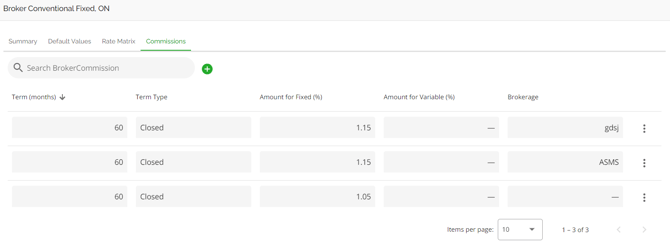
To learn more about how these are set up, refer to the ‘Commissions’ Tab section in the Products, Credit Tiers, and Rates PFG.
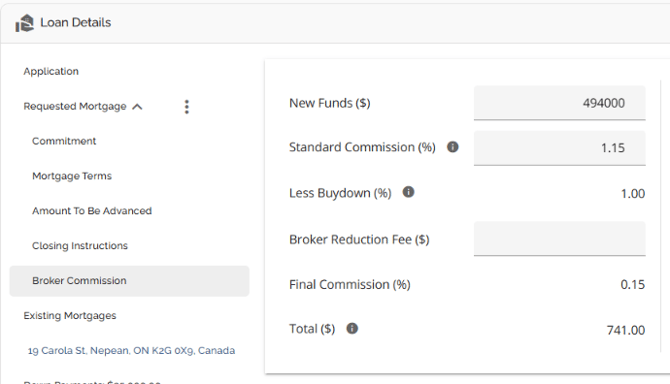
Once a product has been added to the application, the respective commission(s) applied to that product will populate in the Broker Commission tab in the Loan Details widget. Users are able to edit the New Funds, Standard Commissions and Broker Reduction Fee fields.
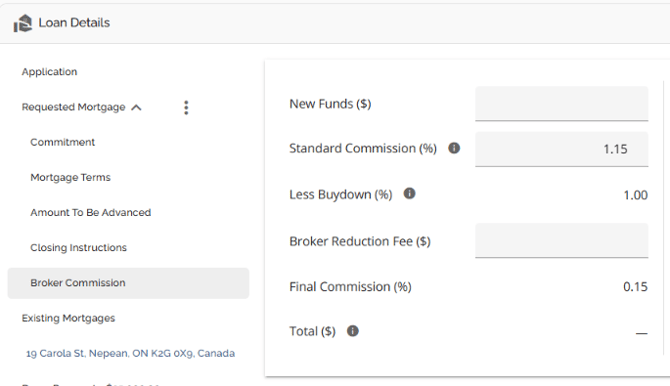
The system will automatically take the commission % as configured in the Manager Portal, apply it to the loan amount and calculate the commission to be paid on the file. The calculation will take into consideration any buydowns applied and a broker reduction fee, if applicable. When a buydown is applied, the total commission is reduced and is dependent on the individual lender's guidelines. I.E. The lender may subtract .20bpts for every .05bpts of buydown. This calculation is configured in the BE based on the lender's guidelines.
The system automatically limits the buydown to the maximum amount the commission can cover and shows a warning if a user tries to exceed it. This ensures commissions never go negative, improves financial accuracy, and removes the need for manual corrections.
‘Existing Mortgages’ Tab
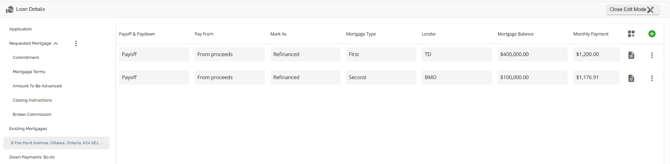
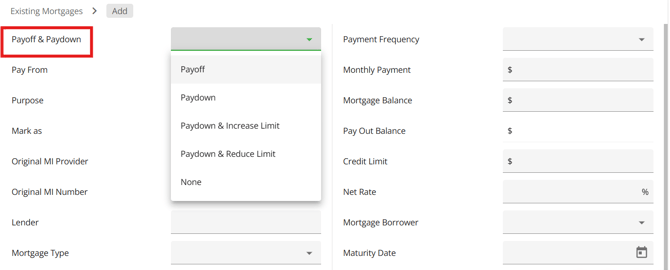
The Existing Mortgages tab holds the data relating to any existing mortgages associated with the subject property if applicable. On this tab, you have the option to view, add, edit, or delete existing mortgages. Additionally, you can choose the payoff method for these mortgages, which includes paying from proceeds, prior to advance, or selecting none.
Add a Mortgage - To add a mortgage, follow these steps:
![]()
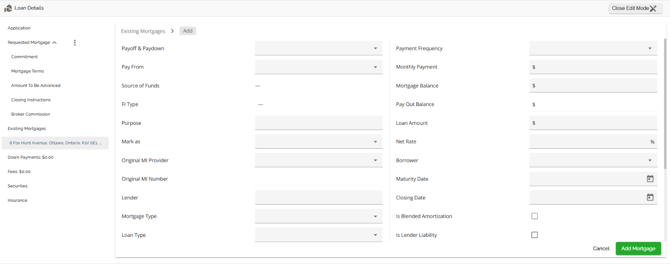
3. Once completed, click the Add Mortgage button. Any changes you made will automatically save.
Edit the Existing Mortgages Tab - To edit fields in the Existing Mortgages tab, follow these steps:
- Click on the edit pencil
 in the top right corner of the widget to enter edit mode.
 - Navigate to the Existing Mortgages tab.
- Locate the field you would like to update.
- Click on the field and edit it. Any edits you made will be automatically saved.
- When you done editing, click the Close Edit Mode
 button at the top right corner of the widget.
Delete a Mortgage - To delete a mortgage from the Existing Mortgages tab, follow these steps:
- Click on the edit pencil
 in the top right corner of the widget to enter edit mode.
 - Navigate to the Existing Mortgages tab, and find the the mortgage you wish to delete,
- Click the ellipsis (
 ) located in the line of the mortgage you wish to delete.
 - Select the delete option from the drop down menu.
- A warning will appear asking ‘Are you sure you want to remove the mortgage record?’.
- Click the remove (
 ) button and the mortgage entry be deleted. Alternatively, you can click the cancel button if you no longer wish to proceed.
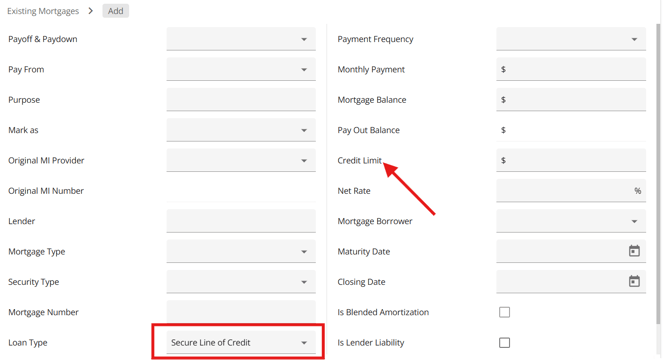
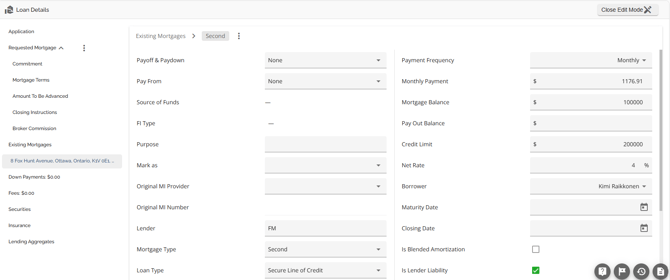
Existing Mortgages Display Credit Limit on LOCs
You can identify if an existing mortgage is a Secured Line of Credit (LOC) in the “Loan Type field”. Upon selecting the LOC option, the system dynamically transforms the "Loan Amount" label to "Credit Limit". Updating this field to “Credit Limit” offers a more accurate representation of the borrower's financial landscape, aiding lenders in assessing capacity for additional borrowing, managing risk effectively, and making informed decisions on refinancing. The update also emphasizes the relevance of focusing on the credit limit over the balance, especially when evaluating existing mortgages and considering factors like Loan-to-Value (LTV) ratios.
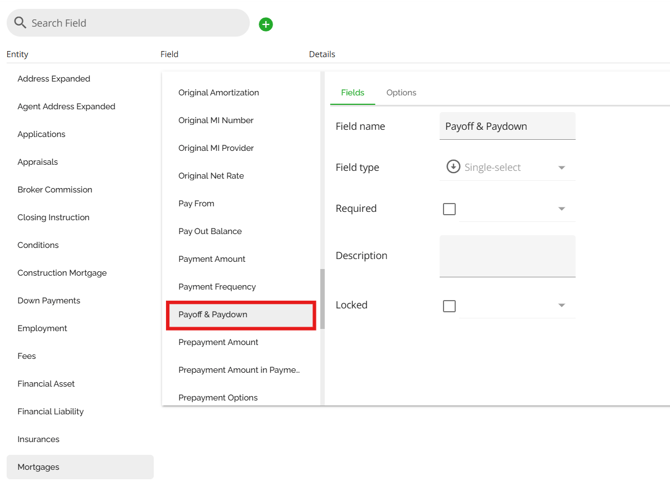
Similar to liabilities, we have included a “Payoff & Paydown” field to the Mortgage entity. This allows users to indicate if an existing mortgage is going to be paid off or paid down in the same manner as liabilities. This field can be configured by system administrators within the Custom Fields section of the Manager Portal.
Within the Manager Portal:
Within the Loan Details Widget:
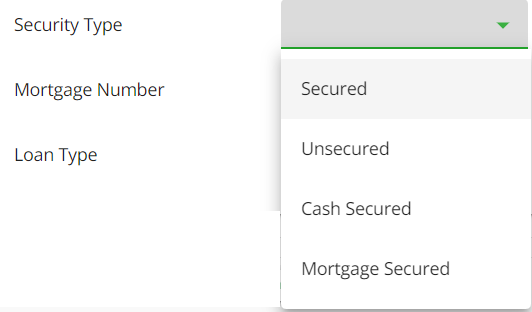
Security Type Field
Note: This is tenant specific and may not apply in your environment.
We have included a Security Type field in the Existing Mortgages tab. This is the same as the Security type field in the Credit Widget. It is a single select, manual population/edit field that will tie into aggregates if that is relevant to your organization. The system or user can now designate a security type for each existing mortgage. Users have the ability to specify the type of security for each liability. The available choices include: Mortgage Secured, Cash Secured, Secured, and Unsecured.
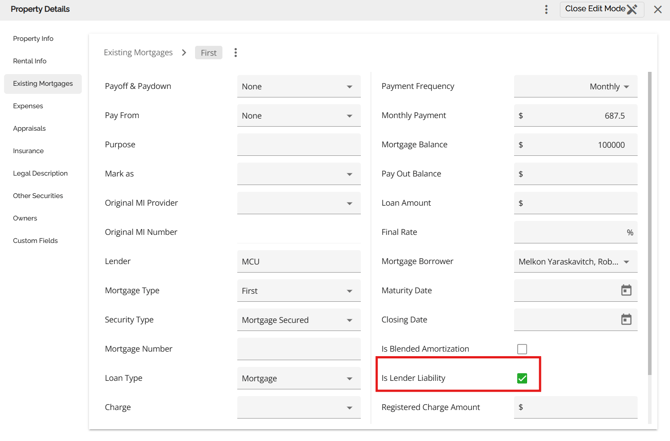
Lender Liability Field
Users can mark existing mortgages in the Existing Mortgages tab to ensure they are included in all mortgage aggregates (current and future) by checking off the Is Lender Liability checkbox. This ensures current aggregates also update when the "Is Lender Liability" checkbox is ticked.

‘Down Payments’ Tab
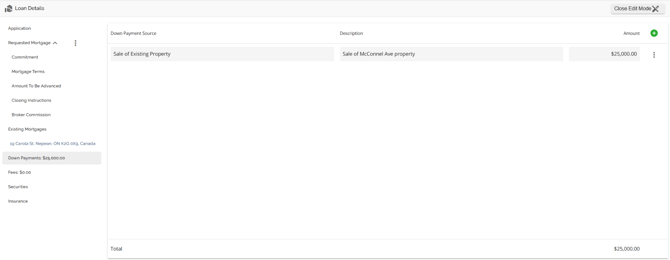
The Down Payments tab holds all the data related to the Down Payment associated with the Mortgage on purchase transactions. Down Payments can be created, edited, or deleted directly within this tab, or managed via the Net Worth widget. However, there are some restrictions on how the two sections relate to one another.
When you make changes to the Down Payment tab in the Loan Details widget, these changes will not be reflected in the Net Worth widget. However, if you select the down payment checkbox in the Asset tab of the Net Worth widget, the total value of the listed asset will automatically appear in the down payment tab of the Loan Details widget. Similarly, if you uncheck the checkbox in the Net Worth widget, the asset will be removed from the down payment tab in the Loan Details widget.
Note: We have implemented a tenant setting in which the down payment tab and the Financial Liabilities tab (tradeline fields) are locked to edits from a designated stage onwards (e.g. Adjudication Stage). If edits need to be made in either of these areas, the application needs to go back to the Underwriting stage first. This is lender specific and may not be applicable to your organization.
Add a Down Payment - To add a down payment, follow these steps:
- Click on the "Add New Down Payment" (
 ) button.
 - In the drop down menu, enter all the appropriate information.

Note: There are no required fields to create a new down payment. - Once completed, click the Add Down Payment button. Your downpayment entry will be saved automatically.
4. Click the Close Edit Mode  button at the top right corner of the widget when exiting
Edit the Down Payment Tab - To edit fields in the Down Payments tab, follow these steps:
- Click on the edit pencil
 in the top right corner of the widget to enter edit mode.
 - Navigate to the Down Payments tab.
- Locate the field you would like to update.
- Click on the field and edit it. Your edits will be saved automatically.
- When you done editing, click the Close Edit Mode
 button at the top right corner of the widget when exiting the section.
Note: You can make changes to the assets listed in the Net Worth section, but these changes will not be reflected in the Down Payment tab. Thus, we recommend creating and managing your down payment information within the Down Payment tab of the Loan Details section.
Delete a Down Payment - To delete a down payment, follow these steps:
- Click on the edit pencil
 in the top right corner of the widget to enter edit mode.
 - Navigate to the Down Payments tab,
- Click the ellipsis (
 ) located to the far right of the down payment line time you wish to delete.
 - Select the delete option from the drop down menu.
- A warning will appear asking ‘Are you sure you want to remove the down payment?’.
- Click the remove (
 ) button and the down payment will be deleted. Alternatively, you can click the cancel button if you no longer wish to proceed.
Note: This can only be done if down payment is created within this tab and not populated from the Net Worth Widget.
‘Fees’ Tab
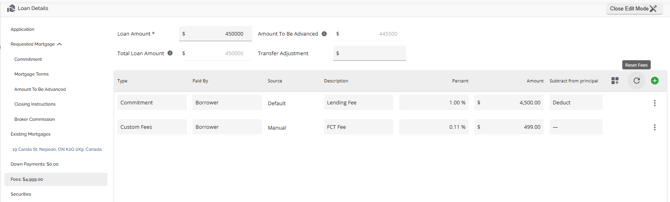
The Fees tab holds all the data related to the fees associated with the mortgage and how they are applied. These fees can be deducted from proceeds, capitalized into the loan, have no impact on Principal, or be included in APR. The Amount To Be Advanced and Total Loan Amount will reflect according to how these fees are input. Within this tab, you can view, add, delete and edit fees.
Note: Fees configured in the Manager Portal may apply either at ingestion or when a product is applied or changed. This is a tenant setting that defaults to disabled. To have it enabled, please contact the Client Success Team.
Users can also add any fees manually if necessary.
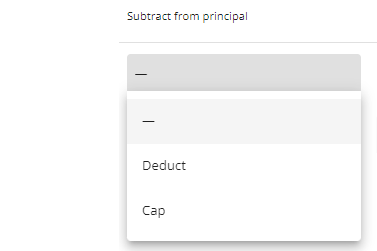
!Subtract from principal functionality! - Fees indicated as “Deduct” will impact your Amount To Be Advanced while fees indicated as “Cap” will impact your Total Loan Amount. Fees indicated as neither (marked with a '-') will not have any impact on the Amount To Be Advanced or the Total Loan Amount. Typically, these are fees that the lender wants included in the APR calculation but the borrower is paying independent from the mortgage transaction.
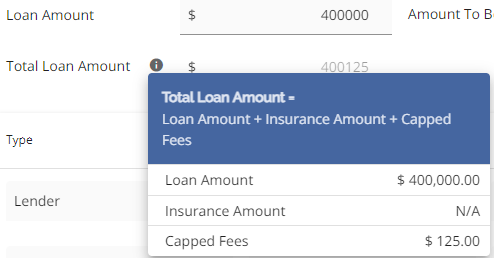
“Cap Fees Percentage” - This works in conjunction with the “Subtract from principal” option when "Cap" is indicated. When selecting Cap for a fee, there is an additional field directly to the right of Cap where you can indicate a percentage of the fee you wish to cap. By default, the cap fees percentage is set to 100%. However, if you want to cap only 50% of the fee, you can indicate it accordingly. This means that 50% of the fee will be capped, and the remaining 50% will be deducted. In this case both Total Loan Amount and Amount To Be Advanced will be affected.
Note: The percentage amounts for any fees indicated as Deduct or “-” are not editable.
As seen in the example below, only 50% of the $250 Administrator fee was included in the Total Loan Amount as a cap.
On the other hand, 100% of the $4000 Lender Fee and the remaining 50% of the Administrator Fee were deducted from the Amount To Be Advanced. The appraisal fee, however, was not included in either the Total Loan Amount or the Amount To Be Advanced.
It is important to remember that "Deduct" will impact the Amount To Be Advanced, and "Cap" will impact the Total Loan Amount.
Transfer Adjustment - This is relative to Porting a Mortgage or Switch/Transfers. Refer to the Ports PFG or Switch/Transfer PFG for further information.
Users have the option to add a default fee from a predefined list. Users are also able to create a custom fee if they have a fee they cannot find in the list (ad hoc fees). Any custom fees added in the UI will not populate the Default Fee list in the Manager Portal.
Add a Default Fee - To add a default fee, follow these steps:
- Click on the "Add New Fee" (
 ) button located on the far right of the list headers.
 - Click on the Type field.
3. Select a default fee from the list. You have the ability to search or filter through the existing default fees.
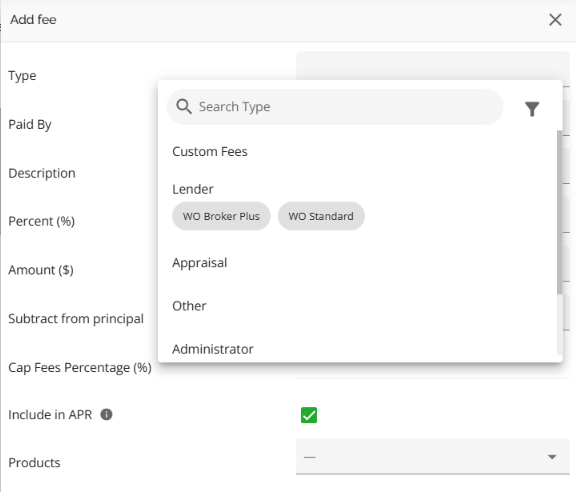

Video Demonstration:
feat(fees) add search + filter for pre-selecting default fee.mkv
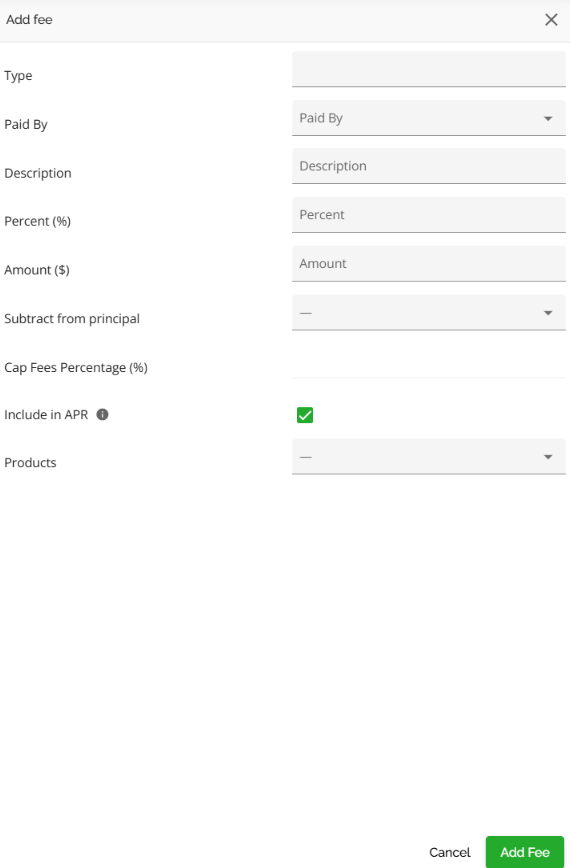
Add a Custom Fee - To add a custom fee, follow these steps:
6. Click on the "Add New Fee" (![]() ) button located on the far right of the list headers.
) button located on the far right of the list headers.
7. From the drop down menu in the type field, select Custom Fees.
8. Complete the rest of the fields in the side panel.
Note: All fees default to “Include In APR” Simply uncheck that box if you do not want that fee to be included in the APR calculation.
9. Once completed, click the Add Fee button and your fee will save automatically.10. Click the Close Edit Mode
 button at the top right corner of the widget when exiting the section.
Edit the Fees Tab - To edit fields in the Fees tab, follow these steps:
- Click on the edit pencil
 in the top right corner of the widget to enter edit mode.
 - Click on the Fees tab.
- Locate the field you would like to update.
- Click on the field and edit it. Your edits will save automatically.
- When you done editing, click the Close Edit Mode
 button at the top right corner of the widget when exiting the section.
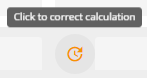
Note: When you make changes to either the % or $ fields, orange refresh icons ![]() will appear next to both the Percentage and Amount fields. These icons indicate that the values in the fields do not match. To correct this, click on the orange icon next to the relevant field (i.e. % or $) for the value that needs to be corrected or updated. The value in that field will automatically update to match the value in the other field. The system does not automatically update the 2nd field when one is updated.
will appear next to both the Percentage and Amount fields. These icons indicate that the values in the fields do not match. To correct this, click on the orange icon next to the relevant field (i.e. % or $) for the value that needs to be corrected or updated. The value in that field will automatically update to match the value in the other field. The system does not automatically update the 2nd field when one is updated.
Delete a Fee - To delete a fee, follow these steps:
- Click on the edit pencil
 in the top right corner of the widget to enter edit mode.
 - Navigate to the Fees tab,
- Click the ellipsis (
 ) located in the line of the fee you wish to delete.
 - Select the delete option from the drop down menu.
- A warning will appear asking ‘Are you sure you want to remove the fee?’.
- Click the remove (
 ) button and the fee will be deleted. Alternatively, you can click the cancel button if you no longer wish to proceed.
Re-apply fees on product change
To properly manage your default fees, we recommend accessing the default fees section in the application after applying or changing your product. This allows you to make necessary edits and remove modified default fees that were not automatically removed, and may now be duplicated or redundant.
When a product changes for a requested mortgage, the following will occur:
1. Any manually added fees will remain.
2. Any modified default fees will remain. A modified default fee means any default fee that was changed from when it was originally applied. This includes clicking to update the calculation:
3. Any unmodified default fees will be removed.
4. Default fees will be re-applied based on the new product and matching criteria defined in the Manager Portal. There are some algorithms in particular with respect to the Product, Credit Tier, Term type and Purpose fields that determine how the system identifies which default fees to apply at ingestion, product selection, and product change.
These fields are all multi select fields but you also have the option to select:
(All) which can be any value out of those that the system has, but needs to have a value. Selecting All is telling the system to look for at least one of those values when matching to the application. If none of the values are found it will not match and therefore not apply.
You can also select (-) which means any or null. Selecting this option is telling the system to not evaluate or ignore this field when matching to the application.
These criteria must be set up in default fees for them to apply accordingly. In the screenshot below, the line that has dashes in the criteria section means that no criteria were selected or null. The system will ignore these fields when matching to the application. You also see that All Credit Tiers and All Types are also selected for Credit Tier and Term Type for the 2nd fee. In this case the system will look to match at least one of the values for those categories to the application. If none are found, the fee will not match and therefore not be applied.

Fee Clean Up
We have functionality that will help users understand and clean up fees when re-applying products. We have clear labels showing whether each fee was added by the system or manually, and options to remove unwanted fees in bulk. This helps prevent duplication, reduces manual cleanup, and gives users more control over fee accuracy.
Note: For this functionality to apply, the ‘Enable the Fee origins & Reset Fees actions to remove existing fees before re-applying a product’ setting must be enabled in Manager Portal > Settings > Automations.

“Source” Column in Fee Table - This column helps users understand what fees to remove before changing the product.
- Every fee in the fee table will show its source using a new column labeled “Source”.
- Three types of fee sources:
- Manual – added by user
- Default – automatically applied based on product
- Default (modified) – originally system-added but edited by the user
“Reset Fees” Icon with Selective Cleanup Options - This action is designed to be taken before a product change to clean up old fees. The current functionality which applies new default fees in addition to existing fees when a product is changed remains unchanged.
- A Reset icon is shown in the Fees tab
- Clicking the icon opens a menu with the following options:
- Remove all default fees
- Remove only unmodified default fees
- Remove all fees
- After user selection, matching fees are deleted from the fee table.
For a demonstration of this functionality: Cleanup Fees
Customize Table Button - This functionality enables users to select the specific columns they want to view in the Fees table and arrange them in their preferred order.

To customize the Fees table, follow these steps:
- Click on the Customize Table icon.
- A sidebar will appear on the right side of the screen.
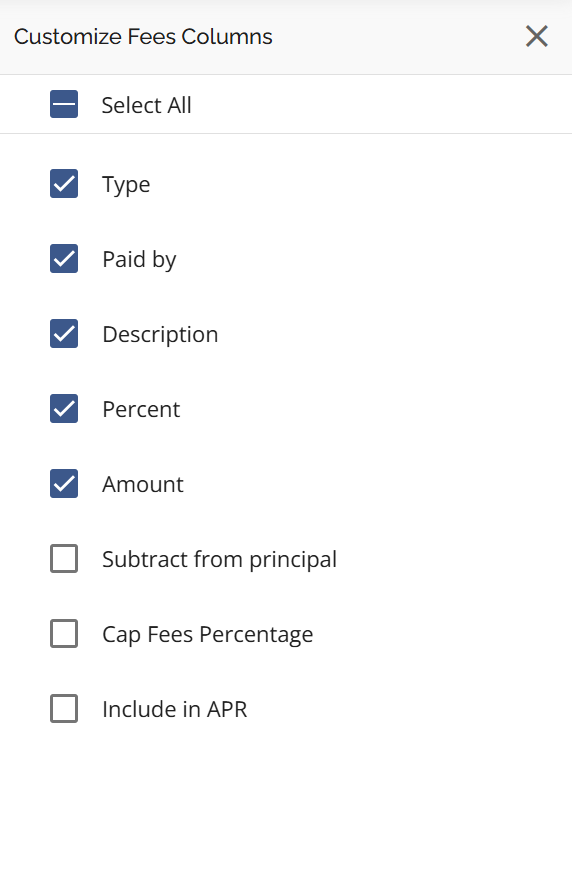
3. Select which columns you want to display in the table by checking the corresponding checkboxes next to the column names.
4. To rearrange the order of the columns, hover to the left of the checkbox. When the drag icon appears, click and drag it to your preferred position.
|
|
|

Note: We have created a tenant setting for default fees reapplying. The setting defaults to disabled. Therefore default fees will not reapply while working on the application such as a product application or ingestion for example unless the lender requests this be enabled.
‘Securities’ Tab
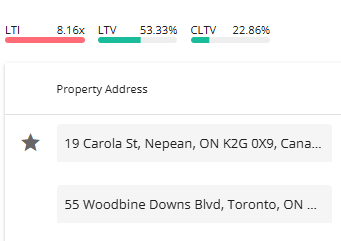
The Securities tab is used to identify which property or properties (blanket or multi product applications) is/are being used as security for the mortgage(s). If the applicants have additional properties that they want to use as security for the mortgage, excluding the subject property, those properties can be added in this section. The subject property will populate this section by default. All properties owned should already be listed in the Net Worth Widget. If a blanket mortgage is being considered you will see at the top of this tab two LTV calculations (LTV & CLTV). The CLTV calculation considers all properties and their associated mortgages, allowing the lender to accurately assess the impact of using additional security. The ability to transact blanket mortgages is controlled by a tenant setting.
Blanket
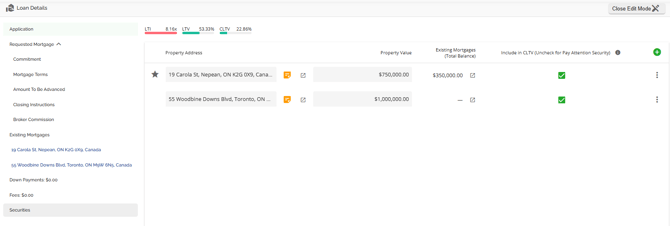
As you can see in the image below before the 2nd property was added as the additional security for the blanket mortgage the ratios were calculating on the 1st property added:
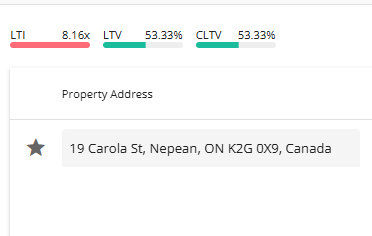
You can see once the 2nd security was added, the ratios updated taking into consideration the mortgage and value of that property. The CLTV calculation at the top of the tab will automatically update with the correct calculation taking into consideration the added security
Add a Security - To add a security, follow these steps:
- Click on the 'Add New Security' button.
- A drop down will appear with a list of the other properties on the application.
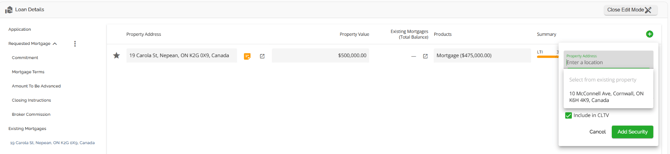
- Select the property you wish to add. You will see that the value auto populates, this is pulling from the data entered in the Net Worth widget.
- Click the ‘Add Security’ button on the bottom left of the drop down. Your edits will save automatically.
5. Once completed, click the Close Edit Mode  button at the top right corner of the widget when you are ready to exit this section
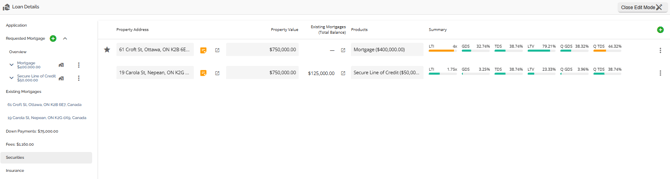
Multiple Securities and Products
Note: This is a tenant specific feature and may not be applicable in your environment.
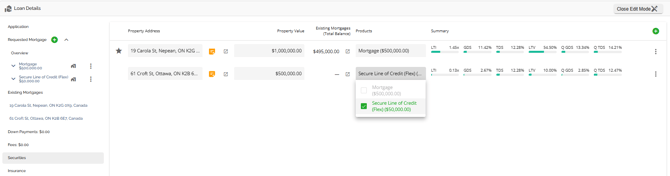
Users can add multiple products and securities to an application. This functionality allows users to have the same or different security connected to a single or multiple products on an application. The exception being that users cannot have multiple securities linked to one mortgage product (blanket mortgage) unless you have the blanket mortgage tenant setting enabled.
Multiple mortgages (products) can be linked to the same security. 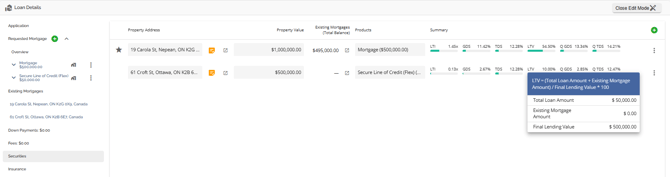
With the multi product scenario you have two separate mortgage transactions on two separate properties. The system is calculating ratios (LTI, GDS, TDS, & LTV) on them independently of one another.
With this functionality, the subject property will automatically populate in both the Security and Existing Mortgages tabs. When additional properties are added as additional securities, they will also populate within both tabs. The properties within the Existing Mortgages tab will also populate in the list within the left sidebar.
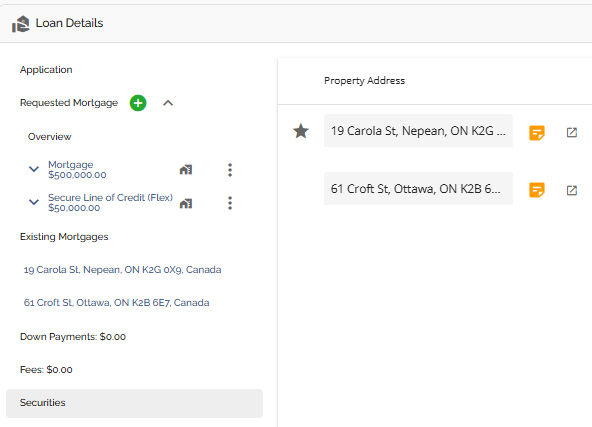
When you click on one of the properties, the list rendered in the center of the widget is filtered to the Existing Mortgages on that property.
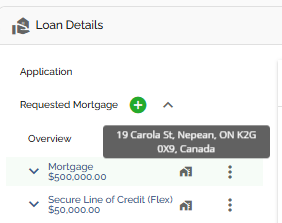
Requested mortgages have a new icon if linked to a security indicating the address as a tooltip.
To understand more about this functionality, refer to the Adding Multiple Products section.
‘Insurance’ Tab
Note: The Insurance tab will only appear for tenants who have it configured.
The functionality for submitting and managing default insurance requests is contained within the Insurance tab located in the Loan Details Widget. As this functionality is quite extensive, we have created its own Product Feature Guide. Please refer to the Insurance Product Feature Guide for more information.
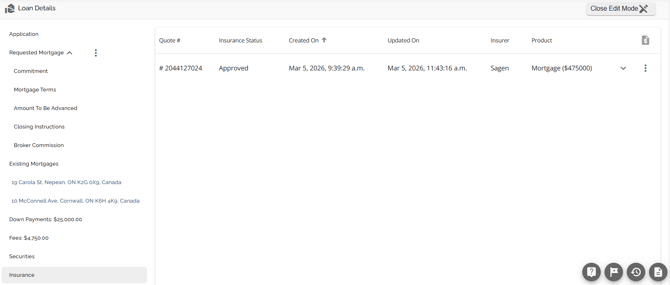
Adding Insurance on Combo Deals
Note: This is a tenant specific feature and may not be applicable in your environment.
We have implemented functionality in the Insurance tab for combo deals. This allows users to apply for default insurance with any of the insurers. The requirements for this are that any of the products identified is a Mortgage (as opposed to Secured Line of Credit or Bridge), and has a product feature of insured (i.e. it is an insured product).
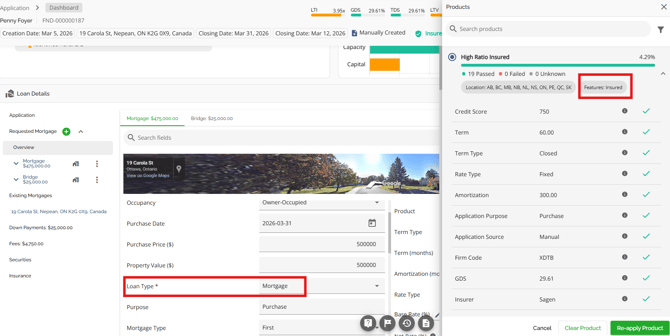
The system automatically filters out products that do not meet these requirements, and prevents the user from completing an insurance request. This is indicated by the greyed-out "Request MI Quote" button.
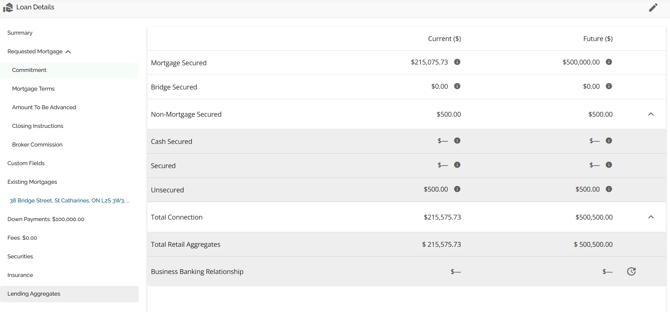
‘Lending Aggregates’ Tab
We have implemented the Lending Aggregates tab which displays and calculates all aggregates by security type including Retail and Business Banking connection. The Lending Aggregates tab is located in the Loan Details widget as per the screenshot below.
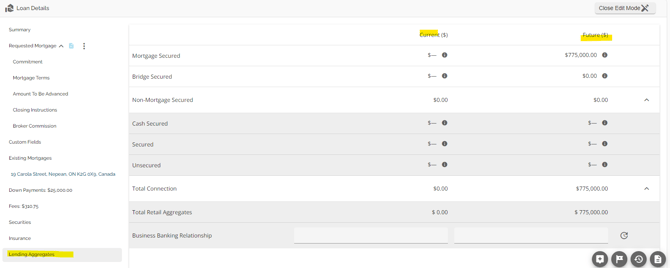
The ability to view this tab is dependent on automation in the Settings tab at the company level. To view this tab, the company would need to enable the “Enable expanded lending limits in user preferences” automation in the Manager Portal.

The Lending Aggregates tab allows a user to see total Lending Aggregates to ensure approval is within lending authority, and to ensure total connection is within lender guidelines/regulatory requirements and manage overall credit risk.
We can ingest data related to aggregates directly from the lender’s banking system API using the banking system security codes. In the screenshot below, the respective liabilities are updated with the respective banking system security codes - ensuring that the lending aggregates are represented accurately.
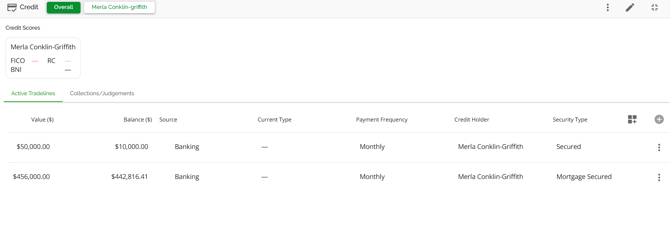
When you check the lending aggregates section, you will see the tradelines are listed per the security type that came over from the banking system: 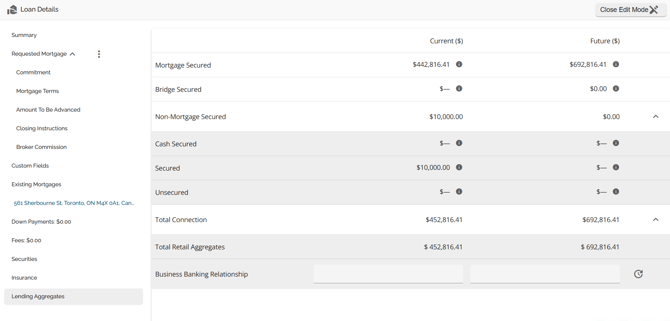
Users can now mark existing Lender mortgages in the Existing Mortgages tab to ensure they are included in all mortgage aggregates (current and future) by checking off the Is Lender Liability checkbox. This ensures current aggregates also update when the "Is Lender Liability" checkbox is ticked.
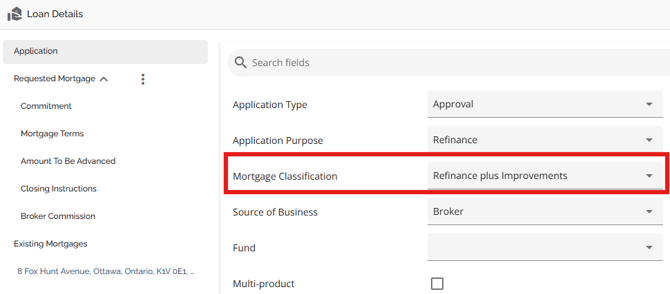
Purchase Plus Improvements & Refinance Plus Improvements
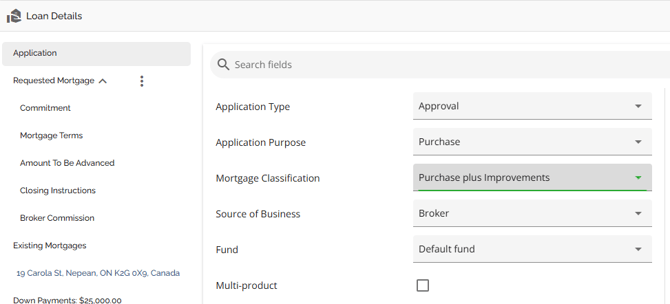
We have added some options, fields and calculations to support Purchase Plus Improvements and Refinance Plus Improvements. The fields that display and certain calculations within the UI will depend on whether your application is a PPI or a RPI. You must indicate Purchase Plus Improvements or Refinance Plus Improvements in the Mortgage Classification field for these fields to render and the relevant calculations to take effect. Those options are available if Purchase or Refinance is indicated in the Application Type field.
Refinance Plus Improvements:
We have added a new mortgage classification option: Refinance Plus Improvements to enable lenders to effectively process these types of transactions.
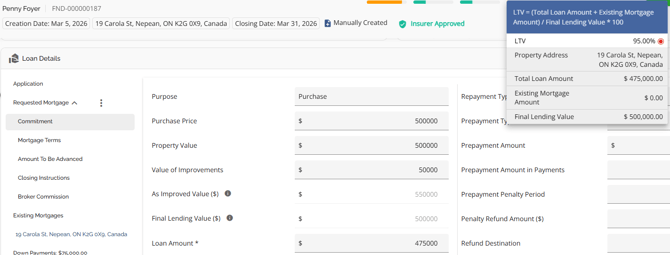
If this classification is selected, there are new ‘Value of Improvements’ field, ‘As Improved Value’ field, and ‘Final Lending Value’ field that will appear in the in the right hand pane of the Commitment tab where users can indicate the value of the improvements that are being added:
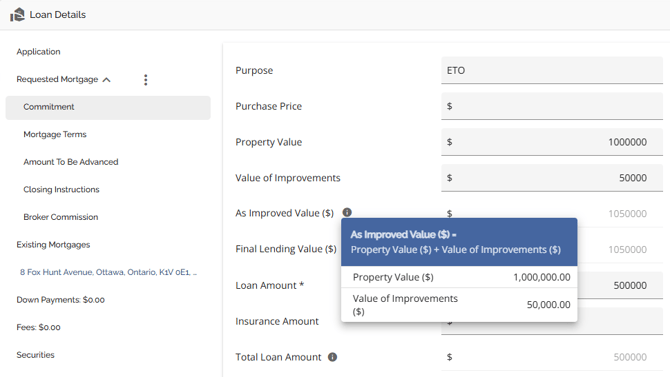
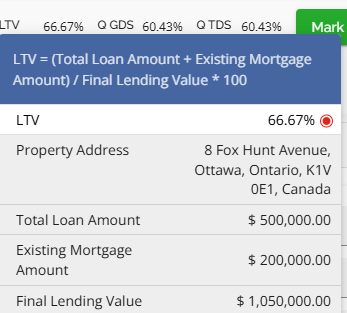
The LTV calculations will use Final Lending Value instead of Property Value in LTV calculator
Uses Estimated Value (no min) for Refinance mortgage classification cases.
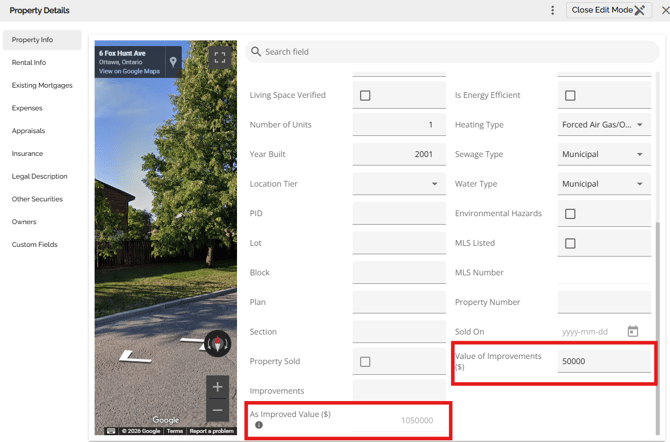
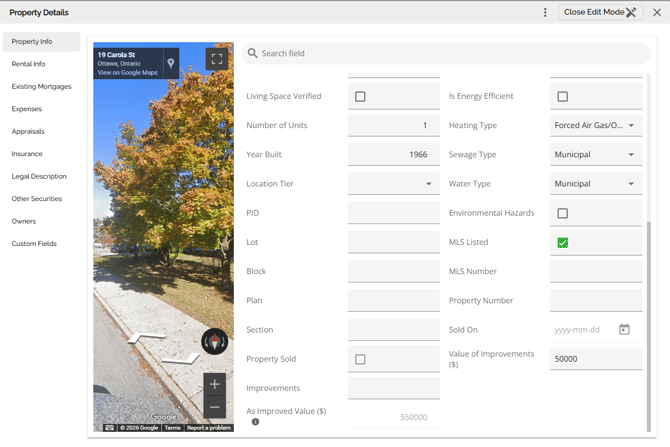
The Value of Improvements field that was previously in the Property Info tab of the Property Details Pop up remains. Both fields are synchronized and will populate as data is input into either one of them. There is now an As Improved Value added to the Property Info tab as well that is automatically calculated by data inputs with a tool tip that tells the user what the formula is to calculate the As Improved Value and the values used to calculate it.
Purchase Plus Improvements:
We have added a new mortgage classification option: Purchase Plus Improvements to enable lenders to effectively process these types of transactions.
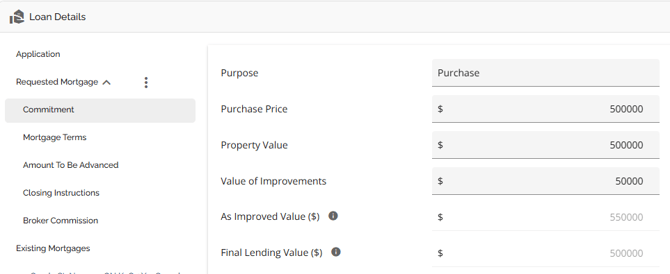
If this classification is selected, there is a new ‘Value of Improvements’ field, an ‘As Improved Value’ field, and a Final Lending Value field that will appear in the in the right hand pane of the Commitment tab where users can indicate the value of the improvements that are being added:
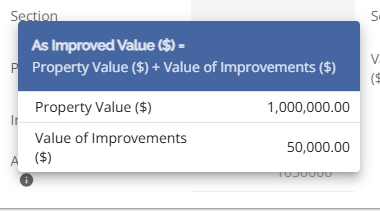
In the ‘Value of Improvements’ field users can indicate the value of the improvements that are being added. The As Improved Value field will calculate and populate based on the purchase price plus the Value of Improvements that are input. There is a tooltip indicating the formula and the values used to calculate the As Improved Value.
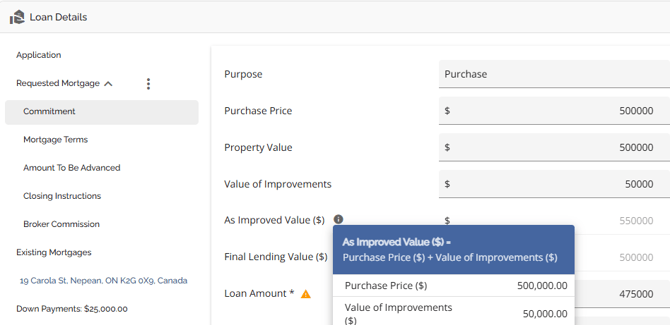
The LTV calculations on a PPI are calculated using the Final Lending Value which Uses min (Purchase Price, As improved Value) in Purchase + Improvements in Purchase + Improvements

The Value of Improvements field that was previously in the Property Info tab of the Property Details Pop up remains. Both fields are synchronized and will populate as data is input into either one of them. There is now an As Improved Value added to the Property Info tab as well that is automatically calculated by data inputs with a tool tip that tells the user what the formula is to calculate the As Improved Value and the values used to calculate it.

Uploading individual products
This feature is lender specific and may not apply to your organization. It enables operations users to upload products to their banking system or servicing system in a multi-product application independently.
Users are able to upload individual products from an application instead of submitting the entire application.
Products can only be uploaded if:
- The closing date is today
- They are in the Operations Fulfillment stage
- They have the status "Ready for Closing"
- They have product member number assigned
- They have a product assigned
- They have not been uploaded previously
If multiple products meet these conditions, they can be uploaded simultaneously.
Products that do not meet all criteria will be disabled and cannot be selected for upload.
Two products can be linked, ensuring they are uploaded together.
A new single-select field, Linked Product, is available at the product level. This field specifies the product that must be uploaded alongside the current product. The dropdown includes all other requested products in the application.
All linked products are disabled and cannot be linked to another product.
Workflow Example
An application contains three products:
- Product 1 – Mortgage
- Product 2 – LOC Flex
- Product 3 – Mortgage
If the user wants to link Product 1 to Product 2, they select Product 2 in the Linked Product field of Product 1.
As a result:
- Product 2’s Linked Product field is automatically updated to Product 1.
- Product 3 cannot be linked to any product, as all options are disabled.
If the linked product is removed for one product, it is also cleared for the other.
Users can select one or multiple products for upload at the same time. However, only products that meet the specified eligibility criteria (see General Product Upload Criteria) can be uploaded.
For linked products, both must meet the upload criteria, as they are treated as a group and cannot be selected individually. If one product in the pair does not qualify, the group cannot be uploaded.
If no products meet the required criteria, the Upload button remains disabled.
If an upload attempt fails, users receive an error message listing the specific products that failed. This allows them to take the necessary corrective actions. Different rules apply depending on the type of product(s) being uploaded:
1. Single Product Failure
- If a single product fails to upload, an error message is displayed, specifying the product that failed.
- The failed product remains eligible for upload and can be retried until successful.
2. Linked Product Failure
- If one product in a linked pair fails to upload, the error message will list the failed product of the two
- The entire pair is considered not uploaded, and needs to be uploaded again until successful
3. Multiple Independent Product Failures
- If multiple unlinked products are uploaded together and only some fail, an error message will list the specific products that failed.
- The products that were successfully uploaded remain uploaded and cannot be uploaded again.
- The failed products remain eligible for upload and can be retried individually or together.
In order to upload products, users require the permission to update and fund applications.