Table Of Contents
Automated daily refresh to maintainAutomated daily refresh to maintain Verisk integration stability
Automated Daily Refresh to Maintain Verisk Integration Stability
Add Notes to an Appraisal
FCT Appraisal (Tenant Specific)
Customize the Existing Mortgages Table
Edit an Existing Mortgage Field
Restructured Liability Payoff Mechanism
Include Expenses in GDS Calculations (Rental Properties)
Include Expenses in TDS Calculations
Add Percentage of Ownership for Rental Properties
Rental Calculation Per Application or Per Property
Introduction
The Property Details pop-up is a valuable resource that offers users in-depth information about a particular property. It serves as a centrali
The Property Details pop-up provides users with in-depth information about a specific property. It serves as a centralized hub, consolidating all essential property information into a single location. There is a Property Details section for every property listed in an application.
To access the Property Details pop-up, click the View Property Details icon, which can be found in two places:
- The Requested Mortgage tab of the Loan Details widget (for the subject property)
- The ellipsis to the right of a property listing within the Property tab of the Net Worth widget (for all owned properties, including the subject property)
zed hub, consolidating all the essential information about the property into a single location.


When the pop-up opens, the Property Info tab is displayed by default. This tab includes a Google Maps image of the property, allowing you to visualize the property's location without navigating away from the page. Additional tabs include: Rental Info, Existing Mortgages, Expenses, Appraisals, Insurance, Legal Description, Other Securities, Owners, and Custom Fields.
Users can also request a Property Valuation through Verisk or verify and update property information via the iClarify Request Residential Building feature, also provided by Verisk. To access the AVM or Building information, click the ellipsis located in the top right corner of the pop-up. For more details, refer to the sections below.
Edit Mode:
- If accessing the Property Details pop-up through the Loan Details widget, you must be in edit mode to update any field. Click the pencil icon in the top right corner of the widget to enter edit mode. After making edits, click Close Edit Mode to save your changes.
- If accessing the Property Details pop-up through the Net Worth widget, it opens automatically in edit mode. Changes are saved automatically. When finished, close the pop-up or click Close Edit Mode.

iClarify
Automated daily refresh to maintain Verisk integration stability
Verisk (formerly Opta) the third party that provides the iClarify services advised that integration credentials expire after periods of inactivity. To maintain uninterrupted service, FundMore implemented an automated daily credential refresh to ensure continued stability and reliability of the integration.
iClarify is a comprehensive property valuation tool developed by SCM Risk Management Services (RMS) as a continuum of its services. It provides insurance brokers and insurers with an accurate, standardized quoting process by validating consumer reporting and property data in real-time. To utilize this feature, follow these steps:
- Click on the ellipsis in the top right corner of the Property Details Pop Up.
- A drop down menu will appear:

- Select the "Request Residential Building Prefill (iClarify)" option. The following will pop up:

- Click on the "Continue with iClarify" button. The following will pop up:

- Click the "Search address" button.
- This will be followed by a pop up confirming if the address is correct.

- If the address needs to be changed, click in the address field and edit accordingly.
- When the address is correct, select the radial button it in the address list located below the address field and click the "Submit" button.
- When an address is found, information from the iClarify database will appear.

- To prefill information, click the ‘Fill the primary property details’ button. Any relevant data which corresponds to a property detail field will update with information pulled from the iClarify search.
If an iClarify has already been requested on the property and a user is trying run it again, the user will see a warning appear:

They can choose to continue or back out by clicking on the X. If they choose to continue and select the Continue with iClarify the next pop up will appear:

At this point they can back out, search a new address or proceed with the current address.
Selecting ‘Search address” will navigate them to the Address confirmation popup where they can change the address and continue with their request. Selecting ‘Proceed with current address’ will automatically run the iClarify request for the same property.
AVM
Automated Daily Refresh to Maintain Verisk Integration Stability
Verisk (formerly Opta), the third-party provider of Property Valuation/AVM services, has advised that integration credentials expire after periods of inactivity. To maintain uninterrupted service, FundMore has implemented an automated daily credential refresh, ensuring continued stability and reliability of the integration.
Automated Valuation Models (AVMs) are AI-driven solutions that calculate the value of a property based on sales data in the surrounding area and any available data about the property itself. AVMs offer lenders faster home valuations at a lower cost than traditional appraisal methods, without sacrificing accuracy.
e AI-driven solutions that calculate the value of a property based on sales data in the area, as well as any data they can find on the property itself. They offer lenders much quicker home valuations at a lower cost than traditional appraisal methods, without sacrificing accuracy.
To complete a property valuation:
- Click on the ellipsis in the top right corner of the Property Details Pop Up.
- A drop down menu will appear:

- Select the "Request Property Valuation (AVM)" option. The following will pop up:
- Click on the "Continue with AVM" button. The following will pop up:

Note: if you have already requested an AVM or an iClarify on this property you will see the following pop up instead:

- Click on the‘Search address’ button or ‘Proceed with current address’ button as needed.
- If you selected ‘Search address’, this will be followed by a pop up confirming if the address is correct. If the address needs to be changed, click in the address field and edit accordingly.

If you select the ‘Proceed with current address button the system will run your AVM check for you immediately and you will see the results per item #8 below. - When the address is correct, select it in the address list located below the address field and click the "Submit" button.
- When the search is complete, a pop up will appear with the property valuation.
The AVM provides a value with a confidence score of High, Medium, or Low.
High means many comparables in close proximity to the subject property.
Medium means fewer comparables and they may be farther away from the subject property
Low means no or few comparables close to the subject property.

- If you wish to use this property valuation, click on the ‘Update primary property value’ button. This data will populate in the Appraisals tab of the Property Details pop up. If you wish to go back, simply select the ‘Back’ button.


The Verisk (formerly Opta) valuation will populate at top of the Appraisals list. By clicking on the page icon, you can see all the details related to the AVM:

There is an inline ellipsis located to the right of the valuation which will enable the user to use the AVM value as the property value in Loan Details. They would only use this option for the subject property, not other properties listed within the application.


Selecting this option will update the Property Value field in the Requested Mortgage tab and the Commitment tab of the Loan Details widget. A green checkmark will appear to the right of the field label indicating the value has been verified. Additionally, the calculations for LTV and CLTV will automatically update based on the value that is being used.
 .
.


Property Information Tab

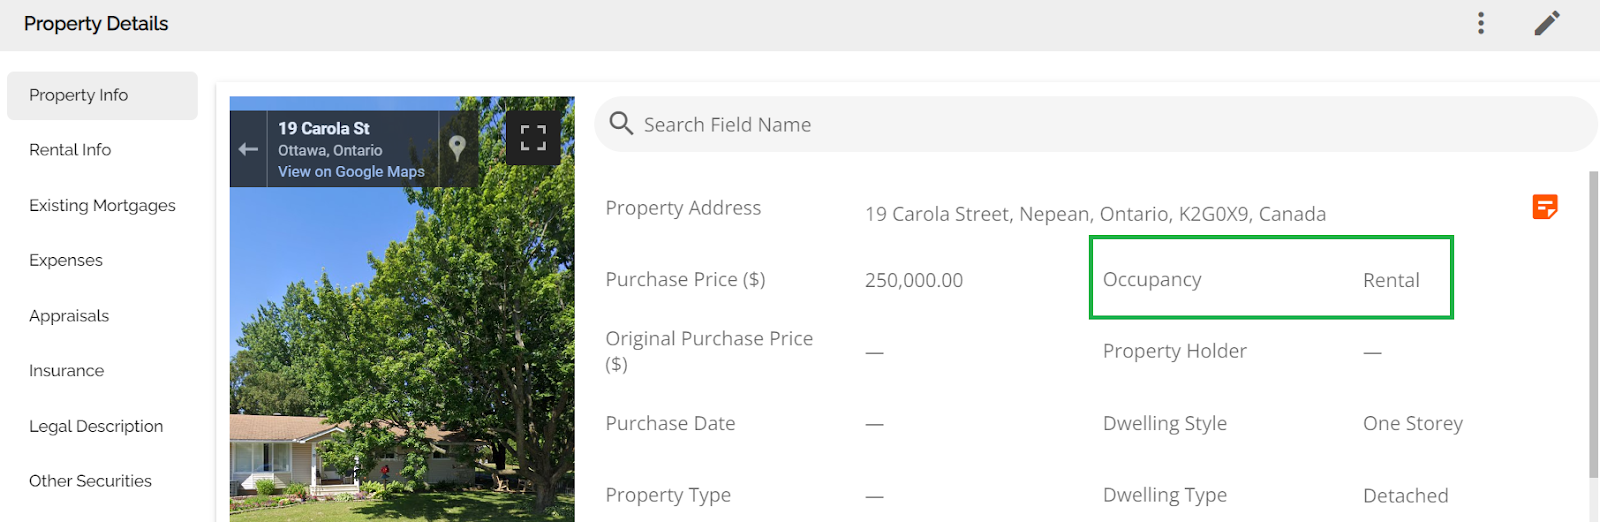
By default, the Property Details pop-up opens to the Property Info tab. This tab provides a summary of general property information, including the address, a street view of the property, purchase details, occupancy type, property type, and more. The Builder Name field in this tab is mapped to all insurers (Sagen, Canada Guaranty, and CMHC). Some values in this tab can be prefilled by running an iClarify request.
Google Maps View
FundMore is integrated with Google Maps. As you begin typing an address, a list of suggestions will automatically populate. Once an address is selected, the system displays a Google Street View of the property within the Property Details pop-up.

The following Google Maps options are available:
- Toggle to Full Screen — Click the full screen icon to expand the map view. Click the same icon to exit.
- View on Google Maps — Click this link to open a street view of the property directly in Google Maps.

- Show Location on Map — Click this button
 to open the property's location in a new tab in Google Maps.
Appraisals Tab

The Appraisals tab allows you to input and view appraisal data for a property, supporting multiple appraisals as needed. Information includes the appraiser's name, company, appraisal date, source, type, property value, and appraisal status.
Depending on your company's configuration, you may be able to order appraisals directly through this tab or enter appraisal information manually. Available options may include FCT Appraisals, Property Valuation (AVM) through Verisk, ordering via Value Connect, or manually adding appraisal details.
Note: If the Property Details pop-up was accessed through the Loan Details widget, updates to this tab may only be made when the widget is in edit mode.
You can sort entries in ascending or descending order by clicking any column header. An up arrow sorts ascending; a down arrow sorts descending.

To use an appraisal value as the property value:
- Locate the appraisal whose value you wish to utilize.
- Click on the ellipsis icon at the far right of the corresponding row.

- Select the "Use as property value" option from the dropdown menu.
The Property Value field in the Requested Mortgage tab and the Commitment tab within Loan Details will update with the selected value, and a green checkmark will appear next to the field label. LTV and CLTV calculations will automatically update accordingly.![]()
Customize the Appraisal Table
You can customize which columns are displayed in the Appraisals table and the order in which they appear.
- Click on the customize table icon.
- A sidebar will appear on the right side of the screen:

- Check or uncheck the boxes next to column names to show or hide them.
- To reorder columns, hover to the left of a checkbox until the drag icon appears, then click and drag the column to the desired position.
- Close the sidebar — the table will automatically update to reflect your preferences.
Add an Appraisal
To add a new appraisal, follow these steps:
- Click on the "Add New Appraisal"
button.
- Select Add Appraisal from the dropdown menu.

- Enter the required appraisal information in the pop-up window.

- Click Add Appraisal to save. The new entry will appear in the appraisals list.
Add Notes to an Appraisal
To access or add notes related to the appraisal, follow these steps:
- Click the details icon to the right of the value column for the relevant appraisal.

- In the pop-up, click the Notes tab.

- View or enter any relevant notes. Notes are saved automatically.

Delete an Appraisal
To delete an appraisal, follow these steps:
- Locate the appraisal you wish to delete.
- Click on the ellipsis icon at the far right of the corresponding row.
- Select the "Delete" option from the dropdown menu.
- A confirmation warning will appear.

- Click Remove to proceed, or Cancel to abort.
FCT Integration (Tenant Specific)
FundMore offers an FCT Appraisal integration that allows users to order appraisals through FCT directly within the LOS for any property listed in an application. This integration supports ordering, updating, cancelling, and deleting appraisal orders.
Note: If your organization has a contract with FCT for appraisals and you would like this feature enabled, a support ticket must be submitted to FundMore.ai. Please direct your request to the appropriate individuals within your company responsible for initiating support tickets.
To order an FCT Appraisal:
1. Navigate to the Appraisal tab within the Property Details Pop Up.
2.Click on the "Add New Appraisal" ![]() button.
button.
3. Select Request FCT Appraisal from the dropdown menu.t.

4. Review the property address in the pop-up that appears and click Next.

5. Select the FCT product you require. If your organization supports only one product, it will be pre-selected. You may also check the Rush Flag indicator for expedited service or the Mark Rent indicator if applicable.

Note: Supported FCT products are established between the lender and FCT.
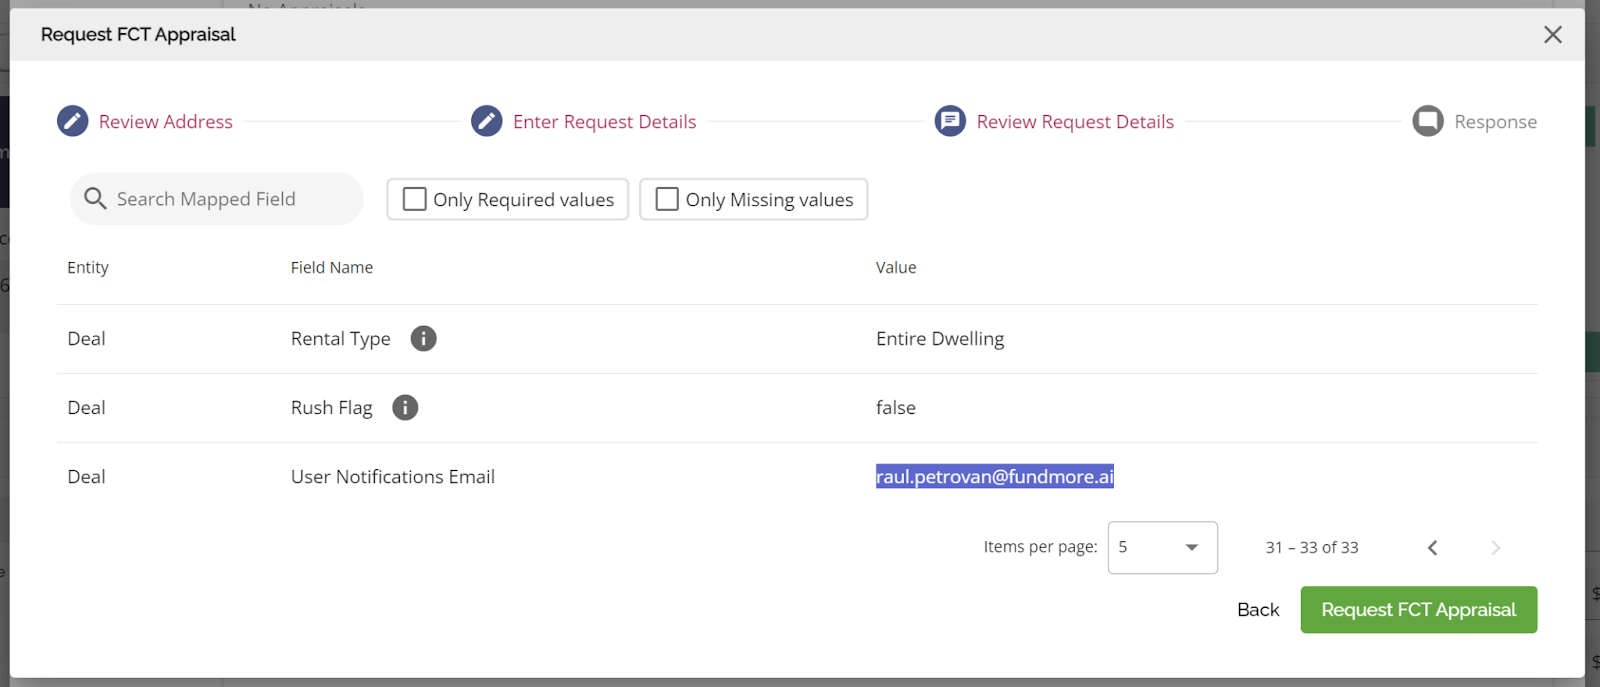
6. Click Next to proceed to the review screen. Any missing required fields will be identified at this step.

7. If any information is missing, go back and complete the required fields before resubmitting. Once all information is complete, submit the request.
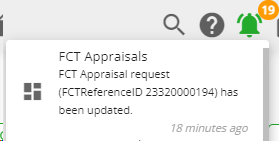
After submission, a notification will confirm that your request is being reviewed, and all relevant parties on the deal will be notified. FCT may respond immediately or asynchronously (typically within 4 hours). You will receive a notification once the request has been successfully processed.
If the response is immediate, the results will be displayed on screen.

An FCT response contains the following:
- Reference Number
- Deal Status
- Completed
- Received for Review
- Assigned for Review
- Request Status
- In Progress
- Ready
- Delivered
- Insurance Status
- Eligible For Insurance
- Ineligible For Insurance
- Pending
- Order Update Required
- No Report Available
After clicking Done, the pop-up will close and you will be returned to the Appraisals tab. The order will appear in the list, and the source and status fields will update automatically as the request is processed.
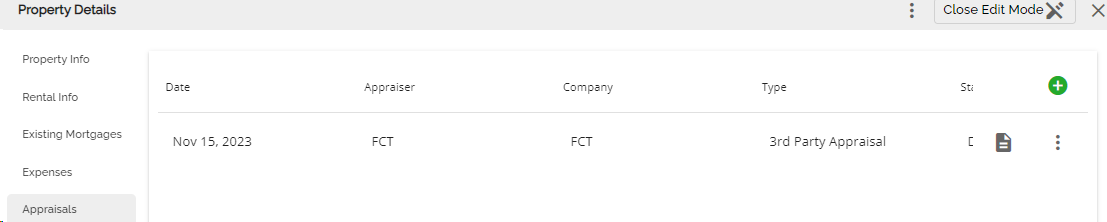
To view the details of an FCT Appraisal, click the details icon at the far right of the order row.

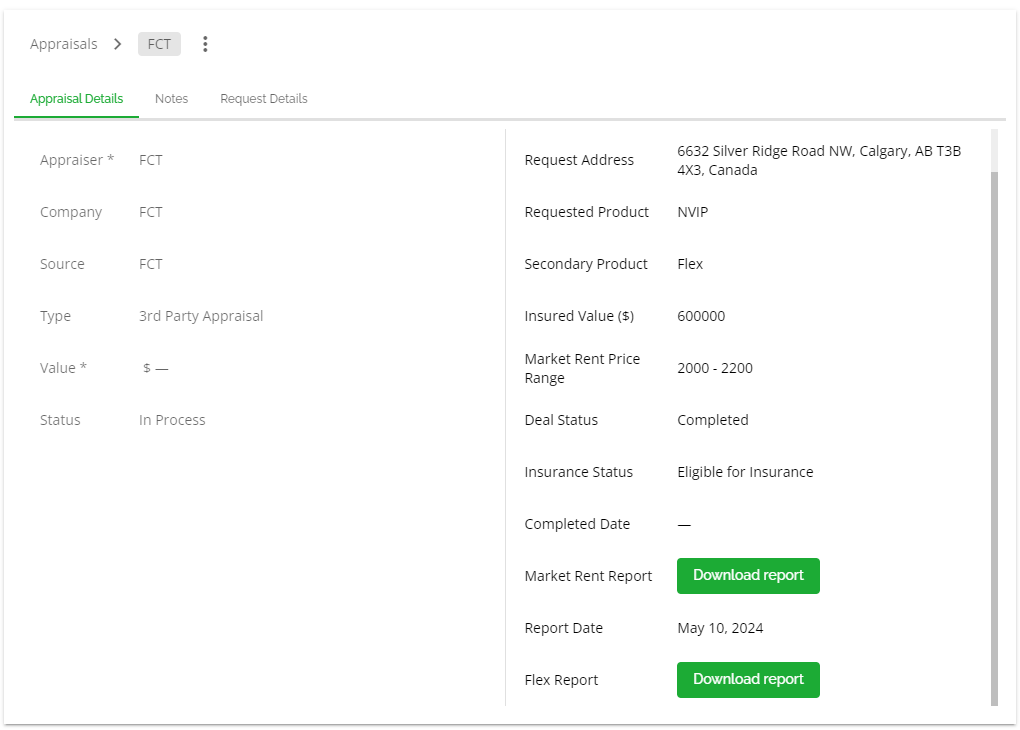
A screen with three tabs will appear:

Appraisal Details — Overview of the order, including current status and an option to download the report.
Note: The Download Report button is temporarily disabled.
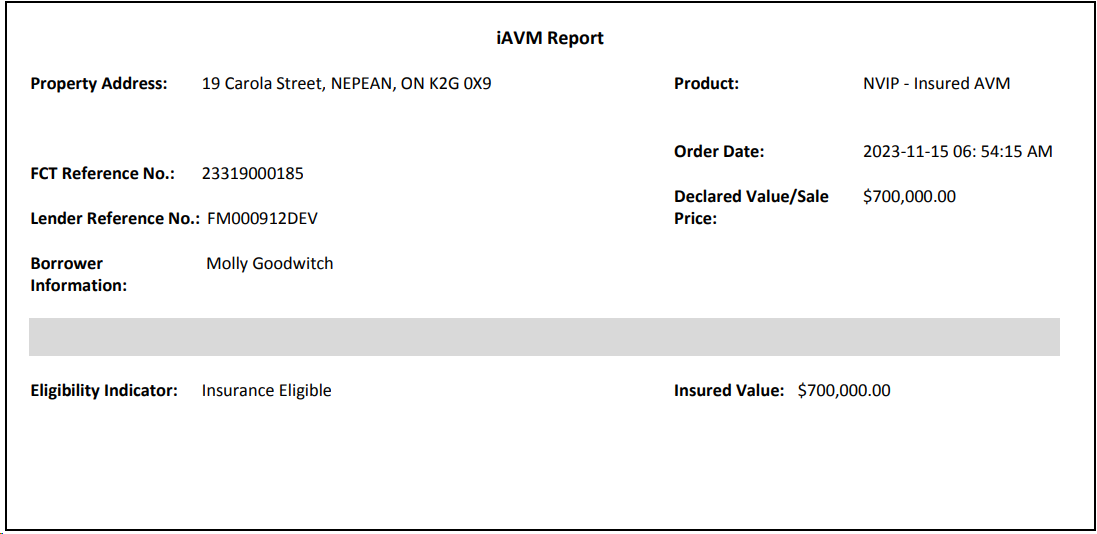
Here is an example of a downloaded report:
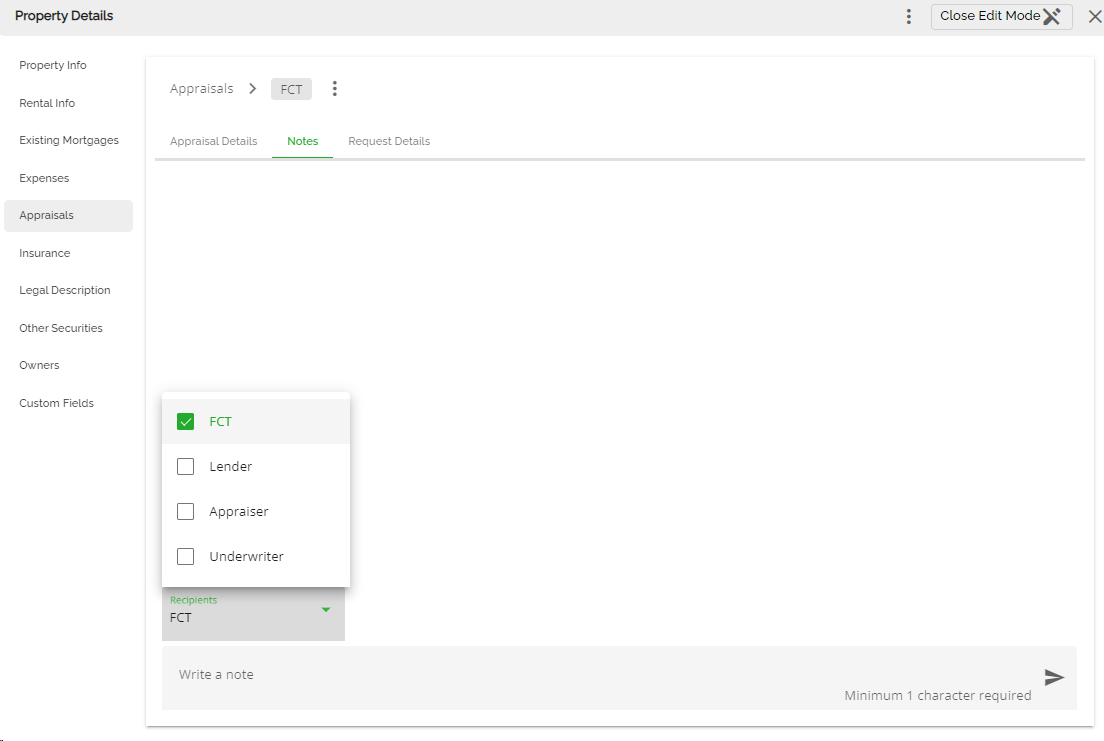
Notes — Communicate directly with FCT, the Lender, the Appraiser, or the Underwriter.
Request Details — Full details of the submitted request.
Market Rent Response:
Additional fields are supported for FCT appraisal responses, including Market Rent Range Price and Market Rent Report.

Clicking the Market Rent Report field allows you to download the Market Rent Report.
Email Communication:
When a user requests an FCT appraisal through FundMore, their email address is automatically sent to FCT via the integration. Users will receive email notifications from FCT for any updates to their request.
Furthermore, in the "Notes" tab, you can communicate with various stakeholders directly. This includes FCT, the Lender, the Appraiser, and the Underwriter.
FCT Partial Match
If FCT returns a partial address match, a notification will appear.
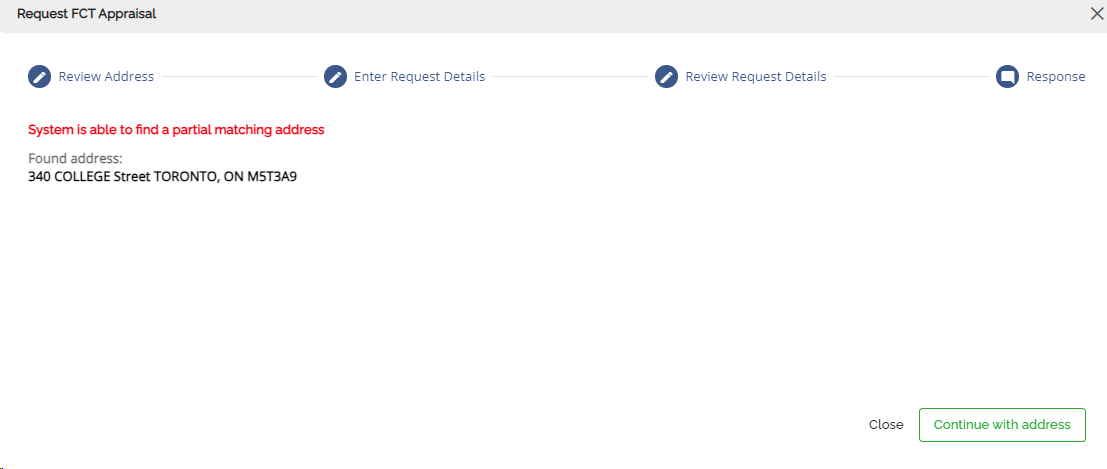
You may click Continue with address to proceed, or go back to update the address and restart the process.
FCT Multiple Match
If FCT returns multiple address matches, you will be presented with a list of options.
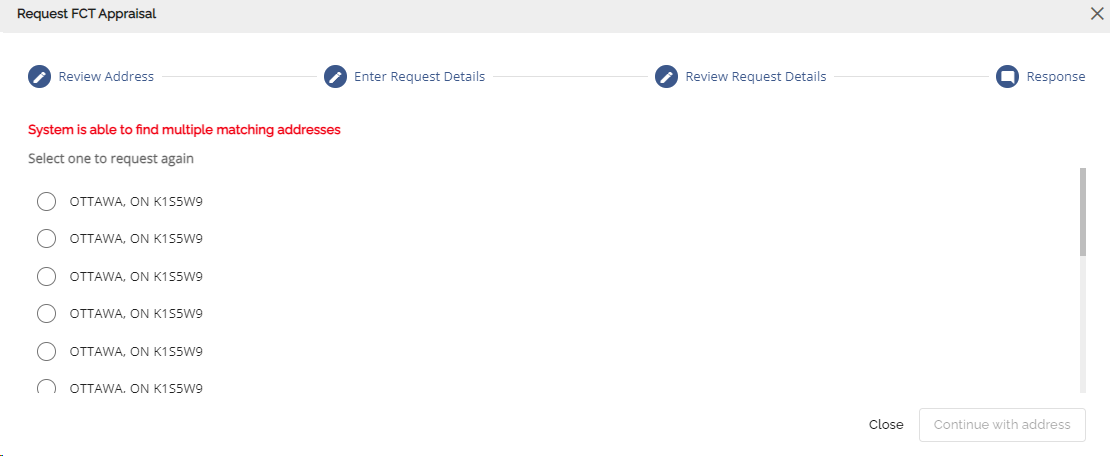
Scroll through the list, select the correct address, and click Continue with address to proceed.
FundMore offers appraisal ordering through Value Connect. This feature works in conjunction with the FundMore IQ product, providing a seamless workflow between the lender, the broker, and Value Connect — from condition creation through to receipt of the appraisal.
To order a Value Connect appraisal:
Navigate to the Appraisal tab within the Property Details Pop Up.
Click on the ‘Add New Appraisal’ ![]() button.
button.
Select Request Value Connect Appraisal from the dropdown menu.

Review the request details in the pop-up. Make any necessary edits, then click Request Value Connect Appraisal. Note: A document request will be created and sent to the broker.

Once submitted, the following will occur automatically:
- A document request is sent to the selected broker.
- The document request entry is displayed in the Conditions and Documents widget.
- An in-app notification is generated.
- The appraisal order entry is saved in the Appraisals tab.
- All activity is tracked in the application history.


The broker will receive a notification of the document request. When they log into their portal, they can click Order Appraisal via Value Connect, which will connect them to the Value Connect portal to complete the ordering workflow.

Once the appraisal is completed, it will be delivered to the broker's portal as an uploaded document and forwarded to the POS accordingly.

Custom Fields Tab
The Custom Fields tab contains all fields created within the Application Entity in the Custom Fields section of the Manager Portal. These fields are created by your System Administrators or Managers based on your organization's specific needs.
Note: Custom fields are not mapped due to their dynamic nature. These fields can be created, modified, or deleted at any time and are therefore not reliable inputs for general mappings.
Custom fields are displayed in alphabetical ascending order for easy reference.

Edit the Custom Fields Tab
Note: If the Property Details pop-up was accessed through the Loan Details widget, updates to this tab may only be made when the widget is in edit mode.
Click on any field to make edits directly. Changes are saved automatically.
Existing Mortgages Tab

The Existing Mortgages tab contains data relating to any existing mortgages associated with properties listed in the application, including the subject property. This tab is unique to each property's Property Details pop-up. Within this tab, you can view, add, edit, or delete existing mortgages, and select a payoff method for each mortgage (pay from proceeds, prior to advance, or none).
Click the page icon at the far right of a mortgage row to open the details page, where all fields can be viewed and edited.

The tab is structured as a customizable data table with inline editing functionality. The same features and functionality are also available in the Existing Mortgages tab within the Loan Details widget.
Note: If the Property Details pop-up was accessed through the Loan Details widget, updates to this tab may only be made when the widget is in edit mode.
Customize the Existing Mortgages Table
You can customize which columns are displayed in the Existing Mortgages table and the order in which they appear.
- Click on the customize table icon.
- A sidebar will appear on the right side of the screen:

3. Check or uncheck the boxes next to column names to show or hide them.
4. To reorder columns, hover to the left of a checkbox until the drag icon appears, then click and drag the column to the desired position.
5. Close the sidebar — the table will automatically update to reflect your preferences.
Add a Mortgage
To add a mortgage, follow these steps:
- Click on the "Add New Mortgage" (
 ) button while in edit mode.
 - In the form that appears, enter all the appropriate information.

Note: The MI Provider fields are decoupled from the Refinance/Switch/Transfer checkbox. When the checkbox is selected, the MI provider information is optional. If the deal is insured and MI provider information is provided, the system will send the existing balance to the insurer.
3. Once completed, click the "Add Mortgage" button. The mortgage will populate the Existing Mortgages list.Edit an Existing Mortgages Field
Click directly on any field to make inline edits, or click the Open Details icon to access a full edit screen. Changes are saved automatically.
Delete a Mortgage
- Locate the mortgage you wish to delete.
- Click the ellipsis icon at the far right of the corresponding row.
- Select Delete from the dropdown menu.
- A confirmation warning will appear. Click Remove to proceed, or Cancel to abort
Restructured Liability Payoff Mechanism
A Payoff & Paydown field is available in Existing Mortgages, consistent with the same functionality in Liabilities. This field allows users to indicate whether an existing mortgage will be paid off or paid down, providing underwriters with greater flexibility when managing liabilities.
Payoff & Paydown options:
- None
- Payoff
- Paydown
- Paydown and Increase Limit
- Paydown and Reduce Limit
- Payout; Discharge Encumbrance on Title
- Payout; To Remain Open
- Payout and Close
Note: The available options for the Payoff & Paydown and Pay From columns can only be managed in the backend. To modify these options, submit a support ticket to FundMore.ai via the designated individuals within your organization.
How calculations are affected:
- Payoff: The liability is excluded from GDS/TDS and Future Net Worth calculations. It is included in Current Net Worth only.
- Paydown / Paydown and Increase Limit / Paydown and Reduce Limit: No UI changes are applied to the mortgage entry in existing mortgages.
Within the Property Details Pop-Up:


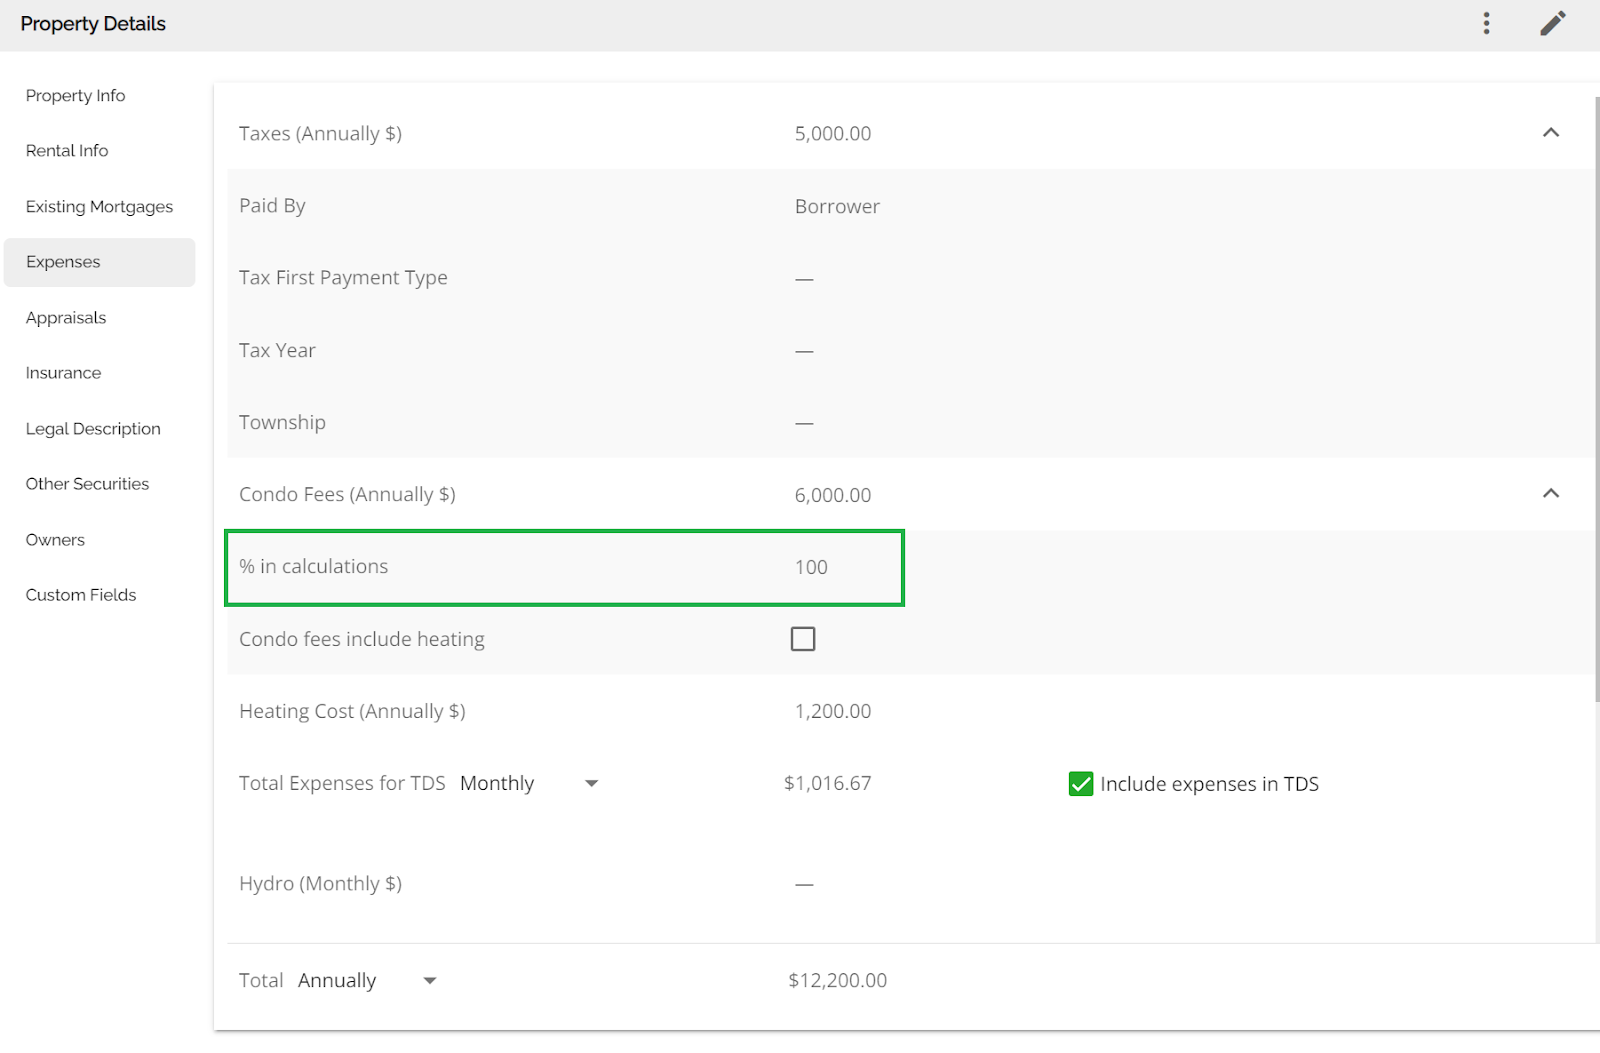
Expenses Tab

The Expenses tab contains fields for property-related expenses such as taxes, condo fees, and heating costs. All values are entered in annual terms. Users can control whether each expense is included in GDS or TDS calculations. Any edits made here will be reflected in debt service and rental cash flow calculations where applicable.
Note: If the Property Details pop-up was accessed through the Loan Details widget, updates to this tab may only be made when the widget is in edit mode.
Include Expenses in GDS Calculations (Rental Properties)
The following enhancements apply to rental property expense handling in GDS calculations:
- Include in GDS checkboxes have been added for taxes, condo fees, and heating costs, alongside the existing TDS options.
- Existing default selections have been applied to the new GDS checkboxes.
- GDS and TDS inclusion logic operates independently, allowing each to be toggled separately.
- The condo fee percentage is applied in GDS only if its corresponding checkbox is selected.
- Hovering over each checkbox displays a tooltip explaining whether it affects GDS or TDS.

The following examples show how expense inclusion settings in the Property Details pop-up flow through to the Loan Details widget.
Expenses excluded from TDS:

For example, if you indicate in the Property Details pop-up that expenses such as heat, condo fees, property tax, etc., should not be included in the TDS, you will see the same information in the Mortgage Terms section of the Loan Details widget:
Property Details Pop Up (Expense Tab)

Loan Details Widget (Mortgage Expenses Tab)

TDS

You can see that the monthly expenses for heat, taxes, condo fees, etc., are not included in the cost to carry figure which carries through to the TDS calculation.
Conversely, if they are indicated to be included you will see the following:
Include Expenses in TDS Calculation
Property Details Pop Up (Expense Tab)

Loan Details Widget (Mortgage Expenses Tab)

TDS

Condo Fees Percentage by Occupancy
Note: This is a tenant-specific setting and may not be applicable in your environment.
A tenant setting is available to update the percentage of condo fees used in debt service calculations based on occupancy type. The default settings are:
- For rental property default condo/maintenance fees to 100%
- For Owner Occupied and Rental default condo/maintenance fees to 50%
To provide an example/validate this setting, we entered a rental income property purchase application in Velocity with condo fees. The system automatically set the percentage (%) of Condo fees to include to 100% as it was submitted with Rental as the occupancy:

Add Taxes Paid By default on ingest Only affects ingestion from
Note: Note: This is a tenant-specific setting and may not be applicable in your environment. This setting only affects ingestion from a POS.
To improve efficiency and reduce manual entry, default values have been introduced for the Paid by field for property taxes during the loan ingestion process:
- For ALT and Combo products, the ‘Paid by’ field will now default to Lender.
- For SHELOC products, the ‘Paid by’ field will default to Borrower.

Insurance Tab

The Insurance tab allows you to enter and view insurance policy information for the property, such as Fire, Flood, and Earthquake policies (named peril policies). This tab is not related to Default Insurance provided by Mortgage Insurers. Data entered here is informational only and does not affect any calculations elsewhere in the application.
Entries can be sorted in ascending or descending order by hovering over a column header until an arrow appears, then clicking the header or arrow.
Note: If the Property Details pop-up was accessed through the Loan Details widget, updates to this tab may only be made when the widget is in edit mode.
Add an Insurance
To add an insurance, follow these steps:
- Click on the "Add New Insurance"
- Enter the necessary information related to the insurance in the pop-up window.

The percent field will calculate automatically once an amount is entered, based on the property value in the application.
- Click Add Insurance to save. The new entry will appear in the insurance list.
Edit an Insurance Field
Click directly on any field to make inline edits, or click the Open Details icon to access a full edit screen. Changes are saved automatically.

Delete an Insurance
To delete an insurance, follow these steps:
- Locate the insurance you wish to delete.
- Click on the ellipsis icon
 at the far right of the corresponding row.
 - Select Delete from the dropdown menu.
- A warning will appear asking ‘Are you sure you want to remove the insurance record?’.
- A confirmation warning will appear. Click Remove to proceed, or Cancel to abort.
Legal Description Tab

The Legal Description tab contains fields for entering the Short Legal Description and/or the full Legal Description of the property. Both fields accept free-form text and can be mapped to documents as needed.
Best Practice: Copy and paste legal descriptions from a source document to reduce the risk of input errors.
Other Securities Tab

The Other Securities tab contains details about additional assets that can be used as collateral in the application. This tab includes a checkbox for Assignment of Rents/Caveats and a text area for entering information about the conditions associated with these other securities (for example, details about a Mobile Home included as part of the collateral).
The Assignment of Rent/Caveat checkbox can be used to trigger specific clauses in documents.
Owners Tab

The Owners tab contains information about the property's owners. This tab can be used to list all owners, including those who are not stakeholders on the application. No fields in this tab are required, allowing for privacy considerations.
Add an Owner
To add an owner, follow these steps:
- Click on the "Add New Owner"
- Enter the relevant information in the pop-up window.

- Click Add Owner to save. The new entry will appear in the owners list.
Edit an Owner Field
Click directly on any field to make inline edits, or click the Open Details icon to access a full edit screen. Changes are saved automatically.
Delete an Owner
To delete an owner, follow these steps:
- Locate the owner you wish to delete.
- Click on the ellipsis icon
 at the far right of the corresponding row.
 - Select Delete from the dropdown menu.
- A warning will appear asking ‘Are you sure you want to remove the owner record?’.
- A confirmation warning will appear. Click Remove to proceed, or Cancel to abort.
Rental Info Tab

The Rental Info tab contains all details related to rental income for rental properties. This information is used to calculate the rental income factored into debt servicing, and includes the rental income amount, offset method (offset or add-back), and the percentage of the offset method applied. This tab is only accessible when the Occupancy field in the Property Information tab is set to Owner-Occupied & Rental or Rental.
Data entered in this tab directly impacts debt service calculations.
Add Percentage of Ownership for Rental Properties
Note: This is a tenant-specific setting and may not be applicable in your environment.
Users can identify the percentage of ownership for each stakeholder in a rental property, ensuring that rental income is correctly allocated in debt servicing calculations based on ownership share.
To use this feature:
- Open the Property Details pop-up (from either the Loan Details widget or the Net Worth widget).
- In the Property Info tab, set the Occupancy field to Rental or Owner Occupied & Rental.
Note: The property must be designated as a rental before this feature can be used.
3. Select the relevant stakeholders in the Property Holder field (available in either the Property Info or Rental Info tabs). This is a multi-select field.
4. Navigate to the Rental Info tab. Each selected stakeholder will appear in the % of Ownership section.
5. Enter the appropriate ownership percentage for each stakeholder.
 .
.
Video Demo: Add Rental Ownership Percentage.mov
Key behaviours:
- Rental Surplus: Rental income is calculated based on each stakeholder's ownership percentage. For example, if a stakeholder owns 50% of a property with a $1,000 rental surplus, only $500 will be included in the income calculation.
- Exclusion of Rental Income: Users can choose to exclude rental income from calculations where necessary.
- Rental Shortfall: Regardless of ownership percentage, 100% of any rental shortfall is included in debt servicing calculations.
- Validation: If the total percentage entered across all stakeholders exceeds 100%, a warning will appear.

Rental Calculation Per Application or Per Property
Note: This is a tenant-specific setting and may not be applicable in your environment. The system defaults to per-property calculation.
When configured, the system can calculate the net total of all rental surpluses and deficits across rental properties at the application level rather than per property. The resulting net amount is applied in debt service calculations as follows:
- Net Surplus: Displayed as a read-only income line in the Income Widget, labelled Rental Surplus under GDS/TDS.
- Net Deficit: Displayed as a read-only liability in the Credit Widget, labelled Rental Deficit under Total Debt.
Per-application calculation:
The system calculates the total net surplus or deficit across all rental properties. The result is displayed as either a single income or liability record, depending on whether the net result is a surplus or deficit.
Per-property calculation:
Rental income or deficit is calculated individually for each property. Results are displayed as separate entries per property holder in the GDS/TDS and Total Debt breakdowns.
GDS and TDS Formulas
GDS (Subject Property Only):
Subject Property Debt ÷ Total Income
Components: Monthly Payment, Principal, Interest, Total Monthly Expenses, Taxes, Heat, Condo Fees, Employment Income, Other Incomes, Rental Income.
TDS:
Total Debt ÷ Total Income
Components: Total Debt, Subject Property, Existing Mortgage Payments, Other Property Debts, Employment Income, Total Rental Income.