Table Of Contents
Risk Flags Management Items, Their Description & Functionality
Risk Flags Management
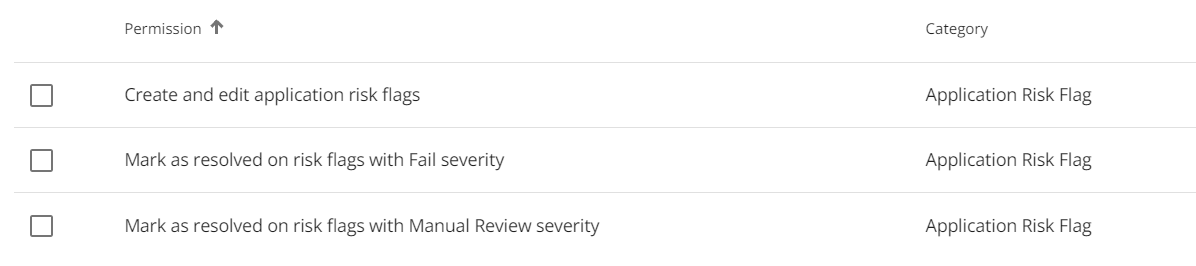
Risk Flags are indicators within the LOS that highlight potential risks associated with a mortgage application. These risks can include fraud alerts, and other factors that may impact the loan approval process. Risk flags can be created and managed by admin-level users with the relevant permissions in the Manager Portal. To achieve efficient risk flag management, it is important to properly configure the roles for users handling this responsibility. At the application level, the ability to manage risk flags is permission-based and linked to three specific permissions, as seen below:
Risk Flags Configuration
Risk flags need to be configured manually by the company within the Manager Portal. To locate the risk flags management section, follow these steps:
- Navigate to the Manager Portal.
- Click on the Risk Flag Management option within the left-hand navigation.

Risk Flags Management Items, Their Description & Functionality
Search Box - Located at the top left corner of the section. In the search box you are able to enter text/keywords related to the previously created risk flags. All risk flags within the search criteria in them will appear in a list view.
Sort the Risk Flags List - You can sort the risk flags list by ascending or descending order. Simply click on the arrow icon next to the column header you wish to sort by. When the arrow points upwards, the list is sorted in ascending order; when it points downwards, it is sorted in descending order. The arrow in the sorted column will remain fixed, indicating your chosen criteria.
Ascending: Descending:


‘Add Risk Flag’ Button - Enables you to create a new risk flag. When selecting this button a pop up will appear with fields to input data. The fields consist of: Type, Type (Fr), Severity, Description, & Description (Fr).
Column List Headers

The headers below marked with an asterisk (*) carry through to the Risk Flag menu within the application dashboard.
Type* - This represents the specific category or nature of the risk flag being assigned to the application. It categorizes the risk based on its underlying cause or concern. For example, if the risk flag pertains to employment fraud, you can set up the type as “Employment Fraud”. This field is restricted to 255 characters.
Type (Fr) - The French translation of Type.
Severity* - The "Severity" field indicates the level of concern associated with the identified risk. It offers two options:
- Fail: This severity level indicates a critical risk that requires immediate attention and may result in the rejection of the mortgage application if not addressed. Risks categorized as "Fail" typically involve significant discrepancies or issues that pose a substantial threat to the integrity of the application.
- Manual Review: Risks categorized as "Manual Review" signify a moderate level of concern that warrants further investigation or verification. While not as severe as a "Fail," these risks require additional scrutiny and evaluation by underwriters to determine their impact on the application's approval status. They may involve discrepancies or inconsistencies that need clarification but do not necessarily result in an outright rejection of the application.
Description - A detailed description of the risk flag.
Description (Fr) - The French translation of the description.
Ellipsis - Clicking on the ellipsis opens up the option to delete a risk flag if necessary.

Scroll Bars - The presence of the scroll bars depend on the size of your screen and the number of risk flags in the list. If necessary, they will be located at the bottom of the list and to the far right of the screen. Use these to scroll vertically or horizontally to see what does not fit on the page.
Items Per Page - Depending on how large your list is, you may have more than one page of risk flags. To navigate through the pages, use the Items per page navigation at the bottom right hand side of your screen. With this functionality, you can indicate how many items per page you would like to see in groups of 10, 15, 25, 50, or 100. You can see how many pages there are and scroll forwards and backwards through the pages if need be.

Adding a Risk Flag
To add a new risk flag, follow these steps:
- Click on the "Add New Risk Flag" Button
- A popup sidebar will open to the right of the screen, providing fields to fill out for the new risk flag.

- Type (Mandatory): Enter the type of risk flag e.g., "Employment Fraud" or "Income Verification."
- Severity (Mandatory): Choose the severity level of the risk flag. Options include "Fail" for critical risks and "Manual Review" for moderate concerns.
- Description: Provide a detailed description of the risk flag. While not mandatory, filling out this field is highly recommended as it offers additional context to users in the front end.
If you wish to cancel the process of creating a risk flag, click on the cancel button.
Editing a Risk Flag
To edit the details of a Risk Flag, follow these steps:
- Find the risk flag you wish to edit.
- Navigate to the field you wish to edit and click on it.
- Update the data as necessary in the field.
The system will automatically save any updates made.
Deleting a Risk Flag
To delete a risk flag, follow these steps:
- Find the risk flag you wish to delete.
- Click on the ellipsis to the far right and select the “Delete” option.


The risk flag will be removed from the list.
To understand how the Risk Flag configuration in the Manager Portal carries through to the application level, refer to the Risk Flags PFG.