Table of Contents
Introduction
Role management enables the management of user functionalities based on their specific roles. The preview platform has a set of default roles that can be cloned to create custom roles if desired. The default roles in preview environments are: Manager, BDM, Client Admin, Funding Specialist, Underwriter, & Mortgage Officer. In a production environment, the set of default roles can be customized for launch in order to meet lender needs. Default roles can be cloned and all but one (Manager) can be deleted as long as they do not have users assigned to them. The Manager default role can not be deleted because it has Manage System Configuration permission assigned to it.
Note: There is back-end code tied to the default roles so editing them may cause access issues in your environment. We strongly recommend you do not edit these roles. Leave them as is. If you need to create custom roles you can do so by cloning your default roles and editing or deleting those roles as needed instead. Default roles are clearly identified because they have Default Role noted in the description of the role.

Note: The Reports portal is currently accessible only to users with default roles who have report viewing permissions. Users with custom roles will require backend configuration to access reports.
Once a role is assigned to a user, they will immediately be granted the permissions associated with that role. Users can be assigned multiple roles, and the system stacks permissions when this occurs. All permissions grant access rather than restrict it, meaning they add up rather than cancel each other. Therefore, there are no conflicting permissions and no workflow issues when multiple roles are assigned. For example, if Role A has permissions x, y, z and Role B has permissions m, n, o, assigning a user to both Role A and Role B effectively grants them a new role with permissions x, y, z, m, n, o.
To find the Roles Management section, follow these steps:
- Navigate to the Manager Portal from the top menu.
- Click on the Role Management option in the sidebar on the left.
There are two subsections: Origination and Servicing. Any configurations within the Origination section will apply for non-servicing-related functionality. On the flip side, any configurations with the Servicing section will apply for servicing-related functions.
Note: Servicing will only appear in your view if your organization has that module/integration enabled.

Role Management
Role List - On the left hand side of the ‘Role Management’ section is the role list. All existing roles will be listed here and can be clicked on individually to open up their details, permissions, and the users assigned to this role. Roles are appended to the list in alphabetical order.
Inline Ellipsis - Clicking the inline ellipsis for a given role allows the user to clone or delete it.
Note: The Manager Default role can not be deleted therefore this option will be grayed out.

Search Boxes - Within the search boxes, the user can search for a specific role, permission, or permission category by entering the text of what they are searching for. The main search bar will search Role Names; there are additional search bars within the ‘Permissions’ and ‘Users’ tabs as well.

‘Details’ Section
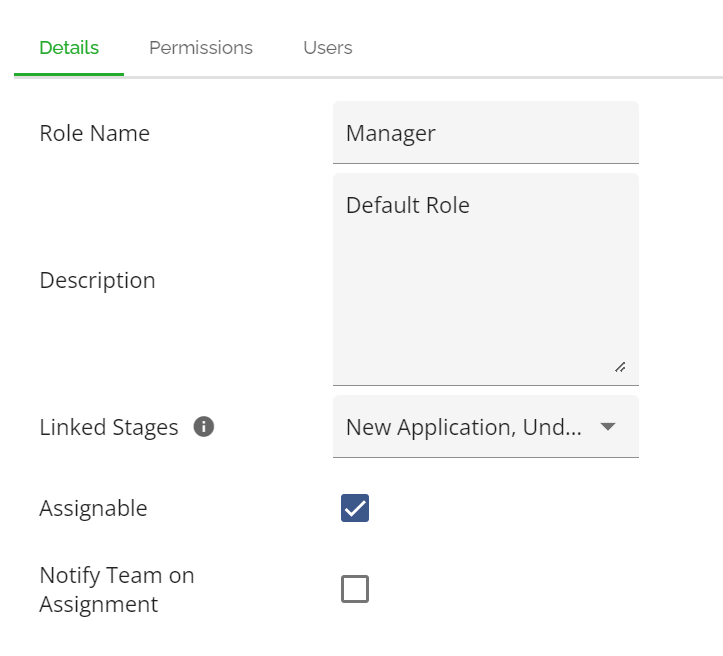
This section displays the name of the role, its description, any linked stages, whether it is
This section displays the name of the role, its description, any linked stages, whether it is assignable or not, and if the team members assigned to this role will be notified when the role is assigned. All fields can be edited inline and will save automatically.
Note: Default Roles will be identified with Default Role in the description.
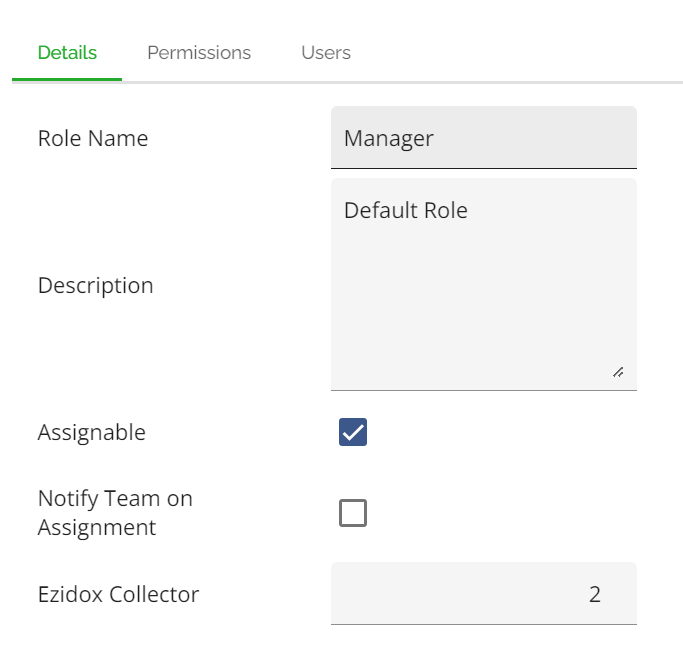
The Details section might look different for some lenders. The Ezidox Collector field applies if your company is set up with Ezidox. The Ezidox Collector Number should not be edited as it serves as a backend configuration for mapping FM roles to DM roles.
Linked Stages
The linked stages functionality offers the ability to use the stages as queues of unassigned work. This is a multi-select field where you can select the appropriate stage(s) to link the role to. When an unassigned deal within a stage is linked to a specific role, all users with that role will see the deal in their Pipeline View. For example, there is an unassigned deal in the Document Review stage, and the Ops Fulfillment role is linked to that stage. If no user with the Ops Fulfillment role is assigned to the deal, all users with the role will see the deal in their Pipeline View until a user with the applicable role is assigned.
Note: This will not apply if the role is unassignable, as an unassignable role cannot be linked to stages. Furthermore, once someone is assigned or self-assigns with that role to a particular deal, the deal will no longer show up in the Pipeline View for other users with the same role.
Assignable Roles
Certain roles, such as Admin, Trainer, Auditor, or Compliance roles for example, may not need to be assigned to applications as they are not necessarily directly involved in the processing of applications. As such, these roles do not need to be visible as part of the team on individual applications, due to the nature of their responsibilities.

Marking a role as Assignable allows Admins to determine which roles should be or should not be visible in the Team section within the dashboard of applications and who should be included in notifications. Roles that are marked as Assignable will display in the Team list of an application and will receive relevant notifications. Users with those roles will be eligible for assignment to applications. Non-assignable roles are excluded from both assignments and related emails.

By default, when you create a role, it will be marked as Assignable. This means that the Assignable checkbox will be checked, allowing the role to be visible in the team list within the dashboard of applications and users to be assigned to applications. If you do not want the role to be assignable, simply uncheck the Assignable checkbox when creating the role.
To mark a role as Assignable, navigate to Role Management in the Manager Portal. Find the role you wish to make visible in the team list and Check the Assignable box.
.

In the example below, you can see a comprehensive list of roles on the left-hand side. Almost all of these roles have been marked as assignable, which means they will be displayed in the team list of all applications. However, there are two roles that have not been marked as assignable, and you can observe their absence in the Team List example on the right.


Even if a role is not marked as Assignable, you can still assign it to users. The role will continue to work as usual, with all its permissions intact. The only difference is that it will not be visible in the Team List and you cannot assign users with those roles to applications.
Note: If a user is assigned a role that is not checked as Assignable, that user will not appear in any drop down lists to select as a Direct Manager, to assign tasks to, or to assign applications to.
Notify Team on Role Assignment
Notify Team on Role Assignment
Within roles, you can indicate if you would like a team or multiple users to be notified at once when their role is assigned. This enables notifications to be managed for multiple users simultaneously instead of just one, providing quicker response times to requests.
This feature is managed in Role Management within the Manager Portal, and it only works if the role is marked as Assignable. To enable this, follow these steps:
- Navigate to the Role Management section in Manager Portal.
- Select the appropriate role.
3. Within the "Details" tab (default tab), click on the checkbox associated with the" Notify Team on Assignment" option. The "Assignable" checkbox should already be selected as a requirement for this feature.
4. Once “Notify Team on Assignment” is checked, an “Email Address to Notify" field will open up for population. You need to complete this field with the applicable team address. This functionality supports roles that work as teams, e.g. Fraud Departments.
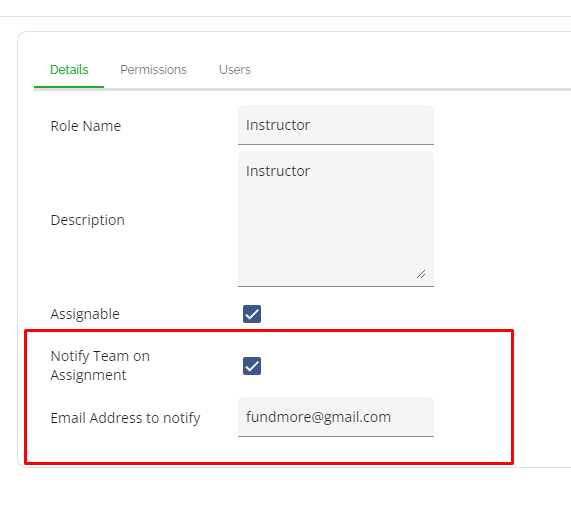
When this feature is enabled, a notification email is sent to the user and relevant team members upon the user's initial assignment to a deal role. Subsequent users added to the same role in the deal will receive the notification, but the team will not. For the notifications, there are two notification templates: a default/generic template notifying the user they have been assigned to a deal, and a team specific template that will go to the team, e.g. a "Fraud Risk" template.
‘Permissions’ Section
The ‘Permissions’ section contains the full list of permissions and displays which have been applied to any given role. The search box enables users to search permissions and categories using keywords. Additionally, there are preset filters that allow users to display All permissions, Selected permissions, or Not selected permissions. Furthermore, you are able to sort permissions and permission categories in ascending and descending order by clicking on the arrow to the right of the column header. This is particularly helpful when you are looking for a set of permissions. The system will group all similarly named permissions or categories together, making it easier to find what you need.

A common use case for filtering permissions is when you are trying to quickly identify which permissions are either assigned to a role or are not assigned to a role. For example to quickly identify which “task” permissions a role has been assigned:
Select the role you want to check from the Role List on the left hand side,
Click on the Permissions tab within that role
Enter “task” in the Permissions search field
Select the “Selected” tab
Any permissions that have been assigned to that role with “task” in the permission title will display. All others will be filtered out:

To assign or unassign a permission with a role, simply select or deselect the checkbox next to the permission label.

A confirmation pop-up will be displayed when you select or deselect the checkbox. Click on Yes to confirm your choice.


Note: A user assigned to a newly created role will not be able to log in until at least one permission has been selected and assigned to that role. A good choice for an initial permission would be “List assigned applications in Pipeline”. Refer to the Permissions and System Login section for more information.
It is also worth noting that some permissions work in conjunction with one another. For example, the view/search permissions work in tandem with the pipeline permissions. That means, if you create a user with view only access but do not assign them the pipeline permissions, they will not be able to log in. They cannot view anything if they cannot see it in their pipeline.
‘Users’ Section
The ‘Users’ section houses all of the users assigned to a given role and gives you some additional functionality. You can:
Add a New User - The "Add New User" button allows you to add a user to a role from a list of existing users configured in User Management. When users are assigned a role within the ‘User Management’ section of the manager portal, they will automatically appear in this section.
View/Edit User - Not functional at this time.
Remove a role from a user - The ellipsis to the far right of the user’s name enables you to remove a user’s role from here.

‘Add New Role’ Button
1. Click the ‘Add New Role’ button under the ‘Role Management’ header.
2. In the drop down, enter the name of the role and a description. If the role you are creating only differs from another role by a few permissions, it may be useful to include this information in the description.
3. Click on the ‘Create Role’ button when you have entered the name and description.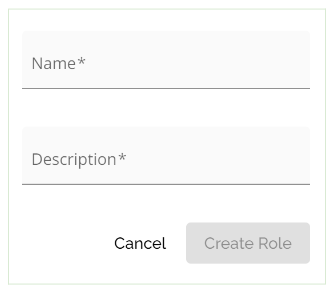
4. Navigate down the list until you find your new role and click on it to edit its details, permissions, and assigned users. The system saves all changes automatically.
‘View/Edit’ Button - Not functional at this time.
‘Remove’ Button
- Select the Role you wish to remove a user from
- Select the Users tab
- Find the user in the list you wish to remove from this role
- Click the ellipsis to the far right of the user whose role you wish to remove
- From the drop down list select ‘Remove’
- The user will disappear from the user list for this role and their role(s) will update automatically in User Management to no longer show this role.
Before the role was removed:


After the role was removed:


Cloning a Role
- Find the role you would like to clone in the role list and click the inline ellipsis.
- In the drop down, select ‘Clone’. The system will automatically create another role with the same name adding - clone to it (so you can differentiate between the two), and permissions, but will not clone over the users.

3. Navigate down the list until you find your new copy of the cloned role and click on it to edit its details, permissions, and assigned users. The system saves all changes automatically.
Permissions
Prerequisite Permissions
These permissions are necessary for the correct functioning of several other permissions available within role management. The system configuration permissions are typically reserved for Management or Admin type roles and allow a user to create and edit roles and permissions within the Manager Portal.
|
System Configuration Permissions |
|
Manage System Configuration - This is a default permission. It cannot be disabled as it is required to allow users to set up the system.
|
|
Update company settings - This permission allows users to configure the company settings in the Settings section of the Manager Portal. It is important to note that this will only work if the ‘Manage System Configuration’ permission is enabled.
|


With application edit rights permissions, you have control over editing applications based on different stages and ownership. Depending on the responsibilities required of a role, one of the five permissions must be enabled for the application edit rights to function. Certain permissions, indicated by a tooltip icon next to the permission name, are contingent upon the activation of one of the Application Edit Rights permissions to function effectively. Here is a breakdown of the five application edit rights permissions:
|
Application Edit Rights Permissions |
|---|
|
Update application assigned to user - Allows you to edit applications that are specifically assigned to you. |
|
Update application created by user - Enables editing of applications that you have created. |
|
Update application in closed stage - Grants permission to edit applications that have already been closed. |
|
Update application in initial stage - Specifically for editing applications that are in the initial stage. |
|
Update application in any stage - Gives you the ability to edit applications regardless of their current stage. If a user has this permission enabled, they do not need the others as it covers all applications, eliminating the need for individual stage permissions. |
Essentially, the system configuration permissions are the all-encompassing powers, and these permissions are needed to adjust all other permissions and to access the manager portal. If a user has these permissions checked off, they can adjust the application edit rights permissions for different roles, which can impose serious limitations on what that role can carry out within LOS.
For example:
A Manager would have all 7 prerequisite permissions checked off and would be able to complete any of the actions outlined in the permissions table below.
An underwriter might have all 5 application edit rights permissions, and can therefore complete almost as many actions, minus the ability to access the Manager Portal.
A BDM might not have any of the 7 prerequisite permissions, meaning that they can only be granted permissions in the table that are not dependent on other permissions identified above.
Notes and tasks are often used by people that do not have edit rights on applications, like a funding specialist or an auditor. These permissions are decoupled from edit rights so you can assign these permissions to users you do not want editing applications.
Note: If you are going to assign a user any of the View/Search application permissions, you should also assign the corresponding pipeline permissions (list).
Permissions and System Login
To log in to the system, a user must be assigned one of the following pipeline permissions:

The system defaults to the Pipeline View upon sign-in. If a user does not have any of these permissions, they will automatically be logged out.
Pipeline Permissions Overview
The following permissions determine what deals a user can view within the pipeline. These permissions are stackable, meaning enabling more than one will expand the scope of visible deals.
List Applications in Pipeline
- Grants visibility into all deals in the pipeline, regardless of ownership or assignment.
- By enabling this permission for a role, any user with that role assigned can see ALL deals in their pipeline.
- This permission overrides the restrictions set by other more specific permissions.
For example, if List unassigned applications in pipeline is disabled but List applications in pipeline is enabled, the user will still see unassigned deals.
List Assigned Applications in Pipeline
- Displays only the deals assigned to the user.
- When combined with other pipeline permissions, the user may see additional deals beyond their assignments, depending on what other permissions are enabled.
List Own Applications in Pipeline
- Shows only deals that the user has created.
- Like other permissions, it can be combined with others to broaden access to additional deals.
List Unassigned Applications in Pipeline
- Shows deals that are not assigned to any user.
- Users will not have access to the "Unassigned" filter in the pipeline UI unless this permission is enabled.
- Unassigned deals may still appear if List applications in pipeline is also enabled.
Key Tip: Pipeline permissions are stackable, enabling multiple permissions will result in a broader view of the pipeline.
Permissions Table
There are 93 possible permissions in total.
|
Category |
Permission |
|
Applicant (5) |
Add stakeholder to application. Also requires the Manage stakeholders of type Lawyer and Third-Party on application to be enabled if adding Lawyers or Third Parties. |
|
Delete stakeholders from application |
|
|
Delete stakeholders from applications in initial stage |
|
|
Update stakeholder on application |
|
|
Manage stakeholders of type Lawyer and Third-Party on application - enables users to add, edit, and delete lawyers in the Stakeholder widget. |
|
|
Application (23) |
Can archive applications |
|
Create new application (this permission enables the Manual Create Button) |
|
|
Update application in any stage |
|
|
Can create application notes (in application - bottom right hand corner) Notes are view only if this permission is not enabled. |
|
|
Update application in initial stage |
|
|
Update application in closed stage |
|
|
Update application created by user |
|
|
Update application assigned to user |
|
|
Delete application |
|
|
Delete application in initial stage |
|
|
Lock/Unlock application |
|
|
Edit buydown in application |
|
|
Edit discount in application - relates to the Discount field in Requested Mortgage and Mortgage Terms tabs of Loan Details |
|
|
Update prepayment period on application. If enabled allows the user to edit the Prepayment Penalty Period (months) field in the Requested Mortgage tab in Loan Details. |
|
|
Adjudicate restricted party applications |
|
|
Adjudicate staff member applications |
|
|
Send to Core Banking System (Tenant Setting) |
|
|
Submit application to decision engine - specific to one lender. If you do not know what this means, please disregard. |
|
|
Edit priority in application |
|
|
Edit discretion on a mortgage |
|
|
Update Draw Schedule |
|
|
Force Upload Application - related to Servicing Module only. N/A if that module is not enabled in your environment. |
|
|
Edit decrements on a mortgage |
|
|
Application Condition (3) |
Delete an application condition |
|
Review application condition |
|
|
Add application condition |
|
|
Application Risk Flag (3) |
Create and edit application risk flags |
|
Mark as resolved on risk flags with Fail severity |
|
|
Mark as resolved on risk flags with Manual Review severity |
|
|
Assign User (3) |
Assign (Underwriter) to application in initial stage |
|
Assign (Manager) to application (allows a user to assign a Manager if the “Assign users to application has not been enabled for their role) |
|
|
Assign users to application (enables the user to assign any role) |
|
|
Chat (1) |
Chat in application |
|
Equifax (1) |
Pull Equifax Report |
|
Condition Document (5) |
Delete a condition document |
|
Add comment to condition document |
|
|
Review condition document |
|
|
Upload condition document |
|
|
Edit condition document |
|
|
Disbursement (1) |
Mark disbursement as completed (allows the user to create, edit, or mark tasks as complete when the application is locked) |
|
Documents Generation (2) |
Generate documents on application **This permission is required for users to be able to export application history and notes. |
|
Edit generated document |
|
|
FCT Closing (1) |
Manage FCT Closing Instruction |
|
Fee (2) |
Include fees in APR on application |
|
Cap fees in application |
|
|
Manager (2) |
Manage System Configuration |
|
Update company settings |
|
|
Manager Portal (2) |
Manage Brokers in Manager Portal |
|
Manage Lawyers in Manager Portal |
|
|
Mortgage (2) |
Create and edit custom increments on a mortgage. Relates specifically to the Custom Increments field as opposed to the Increments field. |
|
Edit increments on a mortgage |
|
|
Net Rate (1) |
Edit base rate in application. Enables the user to edit the base rate (is the rate submitted by the broker before product is applied and product base rate once product is applied) |
|
Out of Office (1) |
Update own out of office details |
|
Notes (4)
|
Can view system notes (all applications) (In Top Menu) |
|
Can delete system notes (all applications) (In Top Menu) |
|
|
Can update system notes (all applications) (In Top Menu) |
|
|
Can create system notes (all applications) (In Top Menu) |
|
|
Pipeline (4) |
List applications in pipeline (All applications - created by or assigned to anyone) |
|
List own applications in pipeline |
|
|
List assigned applications in pipeline |
|
|
List unassigned applications in pipeline |
|
|
Reports (1) |
View reports |
|
Servicing (1) |
Send to servicing (only applicable if we are integrated with your loan service provider. I.E. Intellify, Dolphin, TMO, etc). Also requires the permission Fund Application to be enabled to function. |
|
Stage (7) |
Can move application back from last non-closing stage |
|
Force stage transition with uncompleted tasks. Enables a user to stage transition if there are outstanding tasks and incomplete required fields. |
|
|
Decline application |
|
|
Fund application |
|
|
Move application between any non-closing stages |
|
|
Move application from initial to underwriting stage |
|
|
Advance mortgage secured from document review |
|
|
Revert Funding/Declined decision for application |
|
|
Tasks (8) |
Add new tasks to application |
|
Mark tasks assigned or created by user as complete |
|
|
Mark tasks as complete |
|
|
Can create Tasks when application is locked |
|
|
Can edit Tasks when application is locked |
|
|
Can complete Tasks when application is locked |
|
|
Update tasks assigned or created by user on application |
|
|
Update tasks on application |
|
|
User Management (3) |
Add new user account |
|
Remove user account |
|
|
Update user account |
|
|
View/Search Applications (6) |
View/search assigned applications |
|
View/search own applications |
|
|
View staff member applications |
|
|
View/search applications (All applications. Search functionality. Allows users to search applications that are not their own or those they are assigned to) |
|
|
View restricted party applications |
|
|
View standard applications |
