Table of Contents
Automatic Assignment Algorithm
Role of Parameters in Automatic Assignment
Key Components of the Automatic Assignment Algorithm:
Manual Intervention and Best Practices
‘Out of Office’ Functionality Overview
Managing Users with Single Sign-On (SSO) Integration
Introduction
User Management is where you will add and manage all users of the system. This includes adding, deactivating, deleting, setting DLA (Designated Lending Authority) limits, Out-Of-Office status, MFA activation/deactivation, enabling/disabling automatic deal assignment along with assignment rules, and identifying the user’s direct manager.

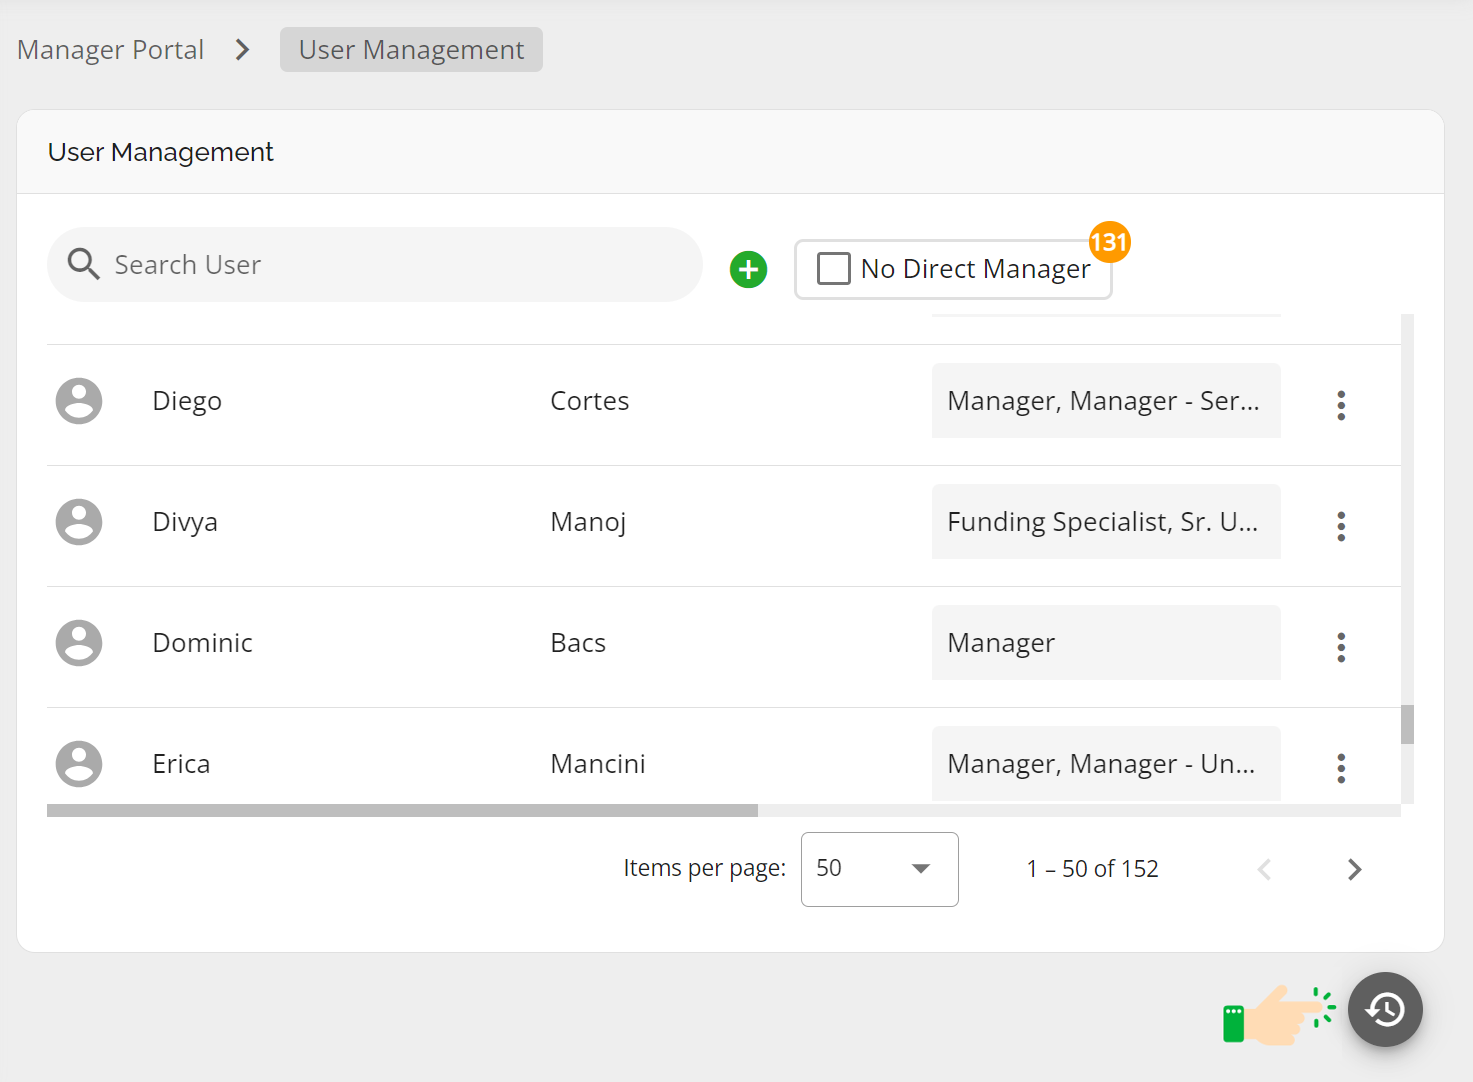
To locate the User Management section, follow these steps:
- Navigate to the ‘Manager Portal’.
- Click on ‘User Management’ in the sidebar on the left side of the screen.
Sorting User List
By default, the user list defaults to an alphabetical sorting by First Name in ascending order. However, you can modify the sorting by a different column, by either ascending or descending order. To do so, hover over the column title and click the arrow next to it. When the arrow is pointing upwards, the list is sorted in ascending order. When it is pointing downwards, the list is sorted in descending order.
Filtering User List
You can also filter users to display only those without a Direct Manager. To do so, select the “No Direct Manager” checkbox. All users with no Direct Manager will be listed, along with an orange warning sign in the Direct Manager column, indicating a missing Direct Manager.
Search for a User
If you have a specific user in mind, you can quickly find them using the search box. As you start typing text/keywords, the list will begin populating with any matching entries. Once you spot the desired user, you can access their settings or make necessary edits directly in-line or by clicking on the Ellipsis icon situated at the far right of the Direct Manager column.
Adding Users
To add a new user, follow these steps:
- Click the Add New User button (i.e. the green plus sign).
- The following drop down menu will appear. Enter the information for a new user.
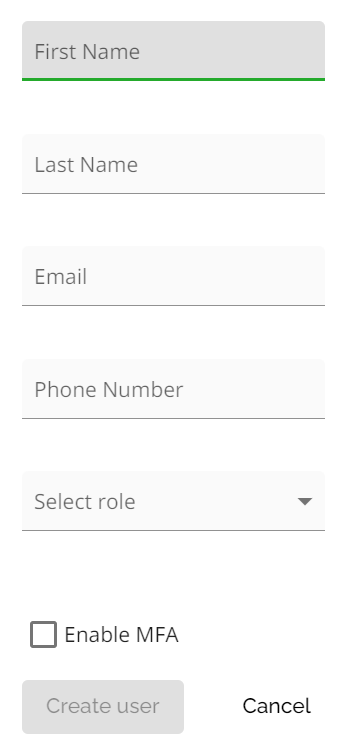
All fields in this form are required with the exception of Enable MFA.
Importance of Accurate Contact Phone Numbers in User Management
Accurate phone numbers are critical for user creation and application submission to insurers.
- The system requires a contact phone number for the underwriter.
- By default, the system uses the user's phone number as listed in User Management when submitting applications to insurers.
- If the user's phone number is missing from User Management, the system will automatically use the company phone number from Company Settings to prevent submission errors.
Action Required:
- Ensure the user’s phone number in User Management is accurate.
- Ensure the company phone number in Company Settings is accurate, as it is the fallback.
Lender Phone Number Format Requirements:
- Lenders must include a plus sign (+), the country code, area code, and a prefix at minimum to avoid errors when adding users to User Management.
- Correct Examples: +14166660000 or +1-416-666-0000
- Incorrect Examples (Avoid these): 0000000, 000-0000, 6661234, 666-1234, 4166661234, or 416-666-1234
- Multi-Factor Authentication (MFA): Checking off the ‘Enable MFA’ checkbox will require the user to use multi-factor authentication to login, either through an SMS code or an authenticator app. After creation, the system administrator is not able to edit the user’s name, email, or phone number. However, users can update their First Name and Last Name & Password via settings after their account is created. If a user’s email address or phone number needs to be changed, Lenders should submit a support ticket as that will need to be updated in the back end by our development team.
It is important to note that a cell phone number is required for SMS-based authentication. Do not provide a landline number.
To adjust the MFA settings, click on the inline ellipsis in the users list and either activate or deactivate MFA as needed.
3. Once completed, click the Create User button.
Upon clicking the Create User button, the user will receive a welcome email from the system. This email will include essential information such as the URL needed for access, their associated email address, and a temporary password. The user needs to promptly log in to the system and for convenience, save the URL to their favorites list. The user will then need to update their password and set up MFA (if applicable).
The addition of users is a three step process within FundMore:
Create User - FundMore
Activate User - FundMore
Send Welcome Email - sent by AWS
Sometimes there is a lag between FundMore performing its actions and AWS recognizing the account that might cause an error message when creating the user. The error message will indicate that the user’s account cannot be found but if you check the user list, you will see them listed. If this occurs, all you need to do is go to the inline ellipsis (see below) and click on Send Welcome. By this time AWS has caught up and the welcome email will go to the new user.
Spaces in the data entry (before or after data) will also cause errors. Please ensure there are no unnecessary spaces before or after the data entered.
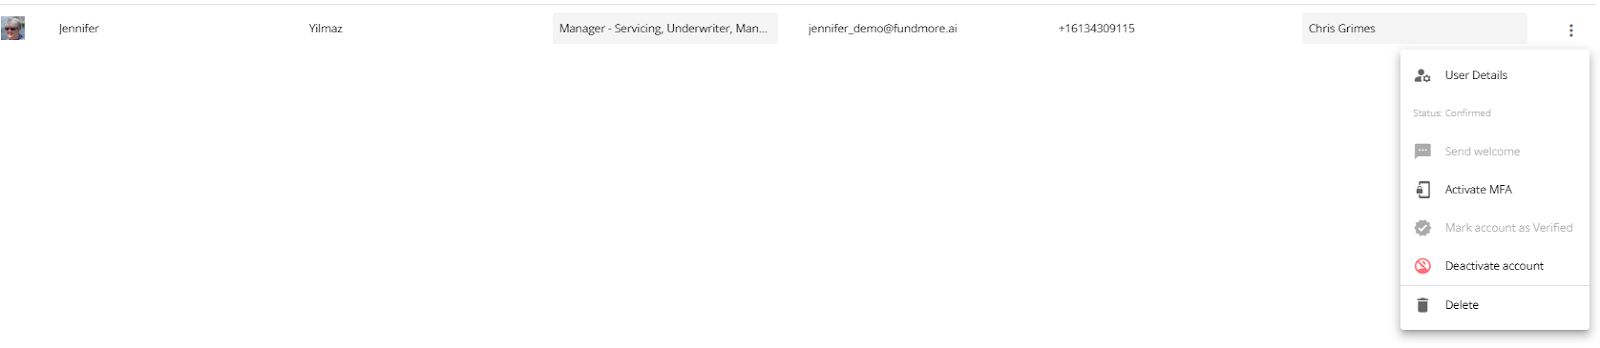
Inline Ellipsis Drop-Down
The inline ellipsis houses a menu where you can manage the parameters of automatic deal assignment for the user, their out of office status, their DLA limits, account activation, MFA activation, or delete their account. Clicking on the inline ellipsis opens the following menu:
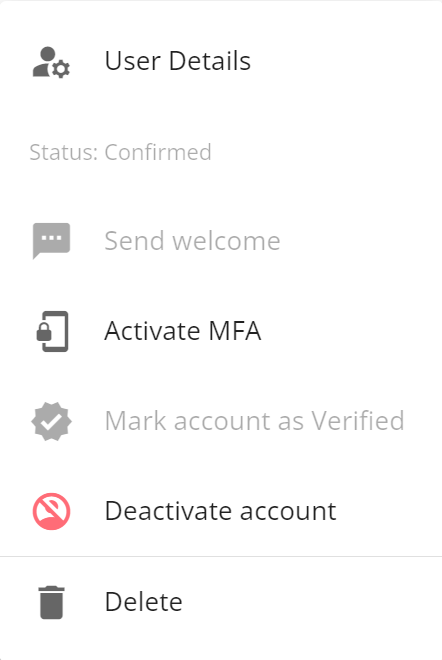
User Details
There are three tabs located within User Details: Preferences, Lending Limits, and Out of Office (O.O.O).
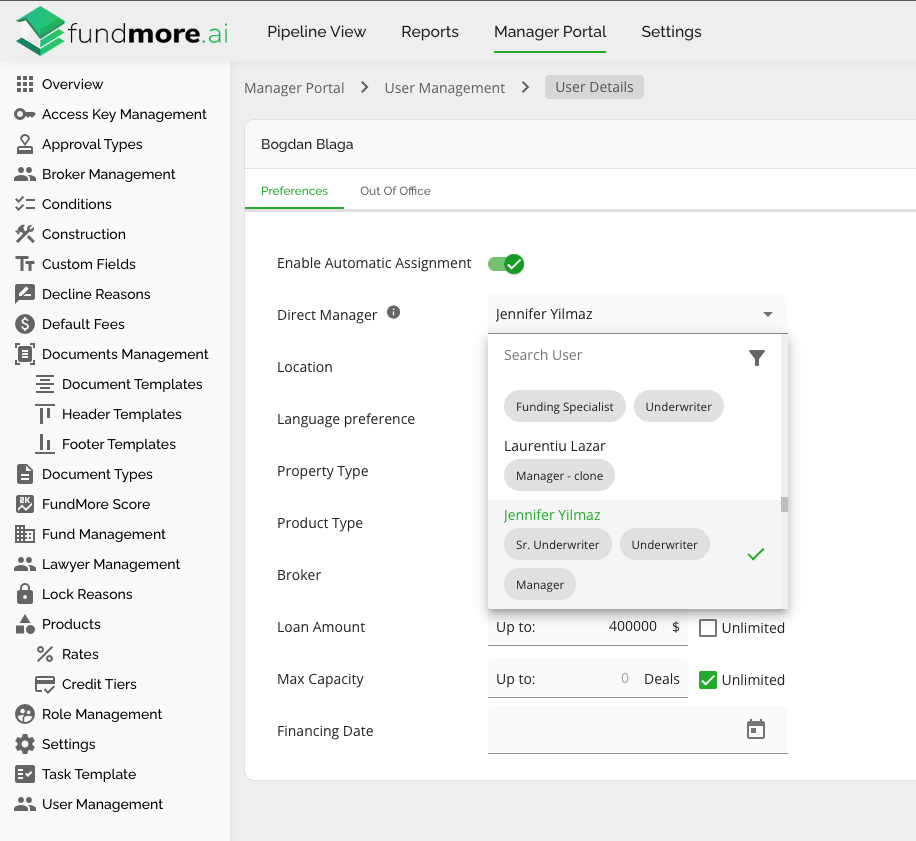
‘Preferences’ Tab
In the "Preferences" section, admin-level users with the necessary permissions can perform a range of actions. These can include enabling or disabling automatic deal assignment, setting Direct Manager designations, and configuring additional user profile fields such as Location, Language Preference, Property Type, Product Type, Broker, Financing Date, Source of Business (tenant specific), & Special Application (tenant specific).
Note: The Financing Date field is not yet functional and does nothing. Please disregard.

Enable Automatic Assignment Toggle - Click to enable or disable. When toggled to the right it will appear in color with a check mark, meaning it is enabled. When toggled to the left, it will appear in gray with a minus sign, meaning it is disabled. The assignment method is determined during onboarding.

Note: Automatic assignment will only function if it is enabled in both the Automations section of the Company Settings and the User Preferences. The feature must be toggled on in both locations to ensure it works as expected. The automatic assignment algorithm will depend on what setting has been applied in the Automations section within Company Settings.
Automatic Assignment Algorithm
The Automatic Assignment feature optimizes deal distribution by ensuring optimal efficiency in deal management. It guarantees that users are only assigned deals relevant to their roles and capacities in their pipeline views.
Configuration Requirements
To enable Automatic Assignment, ensure that User Preferences, Approval Limits, and Maximum Deal Capacity are properly configured in User Management. Additionally, the necessary automations must be activated in Company Settings.


Role of Parameters in Automatic Assignment
The assignment of applications is influenced by specific parameters which we call Preferences, including Location, Property Type, Product Type, Broker, and Max Capacity. The selections made in these fields determine which applications are automatically routed to a particular user:
- Location: For example, if "Ontario" is selected as the Location, only applications with subject properties in Ontario will be automatically directed to that user.
- Property Type and Product Type: Similar logic applies based on these fields; applications that match the specified criteria will follow the established assignment rules.
- Max Capacity: Ensures that users are not overloaded, as the system stops assigning deals once the user's maximum capacity is reached.
- Broker: The logic differs for when it relates to the broker field, and it is important to understand how deals are routed based on this. Refer to the following:
- "Any Broker": If “Any Broker” is assigned, the underwriter will receive deals from any broker, including those already assigned to other underwriters.
- Specific Broker: If all underwriters have specific brokers assigned to them and a deal ingests with a broker not assigned, the deal will go to the unassigned pipeline.
- Out of Office (OOO) Handling and Delegation: If an underwriter has specific brokers assigned in their user preferences and goes OOO while assigning a delegate, deals from their assigned brokers will not be automatically routed to the delegate. Instead, if a deal comes in from one of their assigned brokers, it will be reassigned to the next available underwriter with "Any Broker" access. If no underwriter has "Any Broker" assigned, the deal will be placed in the Unassigned Queue for manual reassignment.
If an application does not match any user's parameters, it will be routed to the Unassigned Pipeline. From there, it can be manually reassigned to an appropriate underwriter.
Key Components of the Automatic Assignment Algorithm:
- Capacity Check: The system first verifies if a user has available capacity. If a user has reached their maximum capacity — determined by the total number of active applications in their pipeline — no further assignments will occur until capacity becomes available.
- Lending Limits Evaluation: Next, the system considers lending limits, prioritizing users based on their ability to handle the deal within their lending capacity.
Deal Queue Priority: If multiple users meet the criteria, the system assigns the deal to the user with the fewest deals in their queue, ensuring balanced distribution.
Operational Insights
- If a user reaches their capacity, automatic assignment stops until they have room for more deals. However, managers or authorized personnel can manually assign deals to users even when they are at capacity.
- If there are no users available that meet the automatic assignment criteria, the application will be placed in the Unassigned deals pipeline. To view these deals, simply apply the Unassigned deals filter to the Pipeline View. This allows you to view and manage only unassigned deals in the pipeline. The availability of this filter depends on the permissions assigned to your role.
- The system continuously evaluates unassigned deals, assigning them as soon as users gain capacity.
- Capacity levels are directly linked to Conditional Approval, influencing the Automatic Assignment feature.
- It is important to keep the auto-assignment feature enabled, especially when onboarding new users or adjusting users’ Direct Lending Authority (DLA) or queue size.
Manual Intervention and Best Practices
- Users can manually pick up deals from the Unassigned Deals pipeline at any time, even if they've reached their maximum capacity.
- To optimize the system’s effectiveness, initially allow the queue to be filled automatically or manually assign deals as needed. Gradually adjust capacity settings based on performance and demand.
Direct Manager - You can add, edit or remove a Direct Manager from a user within the User Preferences tab. To do so:
- Navigate to the Manager Portal.
- Select the User Management option from the sidebar at the left.
- Click on the inline ellipsis for the relevant user and select the “User Details” option.
- Find the Direct Manager field and make the necessary changes from the options available in the dropdown list.
Alternatively you can also edit (only) directly inline by selecting the drop down list icon at the right side of the field for any users that have a Direct Manager assigned already.

The Direct Manager can be any user, except for the user you are configuring this for as long as they have been assigned a role that is marked Assignable.
Note: Deactivated users will populate this list but, it is important to avoid assigning a Direct Manager who is currently deactivated. They still populate the list because they might become active again; otherwise, they would have been removed from the system altogether.
This system was designed to help improve Team Structuring, providing valuable support to lenders in their management of deal flows for their teams, while also enhancing reporting capabilities.
If a user has direct reports, they can switch their pipeline to view the deals associated with those individuals. When they switch to the pipeline view of their direct reports, they can filter the pipeline view by the following:
- All My Team Deals
- Multi-Select between my team members and just see a subset of deals
- Overdue deals
- By default they will see all deals from their own reports.


The Direct Manager will be able to toggle between their “My Team Applications Pipeline” and “My Pipeline” with ease.
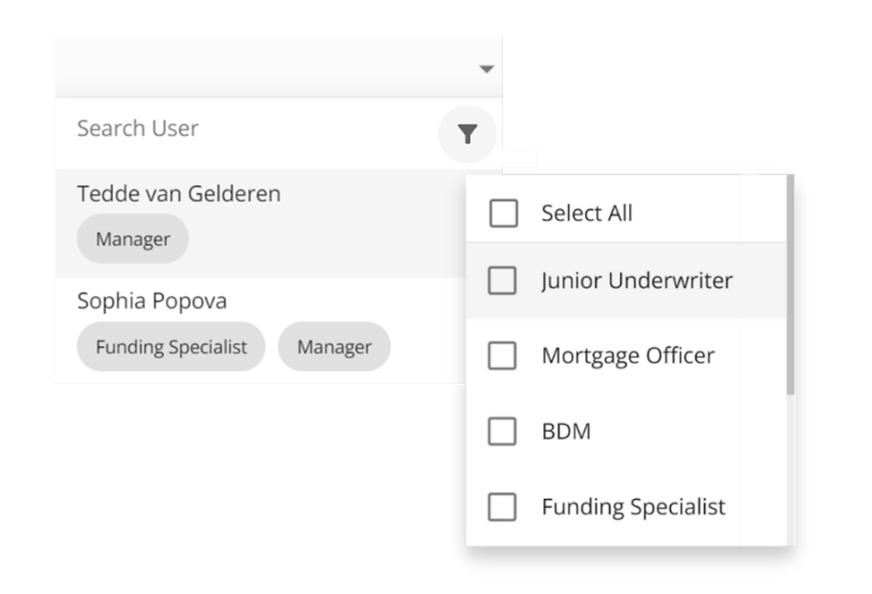
When assigning or changing a user’s Direct Manager, you have two options for locating the right person. You can either search by the Direct Manager’s name if you know it, or you can use the role-based filtering by clicking on the filter icon.
There is also a tooltip available to quickly verify if the user you are assigning is a Direct Manager for other users. This tooltip will display a list of their direct reports for your convenience.

Special Applications - Tenant Specific and may not apply in all environments. A range of special applications enabling Management to fine tune applications being auto assigned. An example of a special application would be one that is indicated as a rush. Management may want these applications going to more experienced users with efficient turn around times.
Source of Business - Tenant Specific and may not apply in all environments. If a Lender has multiple sources of business, i.e. Broker and Retail or Prime and Alternative, they may want to use Source of Business to determine deal assignment as they may segregate their teams by source of business. This field enables them to do so.
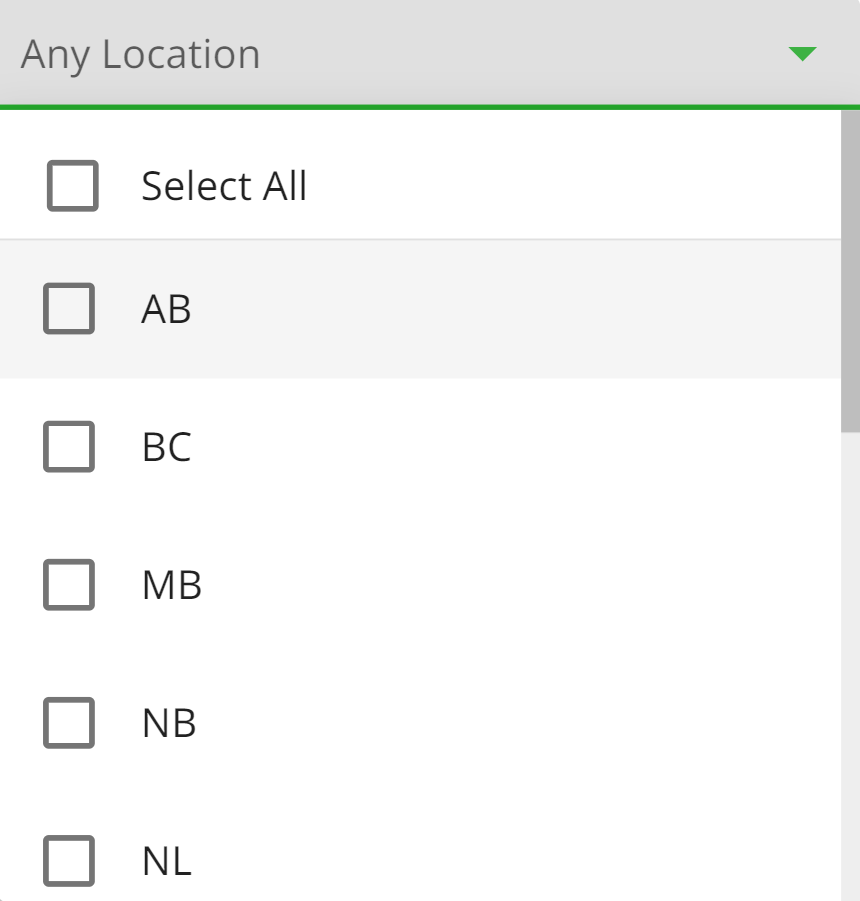
Location - Select one or more provinces where the user is authorized to operate. This setting ensures that only deals within the specified regions are automatically assigned to the user.
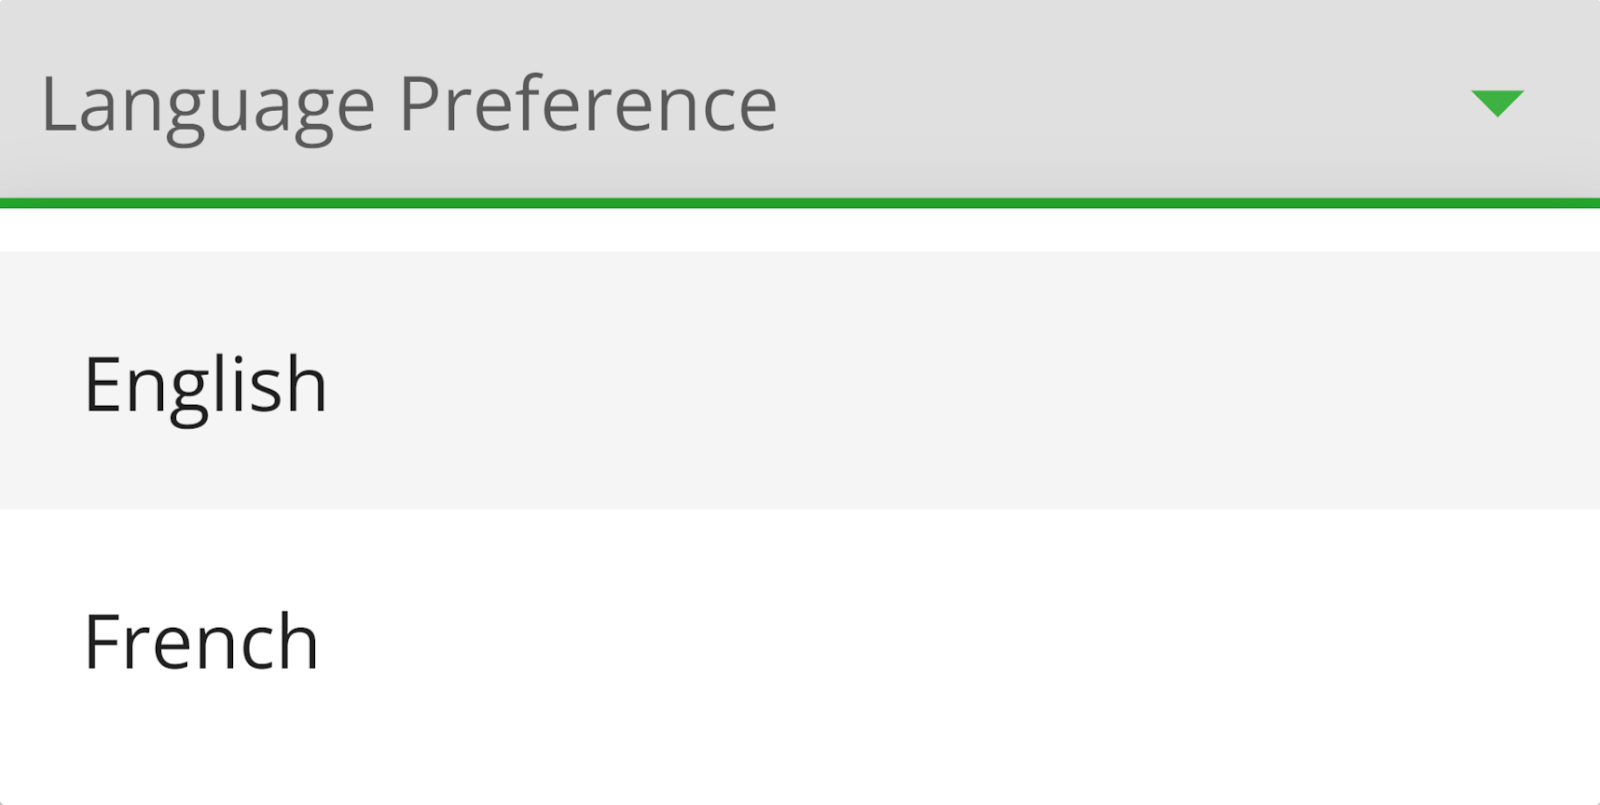
Language Preference - This setting influences deal assignments, ensuring that users receive applications in their selected language. This is the user’s language preference.
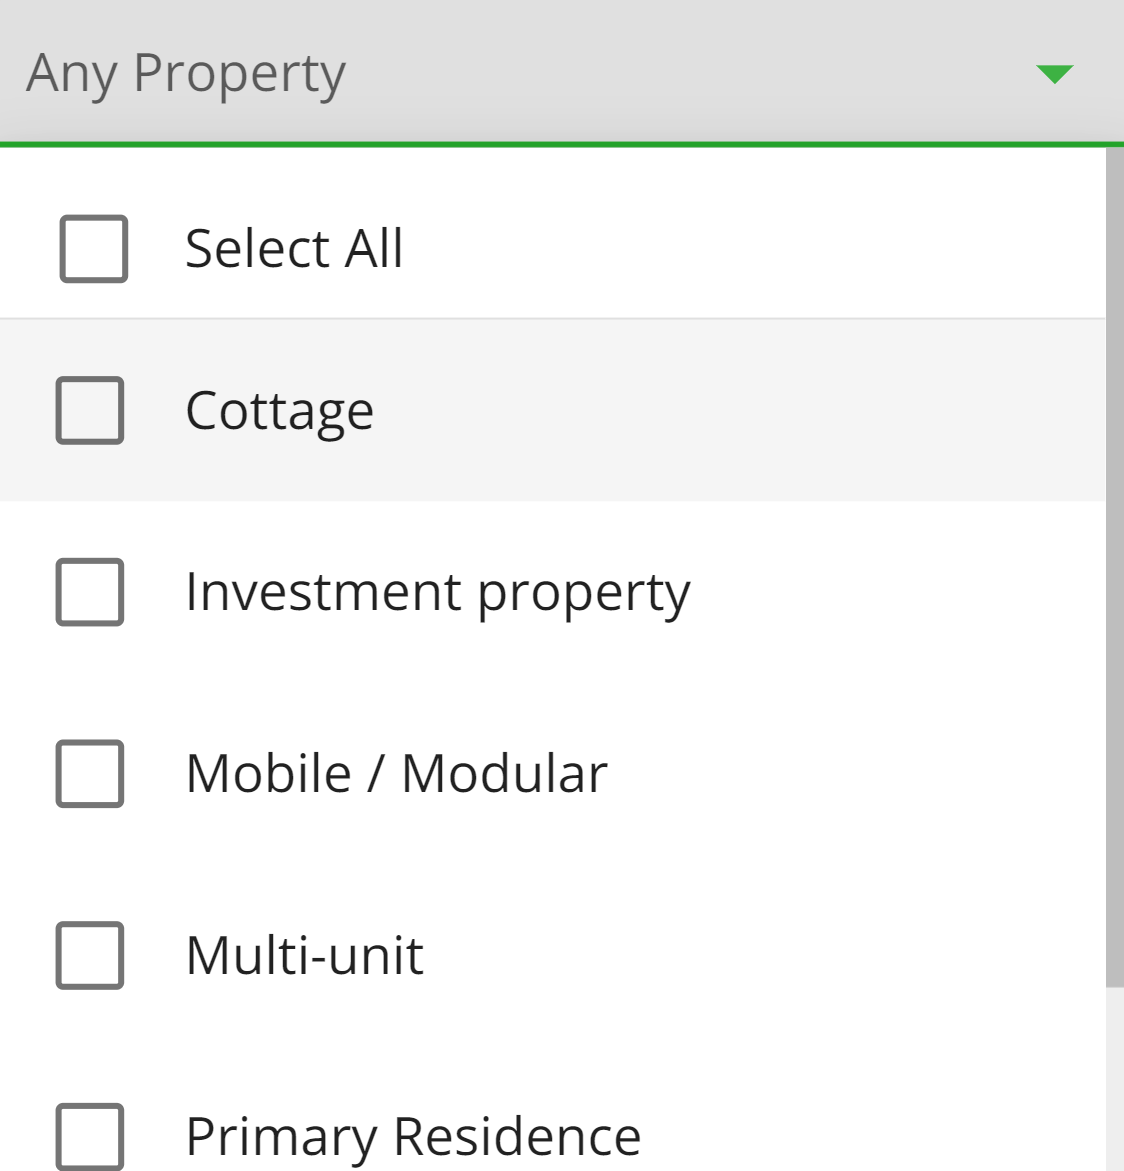
Property Type - Use the dropdown menu to select one or more property types that apply to the user. Available options include: All Properties, Cottage, Investment Company, Mobile/Modular, Multi-unit, Primary Residence, and Second Home.
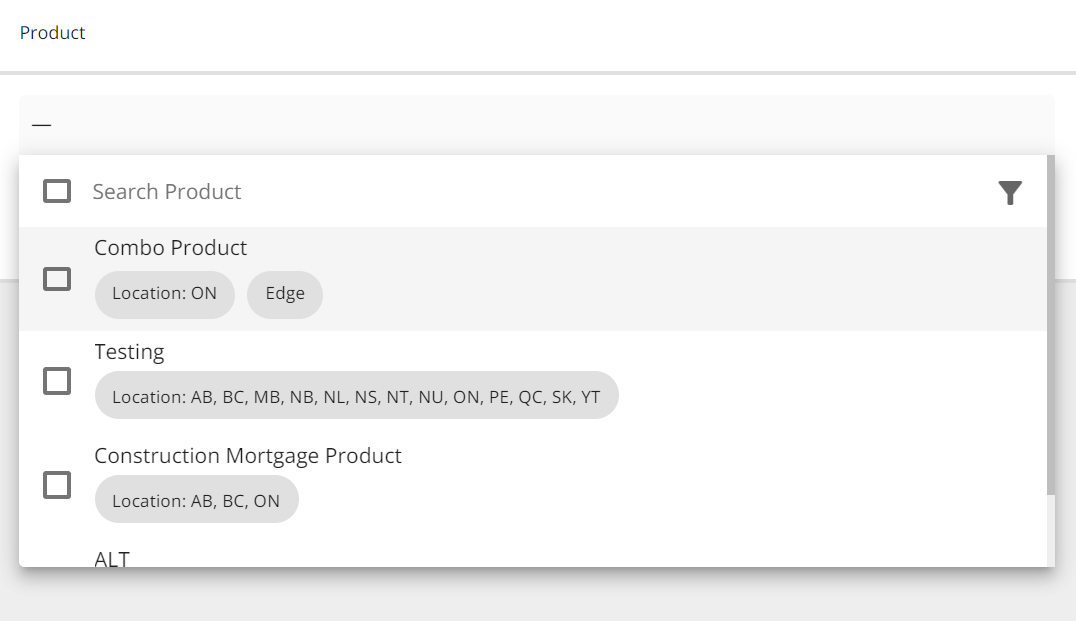
Product Type - Choose one or more product types from the dropdown menu that have been created for your company. You can quickly locate a product by typing in the search box at the top of the dropdown. Additionally, you can filter products by location using the filter icon next to the search box or simply scroll through the list.
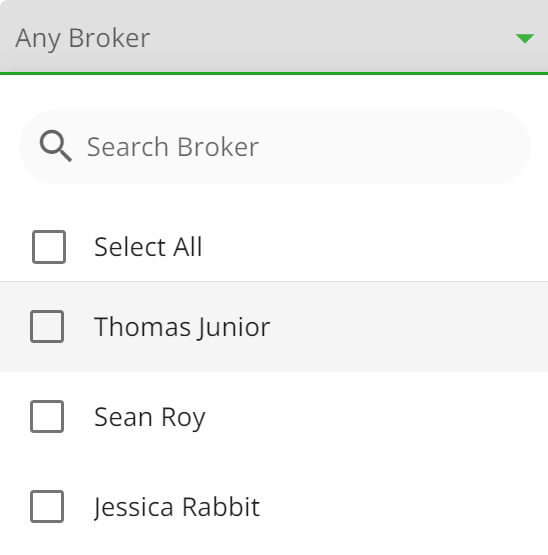
Broker - Select one or more brokers from the dropdown menu. You can search for a specific broker using the search box at the top of the dropdown or browse the list by scrolling. Only verified brokers will populate this list.
Note: If you select "Any Broker," the system will not restrict applications to specific brokers. Instead, you will receive applications from all brokers in the system, regardless of whether those brokers are assigned to you or to other underwriters. This selection bypasses any broker-specific filtering and includes every broker in the application process.
Financing Date - This field is under development.
‘Lending Limits’ Tab
We have included a Lending Limits section within the User Details section of User Management to support multiple lending limits for users. This tab offers both a condensed and an expanded view, with control over the display mode available in the Settings section of the Manager Portal.

When toggled on, the expanded Lending Limits of users in Preferences will be visible. Conversely, toggling it off will only show the condensed view.
Condensed View

The condensed view includes fields such as Loan Amount, Max Capacity and Max Discretion.
Expanded View

The expanded view includes fields such as Max Mortgage Secured, Max Non-Mortgage Secured, Max Bridge Secured, Max Total Connection, Max Capacity, and Max Discretion.
This view allows the lender to apply lending limits considering aggregate lending and multiple products. Max Non-Mortgage Secured includes Cash Secured, Vehicle Secured, and Unsecured products, while Max Total Connection includes Retail Aggregates and Business Aggregates.
Note: The condensed view and expanded view are mutually exclusive, lenders can only display and populate one of these views at a time.
Once a user’s lending limits have been configured, the system will validate these limits within the application process, ensuring users adhere to their set thresholds.
When the expanded Lending Limits are enabled, these limits are integrated into the Approval Flow. As shown in the screenshots, users can see their lending limits by clicking on the “i” tooltip, which will display the relevant lending authority information based on the current application. If the lending request exceeds the user’s authorized limit, a warning icon will appear and the system will block the user from proceeding. This approval banner (DLA) forces the user to seek approval from a higher-authority individual with permission to approve such requests.
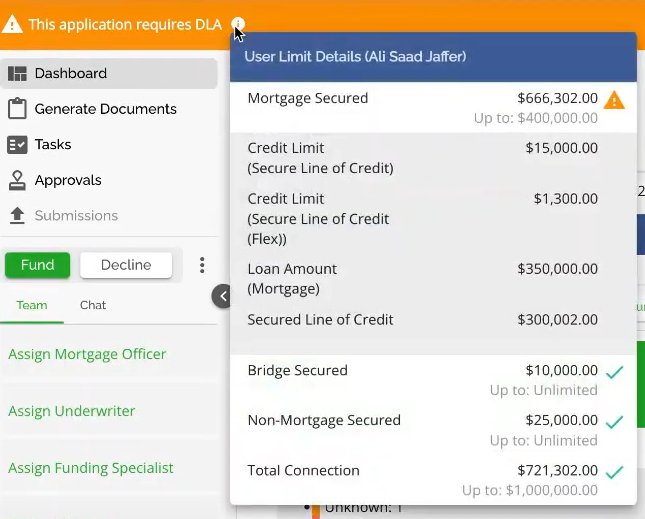
In addition, editing the aggregate amount of secured lines of credit will trigger the system to reassess the user's lending limits in real time. If the changes exceed the user’s set limits, the approval banner will reappear until an authorized individual grants approval. This dynamic assessment ensures compliance with internal lending authority rules. To watch a demonstration of this functionality, refer to this video: Expanded Limits - DLA Request Approval Flow.
The demonstration shows the perspective of an admin user making adjustments to a user’s lending limits and demonstrates how it affects the deal. As you can see in the demonstration, the user is now blocked by an approval banner (DLA) as their lending limit falls outside of what has been configured for them. This forces the user to seek approval from a user with the permission to approve such requests. In addition, you can see that the user edits the amount of the secured line of credit (aggregate) causing the approval banner to appear and disappear in the deal they are working on.
This feature provides admin users with a clear and direct method to control lending limits, helping ensure that requests outside of a user’s authority are appropriately escalated. It also empowers users to quickly identify and adjust their actions within the limits defined for them.
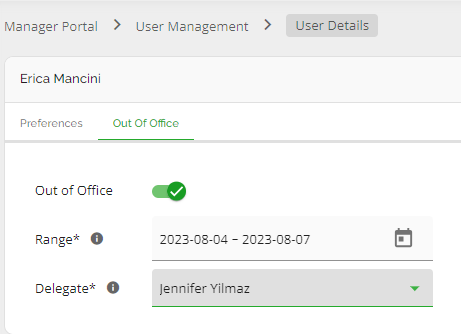
‘Out of Office’ Tab
This is where admin-level users can manage a user’s out-of-office status ensuring that deals are automatically re-assigned while they are OOO.
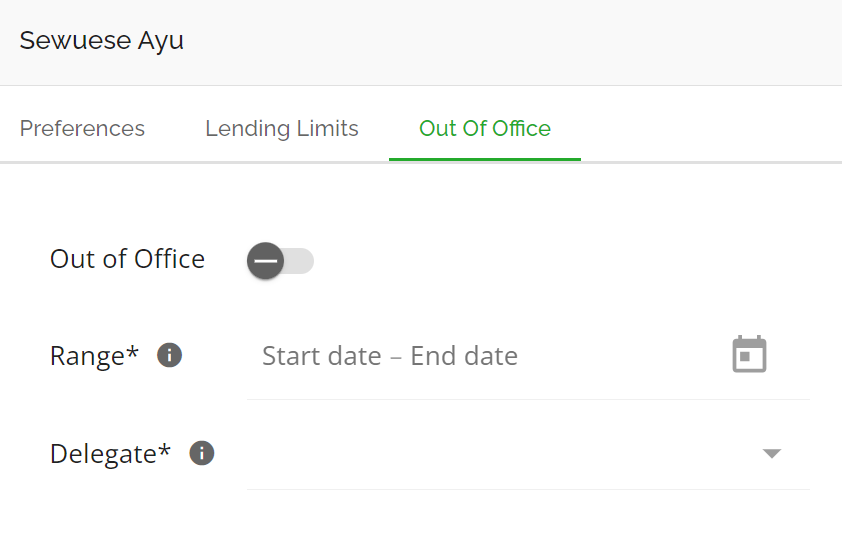
‘Out of Office’ Toggle - Click to enable or disable. When toggled to the right it will appear in color with a check mark, meaning it is enabled. When toggled to the left, it will appear in gray with a minus sign, meaning it is disabled.

Range - Select your start date and end date and it will highlight the range selected in green. All new applications created during this date range will automatically be assigned to the individual selected as the delegate and this user will not appear in the list of available DLA approvers.

Delegate - In the drop down menu, you can either search for a delegate in the Search field, scroll through the list of populated delegates, or, click on the funnel to filter by role. Once you have found the delegate you wish to use, select that individual and they will populate the delegate field.
The delegate will receive a notification and all new applications created that would normally be assigned to the original user will be assigned to the selected delegate. The delegate receives notifications when tasks are assigned on the deal as well as any other notification triggered for the deal. However, any tasks assigned will remain in the original user’s name. When the date range is passed, the OOO will automatically turn off and the deal assignment will resume for the user.
‘Out of Office’ Functionality Overview
When a user sets an Out of Office (OOO) period, the system automatically handles the delegation of their deals to ensure continuity. The main aspects of this functionality include:
Automatic Delegate Assignment
When a user sets an Out-of-Office (OOO) period, the system automatically assigns their designated delegate to handle their deals.
This assignment occurs even if the OOO is set for the current day or if a delegate was already assigned to one of the other users involved in the deal. If a delegate is changed during the OOO period, the new delegate is immediately assigned to the user's deals.
Delegate Queue and Permissions
Assigned deals appear in the delegate's queue, where they can take action based on their permissions. Delegates will receive automatic email notifications when new deals are assigned to them.
Exclusion of OOO Users from Approver List
Users marked as OOO are excluded from the list of available approvers for approval requests, ensuring they are not selected during their absence.

Delegate Assignment Duration
Delegates remain assigned to deals even after the OOO period ends, unless the "Automatically remove delegates from delegated applications when out of office is turned off" setting is enabled.
- When the Setting is Enabled: Delegates are automatically removed from all deals once the OOO period ends, either manually or naturally. This ensures that the original user resumes control of their deals without any manual intervention.
- When the Setting is Disabled: Delegates will continue to be assigned to deals even after the OOO period ends. In this case, managers or users must manually un-assign delegates if they wish to revert control back to the original user. This setting provides flexibility for situations where continued delegation is preferred beyond the OOO period.
Note: If an OOO delegate is also the user’s Manager, the delegate will continue to see the deals in their pipeline after the OOO period ends, as Managers have default visibility of their team’s deals.
Time-Based Considerations
The system clock is set to either 9 PM PST or midnight EST for the end of delegation. If the OOO period is toggled off before 9 PM PST, deals are reassigned to the original user immediately. If the period expires naturally at 9 PM PST, the deals remain with the delegate until manually reassigned. This ensures that the system aligns with the user's time zone and operational needs.
Example: If a user’s OOO is set from September 1st to September 3rd and expires naturally at 9 PM PST on September 3rd, the deals will stay with the delegate until manually reassigned. If the OOO is toggled off on September 3rd before 9 PM PST, deals will be reassigned to the original user immediately.
Delegate Chain Handling
When a user sets an Out-of-Office (OOO) period, their deals are automatically reassigned to a designated delegate. If this delegate also sets their own OOO period, their deals will cascade down to their delegate, creating a chain of delegation. Each delegate in this chain takes over the deals from the previous user, ensuring that deals are always assigned to an available user.
Example:
- User A sets an OOO period and assigns their deals to Delegate B.
- Delegate B is also on OOO, so their deals are automatically assigned to Delegate C.
- This cascading process continues down the chain until a delegate without an OOO period is found.
Unassignment reverses the delegate chain, ensuring that all delegates in the chain are unassigned in the correct order. When the original user or any higher-level delegate returns from OOO, the un-assignment process clears the entire delegate chain, restoring control of the deals to the original user or the appropriate delegate.
Example:
- User A returns from their OOO period.
- The system un-assigns Delegate B and Delegate C (if applicable), returning all deals back to User A.
- This ensures that no deals remain with delegates once the original user is back.
For a video demonstration of this functionality, refer to this video: Delegate Chain on Unassignment.
Detailed Scenarios:
Scenario 1:
- User A sets an OOO period from September 1st to September 3rd. Their deals are reassigned to Delegate X.
- If Delegate X is also out during the same period, their deals are passed on to Delegate Y.
- Upon the end of User A’s OOO period, the system handles the unassignment of Delegate X and Delegate Y based on the "Automatically remove delegates" setting.
Scenario 2:
- User A delegates their deals to User B during their OOO period.
- User B begins their OOO period a day later, so the deals are further reassigned to User C.
- When User A returns, unassigning their delegate clears all delegates in the chain, including User B and User C, restoring full control of the deals to User A.
Lending Limit Transfers for Delegates
Delegated lending limits are fully supported.
When a user is out-of-office, their assigned delegate will automatically inherit the user’s lending limits, ensuring approvals and deal assignments continue without disruption. Key updates include:
- Delegates now automatically see and use the correct lending limits when covering for an out-of-office manager.
- Approvals follow the delegate’s updated limits so deals can keep moving without delays.
- Automatic assignment takes delegated limits and team rules into account for smoother workload distribution.
- Approval buttons now match the delegate’s authority, avoiding blocked actions.
Delegated limits and responsibilities automatically revert once the original manager returns, ensuring business continuity without manual intervention.
Note: For tenants connected to DM (Ezidox), as deals are assigned to the delegate, any DM set up will automatically be shared with them. The function of assigning anyone to a deal in the LOS automatically shares the corresponding DM file with them and the user will have full access to documents, comments, statuses etc., within DM.
Create DM Account
Only applies if your system is connected to DM (Ezidox). When adding a user, a DM account will be created for them simultaneously when their User account is created. If you do not have FundMore DM, this will be grayed out. If you do have DM, it will still be grayed out but when you hover over it you will see a pop up message stating “FundMore DM account already created”.
Send Welcome
Will be grayed out. This is automated through the backend and goes to the user once they have been created in the system. The Welcome email contains their username, a temporary password, and the URL they need to use to log into the system. If ‘Send Welcome’ is not greyed out, it could mean the user has not acted on their welcome email or there was an issue with the original welcome email going out. Best practice here would be to check with the user first. If need be you can select ‘Send Welcome’ which will send a new welcome email to the user.
Activate MFA
Activate MFA (Tenant Setting)
Please contact the CS team if you want to activate MFA for your organization.
Note: If your organization uses SSO, then you will not need MFA.
Allows you to activate/deactivate multi-factor authentication for users. If you activate, the user can then choose their preferred MFA system (SMS or Authenticator App) in their User Profile Settings. The users cannot enable MFA if the Company has not done so first. The initial MFA defaults to an SMS.
FundMore supports SMS & Authenticator Apps (Microsoft & Google). Authenticator App is preferred.
If the company is going to enable MFA, a valid cell phone number must be entered in the user’s profile because the system requires a cell number to send the SMS MFA.
MFA solves the issue of protection when the same password is used across multiple applications. It is the best protection in those situations. FundMore uses Cognito and has advanced security tracking of compromised passwords. We can enable the function to block if Cognito advises a password is compromised.

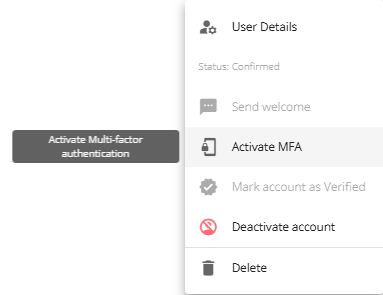
To activate or deactivate MFA for user, follow these steps:
- In Manager Portal -> User Management click on the ellipsis to the right of the applicable User:
-
- In the drop down menu select Activate MFA:
- The next time the user logs in they will get the following message:

The preferred MFA Strategy would be dependent on your organization's preferences but the initial MFA defaults to an SMS. Once the user logs in initially they can then go to their settings page and set their preference to either SMS or Authenticator App where they can either toggle the Authentication App button or select SMS from the drop down. Once they have made their selection, they simply need to follow the instructions on the screen.
Mark Account as Verified
This is currently an automatic process by the system when a user is created. The system verifies the user’s phone numbers and email addresses when you create their account. Because it is automatic this function is grayed out.
Deactivate Account
Recommended to use when you need to prevent users from accessing the system temporarily, i.e. Maternity Leave. Deactivating their account will prevent them from accessing FundMore.ai but will leave their information intact and their previous settings and notification are recorded in the audit log. The system will update the following within the application:
Any history logs will show the deactivated users name as follows: name (deactivated)
Any tasks (completed or outstanding) the user’s name wil update as follows: name (Deactivated)
Any notes the user added will show the deactivated user’s name as follows: name (Deactivated)
Any approvals sent to them as the approver - their name will remain but it will be greyed out
Any approvals they actioned - their name remains in the comment
Any conditions they actioned - no change
Any documents they actioned - Will show as unknown user but their name will remain as part of the comments.
Any chat messages they initiated - will remain but with Name not found instead of their name.
Activate Account
When a user’s account has been deactivated, the option to reactivate it becomes available. The "Deactivate Account" label will change to "Activate Account." Selecting this will restore the user’s access to the system, allowing them to resume their previous activities with all prior settings intact. Their name will also be restored anywhere it had been changed when they were deactivated.
Delete
Use this option to permanently delete a user from the system. Deleting their account will prevent them from accessing FundMore.ai and will remove them from User Management, though audit logs of their actions while an active user will be retained.
Caution: Never delete an account if there is any possibility the user may return. The system will recognize the original email used, causing errors if attempting to recreate the user account. In such cases, it is recommended to deactivate the user instead.
Other notes on deleting users:
- Task Reassignment: Any tasks assigned to deleted users will revert to "Unknown Name."
- History Entries: Actions performed by the deleted user will remain in history logs, but the user’s name in these entries will revert to "FundMore System."
- Deal Removal: If a deleted user is assigned to a deal, they will be removed from the deal and will no longer appear in the team list.
Application Edits: Any edits made by the deleted user in applications will remain intact.
Managing Users with Single Sign-On (SSO) Integration
Note: This section applies specifically to managing users when accessing FundMore through Single Sign-On (SSO) and should be understood in that context.
When a lender has Single Sign-On (SSO) set up, user management functions differ slightly compared to managing users solely within the FundMore platform. It is important to note that when SSO is enabled, certain user actions, such as deactivating or activating accounts, must be handled within the lender’s SSO system rather than within FundMore.
Deactivating Users with SSO
For lenders using SSO, deactivating a user must be done on the lender’s SSO system. FundMore does not have integration with SSO to automatically deactivate a user once they are deactivated in FundMore. This means that administrators must log into the SSO system used by their organization to deactivate the user. Once a user is deactivated in the SSO system, that user will no longer be able to log into FundMore via SSO.
Activating Users with SSO
Similarly, activating a user account should also be managed through the lender’s SSO system. To activate a user, administrators need to ensure that the user is active and has the appropriate permissions assigned in the SSO system. Once the user is activated in SSO, they will be able to log into FundMore using their SSO credentials.
Other User Management Actions
User details, such as profile updates, roles, and permissions, can still be managed within FundMore, but it is essential to understand the limitations with SSO integration. Since SSO handles authentication, any actions related to user status (active/inactive) must be managed directly through the SSO system. However, role assignments and access rights within FundMore can still be updated in the FundMore platform as needed.
User Name changes can be done in SSO.
User Email changes need to be handled by FundMore. Please submit a support ticket.
When managing users for a lender with SSO set up, it is important to keep this separation of responsibilities in mind to ensure that user access is properly controlled and that both the SSO system and FundMore reflect the desired account statuses.
History Log
All activity or updates within the User Management section of the Manager Portal are tracked in the history. To view the Manager Portal history logs, simply click on the “History” icon at the bottom of the screen. Any additions, deletions, or edits will be tracked within the history log identifying who made the change, what change was made and when. The history log component includes a loading indicator that provides real-time feedback by displaying progress while accessing history logs and preparing files for export, ensuring users stay informed throughout the data retrieval and export processes.
To watch a demonstration of this functionality, refer to this video: User Management - History Log Demo.
Export User List as CSV
Admins can now export a list of all users from the Manager Portal. This list will include all users whether active, deactivated, or deleted. It will display the user’s name, email address, when they were deleted (if applicable), if their active status is true or not, their role(s), and their Direct Manager. Multiple roles are consolidated into a single column for better readability in the export file.
The report will populate based on the actions taken as follows:
- Deactivated users , the isActive boolean flag is updated to FALSE
- Deleted users, the deletedAT column is populated & the isActive boolean flag remains as TRUE
- Deactivated users that are then deleted, the deletedAT column is populated & the isActive boolean flag is updated to FALSE
- Active users, the isActive boolean flag shows as TRUE
How to Export the User List:
-
Navigate to the User Management section in the Manager Portal
-
Locate the Download button at the top right, next to the No Direct Manager filter.
- Click the Download button to generate and download a CSV file containing the user data.

The columns in the report are:
First Name - the user’s first name
Last Name - the user’s last name
Email - the email address their user account was set up with
Deleted At - the date the user was deleted. This column will only populate with deleted dates. It does not populate if a user is still active or has been de-activated.
Is Active - TRUE or FALSE. Active and Deleted users will show TRUE. Deactivated/Deactivated + Deleted users will show FALSE. .
Roles - all roles assigned to that user
Direct Manager - if a Direct Manager was assigned to that user it will display.
Here is a screenshot of with an example of a deactivated user, a user that was first deactivated and then deleted, and an active user in that order:
