Table of Contents
Introduction
The User Profile and Settings is specific to the user signing into the platform. In this section you can find the User Profile, User Settings including View User Preferences, MFA Settings, & Team Settings. The user profile section houses all the details associated with account login and the user's profile picture. The user settings section is where you can customize your visual preferences, manage notification settings, and access the user preferences section. The MFA settings house the User’s MFA & SMS security settings.
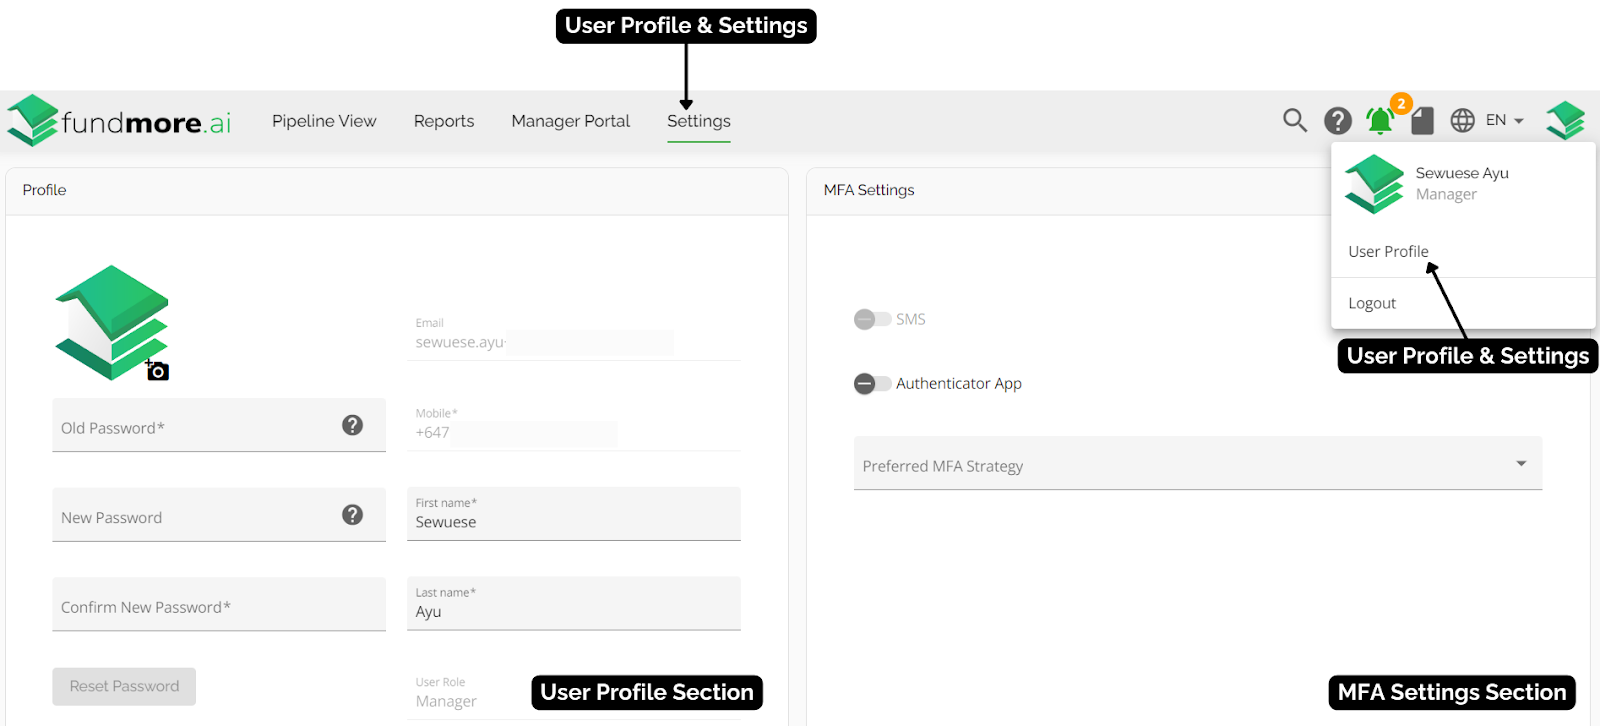


You can navigate to the User Profile and Settings by selecting Settings option ![]() in the navigation bar of the platform, or by clicking the profile icon/picture in the top right corner from anywhere within the app. When the profile icon/picture is clicked, a drop down menu will appear. Select the User Profile option.
in the navigation bar of the platform, or by clicking the profile icon/picture in the top right corner from anywhere within the app. When the profile icon/picture is clicked, a drop down menu will appear. Select the User Profile option.
![]()

User Profile
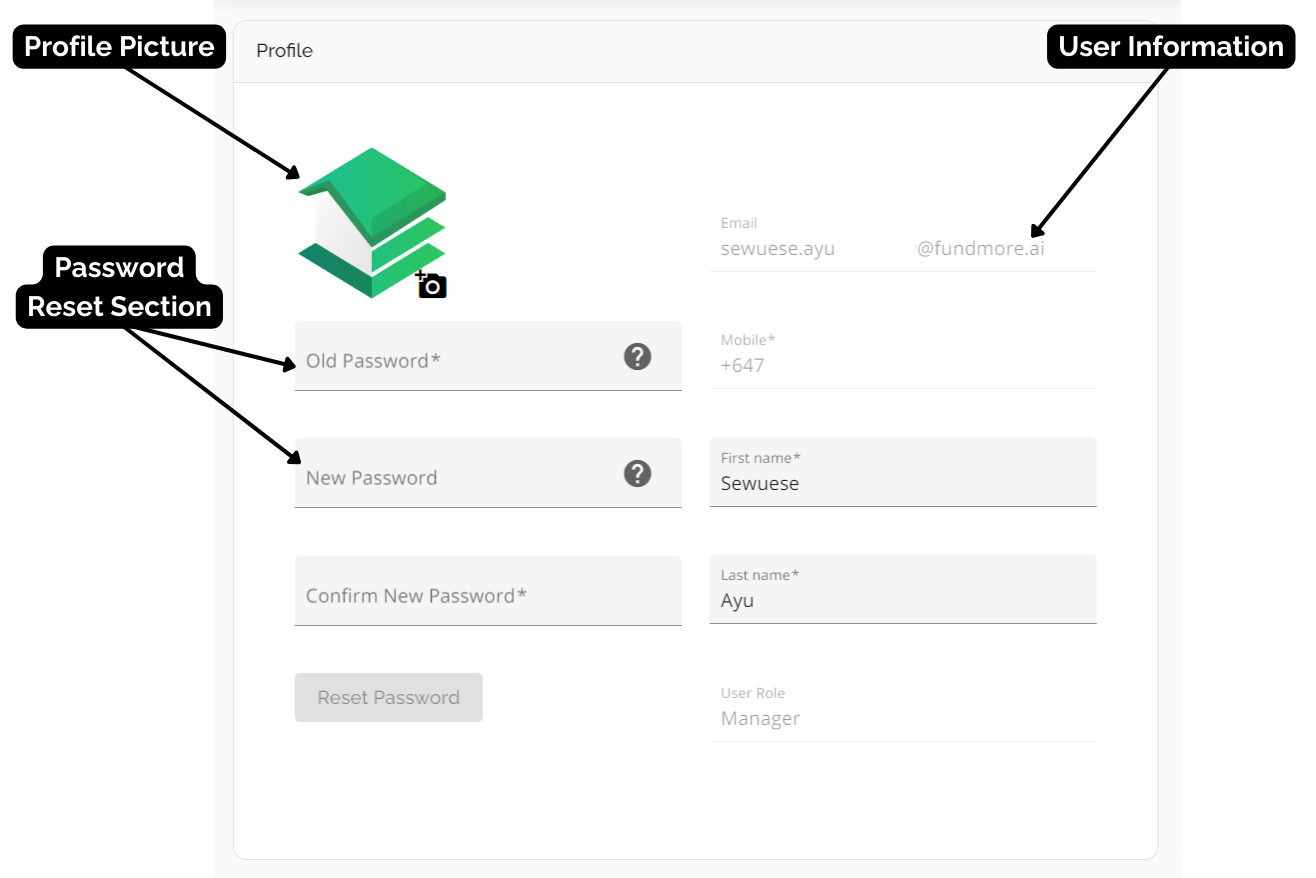
In the user profile you can set a profile picture, reset the password, and view the user’s information.
User's Profile Picture
The User Profile Picture is located on the top left corner of the User Profile section. You can edit the profile picture by selecting the camera icon located at the bottom right corner of the picture placeholder. When the camera icon is clicked, a pop up will appear.
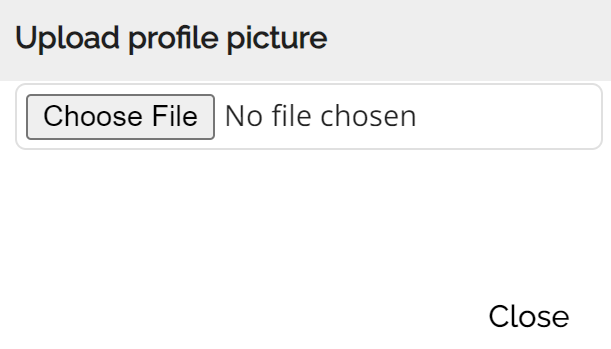
When the pop up appears select the ‘Choose file’ button. From your computer choose the image you wish to use as your profile picture.

When your image is selected, it will preview in the pop up. You can crop the image by using the cropping function which outlines the image. You can increase or decrease the size of the image using this function by increasing or decreasing the cropping outline. Once you are satisfied with the image, select the ‘Upload’ button located on the bottom right of the pop up. If you want to cancel this action, click the ‘Close’ button located to the left of the upload button.
Password Reset

You can reset your password by clicking on the old password field located just below the Profile Picture. After entering your current password in the old password field, select the new password field and enter the new password you wish to change yours too.
The requirements for the password can be found by hovering over the ‘Help’ tooltip icon to the right of the New Password and Confirm New Password fields.

Our password requirements are:
Must have at least 8 characters
Must have one number
Must have one special character
Must have one uppercase letter
Must have one lowercase letter
Confirm the new password by entering it into the Confirm Password field. Once you have successfully completed these steps, select the ‘Reset Password’ button located on the bottom left of this section.
User Information

You can find the user information to the right of the User Profile Picture and Password Reset section. Here you will find the User’s Email Address, Mobile Phone Number, First Name, Last Name, and User Role your account was set up with. The First Name and Last Name can be edited by clicking on the field and updating the data. The platform will automatically save any changes made and those updates will carry through to the Manager Portal. The Email Address, Mobile Number and the User Role, are grayed out and cannot be updated by the user. They can only be updated in the back end. If any of these items require updating, please submit a support ticket.
.
MFA Settings

Multi-factor Authentication (MFA) is an authentication method that requires the user to provide additional verification factors to gain access to the FundMore platform. FundMore.ai supports SMS & Authenticator Apps (Microsoft & Google) but, Authenticator App is preferred.
This functionality is only available if MFA has been activated by the company first. If it has been activated by the company, the user will be able to choose between either SMS or Authenticator App as their verification of choice but the system will default to SMS when initially activated by the company.
If it has not been activated by the company, the functionality is grayed out.
Note: The user can set up both options, and switch between both if they so choose.
Preferred MFA Strategy - A drop down allowing you to indicate your preferred MFA method, either SMS or Authenticator App. Selecting your preference will automatically toggle on your preferred method (see below). The system defaults to SMS when initially activated by the company.
SMS Toggle - If MFA is enabled, the system will automatically turn on the toggle for this feature. FundMore AI will send a text message containing a code to the user's registered mobile phone number whenever they log into the system.
Authenticator App Toggle - To enable the Authenticator App, follow these steps.
1. Slide the toggle to the right by clicking on it.
A pop up will appear with the QR Code to be scanned by your authentication app on your mobile device. Once the QR Code has been scanned, the app will produce a code.
2. Enter the code generated by the Authenticator App into the input field.
3. Click the ‘Confirm’ button to the right of the pop up.

If you wish to cancel this action, select the ‘Close’ button.
Once the MFA Authenticator App feature is activated, users will be required to enter a code from the Authenticator app before logging into FundMore AI. This additional security step ensures a secure login process for users. MFA remains active per session, it does not time out as long as you remain logged in. As soon as you log out, the next time you log back in, you will need to enter your MFA code.
Once MFA is activated a user can choose between SMS or Authenticator App by changing their selection in the Preferred MFA Strategy drop down but they can not turn it off. It can only be turned off if the Company disables MFA. If the company changes MFA from activate to disable for the user, the options will be grayed out and no MFA will be required when logging in. If it is re-activated at any time by the company, it will again default to SMS but you can easily switch it to Authenticator App by simply toggling on Authenticator App and entering the code generated by the App. You do not need to rescan the bar code if you have the original bar code still saved in your Authenticator App on your mobile device.
If you are unsure about which MFA method you saved, the system will tell you when it sends you the authentication code request. It will tell you it is looking for either an SMS code or an Authenticator App code.
User Settings

In User Settings, you are able to choose your preferred Theme (Light or Dark), choose your preferred Pipeline View (Board or List), toggle Default Read Mode on and off, select which Email Notifications you wish to see, see what User Preferences you have been set up with by your Manager, and any Out of Office notifications that have been enabled if applicable.
Themes
You can change the view of the platform by clicking the Choose Theme drop down and selecting Auto (Follow System Settings), Light Theme or Dark Theme located on the top of the User Settings section.

When the auto option is selected, it will follow the settings set by the company for the platform (either Light or Dark).
Light Theme

Dark Theme

Pipeline View

The Pipeline View can be either in Board (Kanban) View or List View. The default setting for each user can be set in the User Settings section. This gives the user the ability to customize the view of the Pipeline View according to their preference.
Board View


List View


Default Read Mode
By default, the FundmoreAI system remembers the last state of a widget. If a user enters edit mode in a widget within one application and then navigates to another application, the corresponding widget in the new application will also open in edit mode.
To prevent accidental edits, users can enable a "Default Read Mode" in their User Settings. This setting forces all applications to open in read-only mode, meaning users must intentionally switch a widget to edit mode if they wish to make changes.
This feature is off by default for all users (both existing and new).
If a user disables the Default Read Mode, the system will revert to its default behavior: remembering the last mode used. For instance, if a user exits an application while widgets are in edit mode and opens a new application, those widgets will remain in edit mode in the new application.
Before navigating to another application, the same widget in the new application will still be in edit mode.

Email Notification Settings
Email Notifications are alerts that users receive from the platform when they are assigned to an application. These notifications are based on the notifications table provided below. Notifications are sent out via email and in app (notification bell in the top right corner of dashboard). When the check box associated with a notification in the same line is checked, it will enable the email notification only. You can disable the email notification by unchecking the same box. Disabling notifications stops the email notification but not the in app notifications, and can be a way to manage “noise”.
Below is a current list of email notifications.
Note: Email notifications are not activated in Preview environments - only in production environments.

View User Preferences
When the View User Preferences button is clicked, a grayed out pop up will appear. In the pop-up window, you can see how the company has set up your User Preferences and Out Of Office details.
Note: The Preferences tab is greyed out and locked to edits. It is for reference only. User’s preferences are set by Admin Managers in the Manager Portal. The Out Of Office tab is open to edits and Users have the ability to action their own Out Of Office settings as needed.
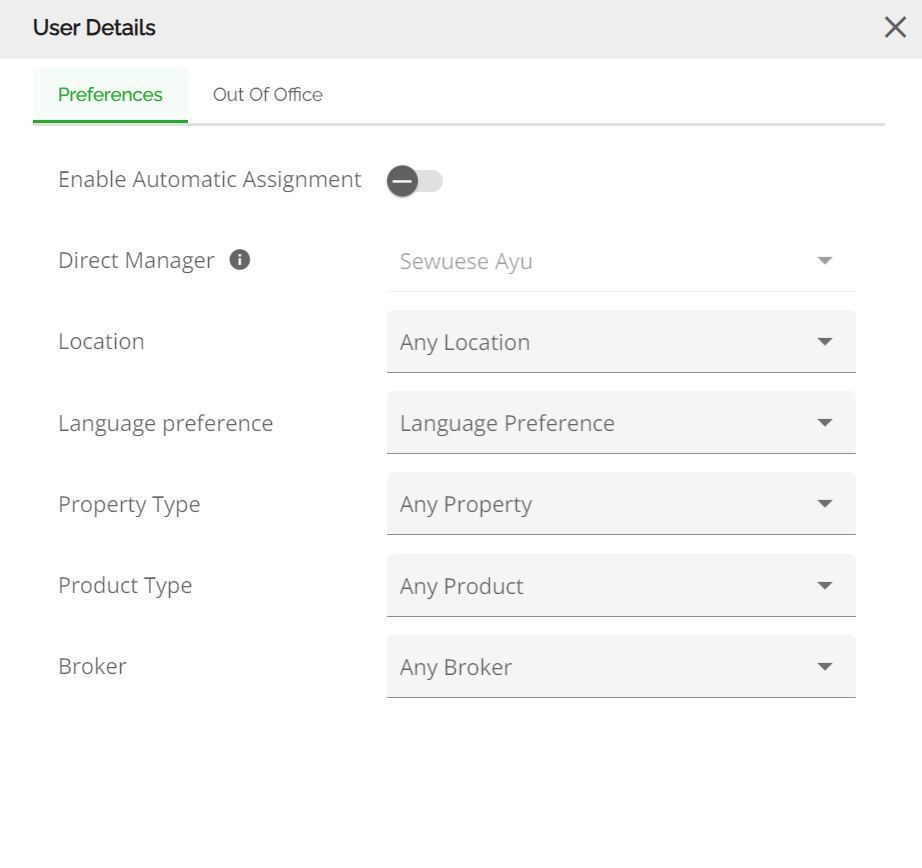
Preferences
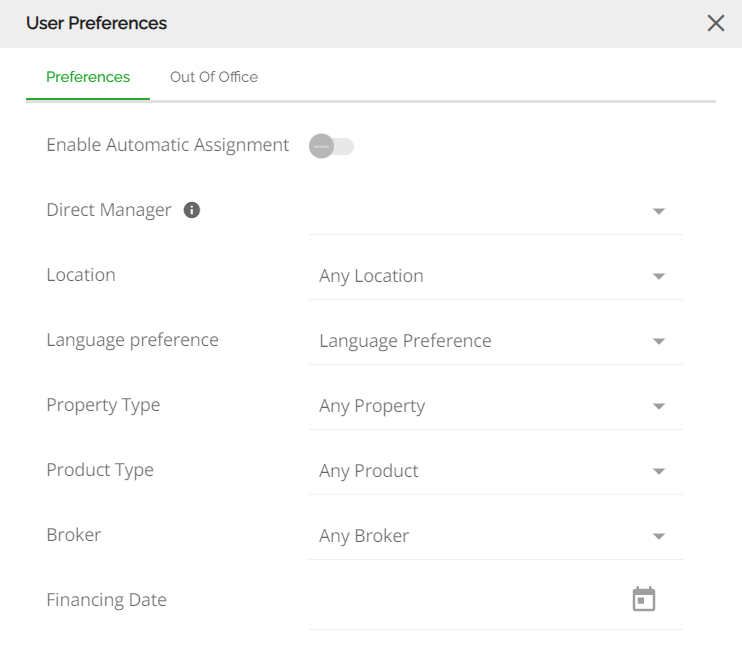
User Preferences displays any criteria specific to particular lending authorities you may have been granted. The fields displayed include: Enable Automatic Assignment, Location, Language Preference, Property Type, Product Type, Broker, and Financing Date.
Note: This is view access only for the user so they can reference what their authorities are. Any changes need to be completed by the user’s Direct Manager or an Admin user that has access to the Manager Portal.
Enable Automatic Assignment Toggle - Enabling automatic assignment means that applications will be assigned to users based on the preferences below the company has set. When the toggle is slid to the right, automatic assignment is enabled, and when it is slid to the left, it is disabled.
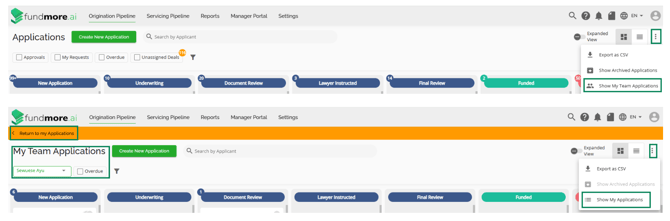
Direct Manager - This field displays the user's Direct Manager. Direct Managers can manage the preferences and out of office settings for their direct reports. Being a direct manager allows anyone with direct reports to easily switch their pipeline view and see & filter the applications for those individuals. When they switch to the pipeline view of their direct report, they have the ability to filter the pipeline view by any of the following:
- All My Team Deals
- Single or Multi-Select between my team members and just see a subset of deals
The Direct Manager will not see the “My Requests” or Unassigned Deals” filters any longer and will see all deals from their own reports. They are able to toggle between their My Team Applications Pipeline and My Pipeline with ease.
Location - Multi or single selected provinces which the user is authorized to work within.
Property Type - Single or Multi select. All property types the user is authorized to work with. Options are based on individual company configurations. I.E. Investment Property, Primary residence etc.
Product Type - All Product Types the user is authorized to work with. The products are set up and specified by the Lender.
Brokers - All brokers the user is authorized to engage with on an application. The brokers are set up and specified by the Lender.
Financing Date - Currently, the financing date is still in development and not actionable.
Out Of Office
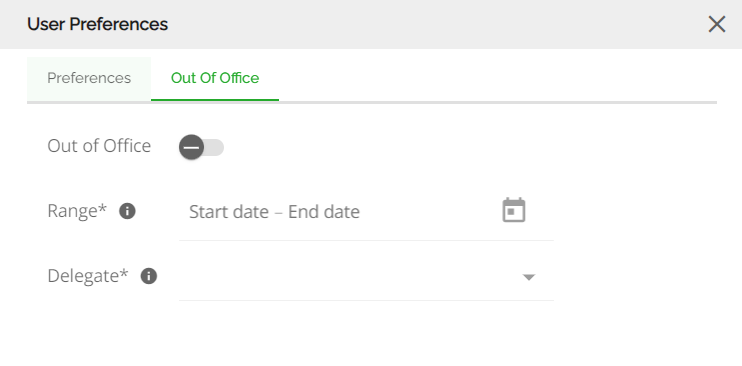
The out of office tab houses the information related to when the user is out of office and not available for automatic deal delegation. The fields in this tab consist of: Out of Office toggle, Range, and Delegate.
Note: This is view access only for the user so they can reference what dates their out of office has been set to, and who has been delegated to receive their deals. Any changes need to be completed by a Manager unless the user has been assigned the permission to edit their own out of office details.
Out of Office toggle - To enable or disable the feature, simply click on the toggle. When the toggle is ‘on’, it will be highlighted in color with a check mark, indicating that the feature is enabled (OOO is turned on). Conversely, when the toggle is slid to the left, it will be displayed in gray with a minus sign, indicating that the feature is disabled (OOO is turned off).
If turned on, the system will automatically start assigning deals to the delegate when the OOO period begins. Furthermore, the user that is away will not show as an eligible selection when anyone is attempting to assign them to a role in any applications during the time they are away.
The system automatically turns the toggle off once the OOO period ends, so users are no longer shown as away after their return date.
Range - Select your start date and end date and it will highlight the range selected in green. All new applications created during this date range will automatically be assigned to the individual you selected as the delegate once OOO is toggled on. Also, you will not appear in the list of available DLA approvers during the OOO period, if applicable.
Note: The time for the day is set to end of day PST. In the system, it is 9pm PST.

Delegate - This will be the user any new applications will be assigned to while the user is Out of Office. You can either search for a delegate in the Search field, scroll through the list of populated delegates, or, click on the funnel to filter by role.
When enabling OOO, the delegate will be assigned to the team list on appropriate deals if:
- An OOO start date has been selected.
- The setting to "Automatically replace out of office users with their delegates" is enabled for the tenant (i.e. the company).
The delegate will receive automatic email notifications when they are assigned by the OOO user. Deals will show up in the delegate’s queue when they are assigned to them and they will be able to take action on them based on their permissions. Delegates will remain assigned to deals until the OOO period ends. Once the OOO is turned off, the delegate will automatically be unassigned from the deal.
When disabling OOO, the delegate will be unassigned from the team list on appropriate deals if:
- The day OOO is turned off is between the start and end date of the OOO range initially set.
- The setting to "Automatically remove delegates from delegated applications when out of office is turned off" is enabled for the tenant (i.e. the company).
When a user is out-of-office, their assigned delegate will automatically inherit the user’s lending limits, ensuring approvals and deal assignments continue without disruption. Key updates include:
- Delegates now automatically see and use the correct lending limits when covering for an out-of-office manager.
- Approvals follow the delegate’s updated limits so deals can keep moving without delays.
- Automatic assignment takes delegated limits and team rules into account for smoother workload distribution.
- Approval buttons now match the delegate’s authority, avoiding blocked actions.
Delegated limits and responsibilities automatically revert once the original manager returns, ensuring business continuity without manual intervention.
A direct manager may not have access to the Manager Portal, but they are able to edit their teams OOO delegate configuration. We have designed the Team Settings tab so that when a user is a direct manager, they have an extra section with all their direct reports listed. They then have the ability to edit the user preferences for their direct reports which includes Automatic deal assignment preferences, and OOO.


Team Settings
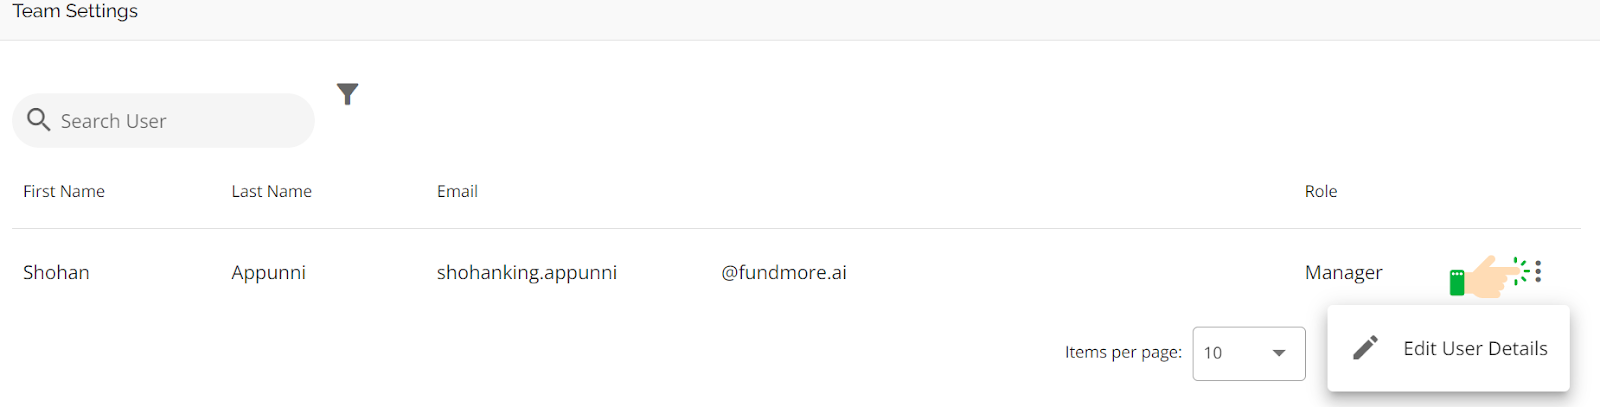
The Team Settings section contains a list of direct reports, where applicable. If a user has team members but they do not have access to the Manager Portal, they need the permission “Update User Account” to be able to manage the Preferences and Out of Office settings of their team members. The information includes their First Name, Last Name, Email and Role. To make it easier for you to manage your direct reports, we have also included list filtering and search capabilities within this section.
Within this section, a user (usually a Manager) with direct reports is able to manage the preferences and out of office settings for each team member. To do so, click on the in-line ellipsis to the right of the row containing their information. This will open a pop-up dialog box where the details of the direct report can be edited. This pop-up is identical to the one presented when the “View User Preferences” button is clicked, and functions the same. The only difference between the two is the view in ‘View User Preferences’ is specific to the user while the view from the direct report’s ellipsis is specific to the direct report and any edits apply to the selected direct report. To learn more about this, refer to the View User Preferences section, which is divided into the Preferences and Out of Office sections.
Please note that a manager can enable editing of the "Direct Manager" field by going to User Profile > Team Settings > Edit User Details. It will then update and sync to User Management in the Manager Portal.This reduces dependency on admin access for team structure maintenance.