Table of Contents
Broker Management and System Permissions
Broker Management Items, Description & Functionality
Adding a Broker in Manager Portal
Multi or Bulk Verification (Unverified Tab Only)
Blocking Multiple or All Unverified Brokers (Unverified Tab Only)
Deleting Multiple or All Unverified Brokers (Unverified Tab Only)
Introduction
The Broker Management section in the Manager Portal allows lenders to efficiently manage their broker list. Key features include adding new brokers, editing broker details, assigning and updating risk scores, updating broker statuses (i.e. Verified or Unverified, and Approved or Blocked), and deleting a broker.
The broker’s list is divided into two segments: Verified and Unverified. Verified Brokers are those that are already entered into the system and confirmed as valid. These brokers can have a status of either Approved or Blocked. On the flip side, Unverified Brokers are brokers not currently in the system but who have submitted an application to the lender. The system automatically adds them to the unverified list, flags their name in the application, and updates the unverified list count in the Broker Management section. This serves as a visual cue for the lender to verify and approve or block the broker. This will be discussed in more detail within the guide.
Broker approval is a manual process. Typically, when onboarding, lenders upload their list of active brokers directly into the verified section. Subsequently, when an application is received, the system cross-references the submitting broker(s) against the Broker Management list.
Broker Matching
Note: This matching logic works for both agents and submission agents.
The following fields are used for broker verification matching:
- First Name
- Last Name
- Firm Code* (optional; see below)
- License Number** (optional; see below)
*Firm Code Matching (Optional). Defaults to disabled
- Matching by firmCode is a configurable tenant setting.
- We use strict equality for matching. Meaning the Firm code needs to be an exact match.
- If enabled: this check is included in the fields above.
- If disabled, this check is not included in the fields above.
**License Registration Number Matching (Optional). Defaults to disabled.
- Matching by License Number is a configurable tenant setting.
- If enabled: First check is performed using licenseRegistrationNumber.
- If this flag is disabled, this check is not performed.
If any of these fields do not align with the records in Broker Management, the system adds the broker to the unverified list as a new entry.
Unapproved or unverified brokers that are not already in Broker Management can still be linked to applications, but only through manual addition at the application level. When added this way, they will automatically be listed in the "Unverified" list in the Manager Portal and will remain unverified until their status is updated. The system will provide visual indicators to highlight the broker’s unverified status at the application level.
Users require the permission ‘Add stakeholder to application’ to be able to add a broker at the application level. Without this permission users are unable to add any stakeholders to the application.
Broker Management can be found in the Manager Portal. To find it:
- Navigate to the Manager Portal from the top menu.
- In the Manager Portal, select Broker Management from the left sidebar.

Broker Management and System Permissions
Access to the Manager Portal, including the Broker Management section, is determined by user permissions. Permissions can be customized in the Roles and Permissions Management section to provide specific access to users based on their roles and responsibilities, ensuring that access is tailored and secure.
Lenders can grant specific permissions to users who need to manage brokers within the system. The "Manage Brokers in Manager Portal" permission grants users access exclusively to the Broker Management section. This setup hides other sections of the Manager Portal, including history logs, from the user's view. It is designed for users who need to handle broker-related tasks without requiring broader access to the system. On the other hand, the "Manage System Configuration" permission provides unrestricted access to the entire Manager Portal, including all sections and features.

For instance, if a Business Development Manager (BDM) only needs to oversee the Broker Management section, the "Manage Brokers in Manager Portal" permission can be activated for their role, while the "Manage System Configuration" permission is disabled. This ensures the BDM can focus solely on managing brokers without access to unrelated system configurations.
Below is a depiction of the Manager Portal interface for a user restricted to Broker Management access:

Broker Management Items, Description & Functionality
Search Box - Located on the top left of the section just below the top header ‘Broker Management’. In the search box, you are able to enter text/keywords related to the previously created brokers in either the Verified or Unverified list. All Brokers with the search criteria will appear in a list below.

Sort Functionality - You can sort the list by ascending or descending order. Simply click on the arrow icon next to the column header you wish to sort by. When the arrow points upwards, the list is sorted in ascending order; when it points downwards, it is sorted in descending order. The arrow in the sorted column will remain fixed, indicating your chosen criteria.


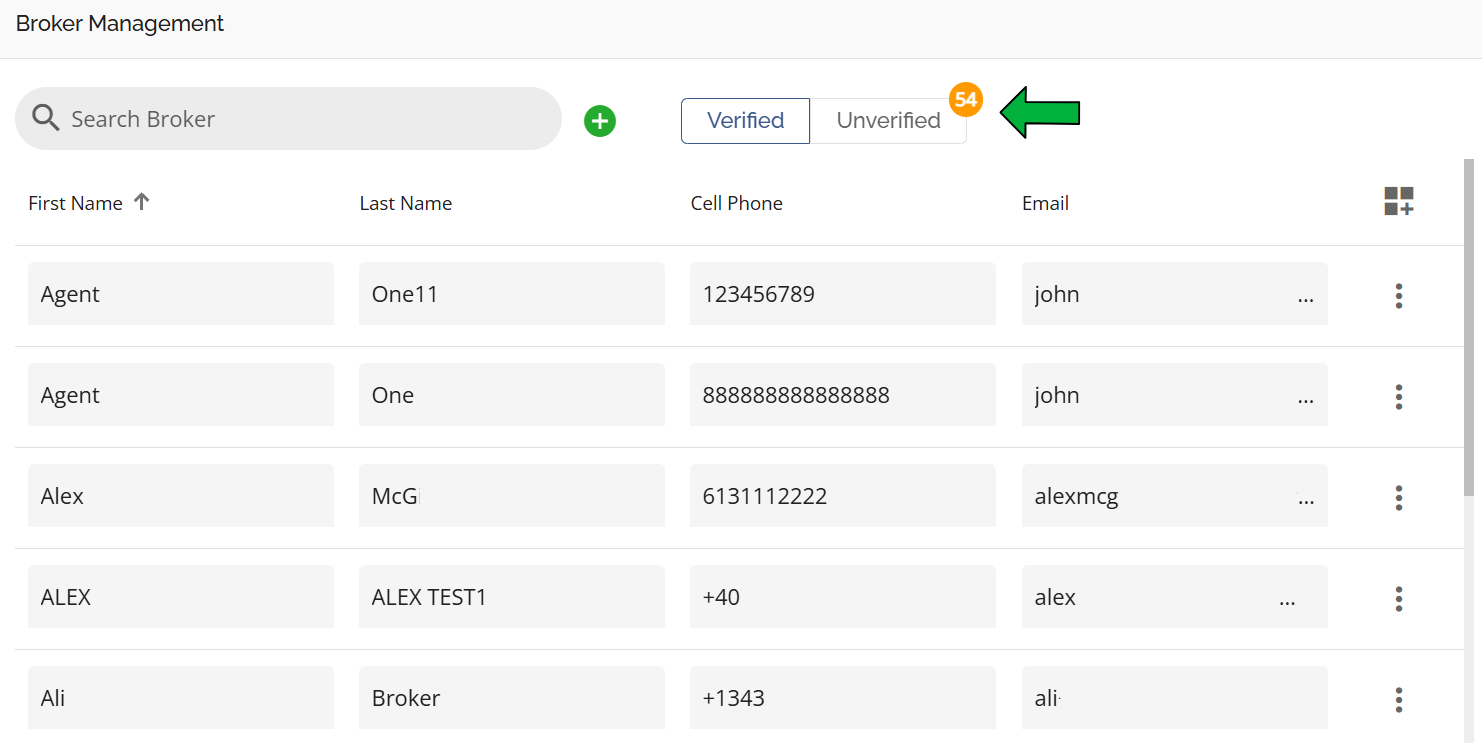
Verified/Unverified Buttons - These tabs list the brokers that are either verified or unverified. Selecting either the Verified or Unverified options will show the brokers in a list view in their respective tabs. The orange-colored counter on the top right of the unverified tab indicates the number of unverified brokers in the system. It serves as a visual indicator for system administrators, highlighting brokers in the unverified list that require attention.

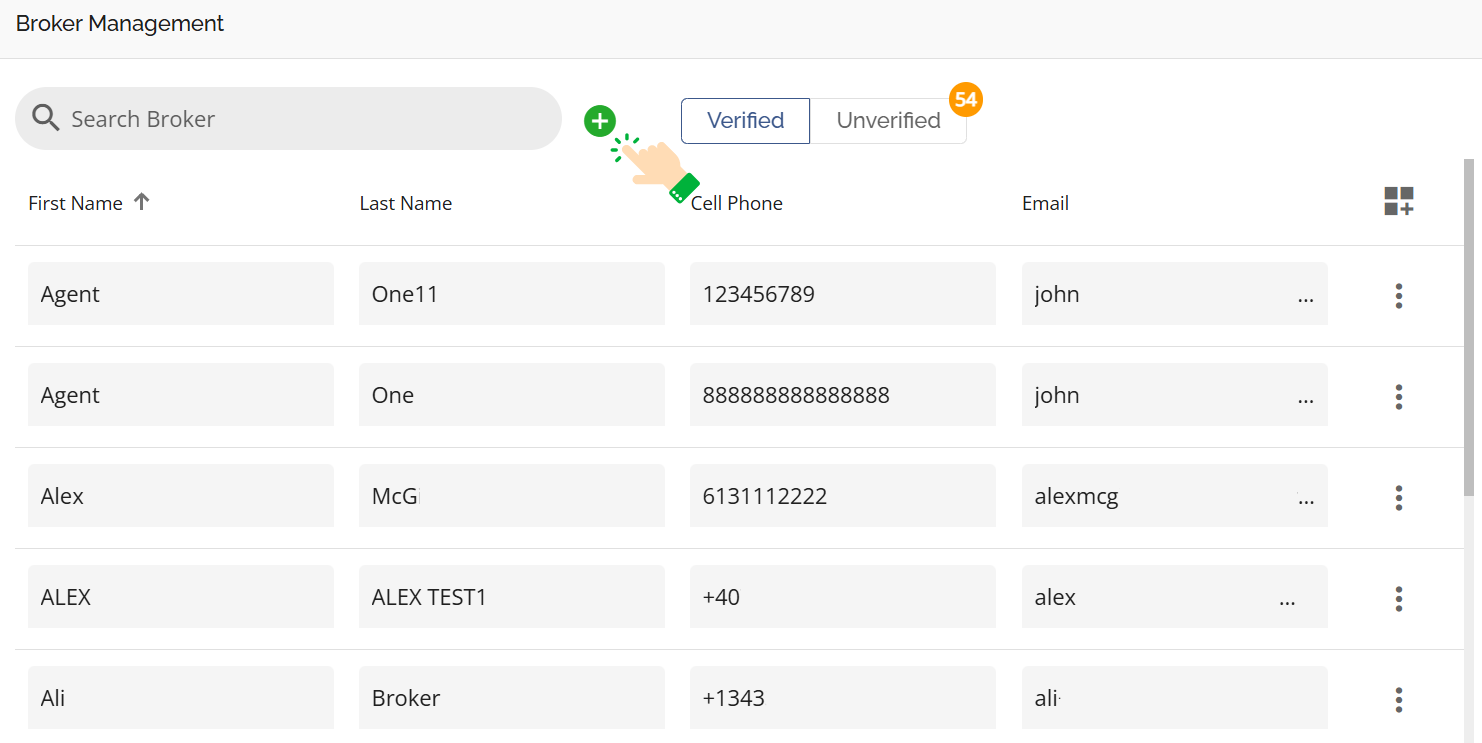
‘Add a New Broker’ Button - Enables you to add a new broker. When selecting this button a pop up will appear with fields to input data. The fields consist of: First Name, Last Name, Cell Phone, Email, Brokerage, Risk Score and Approved checkbox. All fields with the exception of the Approved checkbox are mandatory. When adding a new broker it will default to the Verified list. If you do not check the approved checkbox your entry will default to Blocked.

You cannot enter a new broker in the Unverified list.

Scroll Bars - - Depending on the size of the screen, these will be located at the bottom of the list of brokers and to the far right of the screen. Use these to scroll horizontally or vertically to see what does not fit on the page.
Items Per Page - Depending on your list, you may have more than one page of brokers. To navigate through pages use the ‘Items per page’ navigation at the bottom right hand side of your screen. With this functionality you can indicate how many items per page you would like to see - 10, 15, 25, 50, or 100. You can also see how many pages there are and scroll forwards and backwards through the pages.

Customize Table Button - This functionality enables users to select the specific columns they want to view in the table and arrange them in their preferred order. Here is a video demonstration of the steps outlined below: Customize Broker Management Table.

To customize the Broker Management table, follow these steps:
- Click on the Customize Table icon.
- A sidebar will appear on the right side of the screen.

- Select which columns you want to display in the table by checking the corresponding checkboxes next to the column names.
- To rearrange the order of the columns, hover to the left of the checkbox. When the drag icon appears, click and drag it to your preferred position.

- Once you close the sidebar, the broker management table will automatically update to reflect your selections and column arrangement. Your changes will hold until new changes are made.
Broker Management Fields
Note: If any of the Broker Management fields discussed below are not visible in your view, it may be due to how the table is customized.
These are the key data fields used to manage and track brokers within the system. These fields include:
First Name - The first name of the broker. Passed to FM via POS. 1st data point used in broker matching.
Last Name - The last name of the broker. Passed to FM via POS. 2nd data point used in broker matching.
Cell Phone - The cell phone number of the broker.
Email - The email address of the broker. Passed to FM via POS. 3rd data point used in broker matching.
License Number - The license number of the broker. Passed to FM via POS if applicable (not a required field in the POS system and not applicable in all provinces). This field can be edited if necessary. May be the 1st data point used in broker matching (if tenant setting is enabled).
Brokerage - The brokerage which the broker works for. Passed to FM via POS.
Risk Score - The risk score of the broker. This is a rating functionality completely at the discretion of the lender and is for informational purposes only. It will not impact the workflow of applications. Values range from 0 - 5 with 0 being the least risk and 5 representing the most risk. The risk score is managed in the Manager Portal and is visible within applications in the pipeline. If you do not wish to use this functionality, simply assign all brokers with the same score i.e. 0.
This functionality was built with the original intention that lenders would use this as a scoring mechanism when they needed to indicate a strike against a broker for whatever reason. Brokers would start out with a risk score of 0 and for each “incident” the risk score would increment until the maximum of 5 was reached at which time they would most likely Block the broker.
Verified Checkbox - Appears in the Unverified list only. This checkbox is used to indicate if the broker is verified. It is to be selected if the broker has been reviewed by the lender. If it is not checked, it means this lawyer has not been reviewed by the lender or is new to the lender.
Status - Appears in the Verified list only. This field indicates the status of a verified broker. There are two options: Approved or Blocked. If a broker is approved, a green approved icon will appear inline with their information. On the flip side, if a broker is blocked, a red icon will appear inline with their information.
| Approved: | Blocked: |
 |
 |
CPS Code - A unique code specific to one lender. Leave this blank if it means nothing to you.
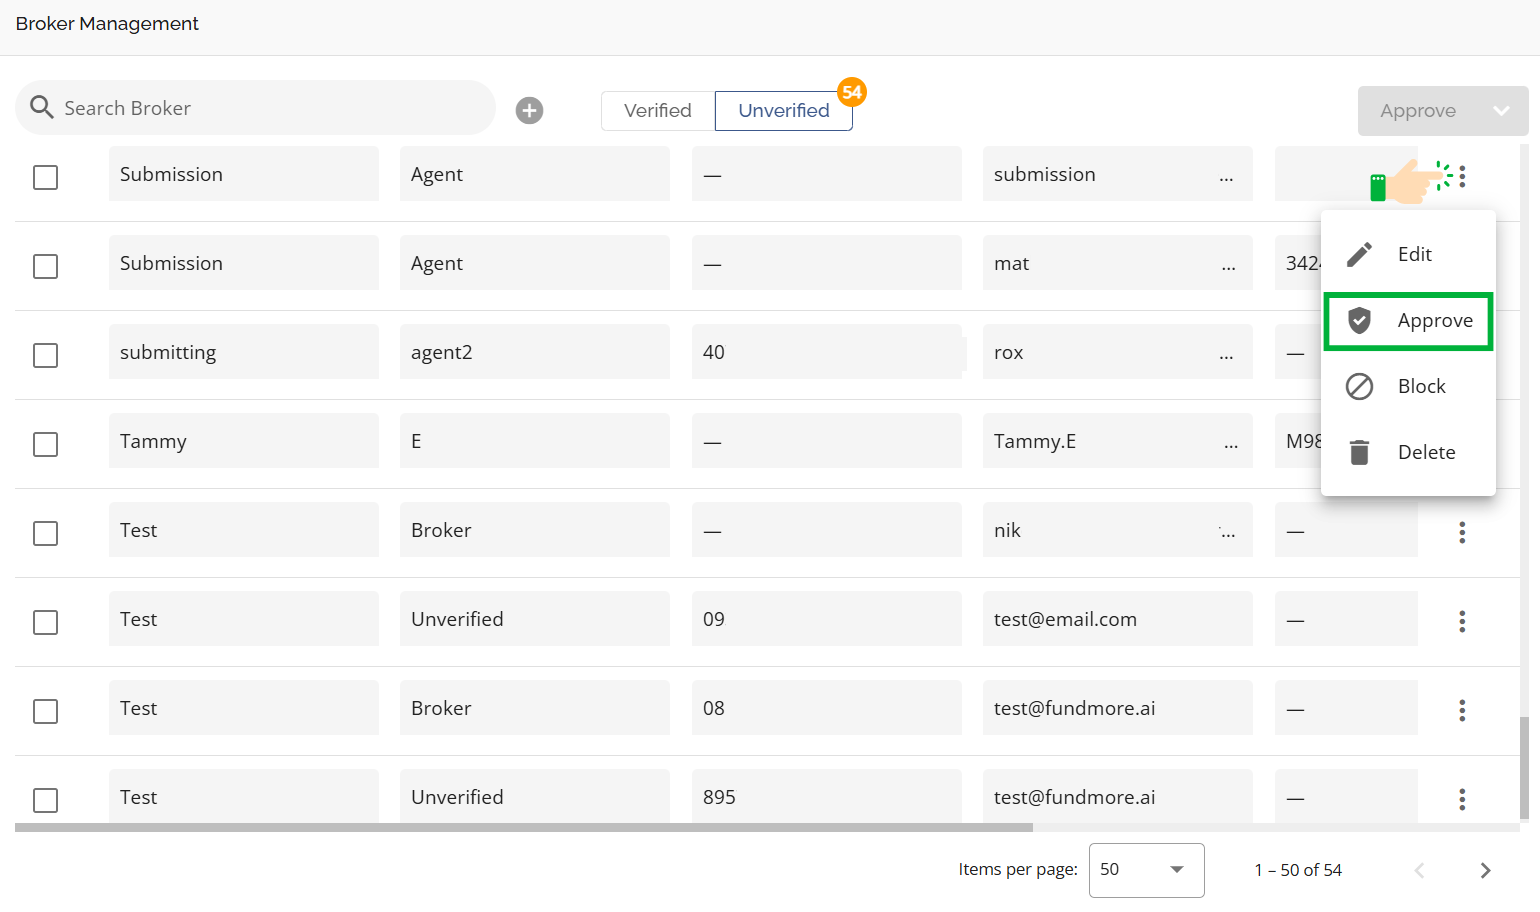
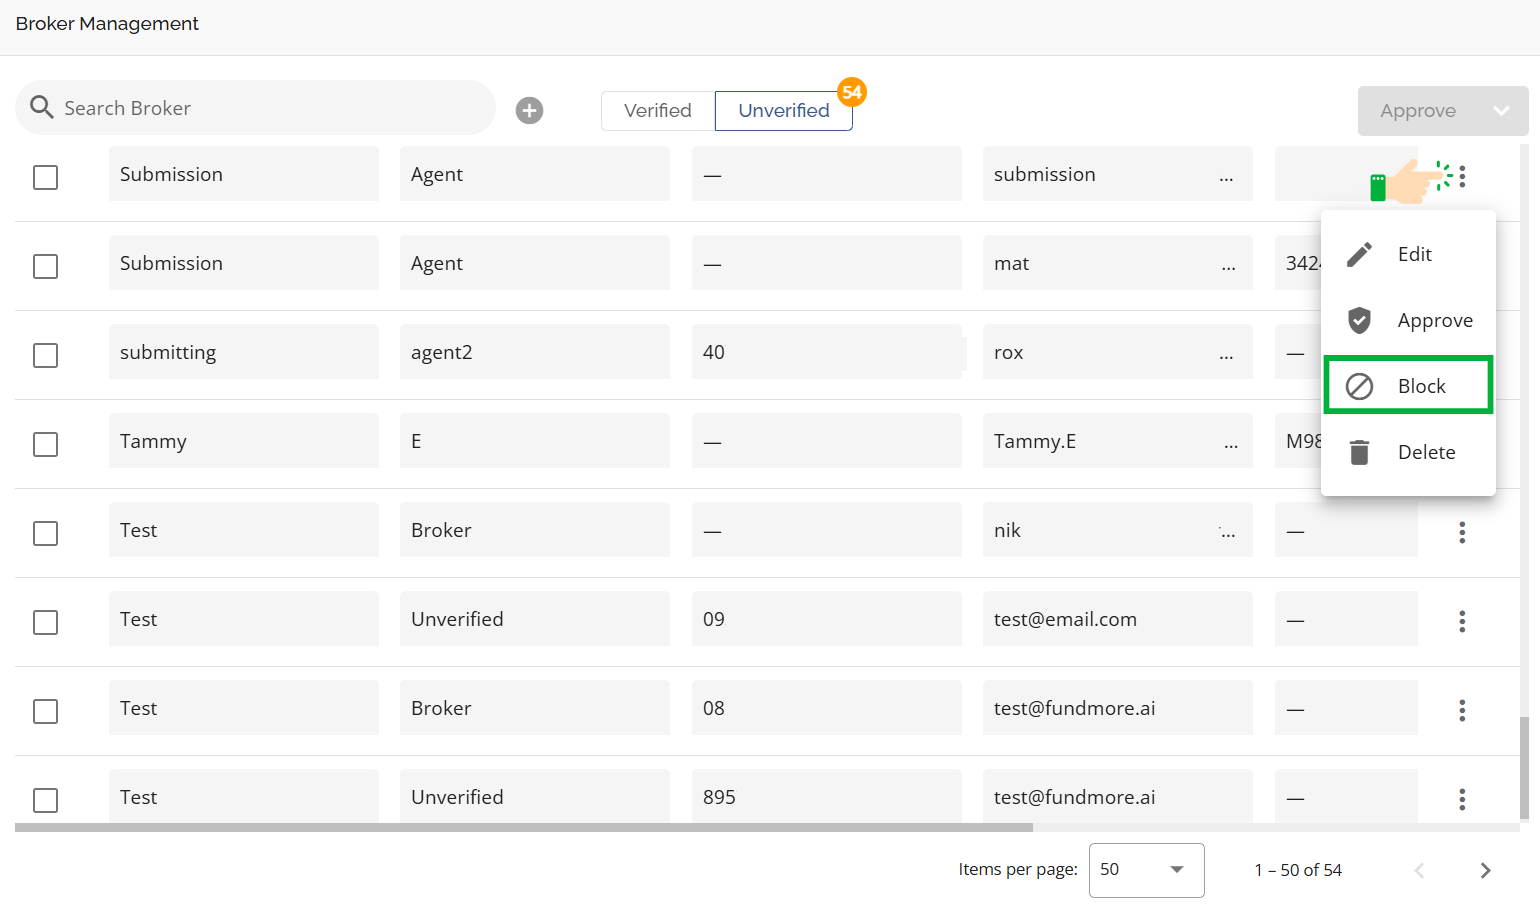
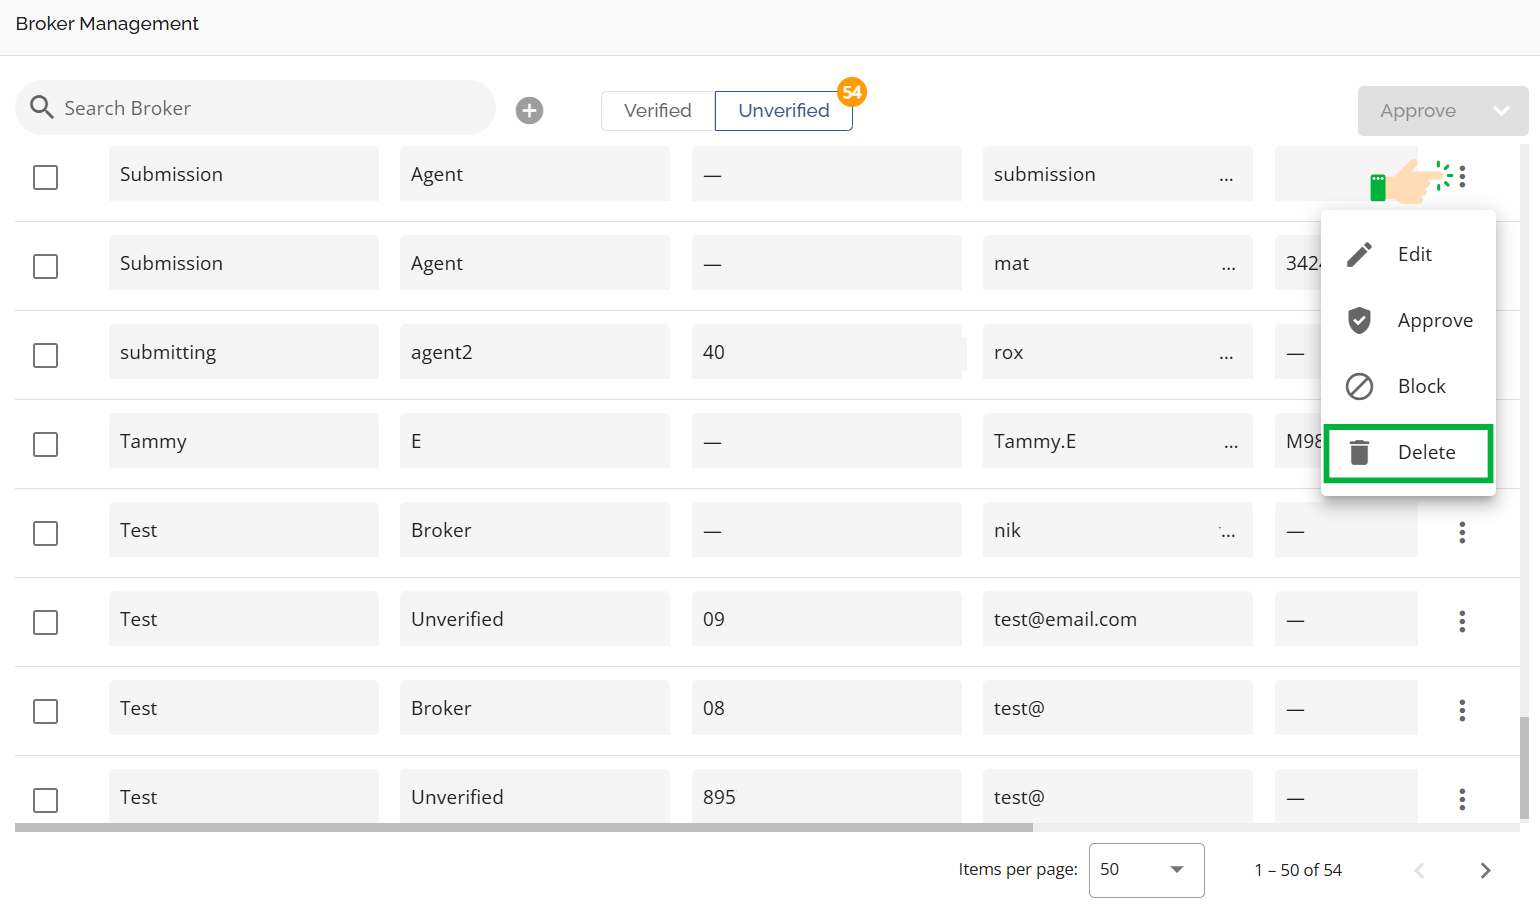
Ellipsis - Clicking on the ellipsis opens up a dropdown menu with four options: Edit, Approve, Block, Delete.
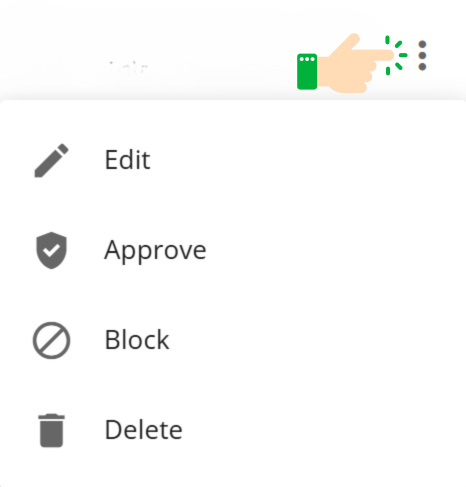
Approve - Marks a broker as approved.
Block - Marks a broker as blocked.
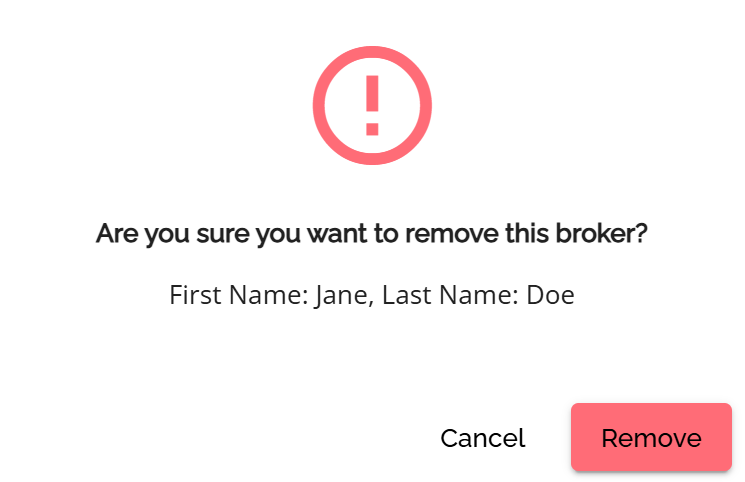
Delete - This is used to remove the broker from the system. Selecting this option will open a pop-up window asking the user to confirm their action. Click on the Remove button to permanently delete the broker. Alternatively, you can click on the Cancel button to cancel the action.
Note: When a broker is deleted from the system via the Manager Portal, their information is removed from the Broker Management list, ensuring they no longer appear in any category, Verified or Unverified. If that broker is associated with a deal, their information will remain linked to that deal. The system will simply flag such brokers as unverified at the application level, providing a clear indicator that their status requires attention.
Edit - Opens up an expanded view of the Broker Details. Within this interface, there are three tabs: Overview, Contact, and Address.
- The Overview tab displays general details about the selected broker, including First Name, Last Name, Brokerage, Firm Code, Client Risk Score, License Number Source, Client Type, Notes, Block Reason (blocked brokers only), & CPS Code (client specific). All information in this tab is editable. Any changes made are automatically saved.
The Firm Code is passed from the POS to FM during ingestion.

- The Contact tab displays the contact information for the selected broker, including their Email, Cell Phone, Work Phone, Home Phone, and Fax Number. Users are able to update this information and indicate what the broker’s preferred contact method is. Any changes made are automatically saved. These fields are populated based on the information passed from the POS at ingestion of the broker’s initial application into the LOS. It can then be manually updated by users that have permission to access and update the data in Broker Management. Any subsequent submissions that do not match the data in this tab will trigger the creation of an Unverified broker entry in Broker Management.

- The Address tab displays the broker’s address and type of address. Within this tab, users can add broker address information and indicate which address is the current address in the case of multiple addresses. Users can easily search for addresses due to our integration with Google Maps, ensuring a smooth and more reliable experience. All information in this tab is editable. Any changes made are automatically saved. To delete an address from the list, simply click on the in-line ellipsis and select the Delete option.


Adding a Broker in Manager Portal
To add a broker to the list, follow these steps:
-
Click on the Add New Broker button.
-
Enter the relevant information in the pop-up window. This includes their First Name, Last Name, Cell Phone, Email Address, Brokerage, and Risk Score (from 0 to 5). Following these fields is the ‘Approval’ checkbox, which is an optional field at this point.

-
Once all fields are completed, select the Create Broker button.
Note: When adding a new broker if you do not check the approved checkbox your entry will default to Blocked.

Note: When adding a broker, the system currently does not notify users if the broker is already in the system. If the details entered exactly match an existing broker's record in the Manager Portal, the system will return an error:

However, slight variations in details, such as a different email address or phone number, may result in a duplicate entry. It is the responsibility of admin-level users to periodically clean up duplicate entries in the system to maintain accurate records.
Brokers added manually can only be added to the Verified section. The thought process here is that if the lender is manually adding a broker, they are already verified. The Add New Broker button is disabled in the Unverified section, as this section is automatically populated with the details for any new broker who submits an application via a POS system. The term ‘new broker’ refers to a broker that is not currently listed in Broker Management, or one whose details do not fully match entries already in the system i.e. First Name, Last Name, and Email.
Verify or Approve a Broker
To verify or approve an individual broker, follow these steps:
- Navigate to the Broker Management section in the Manager Portal.
- If the broker is not verified, go to the Unverified tab. Otherwise, remain in the Verified tab.
- Locate the broker you intend to verify or approve.
- Choose one of the following options:
Option 1 (Unverified Tab Only):
- Use this option to simultaneously verify and approve an unverified broker.
- Click the checkbox next to the broker’s name.
- Once selected, the Approve button at the top of the page will be enabled.
- Click the Approve button or the down arrow next to it to select “Approve” from the dropdown menu.
- Once Approved, they will automatically be moved from the Unverified list to the Verified list with the Approved Status.
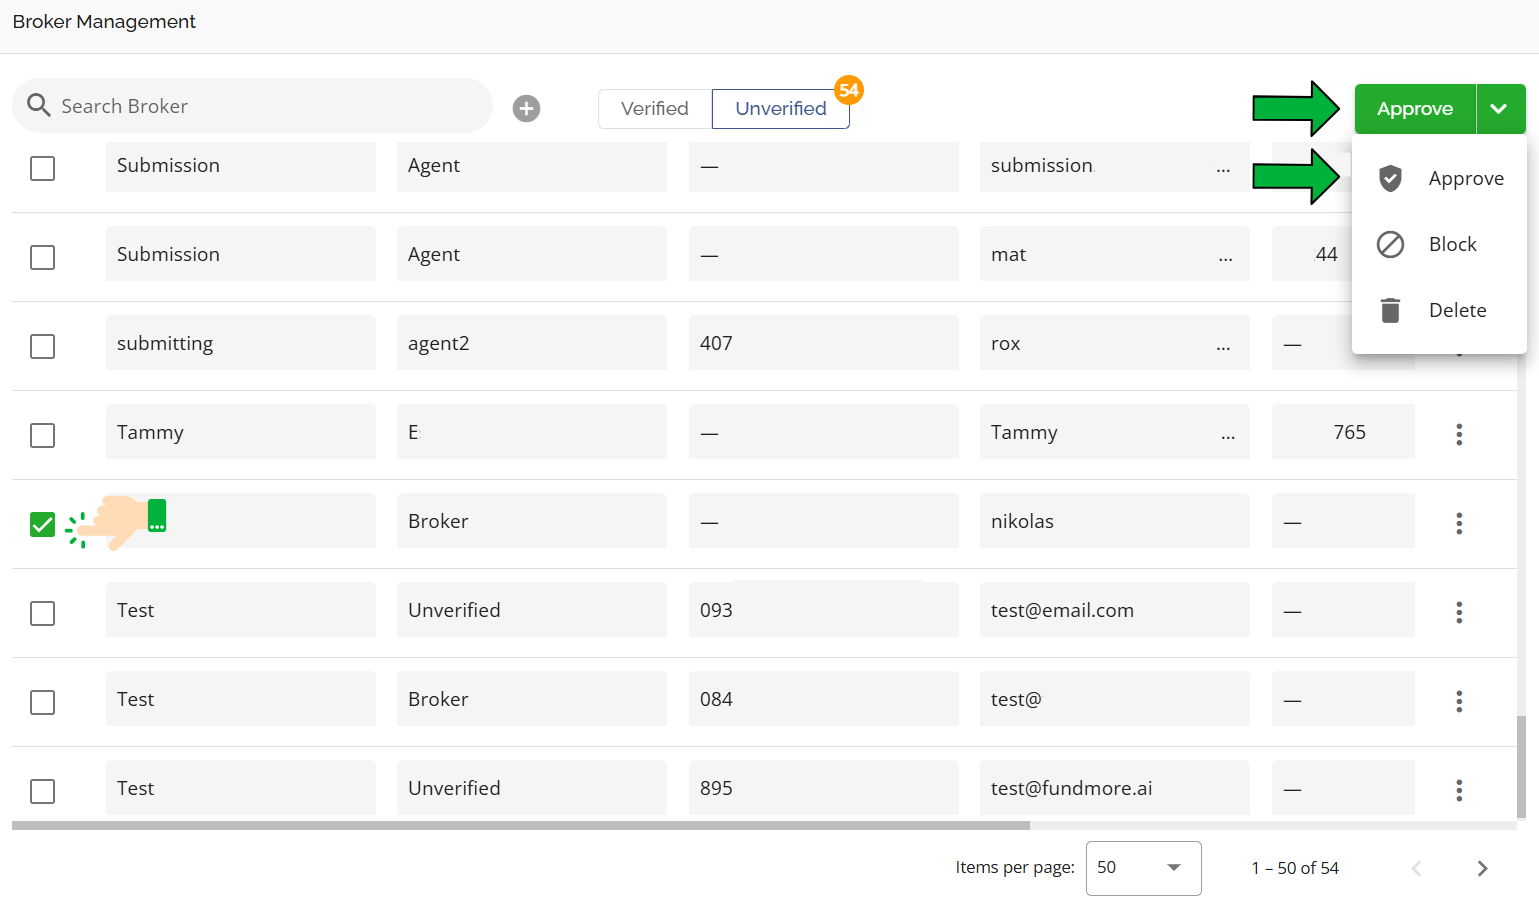
Option 2 (Both Verified and Unverified Tabs):
- Use this option to approve a verified but blocked broker or to simultaneously verify and approve an unverified broker.
- Click the inline ellipsis next to the broker’s name.
- In the dropdown menu, select the “Approve” option.
If the broker was unverified, they will automatically be moved from the Unverified list to the Verified list with the Approved Status. If the broker was verified but blocked, their status will be updated to Approved.
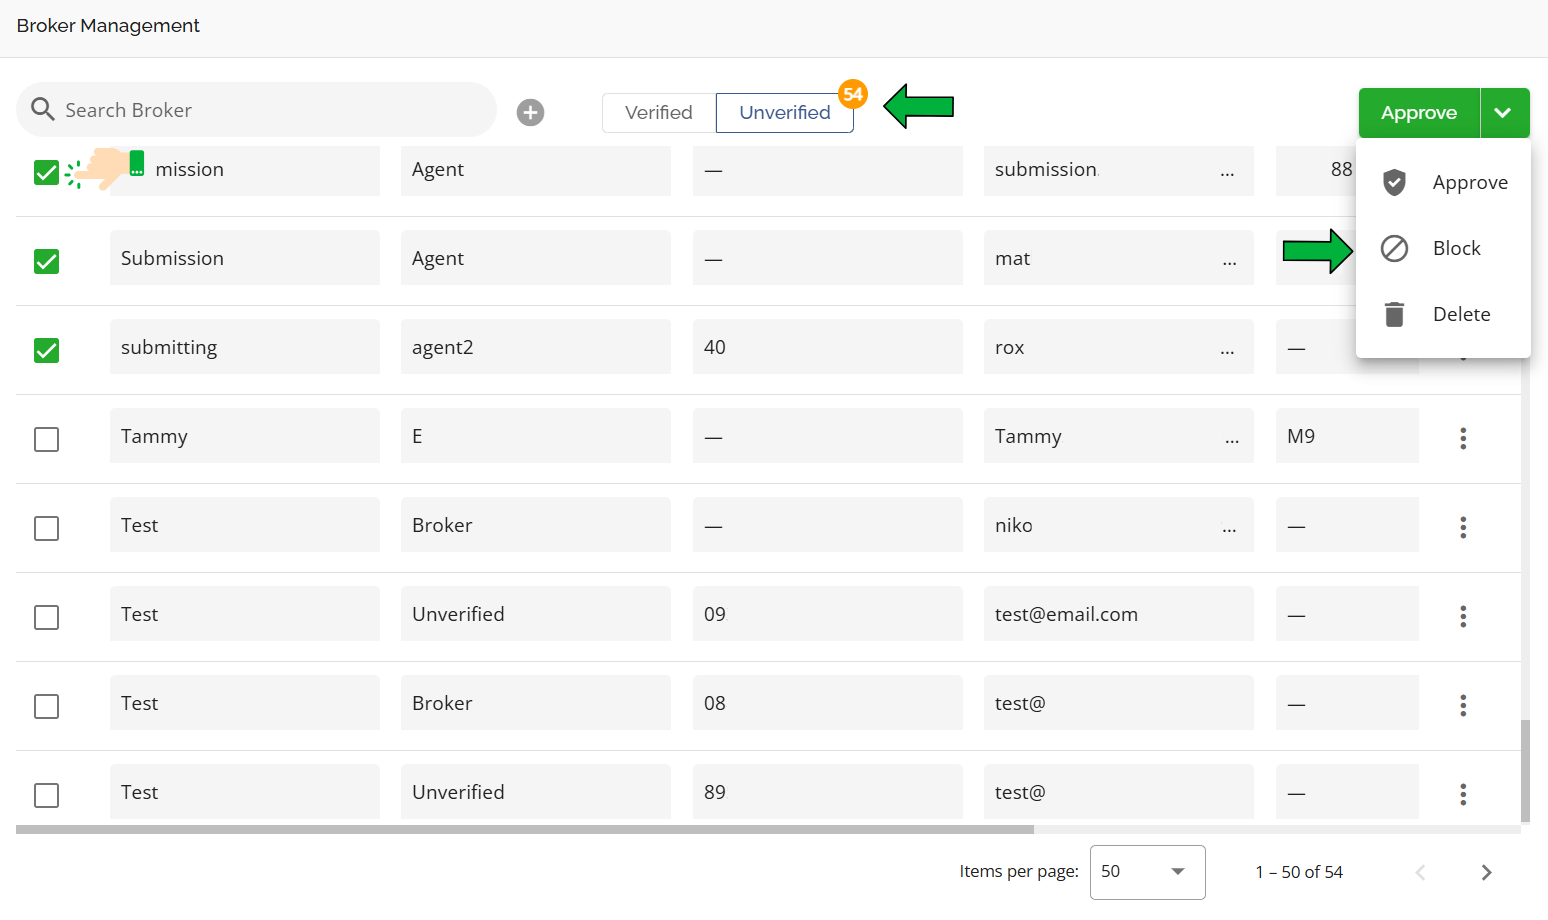
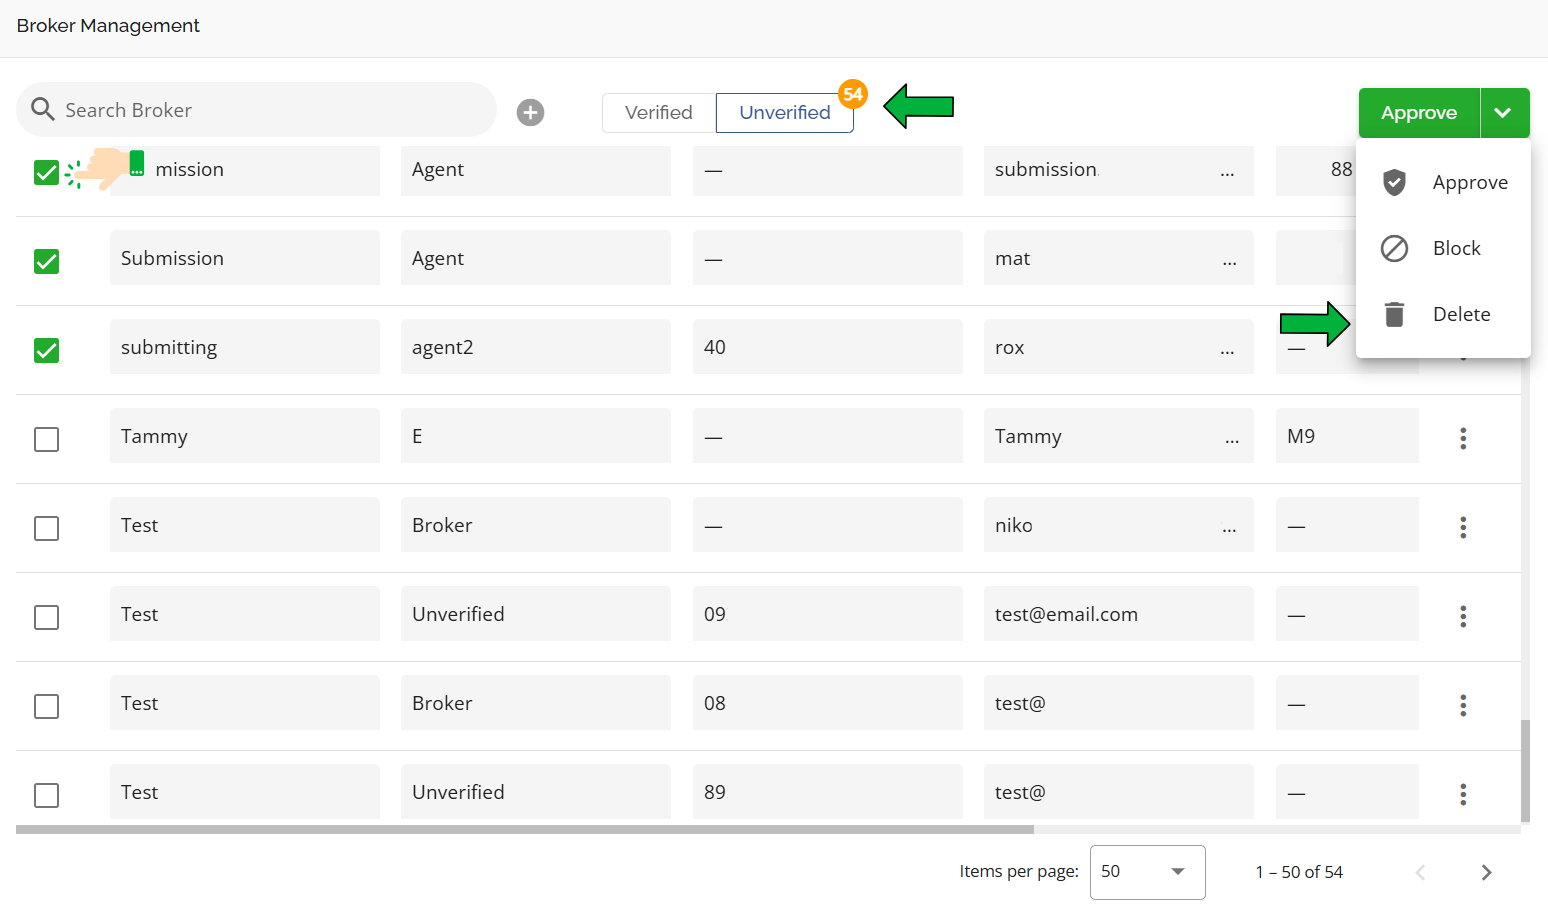
Multi or Bulk Verification (Unverified Tab Only)
To verify and approve several brokers simultaneously:
- Navigate to the Broker Management section in the Manager Portal.
- Select the Unverified tab.
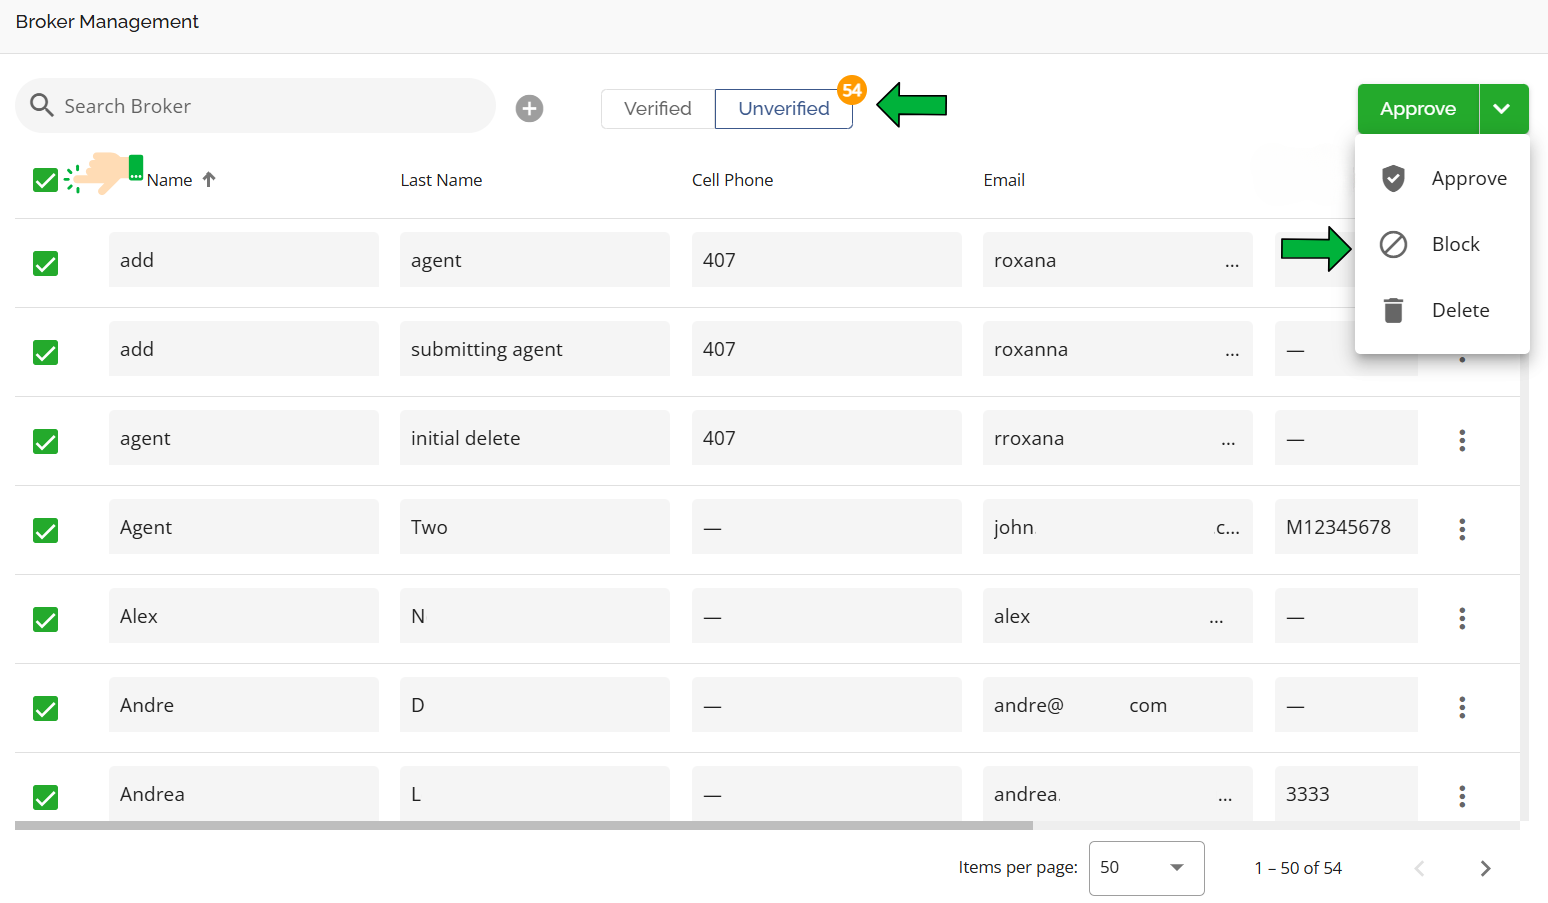
- Click the checkbox next to the name of each broker you wish to verify. To select all brokers in the list, click the checkbox next to the column headers.
- Once brokers are selected, the Approve button at the top of the page will be enabled (go from greyed out to green).
- Either select the Approve button or click the drop down arrow next to the enabled Approve button & select Approve from the dropdown menu.
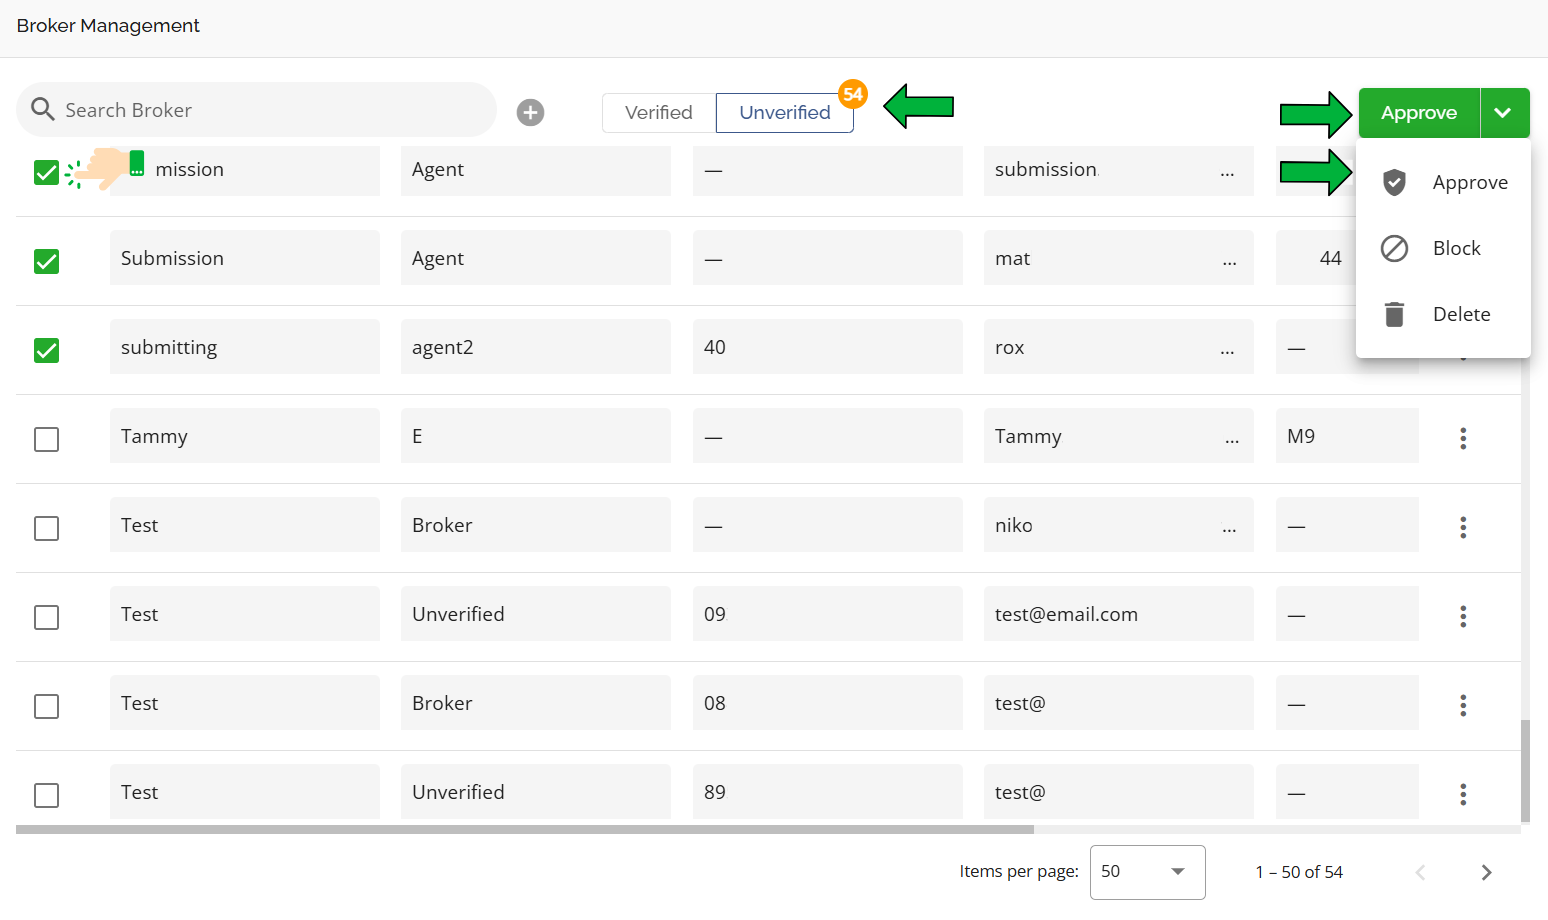
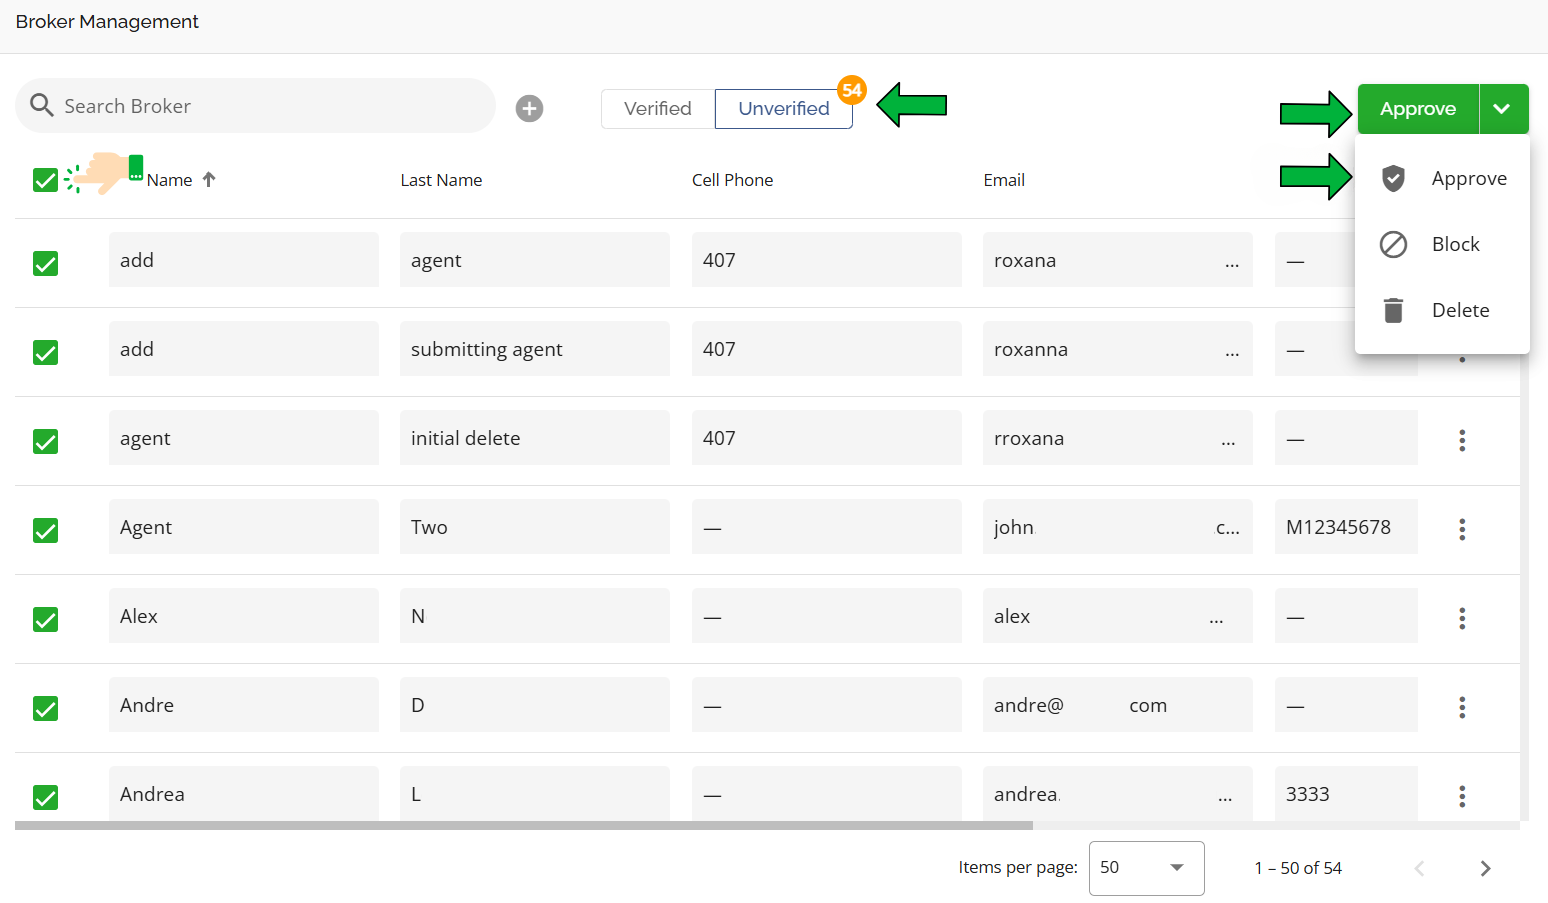
All selected brokers will be verified, approved and automatically moved from the Unverified list to the Verified list with the Approved status.
After successful verification:
- The counter next to the Unverified button will decrease.
- If all brokers are verified in bulk, the counter may disappear entirely.
Note: Once a broker is verified, they cannot be moved back to the Unverified list. To handle this, we have provided functionality for a broker to be verified without being approved (i.e., marked as verified but blocked).
Block a Broker
Blocking Individual Brokers
To block brokers from either the verified or unverified lists:
- Navigate to Broker Management in the Manager Portal.
- Locate the broker you intend to block within the respective list.
- On the far right-hand side of the row, click the inline ellipsis icon.
- In the dropdown menu that appears, select the “Block” option.
- A pop up will show up. Select the reason you are blocking the broker. Note, a reason is required to block a broker to ensure consistency in reporting and decision making. The reason selected will also populate the Block Reason field in the overview tab of the broker profile. Reasons are self-managed via Custom Fields.

- Select Cancel or Block

The block reason will populate in the Broker Details -> Overview Tab beneath the Notes.

Users with access to Broker Management are able to change the block reason if necessary. To do so, they would simply open up the drop down menu in the Block Reason section of Broker Details -> Overview tab and select another option from the list.

If the broker was unverified, they will automatically be moved from the Unverified list to the Verified list with the blocked status.
If a broker’s status is changed from Blocked to Approved the Block reason will disappear from the Block Reason field in the Overview tab.
Blocking Multiple or All Unverified Brokers (Unverified Tab Only)
To block multiple or all unverified brokers:
- Navigate to Broker Management in the Manager Portal.
- Go to the Unverified section.
- Click the checkbox next to the name of each broker you wish to block. If you wish to select all brokers in the list, click the checkbox next to the column headers.
- Once brokers are selected, the Approve button will be activated. Click the down arrow next to this button.
- Choose the “Block” option from the dropdown menu.
- A pop up will show up. You will see that each broker indicated to be blocked is appearing in the list and you are able to select a different reason for each individual broker. Select the reason you are blocking for each broker. Note, a reason is not mandatory to block a broker but is recommended to ensure consistency in reporting and decision making. Reasons are self managed via Custom Fields.

- Select Cancel or Block
The selected brokers will be automatically blocked in the list. If the broker was unverified, they will automatically be moved from the Unverified list to the Verified list with the Blocked status. The block reason will update in each broker’s Overview tab.
Edit Broker Details
Broker details can be edited inline or via an expanded view in both the Verified and Unverified lists. The system will automatically save any updates made.
Note: Edits made to brokers in the Manager Portal will not automatically update or overwrite the information within applications. The 'I' button tooltip updates within an application; however, to maintain data integrity regarding broker commissions, the original broker information on the application will not be automatically overwritten.
Within the application, the broker’s information in the Overview tab of the Stakeholder widget is sourced directly from the POS at the time of ingestion. Although the broker can be updated within the Manager Portal, the details within the application will always correspond to what was ingested from the POS.
Inline Edits
- Navigate to Broker Management in the Manager Portal.
- Locate the broker you wish to edit within the Verified or Unverified list.
- Click directly on the editable fields (e.g., name, email, or other details).
- Make the necessary updates. The system will automatically save the changes.
Expanded View Edits
- Navigate to Broker Management in the Manager Portal.
- Locate the broker you wish to edit.
- Click the inline ellipsis icon to the right of the broker’s line entry.
- In the dropdown menu that appears, select the Edit option.

- The expanded broker details view includes three tabs: Overview, Contact, Address.

- Make the necessary updates in the relevant tabs. The system will automatically save the changes.
Note: If an agent’s license number changes, the lender must request that FundMore update it in the database. After the initial creation, the license number will not automatically update, even if changed in the POS system.
Delete a Broker
Deleting Individual Brokers
To delete brokers from either the verified or unverified lists, follow these steps:
- Navigate to Broker Management in the Manager Portal.
- Locate the broker you intend to delete within the respective list.
- Click the inline ellipsis icon to the right of the broker’s line entry.
- In the dropdown menu that appears, select the “Delete” option.
Deleting Multiple or All Unverified Brokers (Unverified Tab Only)
To delete multiple or all unverified brokers:
- Navigate to Broker Management in the Manager Portal.
- Go to the Unverified section.
- Click the checkbox next to the name of each broker you wish to delete. If you wish to select all brokers in the list, click the checkbox next to the column headers.
- Once brokers are selected, the Approve button will be activated. Click the down arrow next to this button.
- Choose the “Delete” option from the dropdown menu.
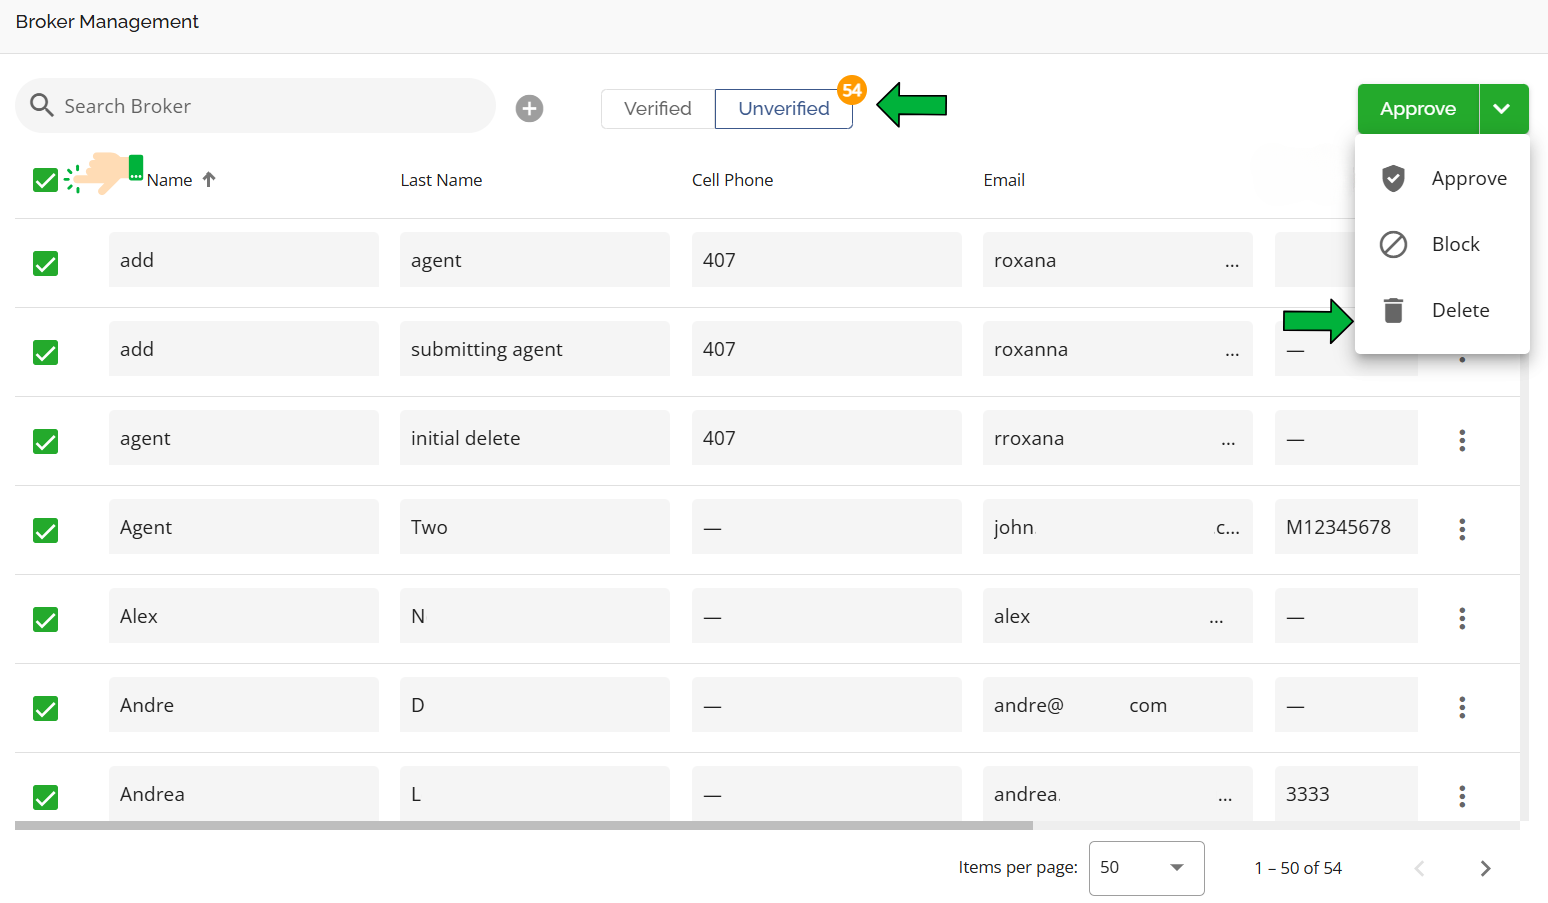
The selected brokers will be automatically deleted from the list.
When a broker is deleted from the system via the Manager Portal, their information is removed from the Broker Management list, ensuring they no longer appear in any category, Verified or Unverified. If that broker is associated with a deal, their information will remain linked to that deal. The system will simply flag such brokers as unverified at the application level, providing a clear indicator that their status requires attention.
Auto-Decline Tenant-Setting
We have tenant-settings available to auto-decline deals from blocked or unverified brokers. These settings are disabled by default. To enable them, you would need to contact our Client Success Team.
There are two settings to consider:
- Blocked with No Auto-Decline Setting: If the lender has not enabled the auto-decline feature, the deal will not be automatically rejected when submitted by a blocked broker. The system will flag the broker with the blocked icon in the application’s Team list and in the Stakeholder’s Details widget. This icon will serve as a visual indicator for users. Lenders are advised to set up tasks within the system to regularly check broker statuses before deal approval, proceeding based on internal guidelines. This workflow is mainly used for blocked brokers.
- Blocked with Auto-Decline Setting: As a reminder, this is a tenant-setting. To have it enabled in your environment, contact the Client Success team.
Lenders can enable an auto-decline feature to automatically decline deals involving blocked or unverified brokers during ingestion. Lenders will need to provide a specific decline reason to be used in the configuration for auto-declines. There are two types of blocks to consider:- Hard Block: This workflow is mainly used for blocked brokers. Deals are auto declined and ingest directly into the declined stage in the pipeline. The system will flag the broker with a red warning icon in the application’s Team list and in the Stakeholder’s Details widget. The broker will receive an email notification indicating the status of the deal, and the status will be updated in the POS. These applications will not be considered in automatic assignment.
- Soft Block: This workflow is mainly used for unverified brokers. Deals are auto declined and ingest directly into the declined stage in the pipeline. Brokers will receive an email notification explaining their status and that they will be contacted by a team member who can provide assistance. The system will flag the broker with an orange warning icon in the application’s Team list and in the Stakeholder’s Details widget.
These features enhance the lender’s ability to manage applications and ensure compliance with their broker approval workflows.
Broker List Export
Managers can now download a full list of their brokers directly from the Manager Portal — no need to contact FundMore to request an extract.
How it works
An Export button now appears in the Broker Management section. Clicking it downloads a CSV file to your browser, named with the date the report was pulled (e.g. 2026-06-02-broker-report.csv). The button is disabled if there are no records to export.
What's included
Each report includes contact details, status, risk score, notes, and a full address breakdown - street, city, province, country, and postal code are each in their own separate column, making the data easier to work with in spreadsheets or external systems. Multiple addresses per broker are supported. Each address gets its own set of columns, labelled in order (e.g. “First Address”, “Second Address”, etc.) Records are sorted alphabetically by last name. Reports are available in English and French, matching the user's application language.
Who can use it
Access follows existing page permissions — if you can view the Broker or Lawyer Management page, you can download its report. All exports will be logged in the Manager Portal audit trail (not available yet).
Permission Report Access
Manage Brokers in Manager Portal Broker report only
Manage Lawyers in Manager Portal Lawyer report only
Manage System Configuration Both reports
Broker export:
