Table Of Contents
Cloning and Editing a Published Condition
Handlebars Expressions for Conditions
Important Object: currentCondition.stakeholderId
Document Types and FundMore.IQ
Document Types Items, Their Description & Functionality
Introduction
A borrower’s ability to meet specific conditions is used to determine whether an application should be considered for funding. Conditions are an integral part of commitment letters as they outline specific requirements that must be met by either the borrower or the property. For example, a condition may specify that funding is contingent upon the borrower providing satisfactory proof of income or that a satisfactory home inspection report is obtained for the property. These conditions ensure that all necessary criteria are met before the funding can be finalized. Depending on the application’s structure and submission, the responsibility of satisfying the conditions may fall on the borrower, the broker, or the lawyer. For example, these responsibilities can encompass legal requirements that are assigned to the borrower’s lawyer once they have received the file for the closing process.
Conditions Management is available in the Manager Portal. To access it, follow these steps:
- Navigate to the Manager Portal using the top menu.
- In the Manager Portal, select Conditions from the left sidebar.

Search Box - Located at the top left of the section. Here, you can enter text or keywords that are related to the conditions you have previously created. By doing so, all conditions that match your search criteria will be displayed.
‘Add New Condition’ Button - To create a new condition, click the 'Add New Condition' button. This will open a sidebar on the right of your screen where you can enter information relating to the condition in the appropriate fields.

Index (optional) - Takes numerical input. Indexing allows you to control the order in which conditions populate within the Commitment Letter. This feature helps ensure a consistent and logical arrangement of conditions when the letter is generated. It assigns a numerical value to each condition, dictating the sequence they will follow in the final document.
Conditions with an Index Number: Any condition assigned an index number will populate the Commitment Letter in the exact order defined by the assigned indices. For example, a condition with an index of 1 will appear before a condition with an index of 2, and so on. The index numbers are not visible to the user within the application. Refer to this video demonstration for a better understanding: Understanding Indexing.mp4
Conditions Without an Index Number: If conditions are not given an index number, they will still appear on the Commitment Letter, but they will be listed after any indexed conditions. The ordering of these non-indexed conditions will depend on how they are selected but will not override the indexed conditions' placement.
Name* - A mandatory field as indicated by the asterisk located to the right of the field name. It is a text field used as a short form description of the content for that condition. You can edit it when in draft mode, but not after it is published. There is a 255 character limit.
Text* - A mandatory field as indicated by the asterisk located to the right of the field name. It is the condition text which will populate in the necessary documents exactly as written unless there are Handlebars expressions used. These expressions will be replaced with their rendered text in the Conditions widget and in any generated documents. No character limit.
Text (French)* - A mandatory field as indicated by the asterisk located to the right of the header. It is the french text for the condition which will populate in the necessary documents exactly as written unless there are Handlebars expressions used. These expressions will be replaced with their rendered text in the Conditions widget and in any generated documents. The system does not automatically translate the English text, so if there is a need for French text, it must be written out in French.
‘Use Text From Default’ Checkbox - By default, this box is checked. When checked, the Text (French)* field will automatically be filled with the same text in the same language (English) as the Text* field. If you want the text in the Text (French)* field to be in French, simply uncheck this box and enter the appropriate French text in that field.
Responsible* - A mandatory field as indicated by the asterisk located to the right of the header. The individual or entity who is responsible for satisfying the condition. The selections available are Lawyer and Broker. Conditions can then be sorted into separate lists in generated documents based on whether they are to be satisfied by a lawyer or broker.
Condition Type - The category the condition falls under, i.e. Income, Identification, Property, etc. You can create new condition types by simply adding them in the text line when creating your condition. Once the condition is saved either in Draft or Published state the added condition type will save automatically and appear in the list going forward. 
Linked Document - The specific document(s) that you want to link to your condition for collection from the borrower. You are able to leave this unlinked by leaving the default option of ‘Not linked’. The exact functionality of this linkage is dependent on the document management system your organization deploys. You can link multiple document types to one condition. This comes in handy when you have conditions which are fulfilled by multiple documents. For example, if you have our DM solution, the Linked Document here is directly tied to the document type within DM and when a linked document is uploaded, it will attach to the appropriate condition and also upload a copy within DM.

Application Purpose - Select an option from the drop down to link an application purpose to the condition. This list is based on the Application Purpose field in the application dashboard.
Products - You can single or multi-select products that the condition should be associated with. The condition will then be restricted to applications with the chosen products. This means that if your condition is associated with a particular product and that product is selected on an application, the condition will populate as part of the list of possible conditions for that application.
‘Default’ Checkbox - This checkbox identifies conditions commonly applied to applications. Selecting the checkbox ensures the condition remains accessible in the list for future use, eliminating the need to recreate it for each new application. At the application level, users can filter and easily select the conditions they wish to apply.
Save Draft/Publish - Once you have filled in all the required fields and provided all the necessary information, you can save the new condition in draft mode by clicking on the 'Save Draft' button located at the bottom of the sidebar. Alternatively, if you are ready to use the condition, you can publish it by clicking on the 'Publish' button, also located at the bottom of the sidebar. If you wish to cancel the process of creating a condition, use the ‘Cancel’ button at the bottom of the sidebar.
Note: It is recommended that you do not publish a condition until you are completely satisfied with its creation, as you are only able to edit a condition when it is in draft mode. In addition, created conditions can only be disabled/enabled, they cannot be deleted. The reason for this is to preserve conditions on deals, e.g. if the lender funds a deal with condition x and then the condition is updated in the Manager Portal which changes x to y. The funded deal would now show it was funded with condition y.
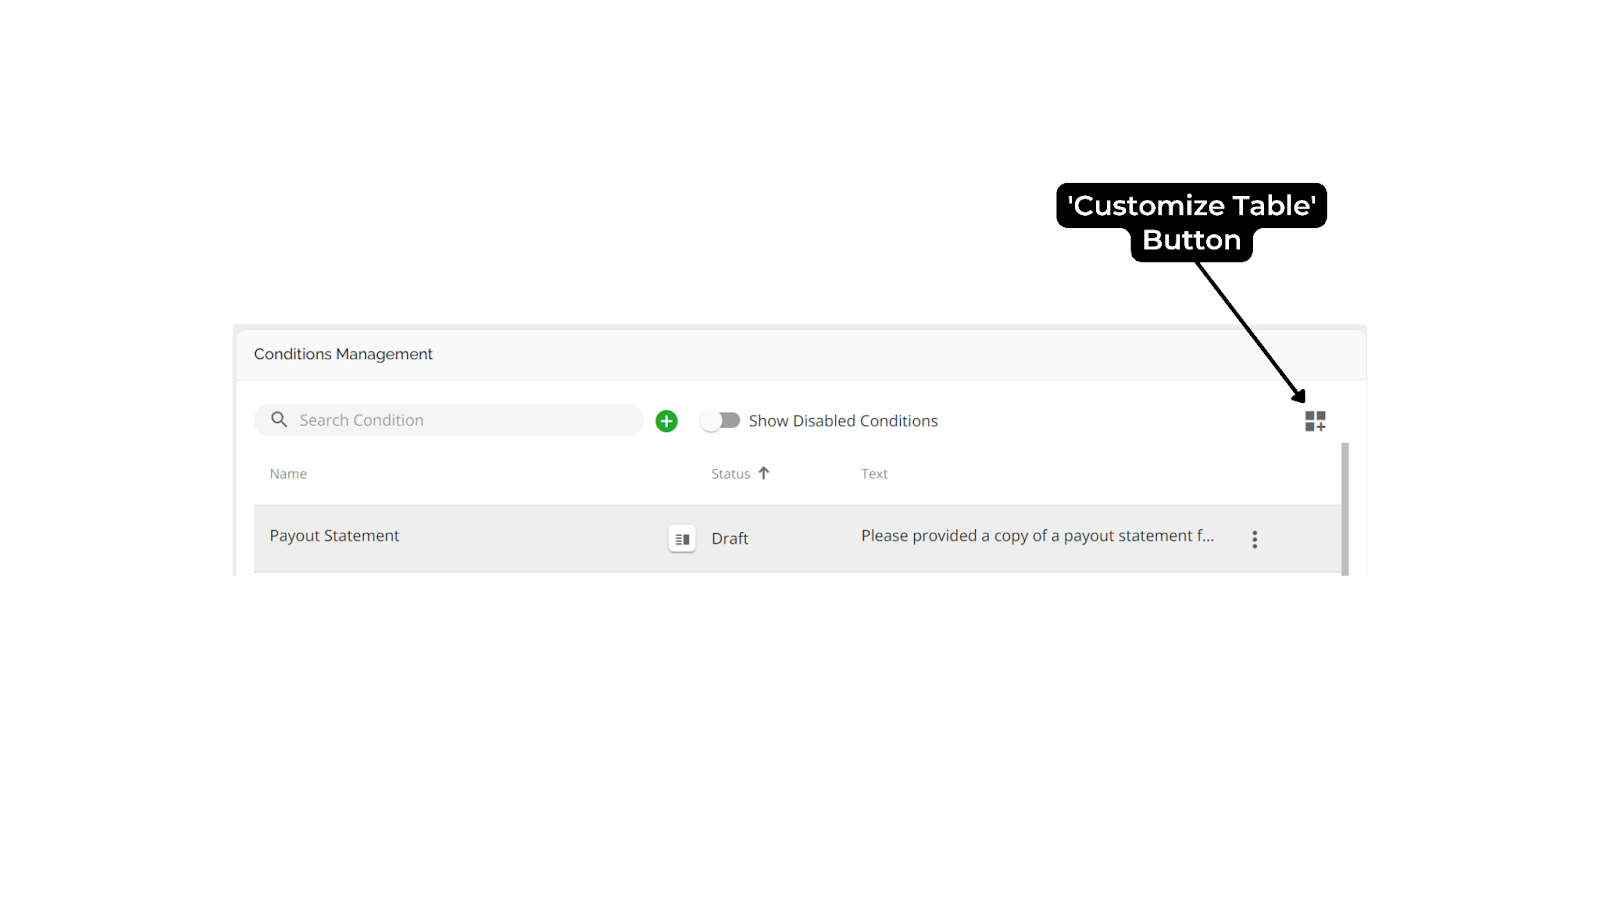
‘Show Disabled Conditions’ Toggle - When the ‘Show Disabled Conditions’ toggle is set to the right, all disabled conditions will populate in the conditions list below. When toggled to the left, all disabled conditions will be hidden.
‘Customize Table’ Button - When this button is clicked, the ‘Customize Table’ sidebar will appear on the right of your screen. In the sidebar, you will see a series of checkboxes: Index, Name, Status, Text, Text (French), Linked Document, Application Purpose, Products, Default, Condition Type, and Responsible. These checkboxes are the same as the fields in ‘Add Condition’ sidebar. The purpose of this sidebar is to enable you to customize which columns appear in the conditions list and the order that they appear in. Selecting the headers will populate those columns on the screen and unchecking them will hide them.
To rearrange the headers, drag and drop them within the sidebar list. The "Index" and "Name" headers are fixed and cannot be moved. They will always appear at the top of the sidebar and in the first and second columns of the 'Conditions' list. Once you are satisfied with the order of your headers, simply click the 'x' button on the top right of the sidebar to close it.

Sorting the Conditions List - To arrange the list of conditions, you have the option to sort it in either ascending or descending order based on a specific column. Simply locate the column header you want to sort, hover over it, and an arrow will appear next to it. Click on the arrow to sort the list. If the arrow is pointing up, the list is sorted in ascending order, and if the arrow is pointing down, the list is sorted in descending order.
Line Item Ellipsis - Each condition in the list will have an ellipsis on the right side of the screen. Clicking on it will open a drop-down menu with options to clone, disable/enable, or delete the condition. The clone option allows you to create a new condition with the same data as the original. Disabling a condition prevents it from being used in future applications and moves it to the disabled list. If a condition is still in draft status, you can choose the delete option to remove it completely. Enabling a disabled condition moves it back to the published status, making it available for use in future or existing applications.
Note: When a condition is disabled, it will only appear in the conditions list when the 'Show Disabled Conditions' toggle is switched to the right.
‘Open details in sidebar’ Button - To access detailed information about a specific condition, locate the condition in the conditions list and hover over it. Then, click on the 'Open details in sidebar' button that appears to the right of its name. This will open the 'Condition Details' sidebar, where you can view all the fields and data associated with the condition.
‘Condition Details’ Sidebar - The condition details sidebar is located on the right side of the conditions section. It provides a comprehensive list of all the fields, data, and details associated with the condition. At the top of the sidebar, you can see the status of the condition, which can be either Published, Disabled, or Draft.
A Published status means that the condition can be found in the condition widget of a specific application if it matches the Application Purpose and Product specifications. A Disabled status indicates that the condition has been disabled for all new applications, but it will still remain in existing applications where it has been applied. On the other hand, a Draft status means that the condition has been created but has not yet been published. It can be edited or deleted, but it is not available to use in applications.

Editing a Draft Condition
To edit a condition, follow these steps:
- Navigate to the Conditions section within the Manager Portal.
- Locate the condition you wish to edit within the conditions list.
- Hover over the condition to the right of the condition's name.
- Click on the 'Open details in sidebar' button that appears:

- This will open the ‘Condition Details’ sidebar where you can make the necessary edits. Once you click into a text field, the line below that field turns green. This indicates that you are in the process of editing. For drop down menus, simply find the selection you wish to change and click on it.

- After making the necessary edits, save your changes by clicking on the "Publish" button.
Note: Conditions can only be edited when they are in "Draft" status. The only exception to this is the Index, which can be edited even if the condition is published.
Cloning and Editing a Published Condition
Although you cannot directly edit a published condition, you have the option to clone the condition and then edit the cloned version according to your needs. To do this, follow these steps:
- Navigate to the Conditions section within the Manager Portal.
- Find the condition you want to clone and edit in the list of conditions.
- Click on the inline ellipsis to the far right, on the same row as the condition.

- In the dropdown menu, select the "Clone" option.
- This will open up the "Add Condition" sidebar where you can make the necessary edits. Once you click into a text field, the line below that field turns green. This indicates that you are in the process of editing. For drop down menus, simply find the selection you wish to change and click on it.

- After making the necessary edits, you have two options. You can click the "Save Draft" button to save the condition as a draft, or you can click the "Publish" button to save and publish the new condition.

Once you have made the changes, it is recommended that you disable the original condition (i.e. the condition that was cloned). This will prevent having duplicate conditions from populating the list of enabled conditions. To disable the condition, follow these steps:
- Locate the condition you wish to disable within the conditions list.
- Click on the inline ellipsis to the far right, on the same row as the condition.

- In the dropdown menu, select the "Disable" option.
This will move the condition to the "Disabled Conditions" list.
Handlebars Expressions for Conditions
Handlebars expressions can be used in the Text* field of a condition to automatically render data from the application.

They can be used in the same way as they are used to create document templates, with added functionalities. In order to have a complete understanding of this section, please first review the ‘Templating with Handlebars’ sections of the Document Template Management Product Feature Guide. This section will outline the ways in which Handlebars is used to render text.
The same principles apply to using Handlebars in condition creation, but formatting the text itself is not done in the 'Conditions' section. Instead, any adjustments to the appearance of a condition's text in generated documents are made through the 'Document Templates' section of the Manager Portal.
Important Object: currentCondition.stakeholderId
This object is commonly used in a combination of expressions that allows the condition text to be generated for a specific stakeholder. To explain this, we will start by examining how a sample condition would be created in a document without using this object in the expressions that form the condition text.
Here is our sample condition:

Our sample application has the following stakeholders:
- Jonas Jackson
- Mia Silver
- Marcus Matheson
The generated document in our sample application is configured to only display the text for the "Test Condition 1".
First, we will add the sample condition to the ‘Conditions and Documents’ widget with Jonas Jackson as the selected stakeholder. Next we will generate the sample document.
The result would be the following:

As we can see, assigning a specific stakeholder to a given condition has no ability to manage which content appears in the generated document. This is where we can leverage the ‘currentCondition.stakeholderId’ object. This object will instruct the document generator to only render the information that is relevant to the stakeholder that we assigned to the condition in the first place.
Here is the revised condition text:
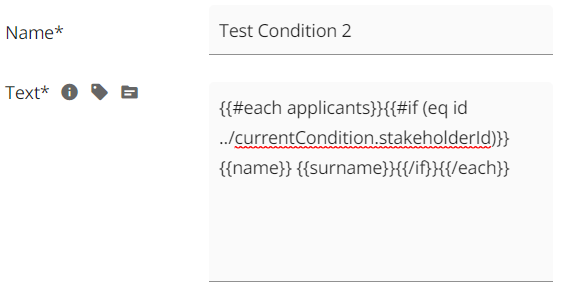
Here, the 'if (eq)' statement will only return as true where the ‘id’ object stored in a given element of the applicants array is the same as the id for the stakeholder assigned to the condition. This limits the rendered ‘name’ and ‘surname’ objects to those that come from an element with the correct value stored in the ‘id’ object.
The resulting document will be the following:
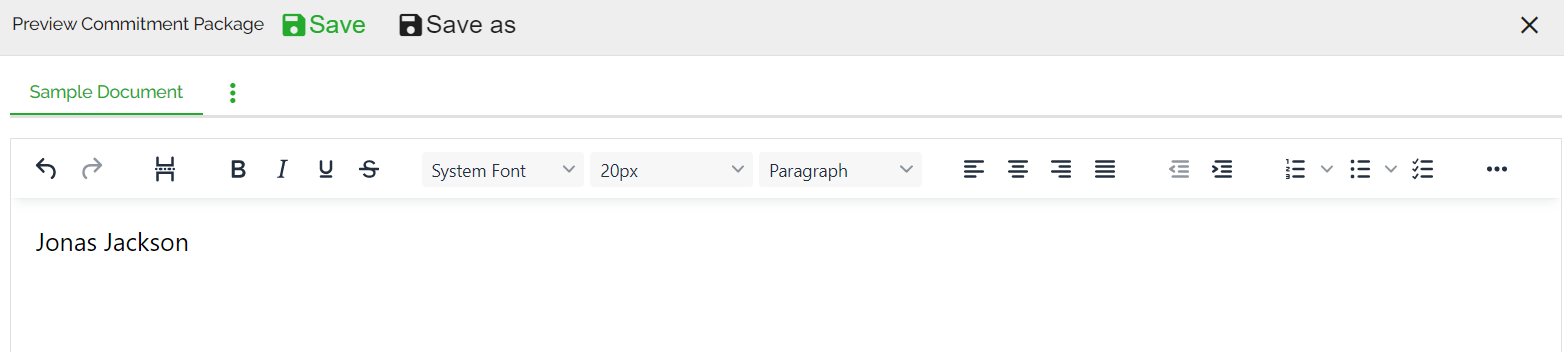
Additional Helper: @newline
This helper is used in conjunction with certain expressions in a given document template. These expressions are used to render a numbered list of all of the conditions in the ‘Conditions and Documents’ widget. The @newline helper is used in the condition text itself to create a new list item should the condition have more than one array element that matches its criteria.
To explain this, we will begin by exploring how a sample condition would be generated in a document without using the helper.
Here is our sample condition:
Our sample application has the following stakeholders:
- Jonas Jackson
- Mia Silver
- Marcus Matheson
Our sample generated document is templated such that it generates a list of all of the conditions on the sample application. For the sake of simplicity, we will assume that our sample condition is the only condition that has been applied to the sample application.
First, we will add the sample condition to the ‘Conditions and Documents’ widget with Jonas Jackson as the selected stakeholder. Next we will generate the sample document.
The result would be the following:

As we can see, the condition populates as one list item instead of three separate list items. This is where we can leverage the @newline helper. We include this helper within the 'each' helper such that when the 'each' helper finishes looking through the first element and rendering the appropriate text, it creates a new list item before looking through the next element.
Here is the revised condition text:

The resulting document will be the following:

Document Types
The ‘Document Types’ section of the Manager Portal is used to manage a library of document types that can be associated with conditions. This provides the ability for managers to configure custom document types. The functionality will depend on the source of document ingestion i.e., Finmo, Velocity, or one of our document request/management solutions (i.e. FundMore.IQ or FundMore DM). If you are using FundMore DM, you will be able to see the documents you have configured in DM. In that case, the document types are not editable. If you are not using FundMore DM, you can set up any document type you wish and link it to conditions.
Note: Document types are specific to the POS system and may differ between systems. We recommend obtaining a list from your POS provider.
Document Types and FundMore.IQ
FundMore.IQ is our document request feature which is integrated directly into our LOS system for seamless and efficient document collection. This ties directly into our Conditions & Documents functionality within the LOS. This section will briefly discuss document types in relation to this solution. For comprehensive guides of this feature, refer to our FundMore.IQ PFG and FundMore.IQ Management (Document Requests) PFG.
Document Types refer to the categories or classifications of documents within the document request system. They are determined by the lender based on their company's requirements. These categories help organize and classify various types of documents based on their content, purpose, or relevance to a specific application. Document Types provide a structured framework for managing documents, allowing users to easily identify, categorize, and retrieve documents based on their designated type. For example, common Document Types might include identification documents, financial documents, legal documents, or any other classification deemed necessary for efficient document collection. It is important to note that document types also tie into Condition Management. It is the Document Type that connects all the pieces together and enables the system to connect documents to their appropriate conditions when they are uploaded.
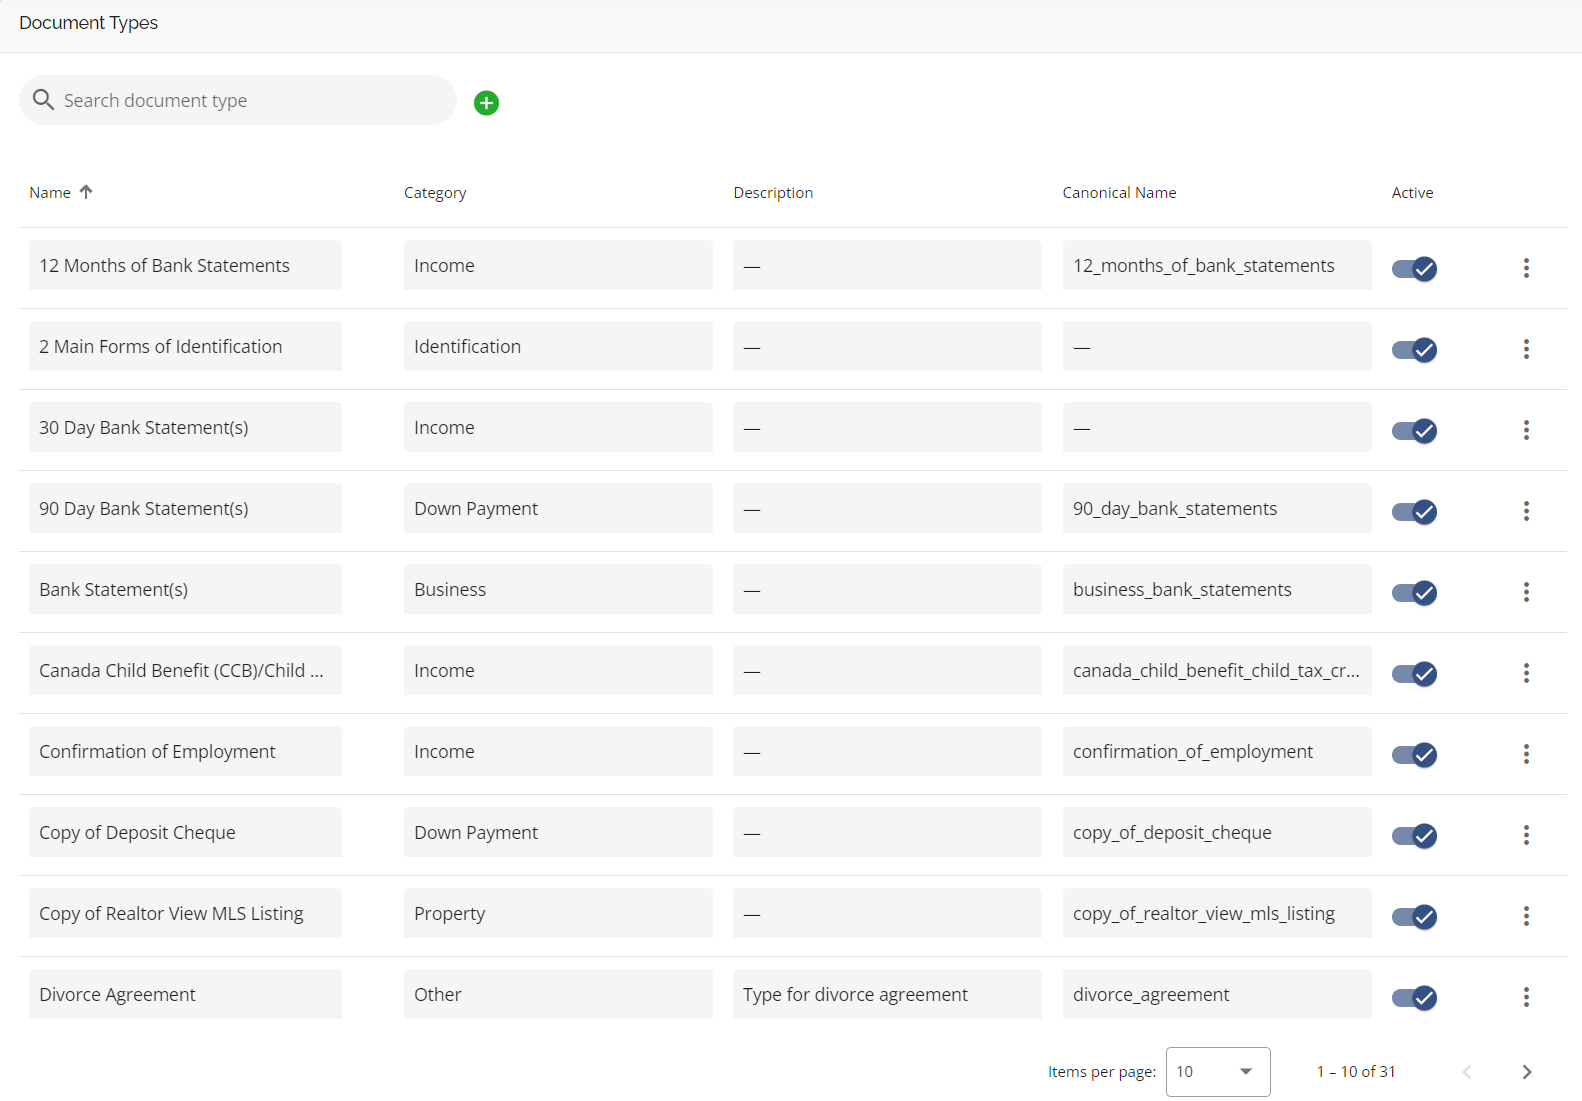
Document Types Items, Their Description & Functionality
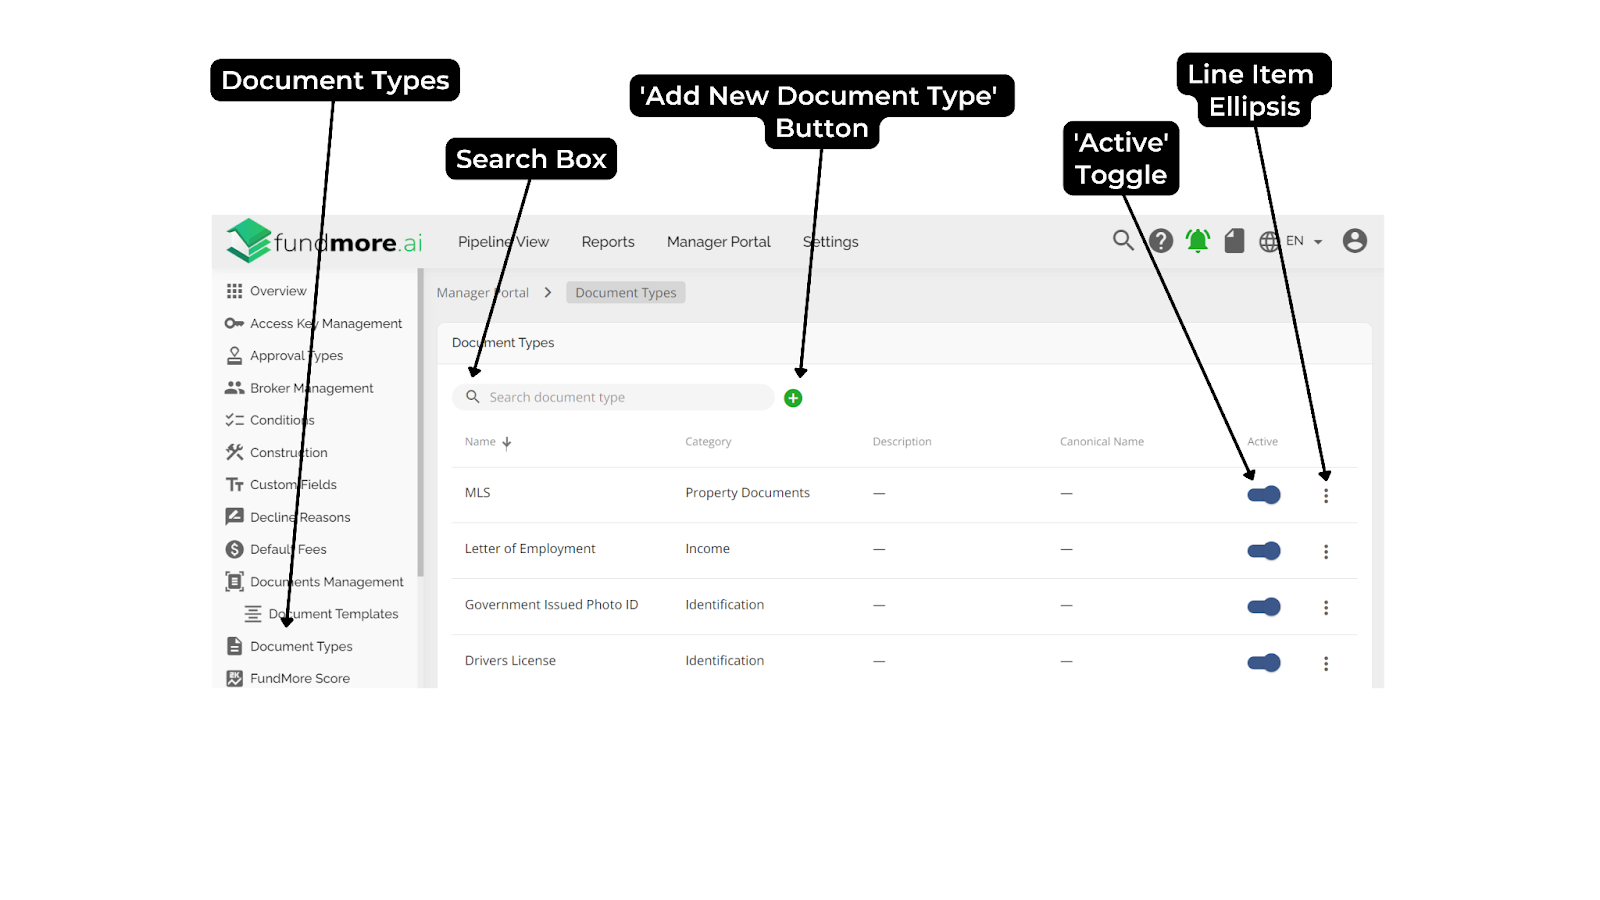
Search Box - Located at the top left corner of the section. In the search box you are able to enter text/keywords related to the previously created document types. All document types within the search criteria in them will appear in a list view.
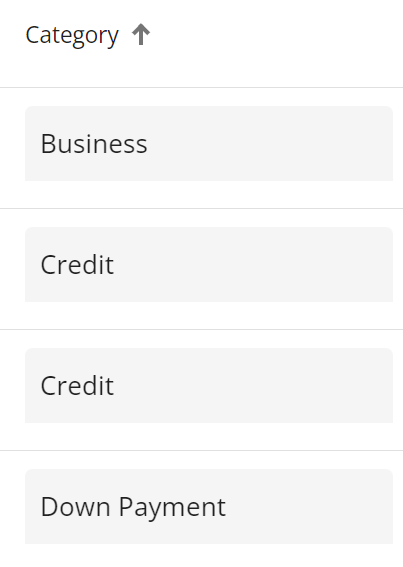
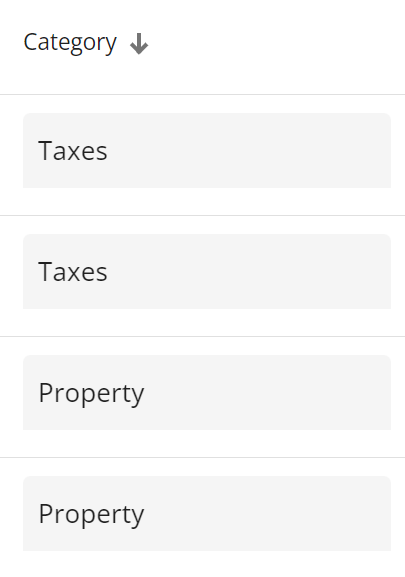
Sort the Document Types List - You can sort the document types list in ascending or descending order. Simply click on the arrow icon next to the column header you wish to sort by. When the arrow points upwards, the list is sorted in ascending order; when it points downwards, it is sorted in descending order. The arrow in the sorted column will remain fixed, indicating your chosen criteria.
|
Ascending |
Descending: |
|
|
|
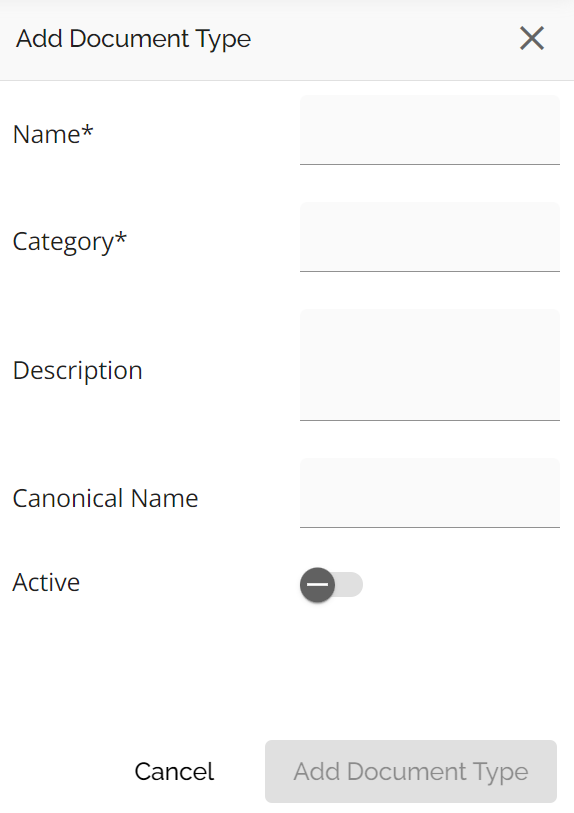
‘Add New Document Type’ Button - Enables you to create a new document type. Clicking on this will open a sidebar on the right of your screen where you can enter information relating to the document type in the appropriate fields. The fields consist of: Name*, Category*, Description, Canonical Name, and Active.
Column List Headers
The headers below marked with an asterisk (*) represent the mandatory fields.
Name* - This field represents the name of the document type. It is a mandatory field and serves as the primary identifier for the document type within the system. Users should enter a descriptive and recognizable name that accurately reflects the content or purpose of the document type. Examples include ‘MLS’ and ‘Letter of Employment’.
Category* - This field allows the user to input the category the document type belongs to. Some examples include ‘Income’ and ‘Lawyer Conditions’. It is a mandatory field and helps organize document types into broader classifications or themes. Users should select the appropriate category that best aligns with the nature or purpose of the document type. These categories can be used optionally in the creation of conditions to categorize the condition in accordance with the associated documents. It also provides the user with the ability to filter through documents based on their category within the ‘Documents’ section of the ‘Conditions and Documents’ widget.
Note: Document Name and Category are required because these are the fields that the system uses to match documents to conditions. To match uploaded documents to conditions, the system checks the document name and category against the Linked Documents selected by lenders when creating conditions.
It might be beneficial to consider being very specific with your document names if you have several conditions that may be satisfied by similar document types. I.E. Conditions satisfied with Bank Statements. If you create a general document type called Bank Statements with a Category of Income, when you have multiple conditions with the same linked document the system will match all bank statements received to all matching conditions. The issue here though may be that the sources of income are from different bank accounts. So, you might want to consider creating a document type specific for each type of income such as Child Tax Benefit Bank Statements, Pension Income Bank Statements etc.
Description - The canonical name field refers to the standardized or official name of the document type. This field allows users to provide a detailed description of the document type. While not mandatory, adding a description can enhance clarity and provide additional context for the document type. Users can include relevant information such as the intended use, specific requirements, or any other details pertinent to understanding the document type.
Canonical Name - This tag is used to link the document type with documents that are being received from third-party systems. It is important that these tags match exactly with the tags from the third-party system in order to automatically categorize the incoming documents. For example, a canonical name for a letter of employment could be 'letter_of_employment'.
‘Active’ Toggle - The active toggle is used to activate or deactivate the document type within the system. It controls whether the document type you are creating should be visible to users in the application dashboard via the ‘Conditions and Documents’ widget. It provides the flexibility to add newly created document types as drafts or retire outdated document types without permanently deleting them from the Manager Portal. Active document types are visible and accessible for use, while inactive document types are hidden or inaccessible until reactivated.
Open Details in Sidebar - Hover your cursor between the Name and Category fields to reveal the “Open details in sidebar” icon. Click on the icon to open the details sidebar. Within this sidebar, you can view the document type details and perform edits. Once completed, close the sidebar and your edits will be saved automatically.
Line Item Ellipsis - Clicking on this ellipsis provides the option to delete a document type.
Scroll Bars - The presence of the scroll bars depend on the size of your screen and the number of document types in the list. Located at the bottom of the list and to the far right of the screen. Use these to scroll vertically or horizontally to see what does not fit on the page.
Items Per Page - Depending on how large your list is, you may have more than one page of document types. To navigate through the pages, use the Items per page navigation at the bottom right hand side of your screen. With this functionality, you can indicate how many items per page you would like to see in groups of 10, 15, 25, 50, or 100. You can see how many pages there are and scroll forwards and backwards through the pages if need be.

For more detailed information on how to manage document types, refer to the Document Types section in the FundMore.IQ Management (Document Requests) PFG.